Friday, June 29, 2018

Tablature - Crescendo Music Notation Tutorial

Crescendo Music Notation Software Tutorial - Tablature


Guitar Tablature Tutorial - Crescendo Music Notation Software

Download Crescendo to get started: https://www.nch.com.au/notation/index.html

To view more Crescendo Music Notation tutorials, visit: https://www.nch.com.au/notation/tutorial.html

How to Add Guitar Tablature 

  • Select New Tablature Score from the New Blank dropdown list. 
  • To add fingering to the tablature, select a note of apt duration, click on the tablature and then type in the fret number.


To view more Crescendo Music Notation tutorials, visit: https://www.nch.com.au/notation/tutorial.html

Do you need help using Crescendo?


Monday, June 25, 2018

Just Released: RecordPad Sound Recorder for Windows

Download RecordPad 7.02 now at www.nch.com.au/recordpad/index.html. Also available for Mac OS X, iOS and Android at the same page

Friday, June 22, 2018

How to Make Slow Motion Videos with VideoPad

How to Make Slow Motion Videos with VideoPad


Sometimes the action in a video just happens too fast for us to truly process what we are witnessing. That is why slow motion is commonly used in sports to help referees make accurate calls about what happened when it all happened so fast. Making a slow-mo video is a great way to observe the action in your footage without missing anything. With an easy-to-use video editing software such as VideoPad, you can slow down the speed of any video to make your own slow-motion movies and videos.


Changing the Speed of Your Clip

Making a slow-motion video really just means that you have adjusted the speed of your footage to playback slower than in real-time. To change the speed of your entire video clip so that it can be viewed in slow motion, start by dragging your clip into the timeline. From there it is as simple as right-clicking anywhere on that clip and then select the option that says "Change Clip Speed..." This will open the Speed Change window where you can adjust the speed and duration of your video clip.
How to make a slow motion video
Change Clip Speed
How to adjust the speed of a video clip in VideoPad
Clip speed is commonly represented as a percentage in video editing. By default, your video will have a speed of 100% That is to say that 100% is real-time playback, viewed exactly as it occurred. Anything less than that will be slower than real-time and anything greater will be faster. A good place to start for slow-motion videos is by cutting your clip's speed in half to 50% Once you have changed the speed of your clip in the Speed Change window, click on the Set button and your change will be applied. If you find that you want your video to be even slower you can always repeat these steps and set the speed (%) even lower.

Making Only a Section of a Video Slow Motion

Example of a slow motion gif made in VideoPad Making just a portion of your video slow motion is another cool and simple effect that you can try in VideoPad. This is great to use when the buildup to the action in your video is perhaps not as exciting as the action itself, or when it would be too time-consuming to play the entire clip in slow motion. To make just part of a video in slow motion, start by dragging the clip into your timeline. Move the red cursor along the timeline to the position where you want the slow-motion portion of the video to begin. Click on the scissors icon to split the clip at the cursor's current position. Then, drag the cursor to the point in your clip where you would like the slow-motion to end and click on the scissors to split the tracks at this point as well. This will give you an isolated segment of your video that you can make slow-motion without affecting the rest of the clip. Right-click on the section of your video that you have clipped to be in slow-mo and adjust the speed as demonstrated above.
Making a section of a video clip slow motion

For more tips on VideoPad:


Saturday, June 16, 2018

Monday, June 11, 2018

Friday, June 8, 2018

How to Make a Transparent PNG in PhotoPad

How to Make a Transparent PNG in PhotoPad

What is a PNG image?

PNG stands for Portable Network Graphics. PNG files are great for use on the internet because they support transparency and because they are compact in size. They are commonly used for web design elements such as icons and logos. PNG graphics are incredibly versatile in their web applications. They can be used against any background and can make adding graphics to websites and other design projects extremely simple. PNG graphics are easy to use and they also happen to be easy to make. With photo editing software like PhotoPad, you can make your own transparent PNG images for use in your next website or graphic design project.

Example of a PNG logo improving a website


How to Make a PNG Image with a Transparent Background

If you are starting from scratch and creating your own graphic, making a PNG image with a transparent background is easy. Open your latest version of PhotoPad and create a new file with a transparent background to work on. You can create a new project file from the New Image Menu by pressing Ctrl + N on your keyboard and then selecting the option that says Transparent for the background. If you have already made a new blank project file in PhotoPad, simply go to the Edit tab, then choose Background and select Transparent. You will see that your white background has now been replaced with a faint grey and white checkerboard. This checkerboard means that the image effectively has no background. Any work that you do on top of the checkerboard will be the only thing that gets saved.
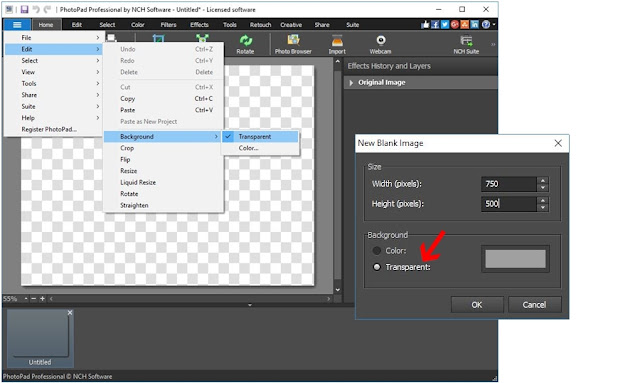
How to remove the background of an image in PhotoPad
Creating a New Image with a Transparent Background


Try visiting the NCH Clipart Library under the Creative tab to add clipart to your transparent design project. The Clipart Library is filled with fun and interesting images that are great for use in logos and other graphic design projects.
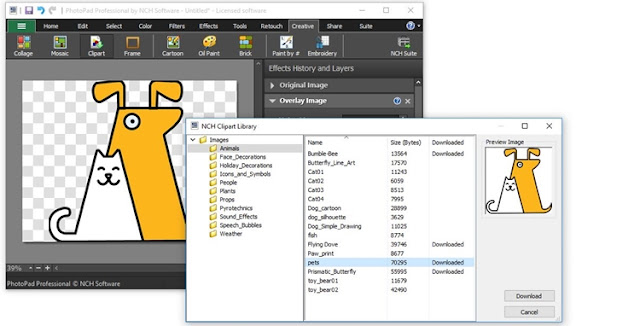
NCH Clipart library with PNG images
NCH Clipart Library 

You can add text to your transparent background too. Under the Tools tab, you can select Text and then change the font, color, size, and placement of your text on your new graphic. Many modern logos use two different fonts or two different font sizes for their company name and tagline.
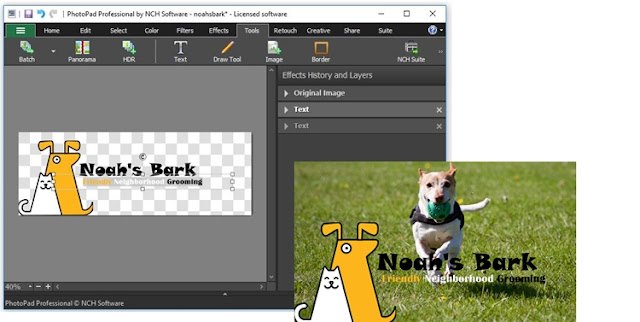
Example of a PNG image being used on a photograph
Adding text onto a transparent background


Removing the Background from an Image

If you already have an existing logo or graphic that you would like to make into a PNG image with a transparent background, no sweat. Open your file into PhotoPad and select the Wand Tool. The wand tool makes a selection by looking for the contrast between colors against the edge of your graphic and its background. You can adjust the level of sensitivity of the Wand Tool depending on how sharp the contrast between your image against its background is. Click on the background of your image with the wand tool to select it. We are trying to select everything that we want to get rid of. The wand tool makes one selection around the outline first. To select any additional elements you wish to remove, hold down the shift key while you click on those other areas in the image. It helps to zoom in close in order to select the smaller details such as the spaces inside letters like "O" and "D."
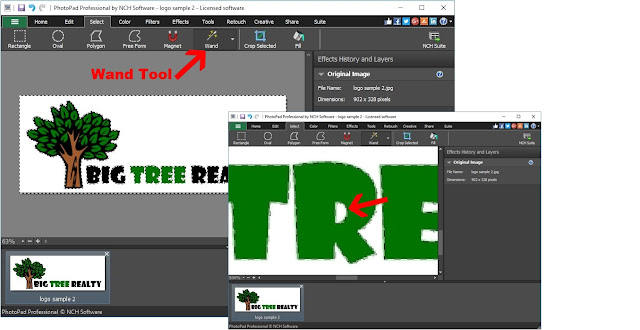
Making a Wand Selection

Now that we have our background selected, we are going to simply press the delete key on our keyboard or right-click and select "delete". This will delete all of the selected areas in the image. In our case, that means it will delete everything except our logo. You will immediately see that the background has disappeared and in its place, there is now a white and grey checkerboard. The checkerboard means that there is nothing there anymore. So when we go to save our image, only the graphic will be saved and nothing else.
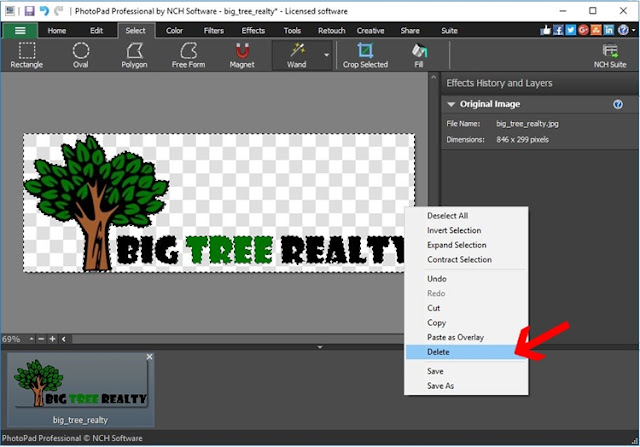
Delete Your Background Selection

Saving an Image as a PNG File

Once we are finished making our background transparent, we are ready to save the image as a PNG file. Saving an image as a PNG in PhotoPad is very simple. Go to the File tab in the upper left-hand corner of the program and then select the option Save As... You can also get there by simply pressing Ctrl + Shift + S on your keyboard. Change the Save as Type: from the drop-down menu to PNG (*.png) and then click Save.
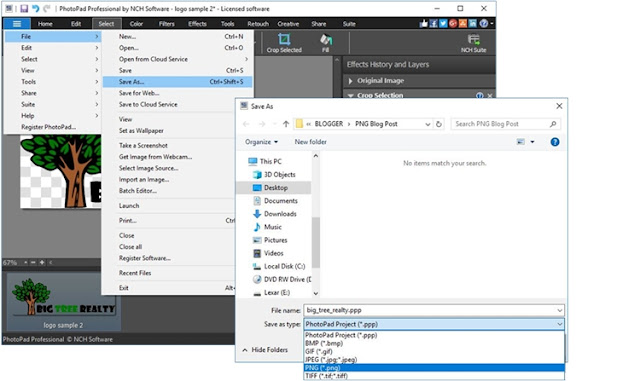
Saving a file as a PNG

Using Your PNG Image File

Now that we have successfully saved our graphic as a PNG file, it is ready for use on the web or in your next graphic design project. You will notice that when you preview the file on your computer,  the background is completely gone. This will remain the case wherever you choose to use your new PNG image. Drag it directly back into PhotoPad to place it on any other image or background you would like, or upload it to the web for seamless integration on your website.

Transparent PNG logos on photo backgrounds


Thursday, June 7, 2018

Just Released: Express Dictate for iOS

Download Express Dictate 7.01 now at www.nch.com.au/express/index.html. Also available for Windows, Android and Mac OS X at the same page

Monday, June 4, 2018

Friday, June 1, 2018

Best Tool to Edit MP3 Tags and Metadata with Switch Audio Converter

Edit MP3 Metadata with Switch Audio Converter


Best Tool to Edit Metadata and Tags when Converting to MP3

When converting a track to MP3, you can edit the track metadata and tags to include title, artist, track artwork, producer, rating, genre, comments, and more. If you record your own music, you may want to set up metadata and tags for your finished recordings before sharing. Editing your tags and metadata will ensure that your album artwork, artist name, and other tags show up correctly when your track is loaded into a new audio library. You can easily edit the metadata of MP3 and tags for audio files when converting with Switch Audio Converter.


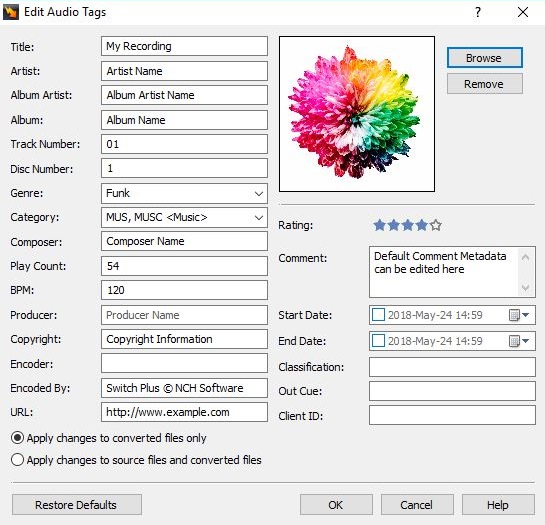
Edit MP3 Tags

To edit the tags of an audio file, begin by loading the file into Switch Audio Converter. To import an audio file, click on the "Add Files" button in the top left-hand corner of the program window.


After you have imported an audio file, you can right-click on the file in Switch and select "Edit Audio Tags" to edit the audio tags.


This will open the Tag Editor for the selected audio file. Here, you can edit the audio track title, artist, album, genre, BPM, producer, rating, artwork, and more. For new recordings, many fields will be blank. If the audio file that you are converting currently has audio tags, the existing tags will be displayed in the Tag Editor.


To edit a tag, click on the field that you would like to edit and type in the new tag information that you would like to save for your mp3 file. You can edit the song Rating by clicking on the star value that you would like to assign to the audio file.


Add Artwork to an MP3 File

To add the artwork to an MP3 file, click on the "Browse" button the right of the artwork image in the Tag Editor. Then, select a file from your computer to use as the artwork for your audio file. 

Apply Changes

You can apply changes to converted files only, or you can apply changes to source files and converted files. To apply tag edits to converted files only, select the option that says "Apply changes to converted files only". This option will leave the file tags for the source file in their original state while applying the tag edits to only converted files.


 To apply tag changes to the original source file as well as converted files, select the option that says "Apply changes to source files and converted files".


Convert to MP3 with New Tags

To convert your file to MP3 with the edited tags, click on the "Convert" button in the bottom right-hand corner of the Switch program window.


New Release: Crescendo Music Notation Editor for Android

Download Crescendo 3.10 now at www.nch.com.au/notation/index.html. Also available for Windows and Mac OS X at the same page