Tuesday, November 30, 2021
Just Released: FlexiStation Employee Client for Windows
Posted by
NCH Software
Download FlexiStation 5.33 now at www.nchsoftware.com/flexi/index.html. Also available for macOS at the same page
Thursday, November 25, 2021
Just Released: VideoPad Video Editor for macOS
Posted by
NCH Software
Download VideoPad 11.01 now at www.nchsoftware.com/videopad/index.html. Also available for Windows, Android and iOS at the same page
Just Released: Doxillion Document Converter for macOS
Posted by
NCH Software
Download Doxillion 5.76 now at www.nchsoftware.com/documentconvert/index.html. Also available for Windows at the same page
Wednesday, November 24, 2021
Just Released: PhotoStage Slideshow Producer for macOS
Posted by
NCH Software
Download PhotoStage 8.99 now at www.nchsoftware.com/slideshow/index.html. Also available for Windows, Android and iOS at the same page
Tuesday, November 23, 2021
How to Record Your Screen
Posted by
Danielle Weingartner
Recording your screen is an essential tool in business and educational practices. Recording your screen can be useful for new employees and seasoned veterans. New employees may want to explain their workflow or clearly ask questions. A seasoned employee may want to document processes or utilize screen recordings for training purposes. No matter the reason why - Debut Video Capture and Screen Recorder Software is perfect for all screen recording needs.
Follow These Easy Steps
- Click the Screen button located in the top toolbar.
- Select the Recording Window using the selection tools beneath the preview. There are 4 different options to choose from. They are the following: - Select the far left button to free form select the area you want to record.
- Click the Options tab to get more specific with your recording. Here you can select Mouse Options and then click into cursor. You can then choose to show your mouse cursor and determine the mouse movement and click settings.
- If you are including audio in your recording you can select your source in the Audio Options segment within the Options tab as well. You can also uncheck all options and audio will not be picked up.
- You may then select the format type in the Record Screen as dropdown.
- Click the red Record button.
- Select the middle left button to record your screen from a window.
- Select the middle right button to record the entire desktop.
- Select the far right button to select a previous window.
Debut Video Tutorial
If you would like a more in-depth explanation on how to record your screen using Debut then check out our tutorial below!
Thursday, November 18, 2021
New Release: Debut Video Capture Software for Windows
Posted by
NCH Software
Download Debut 7.70 now at www.nchsoftware.com/capture/index.html. Also available for macOS at the same page
Wednesday, November 10, 2021
Just Released: Express Animate for Windows
Posted by
NCH Software
Download Express Animate 6.41 now at www.nchsoftware.com/animation/index.html. Also available for macOS at the same page
Monday, November 8, 2021
New Release: Express Zip File Compression for Windows
Posted by
NCH Software
Download Express Zip 8.38 now at www.nchsoftware.com/zip/index.html. Also available for macOS at the same page
Friday, November 5, 2021
New Release: PhotoStage Slideshow Producer for iOS
Posted by
NCH Software
Download PhotoStage 8.92 now at www.nchsoftware.com/slideshow/index.html. Also available for Windows, Android and macOS at the same page
How to Remove Audio From Video
Posted by
Danielle Weingartner
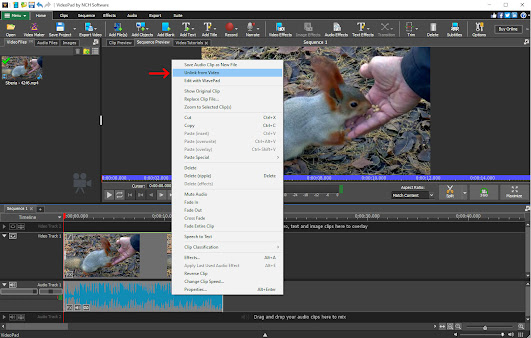
Being able to remove audio from video files can be extremely useful under many different circumstances. You may want to record your audio separately, or maybe the audio you recorded is unusable so you need to dub in a new audio file. Whatever your reasoning, VideoPad will allow you to easily remove audio from video without disrupting your video files.
Follow These Easy Steps
- Make sure that both your audio and video files are visible to you.
- On the timeline: Right click on the audio file that you would like to remove. Then select Unlink from Video.
- Once you have unlinked the audio file from your video, select the audio file you wish to remove. Then hit the delete key.


