
Showing posts with label video editing. Show all posts
Showing posts with label video editing. Show all posts
Friday, August 7, 2026

Monday, May 4, 2026
Sunday, January 18, 2026
Friday, November 5, 2021
How to Remove Audio From Video

Being able to remove audio from video files can be extremely useful under many different circumstances. You may want to record your audio separately, or maybe the audio you recorded is unusable so you need to dub in a new audio file. Whatever your reasoning, VideoPad will allow you to easily remove audio from video without disrupting your video files.
Follow These Easy Steps
- Make sure that both your audio and video files are visible to you.
- On the timeline: Right click on the audio file that you would like to remove. Then select Unlink from Video.
- Once you have unlinked the audio file from your video, select the audio file you wish to remove. Then hit the delete key.
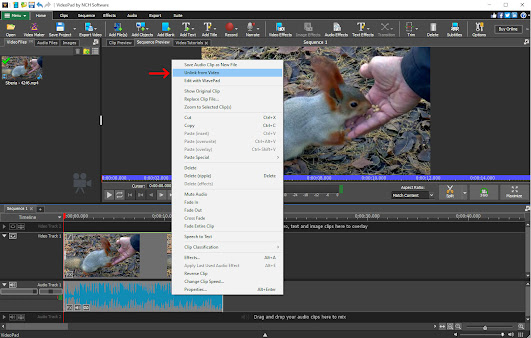
Continue Editing Your Video
Once you have removed the desired audio file you can then go on to add a new audio file that better aligns with your video. Perhaps one with better quality, or maybe a music file. You can also of course complete your video without any audio at all.VideoPad Tutorial
If you would like a video tutorial on how to remove audio from video using VideoPad check out our tutorial below. The video tutorial also includes additional ways to remove audio from video.Monday, April 19, 2021
How to Make a Freeze Frame of a Video Clip
How to Take a Snapshot from a Video in VideoPad

This tutorial video will show you how to take a snapshot of a video and add it to the timeline with VideoPad Video Editing Software.
Download VideoPad to get started: https://www.nchsoftware.com/videopad/index.html
Take a Snapshot from a Video
How to Take a Snapshot from a Video
- Drag your cursor to the position in your timeline where you want to take your snapshot
- Right-click and select the option from the dropdown menu that says "Take Snapshot of Clip"
- Choose the size and resolution of your extracted image
- Your photo will appear under the images tab in the media bin
- Drag the image into your timeline to use as a still photo in your video
For more on VideoPad, check out these posts:
Thursday, October 15, 2020
5 Things To Consider When Choosing a YouTube Video Editor

Once just a job for Hollywood or video professionals, video editing can now be achieved by anyone who wants to post a video on YouTube. However with over 30,000 hours of video content uploaded to YouTube every hour, you know in order to stand out from the crowd and keep your viewers on the edge of their seats, you need to deliver engaging high-quality YouTube videos.
However, with so many video editors available, picking the right video editor for YouTube can be overwhelming. You want to make sure you make the right decision. Below are 5 factors to consider when choosing a YouTube video editor:
How to choose a video editor for YouTube?
1. Ease of Use
A good place to start is to consider how easy and intuitive the YouTube video editing software is. You do not want to pick a video editor that makes you refer to the user-guide each time you need to edit the video or apply an effect.
Some video software are complicated and take forever for you to even load the video. Since it is likely you will be recording and editing a lot of YouTube videos, you want to make sure your video post-production is as easy and enjoyable as possible.
If you are looking to learn more about video editing, a good YouTube video editor should include lots of video tutorials so you can learn each feature and maximize your editing capabilities. In summary, ensure your video editor for YouTube has an intuitive workflow and puts all the tools at your fingertips.
2. Video Format Support
Import
Before buying your video editing software for YouTube, make sure it supports the video format captured by your camera or recorder. This is especially important if you want to edit videos from 360 cameras, Stereoscopic cameras, 4K action cameras, drones, and more.
Export
Imagine if you spent hours importing your video clips, trimming, adding effects, voice-overs, and video effects, only to realize that your exported video is low-definition or not in a video format supported by YouTube.
As an added bonus to save time, you also want to ensure your edited video can directly be uploaded to YouTube so you don’t have to waste time exporting the video onto your machine and then logging into YouTube and uploading the video.
3. Advanced Editing Features
While most video editors have basic editing features that allow you to slice and dice videos, you know in order for your video to stand out on YouTube, you need to take your video to the next level! Some of the advanced video editing features for YouTubers to consider include:
Color correction
Video stabilization
External plugin support
Chroma key green screen
3D and 360 video editing
Fast video rendering
4. Audio Tools
Often an overlooked key feature, make sure your YouTube video editor software has good audio editing capabilities. Things to consider include whether the audio is included in the timeline and the video editor has the ability to separate audio from video.
Most professional YouTube videos will need background music and depending on your video editor, this can be an added cost to either purchase the music and/or buy an expensive audio editing software/plugin.
Ensure your video editor for YouTube has a royalty-free stock sound library and advanced audio features including:
Volume adjustments
Voice over recording
Noise removal
Surround sound
VST plugin support
5. Budget
It is very easy to be overwhelmed by a list of features and fancy marketing videos, but an important consideration for picking a YouTube video editor is to assess how much you are willing to pay? There is a range of paid and free YouTube video editors available, some that even that cost a couple of thousand dollars. Depending on the range of features you require, performance, and ease of use, make a decision.
It is also a good opportunity to consider YouTube video editors that include free trials so you can test out all the features you require, performance, and ease of use, before making a purchase decision.
Recommended YouTube Video Editor
That’s all the key information you need in choosing a video editor for YouTube. If there’s one video editor we would recommend you try out, it’s VideoPad.
Not only is it easy-to-use and intuitive, it includes all the video and audio features listed in this article, supports all video formats including direct export to YouTube, and not going to cost you an arm and a leg. You have access to all the tools you need to edit videos for YouTube and make professional-looking videos in a matter of minutes.
With incredible reviews and having been voted as one of the best video editing software from leading review sites such as PC World, Top Ten Reviews, Tom's Guide and TechRadar VideoPad is one of the best options when it comes to YouTube video editing. But don’t take our word for it, download VideoPad for free and try it out yourself! Happy editing!
Friday, July 5, 2019
Blur a Face using VideoPad Video Editor
Blur a Face using VideoPad Video Editor

Whether you want to keep someone anonymous, blur a face from someone you dislike, or someone unexpectedly video bombed your otherwise perfect video; blurring faces is a desired feature when it comes to video editing. With VideoPad Video Editor, blurring faces is simple.
Installation
After downloading VideoPad, launch the program and follow on-screen directions for a successful installation.Upload Video File
Once you are in the software, select “New Project” and open the video file you wish to edit. Under the Effects Tab choose the censor effect
Choose Your Style
From the censor effect, the following toolbox will appear next to the video you are editing.
Pixelate

Censor (Black)

Blur

Learning how to censor faces in a video is an important skill for anyone to learn. It delivers an essential skill that provides a sense of security when filming in public. Given the myriad of features VideoPad portrays, there is no question that Censoring has become one of the most used features by video editors worldwide.
Friday, June 28, 2019
How to Add a Logo or Watermark to a Video
How to Add a Logo or Watermark to a Video in VideoPad

Knowing how to add a logo or watermark to a video is a useful skill to have no matter what kind of video creator you are. You can brand your videos with a logo for a professional look on your YouTube channel or you can add subtle watermarks to your videos if you are creating video content for resale. No matter your purpose, adding logos and watermarks to videos is easy with VideoPad Video Editing Software and this tutorial video will show you how.
Download VideoPad to get started by clicking the button below or visiting our website here: www.nchsoftware.com/videopad/
Adding a Logo or Watermark to a Video
How to Add a Watermark to a Video
- Place your video on the Timeline
- Drag the logo or watermark image clip onto an overlay track on the Timeline
- Click and drag the image along the track to re-position it relative to your video
- Click and drag either end of the image clip to change the length
- Save and export your video
Friday, May 3, 2019
How to Change AVI to MP4 with Prism AVI Video Converter
How to Change AVI to MP4 with Switch Audio File Converter

MP4 files and AVI files are two of the most popular video file formats used today. They are both common multimedia container file types and they both have their various advantages. AVI files are most often used for playback on your PC via Windows Media Player, while MP4 files are more commonly used for video playback everywhere else. If you have a video player that does not support AVI files, then you are going to want to know how to change AVI to MP4. Converting AVI to MP4 is a very simple process for anyone and can be done by using Prism AVI to MP4 Converter Software in just a few clicks.
Download & Install Prism
Download and install Prism Video File Converter on your computer. Prism can be used to convert a variety of video file formats, compress video file sizes, add effects, and make other adjustments while performing video file conversions. You can download Prism by clicking on the download button below and following the installation steps.Import Files
The first step to change AVI to MP4 is to import your AVI video files into the program. You can do this by dragging and dropping your video files directly into the program or by clicking on the green Add File(s) icon to launch the Locate Video File(s) window and selecting and importing your AVI video files this way.
Video Conversion Options
Click on the Options tab, located at the top of the program to view the various video file conversion options available in Prism. This is where you can adjust the overwrite settings as well as add metadata to your converted video file properties. This is also where you can add or remove Prism to/from the Windows Explorer right-click menu so that you can perform conversions without even opening the program.
Output Settings
Click on the Output Format dropdown menu to set the output file format to MP4. This will make all of the file conversions performed be to the MP4 video file format. Use the Save to Folder dropdown menu to select the output destination for your newly converted MP4 files. You may also click on the Browse button to launch the file finder window and select a more specific output destination folder on your computer or external device.
Encoder & Video Options
Click the Encoder Options button to adjust the encoding settings of your video files before you convert them. You can adjust the video quality/bitrate as well as adjust the compression settings and sound format. Click on the Video Options button to adjust the frame rate of your converted video files as well as resize them when they are converted.
Video Effects
Click on the Effects button to open the Video Effects window. Here you can add text captions to your converted video files, rotate and flip your videos, adjust color/brightness, & add watermarks. The Edit Video tab in the Video Effects window will allow you to trim down your videos as well.
Preview
Click on the Preview button to watch a preview of your video file in the format you will be converting it to. This is useful to keep an eye on the quality of the video if you are compressing it and also just to double check that you are working on the correct files if your file names aren't very descriptive.
Change AVI to MP4
Once you have chosen your output destination and set the output file type to MP4, you are ready to change your AVI files to MP4. Select the files that you would like to convert and click on the Convert icon in the bottom right-hand corner of the program or in the main toolbar. You can convert your files individually or hold down shift to click and select multiple files to convert all at once. The conversion process is extremely fast and your new MP4 files can then be found in your chosen output destination.
For more on articles on video and video editing, check out these posts:
- How to Rotate Videos with Prism Video Converter Software
- The Best Video Editor for YouTube
- How to Convert M4A to MP3
- How to Make a Freeze Frame of a Video Clip
Friday, March 1, 2019
Best Method to Rotate Videos with Prism Video Converter Software
Best Method to Rotate Videos with Prism Video Converter Software

In a world where more and more videos are taken on mobile devices, the struggle is real when it comes to making sure that all of your videos are oriented correctly for your video projects. Knowing how to rotate videos is a great skill to have and it will help you make sure that your videos are viewed at their best. With a simple video converter software, such as Prism Video Converter, you can quickly and easily rotate your video for your viewing pleasure.
Import Video Files
Download Prism Video Converter by clicking on one of the red download buttons on this page. Follow the installation instructions and open the application on your computer. Import the video files that you would like to rotate by clicking the "Add Files" button or by pressing Alt+A on your keyboard. Locate and select the video files on your computer and click "Open" to bring them into the program.
Preview Videos
To preview a video before rotating it or converting it to another format, simply double click on the file name in the program to launch the preview window. You can also select a file and then click on the "Preview" button, located at the bottom of the program.
Video Effects
Click on the "Effects..." button at the bottom of the program to launch the video effects window. Here you can choose from a variety of video effects that you would like to have applied to your videos at the time of the conversion. Prism allows you to adjust the lighting in your videos, add text captions, watermarks and you guessed it, rotate and flip your videos. You can also get to any of these options by simply right-clicking on a file and choosing one from the cursor menu.
Rotate Videos
To rotate a video, click on the video file you wish to rotate to select it. Then click on the "Effects..." button shown in the previous step. Click on the tab in the Video Effects window that says "Rotate and Flip" to view the options for rotating videos. You can also right-click on a file and select the same option from the right-click menu. Click the green arrow buttons to determine how many times you want to turn your video, either clockwise or counterclockwise. You can also choose to flip or mirror your video from this same menu. At the bottom of the window, you can choose to apply the rotation to only the selected files or to all of the files in the program. A small checkmark will appear in the effects column next to the file that the rotation effect will be applied.
Output Settings
Before converting your files and rotating your videos, choose where you want your newly rotated video files to appear after the conversion process. At the bottom of the program, use the "Save to folder" dropdown menu or click on the "Browse" button to select a location on your computer where you would like Prism to output your new video files. Prism Video Converter can convert video files to a variety of formats. If you wish to change file types while rotating your videos, you can do so by selecting a new format from the list in the dropdown menu next to the words "Output Format."
Convert Video File(s)
Once you have chosen your output settings and applied the rotation effect to the video files you wish to rotate, you can simply click the "Convert" button, located in the main toolbar or in the bottom right-hand corner of the program. The rotation effect, as well as any other effects or changes in formats you chose, will be applied to your selected video files and appear in your chosen output folder/location.
How to Rotate Videos
You have now learned how to successfully rotate videos using Prism Video Converter Software. You can open and view your rotated videos from your output folder and if you want you can go even back and rotate them again. You can rotate your videos until you are dizzy. You can also take your rotated video files and create your next movie masterpiece with VideoPad Video Editing Software.
For more on video editing, check out these posts:
Thursday, January 3, 2019
The Best Editing Software of 2019
The Best Editing Software of 2019

The new year has begun and so has the search for the best editing software of 2019. We all strive to find the latest and greatest when it comes to editing software and with each new year comes new updates, new features, and new players in the game. With so many great editing software options out there, we decided to put together a selection of the best editing software of 2019. The world of editing software grows more competitive each year and so in order to stand out a program needs to be feature packed, user-friendly, and affordable. The following programs we feel meet and exceed that criteria, making them the best editing software packages of 2019.
Best Audio Editing Software of 2019

|
WavePad Top Features
|
WavePad Audio Editing Software
WavePad Audio Editing Software has been a major player in the audio editing software industry for many years. With each new release comes game-changing new features and abilities. WavePad's simple yet professional interface allows for quick learning for beginners with easy access to advanced features for pros. WavePad includes just about every effect and function you could ask for in an audio editor. It is for these reasons that we think that WavePad Audio Editor is the best audio editing software of 2019.Best Video Editing Software of 2019

|
VideoPad Top Features
|
VideoPad Video Editing Software
Last year VideoPad was named the Best Value Video Editing Software of 2018 by TopTenRevews. However, it is not the affordable price alone that will make it the best video editing software of 2019. Some of the most recent updates have brought the program on par with the top video editors in the industry. These include 360 video editing, direct sharing from the program, and the support of almost every major file format. VideoPad's sleek and simple design allows for easy editing and application of transitions and effects while maintaining professional quality and standards. This is why VideoPad is the best video editing software of 2019.Best Music Mixing Software of 2019

|
MixPad Top Features
|
MixPad Multitrack Recording Software
MixPad Audio Mixer will minimize the time it takes to mix your next project while optimizing audio quality. MixPad provides you access to all of the power of professional recording and mixing equipment through a single platform that streamlines the process and makes mixing a breeze. This program allows you to record instruments and vocals for music production, create mixes and mashups with existing files, or even use midi controllers and the beat designer to create music in the program from scratch. The versatility of this program is what truly makes it the best music mixing software of 2019.Best Photo Editing Software of 2019

|
PhotoPad Top Features
|
PhotoPad Photo Editing Software
Whether you’re a professional photographer or just want to edit your personal photos, PhotoPad is one of the best photo editors on the market today. It has all of the powerful tools and features you need to easily edit digital photos and other pictures. PhotoPad brings both photo editing and graphic design capabilities together with a fast and simple user interface. With this program, you can have all of the bells and whistles of any professional photo editor at a fraction of the cost. This is why we think that PhotoPad Photo Editing software is the best photo editing software of 2019.Best Motion Graphics Editor of 2019

|
Motion Graphics Top Features
|
Express Animate Motion Graphics Editor
Express Animate is a free animation program that gives you the ability to animate shapes, text and imported images. You are also able to enhance your movie projects in post-production using key-frame motion animation, masking, dummy objects and more. The program really is completely free without a catch too, which is a rare find these days. This is why we feel like Express Animate is the best animation editor of 2019.Friday, December 28, 2018
Make an End of Year Slideshow with PhotoStage
Make an End of Year Slideshow with PhotoStage

What better way to wrap up the year than with an end-of-year photo slideshow filled with all of your favorite memories? You can easily put together a slideshow with all of the great pictures you took this past year and add your favorite songs to go along with it. With a simple and easy-to-use slideshow-making software such as PhotoStage Slideshow Software, you can quickly create your own year-end slideshow to save and share for years to come.
Slideshow Wizard
The easiest way to make an end-of-year slideshow in PhotoStage is by using the Slideshow Wizard. Open PhotoStage Slideshow Software on your PC or Mac and click on the Wizard icon, located in the main toolbar. This will launch the Quick Create Slideshow window where you can get assemble your pictures, audio, theme, and transitions and get them all ready for your slideshow in one place.
Locate Your Images
Click on the Browse button to locate the images you would like to use in your slideshow. This will open the file finder window where you can select the folder that contains the images you would like to use. Select the folder that contains the images you want in your slideshow and in the next step, we will select the actual images.
Select Your Photos
Next, you can choose to either use all of the images in your selected folder or pick the images you want in your slideshow one at a time. Choose the option from the dropdown that says Use Selected to pick individual photos out from your folder. Click the button that says Select to open the folder and choose which photos you want to use in your slideshow. You can click the button that says Select All and then hold down the Ctrl key on your keyboard while clicking on the photos you don't want. You can also click the option that says Select None and hold down Ctrl on your keyboard and select the images you do want. When you are finished selecting images, click OK.
Add Audio
Now it's time to add some audio to your slideshow. Maybe it's that song you had playing on repeat all year long or maybe it's a song that gets you pumped for the year to come. Either way, a good song is a great way to make a photo slideshow come to life. Click on the drop-down menu next to the word Sound and choose from where you would like to import your audio file. If the audio file is on your computer, you can select this option, locate your sound file and click Open. You can also find a number of great sound files in the NCH Sound Library.
Select a Theme
PhotoStage allows you to select a theme for your slideshow that will act as a background behind your images. This is useful when your photos are not all the same size or when you have a mix of landscape and portrait photos as we all often do. Choose a theme option from the drop-down menu to launch the Background Theme window. You can also add Intro and Outro Title Text to your slideshow by clicking in the title text boxes and typing in the Text Overlay window that appears.
Add Transitions
Finally, select the type of transitions you would like to have between the photos in your slideshow from the transitions drop-down menu. You can set their duration in the box beneath the menu. If you would like to use a variety of transitions, check the box that says Randomize Transition Type, and different transitions will appear between your photos in random order.
Create Slideshow
Once you have made all of your selections using the PhotoStage Wizard, click Create to open your slideshow into the main program. You can rearrange the order of your images by simply clicking on the image in the timeline at the bottom of the program and dragging it to any position you would like. You can also click on the transition box between any two clips to change and adjust the transitions. Clicking on the number in the box will allow you to adjust the duration of the transition while clicking on the image icon in the box will display the other transitions available under the transition tab.
Add Text
You can add text to any image/slide in your slideshow by simply clicking on that image in the timeline and then clicking on the Text tab on the top left-hand side of the program. Select the type of text you would like to use, such as Text Overlay, and then click and type in the text box that appears as a new layer beneath the Applied Effects section.
Add Effects
You can add effects to any of the photos in your slideshow by selecting a photo from your timeline and then clicking on the Effects tab to select an effect to apply to that photo. Effects will appear as layers underneath the applied effects section and can be layered on top of each other to create unique and exciting effects of your own.
Export Slideshow
When you are finished making the final adjustments to your slideshow and you are ready to export, simply click on the Export icon located in the main menu at the top of the program. You can select from a variety of export and sharing options such as burning to a DVD, saving to your computer and even uploading directly to YouTube.
Save to Your Computer
To save your slideshow movie to your computer, simply choose the Video File option and use the Video Output Setup window to choose an output file type, destination, and resolution. Name your slideshow whatever you would like then click Create to start the export process. Your year-end slideshow movie will appear in your chosen output destination and you can now share your year with whoever you would like, however you would like. Now you can start off your New Year with the resolution to make more slideshows!
Happy New Year from all of us here at NCH Software!
Friday, December 7, 2018
How to Edit Videos on Mac
How to Edit Videos on Mac

If you find yourself wondering what to do with those videos you took on your family ski trip, then learning how to edit videos on Mac may just change your entire home movie game. Editing your videos on Mac is a great way to get all of that footage organized and put together something that you and the people around you will actually enjoy watching. With a simple video editing software for Mac, such as VideoPad Video Editor, you can easily learn how to edit videos on Mac like a pro.
Import Videos on Mac
To begin editing videos on Mac, start by importing your video files into VideoPad. Open the program on your Mac and then click on the icon that says Add Files. This will open the file finder window where you can locate the video clips on your Mac that you would like to edit. Once you have selected the files you wish to use in your video, click Open to bring them into the program.
Trim Video Clips
When editing videos on Mac, one of the first things you might want to do is trim your video clips down to the good stuff. From the media bin on the left-hand side of the program, click on a clip that you want to trim to open it in the clip preview window. Drag the red and blue brackets along the timeline in this window to set the beginning and endpoints of your clip. You can also let your video play, and click on the Start and End buttons where you want the beginning and end of the clip to be. To split your video into two separate clips, simply click on any point in the timeline and then click on the scissors icon. This will create two new clips in the media bin.
Add Video Effects
VideoPad Video Editor for Mac is full of great effects that you can add to your videos. Touch up and enhance your videos by making color and contrast adjustments. You can also choose from a variety of special effects to really bring your videos to life. To add a video effect, select a clip and then click on the Add Effects tab in the top menu. This will launch the Effects Window, where you can choose your first video effect. After selecting an effect, the Effects Layers Panel will open up and you can adjust your effects and arrange their order. Effects can be layered on top of each other to create your own new and unique video effect.
Video Editing Timeline
Once your video clips are trimmed and you have added your desired effects, you can then start putting them together to make your movie. Drag and drop your clips from the media bin directly into the VideoPad timeline in any order you would like. You can rearrange the order of your video clips in the timeline later or as you go. When a clip is in the timeline, it will have a green checkmark on it in the media bin.
Add Video Transitions
VideoPad Video Editor is loaded with great video transitions to use when you are learning how to edit videos on Mac. If you have several video clips that you would like to edit together, it is a good idea to use transitions to make the change between them smooth and seamless. Click on the X icon between any two video clips in your timeline to open the Transitions Window and select a transition. You can adjust the duration of your transition in the bottom right-hand corner of the transitions menu, or by double-clicking on the transition bar that appears once it has been added.
Add Audio to Video
Adding music or narration to videos on Mac makes for a professional-looking final product and helps your video to be more captivating and interesting to your audience. You can add audio files by clicking on the Add File(s) button in the main menu. Select the audio file or files you wish to add to your video and import them into the program. Once imported, your audio clips will appear in the media bin under the Audio Files tab. Click on an audio file to view it in the preview window and trim and adjust it as you like. Drag the audio clip from the media bin into the timeline and place it wherever you want. Click on the FX or Speaker icons that are located on the audio clip to add audio effects and adjust the volume of your audio clip.
Add Text to Video
Adding text to a video on Mac is a great way to provide your viewer with additional info that isn't otherwise available to them. Click on the Add Text button in the top menu to add text to your video. Type your text into the text box that appears and make any font and style adjustments you wish. When you exit out of the text window, you will see your new text as a clip on your timeline. You can move your text clip, add transitions and effects to it, and increase or decrease the duration of the text clip in your video. If you need to edit your text, double-click on the text clip in your timeline or click in the text box underneath the preview window.
Export Video on Mac
We have now successfully learned how to edit videos on Mac with VideoPad Video Editor. We demonstrated how to trim video clips and apply video effects. We learned how to combine video clips together in the timeline and add transitions between them. We also learned how to add audio and text to our videos and how to navigate the VideoPad interface while doing so. You are now ready to export your final video product to your Mac. To export your video, click on the button that says Export Video in the top menu. You can choose from a variety of exporting options such as saving as a video file, burning to a disk, or uploading your video straight to YouTube.


