
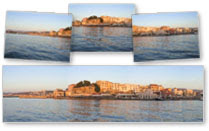
 If you don't have a panoramic camera, you can still make panoramic photos by stitching several photos together. To successfully create a panorama you will need to take two—or more—pictures that overlap. Photo stitching software will need to scan the images to find points that match up in order to fit them together. A good rule of thumb is to take the pictures so that about a fourth of width overlaps other images.
For the best results, in addition to making sure the images overlap you also want to be sure you don't move or change any camera settings like the zoom, between the pictures in the panorama series. Changing your position or other settings will make it difficult, if not impossible, to stitch the photos together.
When you have photos ready to be stitched together open PhotoPad photo editing software and select Panorama on the Tools tab. This will open the Create Panoramic Image dialog where you can Add all of your overlapping photos and arrange them in order in the top preview window. When all of the photos have been added and are in the right order, you can click Update Panorama to stitch together a preview of the panoramic image. If you add or delete any source images the panorama will be deleted. When you are happy with the results in the panorama preview simply click OK and a new project will be created for the panoramic photo.
Note making panoramic images is a resource intensive process, so it can take a long time, and uses a lot of memory. If your computer runs out of memory, try scaling down the images, or using fewer photos.


No comments:
Post a Comment