
Showing posts with label PhotoPad. Show all posts
Showing posts with label PhotoPad. Show all posts
Sunday, December 21, 2025
Sunday, November 9, 2025
Cross-Stitch Your Photos into Seasonal Works of Art
Create Embroidery Designs from Photos

As the leaves turn and the air grows crisp, fall inspires us to slow down and get creative with handmade projects. This season, bring that cozy, handcrafted feel to your favorite photos with PhotoPad’s Embroidery Tool - a feature that transforms digital images into real embroidery patterns you can print and stitch yourself. Whether you’re decorating your home with fall-themed art, stitching a beloved family photo or planning your next handmade gift, this tool makes it easy to turn any image into something beautifully tactile.
Turn a Photo into an Embroidery Pattern in Minutes
Creating your own cross-stitch or embroidery design takes just a few clicks. Open your image, select Tools > Embroidery, then adjust the number of colors and stitches to match your preferred level of detail. The pattern preview updates instantly, showing exactly how your stitched design will look. The printed pattern includes a color key with official DMC Embroidery Floss codes, so matching thread colors is effortless.
You can print your pattern or save it as a PDF to work from digitally. Whether you’re stitching a family portrait, a pet photo, or a favorite landscape, PhotoPad’s Embroidery Design Software makes it easy to turn any picture into a unique, handmade piece of art - no extra software required.
- Tip: Crop or adjust your photo’s brightness and contrast in PhotoPad before generating the pattern for even clearer stitch results. Note: The Embroidery Tool creates real, stitchable patterns - you will need an embroidery hoop, needle, and thread if you plan to stitch the design by hand.
- Tip: Try fewer colors for a minimalist outline or increase the stitch count for detailed results.
Save Your Photo as an Embroidery Pattern
Once your pattern looks just right, select how you want to save or print it.

The Embroidery Tool offers several output options:
- Original - keeps your photo as reference
- Colored Pattern - shows thread colors directly on the image
- Symbol Pattern - great for classic cross-stitch layouts
- Color Key - lists all thread colors and codes for easy stitching
Print your Embroidery Pattern and Start Stitching
When you’re ready, simply save your pattern as a PDF or send it straight to print. Grab your embroidery hoop, needle, and thread - your design is now ready to come to life, one stitch at a time.

Digital Images Reimagined as Embroidery Art
Whether it’s a snapshot from a fall hike, a cozy family photo, or a candid portrait, turning your images into embroidery patterns is a creative way to preserve memories with a personal touch.
With PhotoPad Embroidery Pattern Maker, your photos don’t just stay on a screen - they become something you can truly hold, display, and gift.
Happy Stitching,
The PhotoPad Team
Tuesday, May 23, 2023
Easily colorize your black and white photos with PhotoPad

Have you ever wondered how you can colorize black and white photos to breathe new life into them? You can quickly and easily do so with PhotoPad photo editor. In addition to its many powerful image enhancement and editing tools, PhotoPad comes with a built-in colorize feature that will allow you to literally add as much color as you want to any photo, including black and white ones. Who would benefit from such a feature? Those who are holding onto lots of memories in the form of old black and white photos can instantly take any one of those photos and make it fit for sharing. Whether it's for sharing offline by printing or by posting on social media, adding color to old photos can only be a good thing.
Sunday, May 21, 2023
Free photo touch up - Photo Retouching | Retouch Photos Online for Free

Quick, easy, and free photo touch up capabilities remain to be among the most important features in software programs like PhotoPad. While it has more than a dozen built-in photo enhancement features, its photo retouch tools continue to be some of the most powerful in its arsenal.
Wednesday, May 10, 2023
Increase Photo Resolution Online Free with PhotoPad

One of the most sought-after features in image editing software - perhaps next to the ability to instantly touch up photos as quickly as possible - is the ability to increase photo resolution without losing quality. As you can imagine, this feature can be extremely useful for a number of applications.
Tuesday, May 2, 2023
PhotoPad: Best Picasa Alternative for Editing Photos

When it comes to popular photo editing programs, there are only a few that can rival Google's old product called Picasa - so much so that plenty of people nowadays are searching for the best Picasa alternative. The biggest reason for that is because, for a time, it was one of the most powerful yet highly intuitive image editors available online.
Unfortunately for fans of Google's Picasa photo editor, it was discontinued in the mid-2010s. Luckily, there is no shortage of easy-to-use and capable replacements that can more than adequately handle various image editing tasks.
In this article, we'll talk about one of the most appropriate alternatives to Picasa that you can download and install today: none other than NCH Software's very own PhotoPad Photo Editing Software. It comes with its own set of powerful image editing features, all wrapped up in an easy-to-use user interface that will allow you to enhance photos in no time.
Tuesday, August 25, 2020
Upscale and Enhance Photos with AI Super Resolution

If you have ever tried to increase the size of your photo, you know that one of the biggest challenges with this is that the quality of the photo decreases and becomes unsharp and blurry.
This has to do with the resolution of an image. Since image resolution refers to the number of pixels within an image, this number is fixed. The number of pixels does not increase when you enlarge an image as there is no new image information added, thus decreasing the image quality.
If you wanted to increase the size of your photo without highlighting the poor photo quality, the only solution was to take a brand new photograph at a higher resolution.
But what if I told you that with PhotoPad you could now enlarge an image and increase its resolution at the same time?
Yes, you heard that right. Those scenes you see in police television dramas where detectives zoom into an image and it magically improves the quality and details start appearing is now a reality thanks to PhotoPad Photo Editor.
PhotoPad has released a new feature called “Super Resolution”, an AI and machine-learning tool that makes it possible to enhance and upscale images without losing quality.
How does Super Resolution work?
Using cutting-edge technology, Photopad’s Super Resolution is a fully automated process that uses artificial intelligence and machine learning to recognize patterns and recreate contents of an image including edges, patterns, and textures.
The Super Resolution algorithm has been trained on large data sets of images so that it understands how physical objects such as land, buildings, people, etc. look and what their typical features are.
So when Super Resolution is used to enlarge an image, it scans the image, recognizes these general features, and then adds the extra pixels to create a high-quality resized photo, all in a couple of seconds.
How to use Super Resolution in PhotoPad?
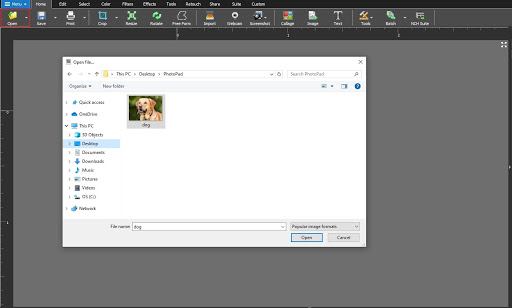
1. The first step if you haven't already, is to download and install PhotoPad Photo Editor.
2. Click on the Open icon to upload your low-resolution image that needs to be enlarged. For best results, ensure your image is in JPG or PNG format.
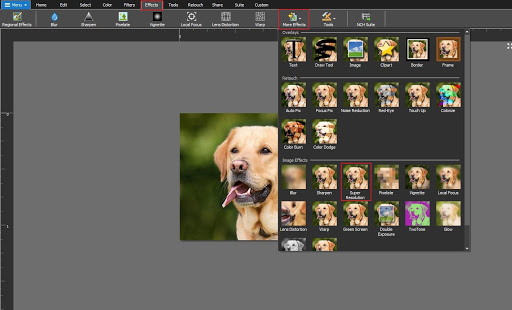
3. Navigate to the Effects section in the main toolbar, click on More Effects. In the drop-down below, select Super Resolution.
3. In the Effects and Layers section on the right, type in the Width and Height measurements to the desired size and click Apply.
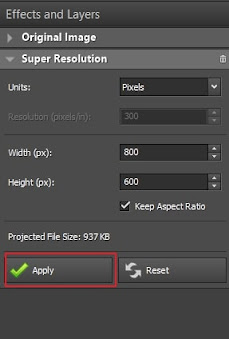

Congrats you have successfully harnessed the power of machine learning to create your enlarged high-resolution image! Whether you need to create HDR images, edit travel photos, or blend images together, photo editing has never been easier. Download PhotoPad and create your first Super Resolution image today.
Tuesday, July 28, 2020
Best Tool to Make HDR Images in Minutes
 |
Picture this.
You’ve taken a trip to the forest and you come across this beautiful spot with the river gently flowing and the afternoon sunlight peeking through the forest trees.
You take out your camera but you are unsure how to best capture the scene in its full detail. Do you light the dark shadows on the river? Or do you light the trees in the background? The high-contrast scene can prove an impossible task for a camera to capture but not to worry, there is a solution. That solution is called PhotoPad and its sophisticated HDR processing tool.
What does HDR mean?
In a simplified definition, HDR photography or High Dynamic Range photography is the technique of fusing different exposure images to create a single image with overall correct exposure. PhotoPad, one of the most comprehensive photo editors and HDR software available, takes all the complications away in a couple of clicks to create an image with so much dynamic range and detail that couldn't otherwise be achieved with a normal photo.
How to Make HDR Images with PhotoPad
The first step is to capture at least three images with different exposures. The first image is to capture a mid-range exposure shot, the second captures the highlights with higher exposure and the third one is a lower exposure shot that captures the shadows. Feel free to capture additional photos that represent exposures between the two extremes.


Once you have your images, the next step is to install PhotoPad which takes less than a couple of minutes to install.
Open PhotoPad and navigate to the Tools tab in the toolbar and select the HDR icon.

Select the dark, medium, and bright exposure images by holding the Ctrl key and click Open.
PhotoPad will now automatically align and combine your images into a single HDR image.


Your eye-popping National Geographic-worthy HDR photo is complete. If you don’t want to take multiple photographs, you can also create an HDR from one RAW image format with neutral lighting and then later create different exposure images digitally with PhotoPad.
Once your HDR image is complete, continue to edit your image like any other PhotoPad project. Maybe try out the advanced double exposure tool or why not some of our top travel photography editing tips? Download PhotoPad HDR photo editor below and check it out yourself.
Thursday, July 9, 2020
Top 5 Travel Photography Editing Tips

We’ve all seen fashion magazine images edited with fake backdrops, flashy text, and intense skies. When it comes to travel photography, it’s recommended to keep editing simple and realistic.
Whether you’re a backpacker, a travel blogger, or a vacationer, you know travel is all about the experience, the journey, the beautiful places and amazing people you’ve met along the way. Unfortunately on many occasions, your travel photos fail to deliver the same experience behind the captured moment.
Not to worry, here are 5 simple travel photography tips that will turn your photos into something special with the help of PhotoPad, one of the easiest and most comprehensive photo editors available.
Crop
While traveling, you won’t always be in the right place at the right time to capture the perfect moment. This leads to photos including unwanted elements which can be distracting. Cropping your image is another way of composing your shot by highlighting the subject.
Take this image of the hot air balloons in Cappadocia, Turkey for example. You can crop the image to focus on a particular subject or make it suitable for social media. To crop the image in PhotoPad, select the Crop button in the toolbar, and adjust your selection. You can also adjust the aspect ratio and resize your crop selection.


AutoFix
Exposure, Resolution, Saturation, Color Correction, Contrast - the photography lingo is endless and can take a while to wrap one’s head around it.
One of the best features of PhotoPad is its one-click AutoFix function, which automatically fixes the most common photo problems and enhances your travel photo in seconds. To apply AutoFix, navigate to the Retouch tab in the toolbar, and select AutoFix. It’s that simple!


Color Boost
Don’t you wish you could take photographs with your eyes? You might notice that the vibrancy of colors in your travel photos looks a bit dull. This is where PhotoPad’s one-click Color Boost function will automatically make your pictures pop.
Head to the Filters tab and select Color Boost. You can also adjust the brightness and strength of the Color Boost accordingly.


Touch Up
All too often when you’re traveling to a place to photograph, other tourists have the same idea and are likely to end up in your photo. Luckily, you can remove tourists from your photo with PhotoPad’s Touch Up tool. This however only works well as long as there isn’t a crowd of people or a lot of elements that need to be removed and the elements are against an unbroken and repeating background like the image of a tourist beside a field of grass below.
To use the Touch-Up tool, go to the Retouch tab and select Touch Up. The tool works by stamping material from one part of a picture onto whatever other parts you choose. Hold down the Ctrl key and click on the part of the picture that will cover up the tourist, in this case - more grass. This tool is also useful for removing dust spots, blemishes, and other imperfections. Works like magic.


Lens Distortion
If you have ever noticed your travel photos to be unnaturally curved inwards or outwards, your image is distorted. Commonly caused by a myriad of reasons such as the use of wide-angle/telephoto lenses, camera positioning or camera tilts. Regardless of the distortion type, you can easily correct it with PhotoPad’s Lens Distortion feature.
Under the Effects tab, select Lens Distortion where you can manually adjust the distortion correction accordingly, giving your pictures a more professional look.


There’s so much more to editing your travel photos than just choosing a filter and posting your photo on Instagram. While these are just some of the quick and easy-to-use features listed in this article, PhotoPad is a comprehensive travel photo editor with many more tools and effects available that will take your travel photography to the next level. Happy editing!
Friday, April 26, 2019
How to Take a Panoramic Picture in PhotoPad
How to Make a Panoramic Photo in PhotoPad

Most smartphones today come equipped with camera settings for taking panoramic photos. The result is always a nice big image that captures much more than a typical photo would. But what if you want to take a panoramic picture with your digital camera or another camera? There is an easy way to create stunning panoramic images yourself even if you don't have a phone with the feature. Lucky for you, a panorama can be created using the Create Panoramic Image dialog in PhotoPad Photo Editing Software
How it works

Download & Install PhotoPad

Open The Panorama Dialog
Open PhotoPad Photo Editing Software on your computer. From the main menu, click on the Tools tab to view the tool options. Select the option that says Panorama to open the Create Panoramic Image dialog.
Add Images
Click on the button in the dialog that says Add Image(s) to launch the file finder window and import your images into the program. Once loaded, the images will appear in the preview window of raw images. You can change the order of the images from within the dialog as well as add or remove images.
Preview Panorama
Before constructing the final image, the dialog will allow you to preview the results. Click on the button that says Update Preview to view a preview of the final product. Remember, at least two images are needed to create a panorama. If everything looks good, you can click OK and a new project with the stitched panorama will be created and opened for further editing in PhotoPad.
Crop Your Image
As a result of how the camera moves when taking the individual pictures, there may be some excess black space left around the final product. From the Home tab, you can select the Crop tool and crop the image to get rid of this. After you have cropped your panorama, you can apply any additional effects to your image before exporting.
Save & Share
Now that you have successfully created a beautiful panoramic image in PhotoPad Photo Editing Software, you are ready to save it and share it with the world. Click on the Share tab in the main menu to view some of the various sharing options that can be used directly within the program. Alternatively, you can select the File tab and choose Save As...to select where and how you would like to save your image onto your computer.
For more on PhotoPad, check out these articles:
Friday, December 21, 2018
Make the Perfect Holiday Greeting Cards with NCH Software
Make the Perfect Holiday Greeting Cards with NCH Software

This holiday season is the perfect time to get into the creative spirit and try making your own holiday greeting cards. Forget going to the store and choosing from the same old greeting card templates. With some simple and easy-to-use photo editing and graphic design software, you can make your own fun and meaningful holiday cards that will truly capture your holiday day cheer.
Edit Your Family Photo
The first step to making a great holiday card is to select a great family photo, and yes, the family does include pets. Open a copy of PhotoPad Photo Editing Software to edit and enhance your picture and make sure it is refrigerator-ready. Under the Edit tab, you can select from several important photo editing options, such as Rotating, Cropping, and Resizing. Try using the Straighten feature to make sure your photo is perfectly aligned.
Enhance Your Family Photo
Next, you can perform some simple photo enhancements and touchups to bring out the best in your family photo. Under the Colors tab, you can adjust important lighting aspects such as the Brightness and Contrast in your photo. You can also adjust the Color Balance, Color Curves, and Color Levels of your image to achieve that professional studio quality.
Save Your Photo
Once you are finished making edits to your photo in PhotoPad, you can save the image onto your computer so that you can use it in your holiday greeting card. Click on the File tab and select Save As...Name your image file and select your image file type. After you have selected the destination where you would like to save your photo, simply click Save.
Add Text to Your Photo with DrawPad
No holiday card would be complete without a message of good cheer. DrawPad Graphic Editing Software is the perfect program for adding and editing text on an image. Open DrawPad on your computer and click on the icon that says Open to bring your image into the program. Click on the Text icon that is located underneath the Home tab in the main menu to add text to your image. Click anywhere on your image to start typing. Highlight your text and use the Color Picker to change the color of your text and then use the Text Options menu to change the font size and style.
Add Holiday Clipart
Now that we have our text on our image, we can visit the NCH Clipart Library to find some festive clipart to add to our card. You can get to the Clipart Library by clicking on the Advanced tab and then selecting the Clipart icon. It can also be found in the drop-down menu, underneath the File tab. Click on the folders in the library to view their contents and select a file to preview the image in the clipart preview window. When you have found an image you like, simply click Download to add it to your card. You can then move the clipart around your image freely and resize and rotate it as you wish.
Save and Share
Now have a professional-looking photograph that you have made into your own personal and unique greeting card. The best part is, you didn't even have to get out into the holiday traffic to do it. When you are ready to save your final image, click on the File tab and choose from one of the options listed. You can select the Print option to instantly print off your masterpiece at home. If you want to save on postage this season, you can select the option to Send by Email, and digitally deliver your card straight to the inbox of your loved ones. Lastly, you can select Save As...to save your holiday card to your computer and share it however else you would like.
Happy Holidays from all of us here at NCH Software!
Friday, October 12, 2018
How to Make a Picture Collage
How to Make a Picture Collage

PhotoPad Collage Editor
Launch the PhotoPad application on your computer. On the first window that opens, you will see a variety of different PhotoPad project types. Click on the option that says Collage to launch the PhotoPad Collage Editor.
Add Photos
The first step in learning how to make a picture collage is to add your images into the PhotoPad Collage Editor. Click on the Add Images...button on the bottom right-hand side of the Collage Editor window. This will open the file finder window so that you can locate and import your pictures into the program. You can also drag and drop images directly onto your collage to add them.

Adjust Canvas Size
Next, you will want to adjust your canvas size to determine the size of your collage. Under the Canvas Options tab, you can set the final output dimensions of your entire collage. You can choose from a variety of standard image sizes for both print and web. Try using 5 x 7 inches to create a postcard with your collage, or make it 8 x 10 inches for printing in a common photo frame size.

Background
Under the Background Options tab, you can select a background for your collage. Select the solid color option and then click on the Background Color bar to launch the Edit Colors window. You can then select and edit a solid color to be applied to your entire background. You can also choose from one of the many background textures/images in the collage editor to add a more exciting background to your picture collage.

Select a Layout
The PhotoPad collage editor comes loaded with over 30 different layout options. You can rearrange your photos within the layout by clicking on an image and dragging it to the position where you would like it. This will cause this image to swap places with the photo that is in that spot. Select the Free-Form layout option if you would like complete control over the size and positioning of your photos.
 Layout Options

Once you have selected your layout, you can make further changes to the layout style by using the layout options adjustments. Drag the Spacing slider to adjust the spacing or padding between the pictures in your collage. Use the Rounded Corners slider to give the images in your collage the effect of a rounded corner. The Random Tilt slider allows you to make your collage look a little more fun and less organized by randomly tilting your images. Click on the Randomize Layout button to reshuffle the order of your images in the layout.

Image Options
Under the Image Options tab, you can remove and replace the pictures in your collage. Select an image and then click on the Remove Image button to remove that image. Then click on the empty space to launch the file finder window and find a new picture to take its place. The Move Forward and Move Back buttons can be used to adjust the layering order of your photos for layout styles that have overlapping images.
Create Your Collage
Once you are finished making your collage, click on the Create button at the bottom of the program. This will bring your finished collage into the regular PhotoPad Photo Editing application. Here you can add text or apply any additional effects that you may want. When you are ready to export your finished product, simply click on the File tab and select Save As...from the drop-down menu. Name your file, set your file type and output destination, and then click Save. Your new and eye-catching photo collage is now finished and ready for use.
For more on photo editing, check out these similar posts:


