Showing posts with label audio mixing software. Show all posts

Friday, April 27, 2018

How to Edit Audio Files with WavePad

How to Edit Audio Files with WavePad

musician recording with WavePad

You don’t have to be a professional music producer to record and edit your own music. With easy-to-use music editing software like WavePad, you can take your audio recordings to the next level. Recording and editing your songs yourself is a great way to share and preserve your musical masterpieces and anyone can do it. Whether you are recording your voice for a podcast or you are editing tracks of your band playing live music, it has never been easier to create professional-quality recordings from home.

Record Audio

If you don’t already have an audio recording to work with, don’t worry. WavePad allows you to record audio directly into the program using an accessory microphone or the internal microphone on your computer or device. To begin recording a new track, simply click the red record button, a new blank track will be created and your recording will begin automatically. You can stop your recording by clicking the square stop button, pushing the Esc key, or by clicking anywhere on the track.
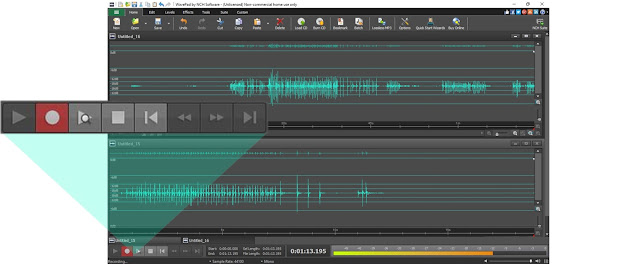
screenshot of recording in WavePad audio editing software
Recording Audio in WavePad

Import Audio

If you already have a pre-recorded track you would like to work with, you can easily import the track into WavePad to edit. Simply press Ctrl + O on Windows or Command + O on Mac to open it. You can also go to the main drop-down menu and select File and then Open. Import a file from your computer or external device, or you can choose to open a file directly off of a CD or data disc. You can even import files straight from the Cloud. Make sure to explore the NCH Sound Library for additional audio samples and sounds to add to your music or audio project.
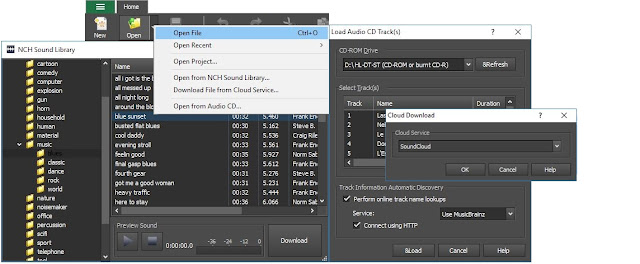
screenshot of WavePad audio recording software file import
Import Audio Files

Trim Tracks

Trimming down your audio recordings or music tracks is one of the first tasks you will want to complete when you begin editing audio files. WavePad allows you to easily remove the silences from the beginning and end of your recordings. Simply select your entire track, go to the Edit tab, click Trim, and then choose the Auto-trim silence from the Start and End of the File option from the drop-down menu.
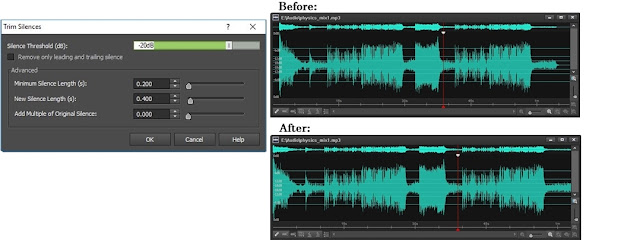
screenshot of trimming silences in WavePad audio editing software
Trim Out Silences in Your Tracks 

Split Tracks

You can split your recordings and files at any point you would like to in WavePad. Simply place your cursor wherever you would like to split your track, select the Split option from under the Edit tab and then choose "Split at cursor" from the drop-down menu. This will split your audio at the position of the cursor, generating two separate tracks.
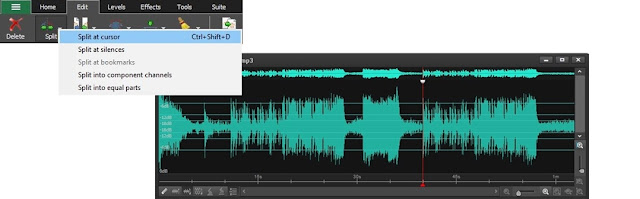
screenshot demonstrating how to split audio tracks in WavePad
Split Tracks

Reduce Noise

Removing background noise from your audio tracks is essential if you want to make your recording sound professional. Background sounds such as chair squeaks, footsteps, and even your own breathing, are all noises that are easily picked up by your microphone. Luckily, they are just as easily removed from your tracks. Choose the track you want to remove noise from and then select the Cleanup option in the Effects menu. From there you can choose from a variety of noise cleanup options, such as auto click/pop removal or noise reduction.
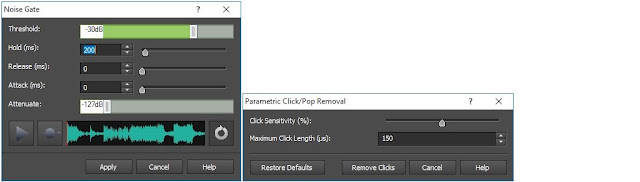
Screenshot demonstrating how to remove background noise from an audio file or recording
Reduce Background Noise

Mix Audio

The Paste-Mix feature in WavePad allows you to overlay tracks to create mash-ups, voice-overs or layer recorded instruments for that full band sound. To combine the audio from two tracks into one, start by selecting one of the tracks and copying it to the clipboard. Next, select your second track and click on the Paste Mix icon in the menu under the Edit tab. When you play it back you will hear that the two pieces of audio have now been combined.
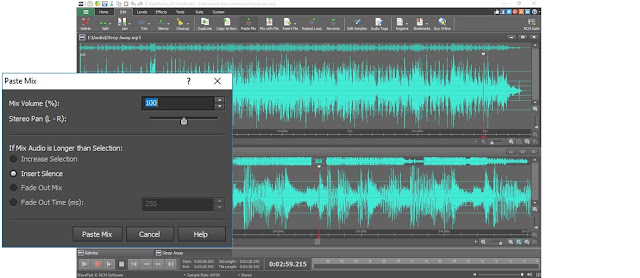
screenshot demonstrating how to mix audio tracks in WavePad
Mixing Audio Tracks 

Volume Control

Now that your song or voice recording is cut down to the good stuff, you can decide what you want to do with your volume levels. Not all microphones are created equally and so your song may end up being a lot louder or a lot quieter than you expected. Select the Levels tab to view some of the different volume control options available in WavePad. Select Normalize Audio from the effects tab to amplify audio gain across the entire track. This is a great last step to finalize your project before exporting.
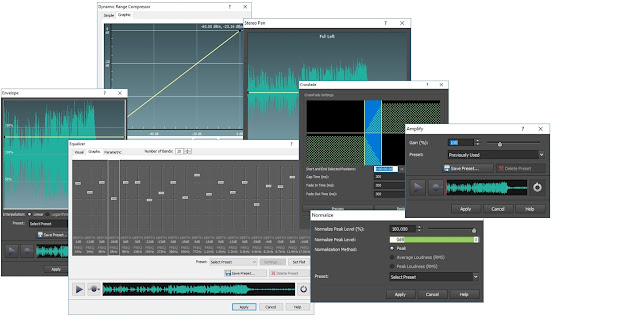
screenshot demonstrating different audio adjustments and controls for music editing
WavePad Volume Control Features

Save and Export

When you are finished editing your audio project, you will need to save it. WavePad has several easy options for saving and exporting your audio files. Under the Home tab, you can click on the Save icon and choose to burn your song to an audio or data CD, send the file in an email, upload it to the cloud, or save it as a number of audio file formats. If you plan on making additional edits to your project later, you can save all of your work as a WavePad project file to preserve quality.
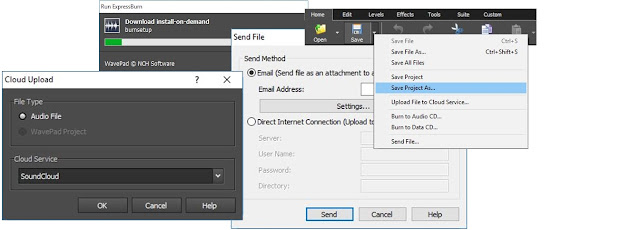
screenshot demonstrating the different ways to save and export a music project
Saving Audio Files


Friday, August 19, 2016

How To Record Instrumental and Vocal Tracks with MixPad MultiTrack Mixer

Record Audio and Instrumental Tracks with MixPad MultiTrack Mixer


MixPad MultiTrack Audio Editor


MixPad is a multi-track audio mixing software that is useful in recording and mixing audio tracks. This audio software will allow you to mix an unlimited number of tracks, add audio effects such as EQ, reverb, or compression, and finally export your mixes in a number of high-quality formats. MixPad can export audio compilations as mp3, burn directly to a CD, or upload audio projects to SoundCloud and Dropbox.

How To Record Audio Tracks with MixPad

To enable recording in MixPad, click on the recording icon on the track that you would like to record.


When recording is enabled for a track, the recording icon will be red.


When you are ready to record, click on the recording icon on the bottom of the MixPad window. You can also use the F5 key on your keyboard to begin recording without clicking in MixPad.


To pause or stop your recording, click on the stop button, or square in the bottom toolbar. You can also press the space bar on your keyboard to stop recording without clicking in MixPad.

Recording multiple tracks will allow you to isolate instruments, vocals, and other audio tracks. With MixPad, you can then add effects, change volume levels, apply pitch correction, change stereo pan, and apply looping to tracks.

Isolated tracks will allow you to remove vocals to create audition tapes and karaoke tracks, remove or re-record instruments, and professionally edit your audio tracks. Bands and recording artists can use MixPad to lay down instrumental and vocal tracks individually, then mix, edit and upload songs directly to fans on SoundCloud with the click of a button. 

Easily Identify Instrument Tracks

You can edit the names and colors of individual tracks in order to make them easily identifiable during the editing process. To edit the name of a track, select the "Track" tab from the top menu. Click to select the track, then select, "Rename Track" from the Track Tab. 


You can also double click on the "Untitled Track" label to edit the track name. The track name will become an editable field which you can change to whatever title will be easily identifiable for you.


 To change the color of a track, select the "Track" tab from the top menu. Click to select the track, and then select "Track Color" from the top menu. A color selector window will appear. You can select a common pre-set color, or you can create custom colors by clicking on the button that says "Define Custom Colors".


Download MixPad Here


You may also like:


How To Record Instrumental and Vocal Tracks with MixPad MultiTrack Mixer

Record Audio and Instrumental Tracks with MixPad MultiTrack Mixer


MixPad MultiTrack Audio Editor


MixPad is a multi-track audio mixing software that is useful in recording and mixing audio tracks. This audio software will allow you to mix an unlimited number of tracks, add audio effects such as EQ, reverb or compression, and finally export your mixes in a number of high quality formats. MixPad can export audio compilations as mp3, burn directly to a CD, or upload audio projects to SoundCloud and Dropbox.

How To Record Audio Tracks with MixPad

To enable recording in MixPad, click on the recording icon on the track that you would like to record.


When recording is enabled for a track, the recording icon will be red.


When you are ready to record, click on the recording icon on the bottom of the MixPad window. You can also use the F5 key on your keyboard to begin recording without clicking in MixPad.


To pause or stop your recording, click on the stop button, or square in the bottom toolbar. You can also press the space bar on your keyboard to stop recording without clicking in MixPad.


Recording multiple tracks will allow you to isolate instruments, vocals, and other audio tracks. With MixPad, you can then add effects, change volume levels, apply pitch correction, change stereo pan, and apply looping to tracks.

Isolated tracks will allow you to remove vocals to create audition tapes and karaoke tracks, remove or re-record instruments, and professionally edit your audio tracks. Bands and recording artists can use MixPad to lay down instrumental and vocal tracks individually, then mix, edit and upload songs directly to fans on SoundCloud with the click of a button. 

Easily Identify Instrument Tracks

You can edit the names and colors of individual tracks in order to make them easily identifiable during the editing process. To edit the name of a track, select the "Track" tab from the top menu. Click to select the track, then select, "Rename Track" from the Track Tab. 


You can also double click on the "Untitled Track" label to edit the track name. The track name will become and editable field which you can change to whatever title will be easily identifiable for you.


 To change the color of a track, select the "Track" tab from the top menu. Click to select the track, and then select "Track Color" from the  top menu. A color selector window will appear. You can select a common pre-set color, or you can create custom colors by clicking on the button that says "Define Custom Colors".


Download MixPad Here


You may also like: