Showing posts with label audio editing. Show all posts

Friday, November 5, 2021

How to Remove Audio From Video


Being able to remove audio from video files can be extremely useful under many different circumstances. You may want to record your audio separately, or maybe the audio you recorded is unusable so you need to dub in a new audio file. Whatever your reasoning, VideoPad will allow you to easily remove audio from video without disrupting your video files.

Follow These Easy Steps

  1. Make sure that both your audio and video files are visible to you.
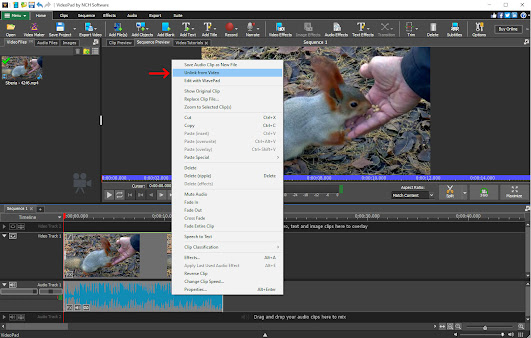
  2. On the timeline: Right click on the audio file that you would like to remove. Then select Unlink from Video.
  3. Remove Audio From Video on VideoPad


  4. Once you have unlinked the audio file from your video, select the audio file you wish to remove. Then hit the delete key.

Continue Editing Your Video

Once you have removed the desired audio file you can then go on to add a new audio file that better aligns with your video. Perhaps one with better quality, or maybe a music file. You can also of course complete your video without any audio at all.

VideoPad Tutorial

If you would like a video tutorial on how to remove audio from video using VideoPad check out our tutorial below. The video tutorial also includes additional ways to remove audio from video.


Friday, April 19, 2019

How to Split Audio with WavePad

How to Split Audio Files


Learning how to split audio tracks is an important skill to have for anybody editing audio and sound files. You may want to split your tracks to rearrange them in an audio or video project or perhaps you want to split them just to trim off the excess in your recording. In either case, WavePad Audio Editing software will allow you to split audio tracks with ease.

Download WavePad here to get started: https://www.nch.com.au/wavepad


Splitting Audio Files in WavePad


How to Split Audio

  1. Add an audio file into the WavePad 
  2. Click the Split button on the Edit toolbar and select an option.
  3. Split at the cursor or Split into component channels will cause the splitting to occur immediately.
  4. Choose another option to open the Split File into Multiple Parts dialog.
  5. Complete the dialog and click Split to split the audio file.
  6. Save or export your project


Thursday, January 3, 2019

The Best Editing Software of 2019

The Best Editing Software of 2019


The new year has begun and so has the search for the best editing software of 2019. We all strive to find the latest and greatest when it comes to editing software and with each new year comes new updates, new features, and new players in the game. With so many great editing software options out there, we decided to put together a selection of the best editing software of 2019. The world of editing software grows more competitive each year and so in order to stand out a program needs to be feature packed, user-friendly, and affordable. The following programs we feel meet and exceed that criteria, making them the best editing software packages of 2019.


Best Audio Editing Software of 2019


WavePad Top Features

  • Easy to use interface with non-destructive audio editing
  • Supports almost all audio & music file formats (mp3, wav, vox, gsm, wma, au, aif, flac, real audio, ogg, aac, m4a, mid, amr, & many more)
  • Edit the audio from video files
  • Batch processing allows you to apply effects and/or convert thousands of files as a single function
  • Audio restoration features including noise reduction & click/pop removal
  • DirectX & VST plugin support gives producers access to thousands of additional tools & effects

WavePad Audio Editing Software

WavePad Audio Editing Software has been a major player in the audio editing software industry for many years. With each new release comes game-changing new features and abilities. WavePad's simple yet professional interface allows for quick learning for beginners with easy access to advanced features for pros. WavePad includes just about every effect and function you could ask for in an audio editor. It is for these reasons that we think that WavePad Audio Editor is the best audio editing software of 2019.

Best Video Editing Software of 2019


VideoPad Top Features

  • Supports all popular video formats seamlessly
  • One of the fastest video stream processors on the market
  • Over 50+ visual effects and transitions to add a professional touch to your movies
  • 3D video editing and 2D to 3D stereoscopic conversion
  • Upload to Facebook, YouTube & Flickr directly from the program
  • Edit 360 videos for YouTube & VR headsets
  • Create visual effects templates to use on any project
  • Create title text animations in seconds with templates

VideoPad Video Editing Software

Last year VideoPad was named the Best Value Video Editing Software of 2018 by TopTenRevews. However, it is not the affordable price alone that will make it the best video editing software of 2019. Some of the most recent updates have brought the program on par with the top video editors in the industry. These include 360 video editing, direct sharing from the program, and the support of almost every major file format. VideoPad's sleek and simple design allows for easy editing and application of transitions and effects while maintaining professional quality and standards. This is why VideoPad is the best video editing software of 2019.

Best Music Mixing Software of 2019


MixPad Top Features

  • Mix an unlimited number of audio, music, sounds, & voice tracks
  • Record single or multiple tracks simultaneously
  • More supported formats than any other mixer
  • Includes a royalty-free sound effect & music library
  • Use sample beats or craft your own using the beat designer
  • VST plugin support for added studio effects and instruments
  • Very low latency, ASIO support for sample accurate recording
  • Export at all popular bit depths up to 32 bits floating point audio
  • Upload directly to SoundCloud, Dropbox, or Google Drive

MixPad Multitrack Recording Software

MixPad Audio Mixer will minimize the time it takes to mix your next project while optimizing audio quality. MixPad provides you access to all of the power of professional recording and mixing equipment through a single platform that streamlines the process and makes mixing a breeze. This program allows you to record instruments and vocals for music production, create mixes and mashups with existing files, or even use midi controllers and the beat designer to create music in the program from scratch. The versatility of this program is what truly makes it the best music mixing software of 2019.

Best Photo Editing Software of 2019


PhotoPad Top Features

  • Millions of effect combinations available through photo effects and filters
  • Supports editing RAW photos directly from your DSLR Camera
  • Non-destructive editing enables you to easily undo, re-order and edit existing effects on the layers list
  • Merge multiple exposures to create stunning HDR photographs
  • Change the aspect ratio of an image without distorting key features using the liquid resize effect
  • Upload edited pictures directly to Twitter, DropBox, Google Drive & Flickr
  • Insert clipart from the included clipart library

PhotoPad Photo Editing Software

Whether you’re a professional photographer or just want to edit your personal photos, PhotoPad is one of the best photo editors on the market today. It has all of the powerful tools and features you need to easily edit digital photos and other pictures. PhotoPad brings both photo editing and graphic design capabilities together with a fast and simple user interface. With this program, you can have all of the bells and whistles of any professional photo editor at a fraction of the cost. This is why we think that PhotoPad Photo Editing software is the best photo editing software of 2019. 

Best Motion Graphics Editor of 2019


Motion Graphics Top Features

  • Free and easy to use
  • Objects can be moved, resized, rotated & more
  • Digital effects, such as brightness, contrast, negative and more may be applied to objects
  • Keyframes can be applied to each object and parameter
  • Create animated text and text bubbles
  • Add audio tracks or record audio
  • Apply effects to audio tracks
  • Group objects for easy editing
  • Add masks to an object
  • Export as video, flash, html5 or an animated GIF

Express Animate Motion Graphics Editor

Express Animate is a free animation program that gives you the ability to animate shapes, text and imported images. You are also able to enhance your movie projects in post-production using key-frame motion animation, masking, dummy objects and more. The program really is completely free without a catch too, which is a rare find these days. This is why we feel like Express Animate is the best animation editor of 2019. 

Friday, November 30, 2018

Introducing Multi-Channel Audio Editing with WavePad

Multi-Channel Audio Editing with WavePad Audio Editor


You have been asking for separate channel audio editing and we have been listening. We are excited to announce that WavePad Audio Editor is now capable of performing sperate edits to individual audio channels in your multi-channel audio files. Not only is the new feature a fun and exciting way to step up your audio editing game, but it is also easy and simple to learn. Being able to edit and make adjustments to the separate channels in a multi-channel audio file is an important task in audio and sound editing. Not all edits are applicable for all channels in a file so being able to edit them individually can help you achieve a higher level of professional sound quality.


Open your Audio File in WavePad

Open your audio file in WavePad Audio Editor by clicking on the Open icon in the main menu and selecting the option that says Open File. This will launch the file finder window where you can choose the file with multiple channels that you wish to edit and bring it into the program. Select your file and then click Open to bring the file into WavePad.

Show Different Channels

Beneath your waveform on the left-hand side, locate the Show Different Channels Separately button. Click on this button to show the separate channels in your multi-channel audio file. Stereo is generally the most common, which will display two channels. At this point, all edits made will still be applied to both channels, but now the separate channels in the track are visible.

Separate Channel Editing

In the same toolbar, you will also find the option to enable separate channel editing. Your first few uses, a bubble tip will point out the Separate Channel Editing button. Click the Separate channel editing button to enable separate channel editing mode. Select the channel you wish to edit by clicking on its waveform and editing it as usual. The active channel will be colored and the inactive waveforms will turn gray. To edit all channels simultaneously, click the Separate Channel Editing button again to disable it.

Editing Audio Channels Separately

Now that you have enabled separate channel editing, you can make typical edits to each channel individually. Select a channel to activate it and then choose from a variety of the audio editing options available in WavePad. You can normalize the audio and adjust the gain of just one channel and then perform different edits on another channel. If you wish to edit only a portion of one channel, simply click on the waveform of the channel you wish and drag the cursor to select only a  portion of it.

Export Multi-Channel Audio Files

Once you are finished editing the separate channels of your audio, you can then export your new audio file however you would like. From the main menu, select File and choose Save File As... to save your multi-channel audio file in a variety of popular formats. You can also burn your file to a disk or upload it directly to the cloud.


For more on audio editing, check out these posts:

Friday, November 2, 2018

How to Mix an Audio File and Change to MP3 format

How to Mix an Audio File and Change to MP3 Format

Mixing audio files is a great way to take the best parts of all of your favorite songs and combine them into one awesome track. With MixPad Audio Mixer, you can mix a variety of audio types together to create mixes and mashups of your very own. After you have made a mix you love, you can change to MP3 format and share it with the world.


Load/Record Tracks

Click on the Load icon underneath the Home tab to add audio clips to your mix. You can add clips from your computer, rip a clip from a disc, or add an empty midi clip to record on a track using a midi controller. Imported clips will be added to the selected track. You can also record your audio tracks directly into MixPad by enabling recording  on the selected track, then clicking on either the record icon underneath the Home tab or on the record button at the bottom of the program.


Arrange your Clips

Use click and drag to rearrange the position of the tracks in your mix. Under the Editing tab, you can choose from a variety of options to cut and trim the clips in your mix. Select a portion of audio in a track to trim, delete, or silence it. Click on any point in an audio clip and choose the Split Clip option to divide it into two separate clips. You can then move the clips around or move them to different tracks in your mix. You can also Merge two separate clips into one clip anywhere you would like within your mix.


Adjust track settings

Adjust the play volume of an entire track using the volume slider in the track controls. You can also adjust the volume at different points in your track by clicking on the red line in the waveform and then dragging the square box that appears up or down to increase or decrease the volume. Click on the envelope icon to choose whether you are adjusting the volume or the pan in your track.


Apply Effects

You can apply live effects to the audio tracks in your mix by selecting a track and then clicking on the FX button to launch the effects window. Layer multiple effects on top of one another and edit and adjust them as you please. Effects will be applied to the audio in the selected track.


Change to MP3 Format

Now that you are finished mixing your audio, you can export your mix and change to MP3 format. Click on the Export Mix button located underneath the Home tab. Use the Browse button to select your output destination, name your file, and set your output file type to MP3. You can also change your file to MP3 directly from the Export Options window by clicking on the dropdown menu and choosing MP3 from the list of output file types. Click Export when you are ready to export your audio mix as an MP3 file.


For more on MixPad and audio editing, check out these tutorial videos:

Friday, October 5, 2018

How to Edit an Audio File and Change it to MP3

How to Edit an Audio File and Change it to MP3


The MP3 audio file format is the most commonly used format for sound today. MP3s are the preferred file type for sending and receiving audio files as well as storing them on discs and devices. Learning how to change an audio file to MP3 will provide you with virtually unlimited sharing and storing possibilities for your music and audio files. With a simple audio editing software such as WavePad Audio Editing Software you can easily learn how to edit audio files and save audio as MP3.


Import Audio

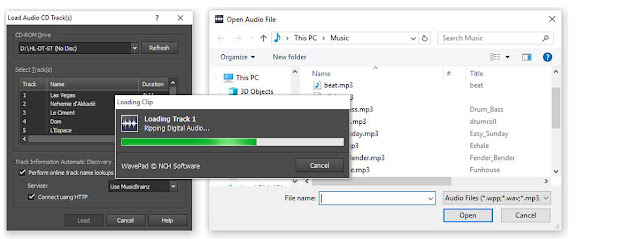
To begin editing audio files to export as MP3, you will first have to import those files into WavePad. You can add files to a WavePad project directly from a disc, from your computer or external drive, from the NCH Sound Library or you can record audio directly into the program.
 

Edit Audio

Before changing audio to MP3, you may first want to edit your music or sound file. Click on the Edit tab in the main toolbar to view the options for editing your audio files in WavePad. From here you can perform basic audio editing such as splitting and trimming clips, removing silences, mixing audio files, and performing general audio file cleanup.


Adjust Audio Levels

Adjusting audio levels is something both seasoned music producers and beginners alike can quickly accomplish in WavePad. Adjusting audio levels will allow you to clean up and improve the sound quality of audio files. Click on the Levels tab in the main tool bar to view the different options for adjusting audio levels. Use the Noise Reduction feature to eliminate any unwanted background noise in your audio. You can also use the Amplify function to increase the sound volume or the Normalize function to further optimize the overall sound quality.


Apply Effects

WavePad comes loaded with a variety of exciting and useful audio editing effects that you can use on your files. Choose from a list of classic effects such as Reverb, Chorus, and Echo or experiment with the many other effects available such as the Voice Changer. WavePad even allows you to combine and layer effects over each other to in order to create your own unique and original sound effect.


Use Tools

Make use of the many tools available in WavePad while you learn how to edit audio files and save them as MP3. Use the Surround Sound Editor to edit and apply a surround sound effect to your audio for playback with a surround sound system. The Batch Converter Tool allows you to add multiple files for editing and converting all at once within your project. You can access the NCH Sound Library from the Tools tab and access a library of free sound effects and audio samples to use in your audio editing project.


Save as MP3

Now that you have successfully learned how to edit an audio file with WavePad, you are ready to learn how to change audio files to MP3. Click on the Home tab in the main toolbar and then click on the drop down arrow next to the Save button. Here you can select the option that says Save File As... to launch the file finder window. Select your preferred output destination and name the file what you would like. Then click on the drop down menu that says Save as File Type and choose the option MPEG Layer-3. This is just a longer way of saying "MP3." Once you click Save, your newly edited audio file will appear as an MP3 in your chosen output folder.


For more on audio editing, checkout these posts: 

Friday, July 27, 2018

Change Audio to MP3 Format with Switch

How to Change to MP3 format


The MP3 format is one of the most common audio file formats in the world today. MP3 files are widely used for saving and sharing digital audio files because of their compression size and ability to maintain the high quality of their original format. This makes the MP3 file type great for storing and emailing because download speeds are quick and the files don't occupy much space. You may have found yourself in possession of audio files on your computer or on a disc that is in a different format that you would like to change to MP3. With a simple file conversion software such as Switch Audio File Converter Software, you can quickly learn how to change to Mp3 format in a matter of seconds.


Import Files into Switch

The first step to learning how to change to MP3 format is to open your copy of Switch and add/import the files that you would like to convert. Switch allows you to import individual audio files, video files, entire folders, or even import them from a DVD or audio CD. Click on the green Add Files button at the top of the program to begin adding your files. Once you have selected the files you wish to convert, click Open. You can also drag and drop files from your File Browser window directly into Switch.
How to change to Mp3 Format
Import files to convert to mp3 

Set Output Destination

Next, decide where you would like your new files to go once you have converted them. This is where your files will be located after they are changed to MP3 format. Use the drop-down menu or the Browse button at the bottom of the program to set your output folder. You can click on the Open Output Folder button to view the selected output folder and its contents. You can also check the box next to it to save your files to the same folder as the source files. This option will output your converted MP3 files right next to their original versions.
How to set output destination for changing to mp3 format
Set output destination 

Set Output Format

Switch is capable of converting to just about any audio file format you can think of. However, you are here because you want to know how to change to MP3 format, specifically. Click on the Output Format menu at the bottom of the program to open the drop-down menu. Select .mp3 as your output format. This will be applied to any and all files that you select.
How to change output format of audio files to mp3
Set output format 

Output Options

Click on the Options tab next to the Output Format menu to open the Options window. Here you can adjust some of the more advanced options such as the Bitrate and Channel Mode. You can also adjust the metadata that will be attached to your newly converted MP3 files. For more information on adjusting audio file meta tags, check out this blog post:
How to Edit MP3 Tags and Metadata with Switch Audio Converter
How to edit mp3 meta descriptions and mp3 meta data
Edit MP3 metadata 

Convert to MP3

Now that we have chosen our files and set the output format and destination, we are ready to convert our files to MP3. If you imported an entire folder or files from a disc and you only want to change some of them to MP3, simply go through and select those files. Otherwise, with all of your files selected, click on the Convert button at the bottom right of the program. The conversion will be performed and your new MP3 files can now be found in your chosen output folder.
How to convert files to mp3 with Switch
Conversion complete


For more on Switch, check out some of our other posts:

Friday, June 1, 2018

Best Tool to Edit MP3 Tags and Metadata with Switch Audio Converter

Edit MP3 Metadata with Switch Audio Converter


Best Tool to Edit Metadata and Tags when Converting to MP3

When converting a track to MP3, you can edit the track metadata and tags to include title, artist, track artwork, producer, rating, genre, comments, and more. If you record your own music, you may want to set up metadata and tags for your finished recordings before sharing. Editing your tags and metadata will ensure that your album artwork, artist name, and other tags show up correctly when your track is loaded into a new audio library. You can easily edit the metadata of MP3 and tags for audio files when converting with Switch Audio Converter.


Edit MP3 Tags

To edit the tags of an audio file, begin by loading the file into Switch Audio Converter. To import an audio file, click on the "Add Files" button in the top left-hand corner of the program window.


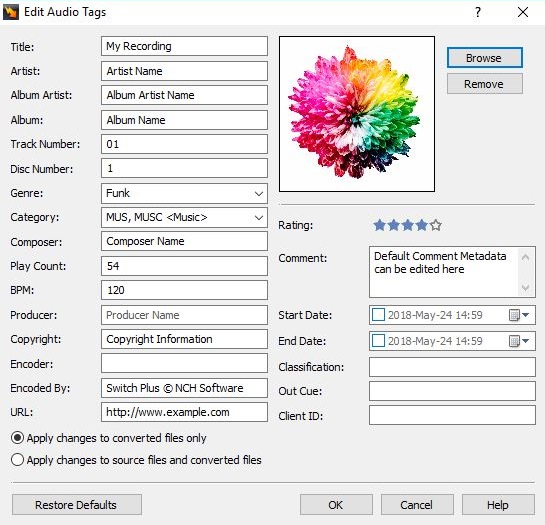
After you have imported an audio file, you can right-click on the file in Switch and select "Edit Audio Tags" to edit the audio tags.


This will open the Tag Editor for the selected audio file. Here, you can edit the audio track title, artist, album, genre, BPM, producer, rating, artwork, and more. For new recordings, many fields will be blank. If the audio file that you are converting currently has audio tags, the existing tags will be displayed in the Tag Editor.


To edit a tag, click on the field that you would like to edit and type in the new tag information that you would like to save for your mp3 file. You can edit the song Rating by clicking on the star value that you would like to assign to the audio file.


Add Artwork to an MP3 File

To add the artwork to an MP3 file, click on the "Browse" button the right of the artwork image in the Tag Editor. Then, select a file from your computer to use as the artwork for your audio file. 

Apply Changes

You can apply changes to converted files only, or you can apply changes to source files and converted files. To apply tag edits to converted files only, select the option that says "Apply changes to converted files only". This option will leave the file tags for the source file in their original state while applying the tag edits to only converted files.


 To apply tag changes to the original source file as well as converted files, select the option that says "Apply changes to source files and converted files".


Convert to MP3 with New Tags

To convert your file to MP3 with the edited tags, click on the "Convert" button in the bottom right-hand corner of the Switch program window.


Monday, January 30, 2017

Navigate Speech in WavePad

Navigate Speech in WavePad


Using the Navigate Speech Tool in WavePad

The Navigate Speech tool in WavePad Audio Editor will allow you to locate sections of audio quickly and easily. Using speech recognition, WavePad can generate a script of words spoken in an audio file and can navigate directly to the moment when a specific word was spoken in an audio file. This can be very useful in many different situations. For example, you can use the Navigate Speech tool to locate and navigate to a specific section in a large audio recording, such as a company meeting, college lecture recording, or audio file for transcription.

Using the Navigate Speech Tool

To begin, load your audio file into WavePad. You can do this by selecting "Open File" from the File menu, or by using the key command "Ctrl+O"


Once your audio file has been opened in WavePad, click on the Tools menu in the top bar menu, and Select "Navigate Speech" from the list of tools.


When you click on the Navigate Speech tool, WavePad will begin using speech recognition to generate an output of the words spoken in your audio file. Once your audio file script has been generated, you can use the file to navigate easily throughout the recording.

Search for a Keyword

To search for a specific word in your audio file, simply type the keyword into the box at the bottom of the Navigate Speech window, and click on the "Search" button to locate all instances of a specific word in the text file.


Locate a Specific Word in the Audio File

You can use the generated text to navigate to any point in your audio file. To navigate instantly to the point in your audio file when a specific word is spoken, simply double click on the word that you would like to navigate to.

Highlight a Region in the Audio File

You can also use the Navigate Speech tool to highlight a region of your audio file. To do this, highlight words or paragraphs in the generated text and the region will become selected in your audio file waveform. This can be useful when trimming audio files, or for breaking out specific sections in a larger audio file.


You may also like: