Showing posts with label video transfer. Show all posts

Sunday, February 21, 2021

Looking to Transfer Videos from a Camcorder to a Computer?


Looking to Transfer Videos from a Camcorder to a Computer? Use VideoPad.

Have you come across an old camcorder? There’s a good chance you have used it to capture exciting moments and memories from the past that you would like to treasure for a lifetime. To make sure you preserve it, the best approach is to convert camcorder tapes to digital by transferring the videos from the camcorder to a computer. Download VideoPad Video Editor for free and follow the below tutorial to record and transfer videos from your camcorder. 


Learn How to Transfer Videos From Camcorder to Computer


  1. Plug your camcorder into your computer and turn the camera on in Play mode. 

  2. In VideoPad, navigate to the home toolbar and click the Record button and select Record Video to open the Capture Video dialog.

  3. Select your camcorder, add a filename and where you would like your video to be saved. Click the Capture button to begin recording your video from the camcorder. 

  4. When you have finished recording, click Stop and close the dialog. Your video will also appear in the VideoPad interface if you’d like to further edit the video.    


Watch the below video tutorial for more information and tips. For more VideoPad tutorials, click here


Friday, August 10, 2018

Transfer Video to PC Easily in a Couple of Steps with VideoPad

How to Transfer Video to PC


Everybody loves taking videos these days. We like to film our lives and the things around us so that we can re-visit the memories time and time again. Watching these videos on your camera is great, but transferring videos to a PC allows you to do a lot more with them. Learning how to transfer video to PC will let you save your videos in a secure location, play them back on a much larger screen, edit them to make movies, and share them with whomever you would like. With a simple video editing software such as VideoPad Video Editing Software, you can edit and transfer video to PC with ease.


Transferring Video to PC from SD Card or Other External Device

Import Video Files into VideoPad 
Select Video Files to Transfer to PC
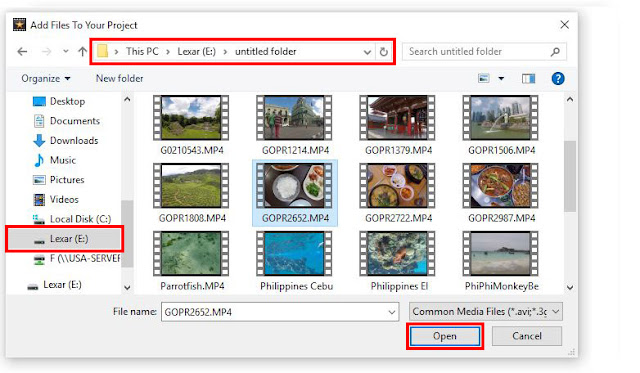
Open your copy of VideoPad Video Editing Software and select New Project. From there, click on the Add Files tab to open your computer's file browser. You can also go to the main menu in the program and select File > Add File(s) or simply use the keyboard command Ctrl + M to open the file finder window. Once this window is open, you can select your SD Card or another external device from where you would like to import your videos. Select the videos you would like to transfer to your PC and then click Open to bring them into VideoPad.

Edit Your Video Clip(s)

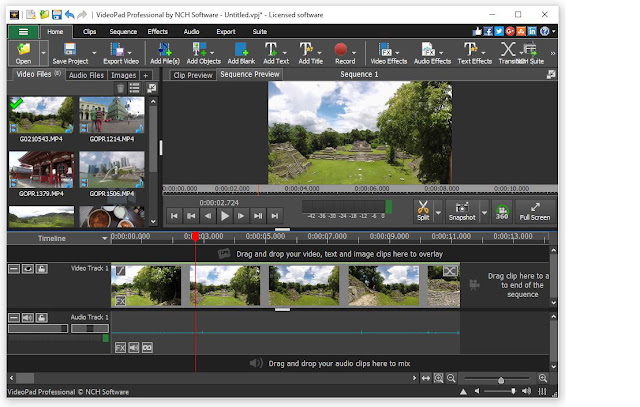
With your clips imported into VideoPad, you can now make any edits or adjustments you would like before transferring your videos to your PC. Apply effects, add text and transitions, and crop and trim your video clips so that your captured moments are action-packed and exciting. Drag your clip into the timeline to make any edits you would like and then move on to the next step.

Edit Your Video Clips 

Transfer Video to PC

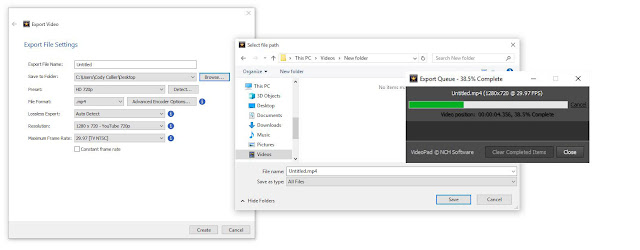
When you are finished editing your clip, you are now ready to learn how to transfer video to PC. With your clip or clips in your timeline, go to the main menu and select File > Export video... You can also use the keyboard command Ctrl + B. This will launch the export video window and you can select the destination where you would like to transfer video to your PC. Use the Browse button to find a folder and then click Create to start the export. This will transfer whatever clip or clips you have in your timeline to your PC.
Transfer Video to PC


For more on VideoPad and video editing, check out these posts:


Friday, July 15, 2016

Convert Videos of Family Moments from Phone or Tablet Device


Tablets and mobile devices have made it incredibly easy to capture videos and pictures of daily life. Precious moments can now be easily recorded without the hassle of developing; but what about transferring or sending these videos to others? With the addition of Prism, all will have the ability to easily convert media into physical or digital copies.

Follow These Easy Steps

Step 1: Transfer the videos from the mobile device to a local computer. This can be done with either a USB Connection, Email, or File Sharing Service.

Step 2: Download the free version of NCH Prism for non-commercial use. After the download is complete, click "Add Files," this will bring up the files of the computer. Select each video that is to be converted; Prism can convert multiple videos at once.


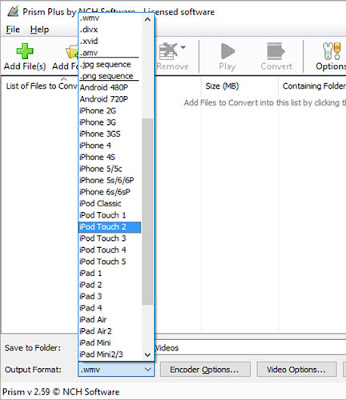
Step 3: With all the videos uploaded, select which format is most suitable. Prism provides conversions for avi, mpg, vob, asf, wmv, and mp4 video formats from digital and physical platforms. The videos can be matched to several mobile devices, tablets, gaming systems and mp4 players.


Step 4: Before finishing the conversion process, feel free to add any video effects and previewing before finalizing. Adjust colors, screen size, resolution, add captions or watermarks, bring more creativity to the videos with these easy edits.
Step 5: After choosing the videos, making the appropriate edits, selecting the output format and previewing the video for assurance. Finalize the conversion process to either a digital file or DVD. This ability to transfer and compress digital files makes it easier to send media to others through emails, phone messages or post on social media. There is even an option through Prism to directly share these new converted files directly onto social media.

Want to create a home movie? Place a blank disk into the computer, select it before the conversion by clicking, "Browse." Then select the blank disc for the targeted conversion.


Prism is available online and the Apple Store.