If you were one the millions of people who tuned in to watch the Super Bowl this past year, there’s a good chance you saw the Google ad, “Parisian Love”. If you haven’t, well, now’s your chance…

The simple concept set it apart from other Super Bowl ads, making it one of the more memorable commercials to play that night. Equally simple is the execution – with the right tools, anyone can make a similar ad. Here’s how:
Video Recording Your Google Search
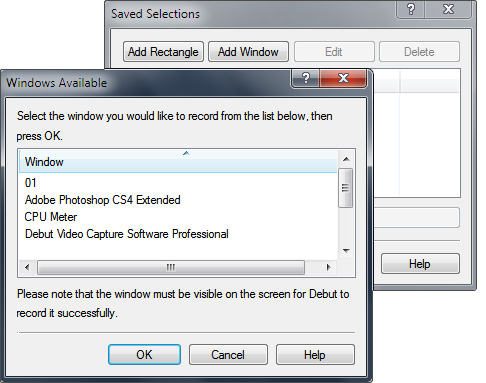
The first thing you need is Debut for video screen recording. Once Debut is installed, click the aptly named “Screen” icon in the toolbar, and you’ll notice the stage on the program switches over to a mirror image of your computer screen. You’ll also notice a variety of options along the bottom, which let you choose which file type you want to save your video as, the size in which to capture, as well as the option to add video effects, adjust the color, cropping options and more. These options may come in handy later, but for now we can ignore them. Now that we have our screen capture software ready, open your web browser and head over to www.google.com, and make sure to maximize your browser window. Now, head back into Debut and click the “Selections” icon in the toolbar to specify the portion of your screen to be recorded. Click the “Add Window” button at the top and select the Google browser window from the list of options. (Note: Make sure the browser window is visible on the screen or Debut won’t record it). Once we’ve squared that away, head into “Options” (in the toolbar) and on the “Devices” tab, click the box that disables recording the Debut window (eliminating the hall of mirrors effect). After that, click on the “Output” tab to choose where these recordings are going to be saved. You may want to make a dummy recording just to make sure things are functioning properly. Now you’re ready to record!
Back on the stage and with our browser window open, hit record, head back into the browser and start searching! Take your time; we’ll cut out any unnecessary parts later. The process of searching through Google may take awhile. Just keep at it with the end result in mind… All done? If so, head back into Debut and hit the stop button. This will (obviously) stop our recording.
With that out of the way, let’s head to our output folder and view our recorded movie. Watching this, you may be wondering how we’re going to separate the parts we need from the parts we don’t. To achieve the end result we want, we’re going to have to incorporate some light video editing. Enter VideoPad. Even if you’ve never edited video before, there’s no need to be scared - VideoPad is very user-friendly and is designed with the beginner in mind.
Cutting Your Recorded Video Down to Size
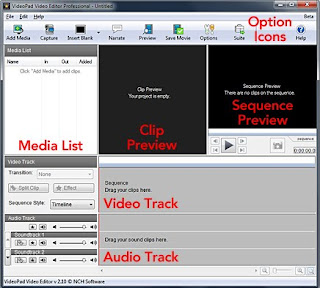
With VideoPad installed and opened, the first thing we’re going to do is import our recording by clicking the “Add Media” icon in the toolbar and navigating to where the file is saved. Click “Open” to import the footage and you’ll see that the file now appears in your Media List. Click on the file, and it will immediately appear in the Clip window (the bigger of the two windows on the left). This window acts as a preview window – here you can set in/out points, view the timeline and save files. For now, let’s select the footage from the Media List and drag it onto the first empty area under the windows; this is the Video Track timeline and is where we’ll be doing our editing to remove any unwanted sections. You should now see a thumbnail preview of your video in the timeline. Underneath the video, you’ll see audio waveforms in the Audio Track section. When you import any video media that has audio attached, they’ll be linked (meaning you can’t edit them separately) until you tell the program otherwise. You can do this by right-clicking on the waveform and selecting “Unlink Sound Clip(s)”. Now that the audio is separated, select just the audio and hit “Delete,” removing the audio from the video. Don’t worry; we’ll be replacing it with our own audio later.
We now have one long video track that needs to be cut down to size. Before we begin cutting, it’s important that we familiarize ourselves with the timeline marker. You’ll notice when you move the timeline marker, a preview of the final product appears in the right window (the Sequence Window). This is an important reference tool in which we can use to make smarter, more accurate editing decisions.
We’re going to again reference the Google ad to get a feel for what we want to keep. This way, we can start trimming the video down to size. Drag the marker to the beginning of an area that we want to omit and click “Split Clip,” located to the left of the Video Track. Now, navigate the marker to the end of the undesired area and click “Split Clip” again. Our timeline will now be segmented into three. Select the undesired clip section, and hit “Delete” to remove it. Congratulations, you have just made your very first cut and are well on your way to recreating the Google ad! This might be a good time to save your project, which you should keep doing periodically from here on out. It’d be a shame to lose all that hard work…
After making a few more cuts, hopefully you’re getting close to the look of the Google ad. When you’re done trimming the fat and are happy with your final product, the last step is adding the audio. It works very much the same as adding video. Click on the “Add Media” button once more and select a piece of music; click “Open” and the audio will be added to your Media List. Select it and, similar to the video track, drag it to the empty area in Audio Track section labeled “Soundtrack 1.” Waveforms will now be visible on the timeline, just as before. If need be, you can also move and cut the track at your leisure in the same way we cut the video. Now when you preview the final product in the Sequence Window, you’ll have audio too. Horray for progress!
Save and Share your Masterpiece
Now that your masterpiece is done, the last step is to save the movie; Click ”Save Movie” in the toolbar, and an output window will appear. From here, you can export for DVD, YouTube, portable media, etc. Select your desired format using the tabs at the top and the drop-down menus below them and click “OK” to begin the export process. It may take several minutes depending on the format and length, but once completed, your video will be ready to share with the world! Pat yourself on the back!Congratulations, you’ve now successfully (re)made Parisian Love!


thanks for the great info
ReplyDeleteBharath Technologies