Showing posts with label tutorials. Show all posts

Tuesday, January 19, 2016

How to Create Flowcharts to Improve Business Meetings

Make Your Meetings/Discussions More Effective by Using Flow Chart Diagrams

Using ClickCharts for Business by NCH Software

Meshing business processes with the nature of human interaction is an inherently difficult process and is a daunting task for any growing business. Meetings where nothing gets done or no resolution/actionable items result in the bane of owners, team leaders, and HR departments everywhere.

Taking the time to map out how those meetings should occur and how to refine the ideas that come from them into solutions will reduce frustrations and increase productivity; this is where flowchart software can help your business.

Here is an example of how a group works to create action points below:


First, let's go over the three types of shapes in this example and what they mean:

Rounded Rectangle = Start/Stop block
The only rounded rectangle in this example is at the top (Discussion) where we start with a discussion about how to handle a specific business goal or problem.

Rectangle = Action/Process
Rectangles represent a specific action or a part of the overall process - the (Proposal) rectangle immediately following the (Discussion) rounded rectangle means that after the initial discussion, the action of making a proposal is taken.

Diamond/Rhombus = Decision
Diamonds indicate that a choice must be made - the lines coming out of a diamond block represent the various decisions that can be made. The one diamond block in the chart (Test for Consensus) means that once a proposal is made, the group must decide if they agree or not.

Of course, there are many different symbols for different purposes, but these will do for now. For information on other standard shapes, visit the Wikipedia page here:
https://en.wikipedia.org/wiki/Flowchart#Common_Shapes

Now, let's review the potential paths the chart shows once the decision (Test for Consensus) is made

Decision (Test for Consensus)
  1. If Yes, then action (Consensus Achieved), then end (Action Points)
  2. If No, then action (Concerns Raised), one of 4 actions are taken after. Repeat the process until reaching an end block.
    1. Go back to start (Discussion)
    2. Action (Modification of Proposal), then back to the decision (Test for Consensus)
    3. Action (Stand Aside), then action (Consensus Achieved), then end (Action Points).
    4. End (Block).
You can use the chart above as a base for your own processor to start from scratch!

Things to consider when creating your own flowchart.
  • These are guidelines, not set rules. Remember, these are people, not computers.
  • Make it right for your business and the team. The flowchart should address if individual members have subprocesses or if non-team members/environmental factors have an influence.
  • Use the diagramming process to identify bottlenecks in the company - inevitably, as one thinks about the process as a whole and mentally maps everything out, the realization that there are points in the process that have been neglected will become apparent. Taking the time to chart these things may allow your company to undergo changes for the better.

To start making your own flowcharts, try ClickCharts, our simple but dynamic flowchart, mapping, and diagramming software program.


Wednesday, August 21, 2013

Create Your Own Webcast

Have you ever wanted to make your own live TV show? More and more people watch their shows online, so you can join the trend and broadcast your own low budget show online with the help of video stream software. Whether you are editing your programming first, or streaming live, you can share your webcasts straight from your PC with BroadCam Streaming Video Server.

share and stream your own video webcasts With Broadcam installed you can set up either a live input or select your finished videos under settings, which is the easy part. What is a little more technical is setting up your computer's connection to the outside world so that viewers can access the video, but don't let that scare you away. To help guide you we have a BroadCam video tutorial available with includes instructions for configuring your router and firewalls for internet video streaming and more. For most people this will cover everything you need, but there is also a more detailed series on making your computer accessible from the public internet with information on port forwarding to allow connections to your computer for streaming and more.

Once you have the routing taken care of you can click "Connect" on main interface and a web page will open with the links you can then use to post your video streams on your website. Then all that is left for you to do is get some friends to test the connection from another location and start streaming.

Monday, April 8, 2013

WavePad Audio Editing Tips & Tricks

WavePad Audio Editing Software Tips and Tricks
Below you will find a compilation of some of the audio effects and sound editing basics for the WavePad audio editor that you will want to know and test out for yourself as you delve into the world of audio editing. Another great way for those new to audio editing to get started is by watching the WavePad sound editor intro video tutorials so you can see the audio editor in action.

Split and Cut Audio Files
You can split a file at any point you choose by simply clicking the Split button on the Edit tab. This will create two audio files split at the point you had the cursor. Be careful when you use this function, the action cannot be undone. Additional audio splitting options include splitting at bookmarks, splitting at silences and similar Trim options that delete sections instead of creating new audio files.

Amplify Audio Volume
To make the audio sound louder, instead of simply turning the volume control up you want to amplify the file. You will find Amplify on the Effects tab, which will open a window where you can either adjust the amplification using the slider or by selecting a preset level from the drop-down menu. Selecting 200% will double the volume, 50% will cut the volume in half.

Equalize Audio
Amplifying affects the full spectrum of the audio in a file, but if you want to increase or decrease certain frequencies, for example, boosting all of the lower bass frequencies, then you want to use the Equalizer. The Equalizer is also on the Effects tab and opens a graph of the frequencies going from low to high frequencies as you move left to right. This gives you very finite control of the frequency ranges you want to control. Moving a point up will make the frequency stronger and moving a point down will make it weaker.

Normalize Audio
Normalizing an audio file is similar to amplifying, except that normalizing increases the sound of the loudest peak to the maximum level without causing clipping in digital audio. This is frequently used as the last step before saving a final version of an edited song or recording. To normalize an audio file, you will find Normalize on the Effects tab.

Fade In and Out of Audio
Fading in and out of an audio file will help acclimate the ear to the background noise of a file. To fade in, select a region at the beginning of your file, then select "Fade in" under Fade on the Effects tab. Similarly, you can select "Fade out" with a region at the end of your file selected. A good tip is to fade in quicker than you fade out because the ear expects to hear the initial audio quickly, but abrupt transitions to silence at the end can be jilting.

Remove Background Noise
Since not every audio recording is made in a sound studio environment, you often get unwanted background noise in recordings. To remove background noise you want to take advantage of the Cleanup options on the Effects tab. Specifically, under Noise Reduction try using Audio Spectral Subtraction and then Multi-band noise gating. If the presets don't give the results you want, try using lower levels on these reductions until you find a combination that leaves only audio you want to keep.

Remove Vocals
You will find an option to Reduce Vocals under the Voice button on the Effects tab. This will open a dialog box that allows you to change the pan position and width, the vocal level, and preserve the bass. Generally, the default settings will work the best, but different songs may require different settings to effectively reduce or eliminate the vocal frequencies, so if you don't get the results you want, try adjust these settings until you are satisfied with the result.

Layer Audio & Voiceovers
WavePad won't allow you to record directly over another file; highlighting a file and clicking record will replace the selection. Depending on how much mixing you want to do, you may want to consider moving to MixPad audio mixing software, but for some basic audio mixing within WavePad, you want to use the Paste Mix feature. Copy the audio you want to add to your file to the clipboard, then select all in the file you want to add it to, then select Paste Mix on the Edit tab. This will open a window with options on what to do if your files are not the same length. When you click OK the two pieces of audio will be combined.

Sound Effect Library
Find audio clips and sound effects to add to your audio projects in the NCH Sound Effect Library. Open the Sound Library from the Tools tab. This opens a new window where you can preview and download sound effects and royalty-free music clips.

Audio Effect Plugins
In the Windows version of WavePad, you can add DirectX and VST plugin effects to further expand your audio editing capabilities. Find the options to add and use VST and DirectX plugins on the Effects Tab. VST Plugins will open their own interface where you can adjust the settings, while you will need to go into the settings when selecting a DirectX plugin for the effect to be applied when you click OK. Get started with this list of free VST plugins you can download and use with WavePad.

FFT Sound Analysis
All of the audio editing features outlined above are all easy to put into action, but don't let that fool you into thinking that WavePad doesn't have a lot of power under the hood. One of the more advanced areas you can explore is the powerful audio analysis tools for examining the spectral content of the audio. Learn about the FFT and TFFT audio analysis graphs and what they represent to start to get your feet wet. These tools can be used in many fields, including linguistics and mathematics, in addition to sound engineering.


If you have any other tips, favorite features, or advice of your own, please comment and share them below.

Wednesday, February 6, 2013

Boosting the Bass in Audio Files

Boosting Bass in Songs and Music Files with the WavePad Equalizer Want to boost up the bass in your music? The Equalizer in WavePad music editing software is your answer. Open your song in WavePad and select Equalize on the Effects tab. Equalizing allows you to adjust the level of frequencies in your audio amplifying ranges of sound frequencies. So you can change the volume of just the higher or lower (bass) frequencies in a song, as opposed to simply amplifying a song which will affect all of the frequencies.

Unlike a graphic equalizer you might see in a studio, with a multitude of knobs and dials for certain frequencies, the WavePad equalizer displays a graph of the frequencies going from the low frequencies at the left to the high frequencies on the right giving you very finite control of the frequency ranges you want to control. Move a point up on the graph to make the frequency stronger and lower a point to make it weaker.

To familiarize yourself with the equalizer take advantage of the presets to get started, but don't be afraid to play around with them and to adjust their settings to see how they affect your songs. To boost the bass start with the Low Pass filter presets. If you hit play you will hear the higher frequencies drop down, giving a boosted effect to the bass. Chances are the result won't be exactly what you wanted on the first shot, but this will provide a good starting place to make further adjustments. Changes aren't applied until you actually click Apply, so you can continue to tweak the graph as needed without fear.

Other preset filters include a High Pass Filter which is the opposite of the Low Pass Filter lowering the bass instead of the higher frequencies, a Band Pass Filter to maintain the frequencies in a specified range and lower the regions above and below that section, and several more that you can experiment with on your own, or go to the help for more details on the settings of each of these presets.

Try WavePad sound editor today to boost your bass and pump up the volume of your music.

Saturday, February 2, 2013

Make "Picture-in-Picture" Videos with VideoPad

Create picture in picture video with videopad for pip video editing The picture-in-picture (PIP) effect is commonly used in videos where more than one set of images is shown simultaneously in order to tell a story or convey additional information. Picture-in-picture is frequently used as part of news clips and in instructional videos.

The PIP effect can easily be achieved using VideoPad Video Editor software (version 3.0) by adding the video clip you want to overlay as your picture-in-picture onto the timeline so that it is positioned above the video you want to serve as the background in your video.

With this clip selected in the timeline, click on the "Effects" button then choose "Motion" from the drop-down menu at the top of the dialog box. Use the "Scale," "Position X" and "Position Y" controls to adjust the size and placement of your clip. You will be able to see the position and size change in the preview window on the right side of the Effects dialog box.

When everything is positioned the way you want it simply close the dialog box to apply your changes. Then, when you preview your movie, you will see your re-sized and re-positioned video clip overlaid on top of the larger clip.

Creating a picture-in-picture video in VideoPad is that easy. Use the same process to position images on the screen, making it an easy way for businesses to add their logo to videos.

Tuesday, December 18, 2012

Speed Up Typing Using Keyboard Shortcut Software

FastFox text expander software used to insert your most commonly used text quickly and easily. Expand words, phrases, images, and more to avoid typing things repeatedly and improve your typing speed and productivity.

FastFox is perfect for everyone whether you are saving shortcuts for the correct spelling of complex terminology, storing email templates and answers to FAQs, or even save your address to fill in online forms more quickly. To help you get started we just put together a tutorial video to walk you through setting up your own keyboard shortcuts and introduce you to the autocomplete text suggestion tool.


Download the free trial today. Once you get started using FastFox shorthand text expander to speed up your typing, you'll wonder what you ever did without it.

Wednesday, September 12, 2012

Screencasting For Better Communication & Teaching

Guest post by Eric Karkovack

Sometimes, your job title doesn't always necessarily explain the full extent of what you do. Personally, I'm a freelance web designer (and have been since 1996). But a great portion of my job is about doing things that have very little to do with design itself.

For example, one role I often find myself taking on is that of a teacher. Whenever I create a website that my clients will update themselves, I have to teach them how the process works. Sometimes it can be difficult to get my point across. It's especially hard when clients don't have much experience with technology.

For awhile, I offered manuals to my clients to use as a reference material. While that helped, it certainly wasn't as interactive as their website's content management system. I felt that I really had to find a better way of communicating.

Create screencast tutorials with Debut video capture software The idea of "screencasting," or recording my screen with a voice-over, came to me. If my clients can see what I'm doing on my screen and can hear my explanations of how to accomplish specific tasks, it could be of great benefit to all of us.

When I found Debut Video Capture Software, I was sold. It works exactly as advertised, it's affordable and easy to customize to my needs.

Probably my favorite part of Debut is that I can simply plug in my headset microphone, open up the software and start recording. That's really all there is to it. Within a half hour, I've created a few short tutorials that will help my clients. I've saved a ton of travel time and my client has an interactive reference that illustrates exactly how to update their website. It's hard to put a price on that kind of convenience.

Eric Karkovack is a freelance web designer with well over a decade of experience. He designs and maintains websites for clients in a wide range of industries. For more information, visit him on the web at www.karks.com

Wednesday, September 5, 2012

Q is for Quick

NCH Software ABCs Series

Q is for Quick SoftwareIf you are looking for a fast solution you have come to the right place. Just like our efforts to provide you with easy-to-use software, we are constantly striving to improve our programs so that they can get you up and running quickly. From speedy downloads, fast installations, quick start guides and wizards a lot of thought goes into getting you as close to the solution you were looking for in three minutes. For example, you can download any of our file converters and go from download to converted in minutes, if not seconds, because who has time to waste learning a program when what you really want is a file in a different format?

If you are not just looking for a fast solution but something that will speed up other day to day tasks we have a few programs that fit that bill as well. Take FastFox Text Expander Software, which allows you to set up your own shortcuts and macros to help you zip through typing or repeated tasks on your computer. Or any transcriptionist can tell you how much time they can save by using Express Scribe Transcription Playback Software when typing from an audio file, and that is just scratching the surface. For more Quick Software solutions be sure to check out the entire NCH Software collection.

<<< Previous: P is for PDFNext: R is for Recording >>>

Monday, June 25, 2012

Remove Background Noise from Audio with WavePad

If you have ever made an audio recording where there are a lot of things going on, like recording an interview at coffee shop, or meetings and lectures with lots of people in the room, you are probably quite familiar with the unwanted background noise that will be a part of your audio when you go back to listen. Sometimes just having a lower quality microphone will add to this background noise, even when you are in relatively quiet surroundings. But the good news is that WavePad audio editor provides an easy way to remove this unwanted noise so you don't need to move all your recording into a studio to get a crisp sounding file. removing background noise and cleaning up audio files is easier than you might think.

To remove background noise, load your audio file into WavePad.
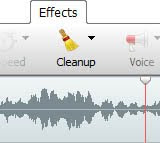
  1. On the Effects tab, click the Cleanup button and select Noise Reduction, Audio Spectral Subtraction. Click the preset drop-menu and select voice or music, then click OK to apply.
  2. Then again from the Effects tab, click the Cleanup button and select Noise Reduction, Multi-band noise gating. Select a preset, then click OK to apply.
Remove Background Noise from Audio Recordings with WavePad

If the presets aren't giving you the best results, try using lower levels on each type of reduction until you find a combination that leaves you with just the audio that you want to hear. Download WavePad audio editing software today to try the noise reduction feature for yourself.

Tuesday, April 3, 2012

2 Easy Ways to Rotate Video

how to rotate a videoNeed to rotate a video? Whether you recorded video on your phone in the wrong orientation or are you want to rotate a video solely for effect, NCH Software has two easy ways for you to rotate your video clips.

If rotating is the only thing you want to do to your video, or if you want to rotate a bunch of videos all at once, then Prism Video Converter is the way to go. Not only can Prism convert video formats, it can also be used to rotate videos. To rotate a video you have loaded into Prism, click the Effects button at the bottom of the window, and set the rotation from the Rotate tab. To Rotate multiple videos the same direction just select them all before opening the Effects effects to save the time of setting the rotation to each clip individually.

If you will be doing more video editing with your rotated video clip, then you might want to rotate your video directly in VideoPad Video Editor instead of using Prism. To rotate in VideoPad, select the video clip on the timeline then choose Rotate on the Effects tab, where you can once again use the arrows to rotate the video clip to the right or left, and notice that the preview will change to display the new orientation of your video clip. Tip: You may need to combine the rotate effect with the crop effect to maintain the aspect ratio of your video without the addition of black bands to the sides of your now rotated video clip.

Wednesday, January 4, 2012

2011 Top Software Posts Roundup

Like so many others, I find the new year a time of reflection both personally and professionally. Last year at this time I took a look at the posts that were getting the most attention on our blog to try to learn more about what our customers and readers are most interested in. With 2012 upon us, here I am again looking at the top posts of 2011:
top software articles
  1. VideoPad Video Editing Tips and Tricks
  2. Changing Video Speed with VideoPad
  3. Adding Text to Your Videos
  4. Video Stabilization
  5. WavePad Audio Editor New for the iPad
  6. Practice Transcription Audio Files
  7. Best Slideshow Software: PhotoStage
  8. Record Audio Playing Through Your Speakers
  9. The WavePad iPhone Audio Editor App
  10. Make Your Music Mash Ups with MixPad
  11. Add Subtitles to Your Videos
  12. NCH Mobile Applications Updates
  13. Transitions and Upgrades to VideoPad
  14. Best Mac Audio Editing Software
  15. New Mac Point of Sales Software
  16. Record Your Own Audio Book
  17. Mac Inventory Management Software
  18. Why Web Designers Don't Need Dreamweaver
  19. VoIP Phone Systems for the Home Office
  20. Express Scribe Transcription Using Voice Recognition
So what can I glean from this list? Not only is there still interest in Mac versions of our applications, of which we have added several additions to this year (and more already in the works), there is a large interest in how to take advantage of the more advanced features in our VideoPad video editor. as well as other how-to instructions. I'm pleased to report that we are expecting a significant new release of VideoPad this year that will have a new interface designed to add more advanced features to our easy to use video editing software. That is just one of the big plans already on the horizon to keep your eyes open for, but as always, be sure to let us know what you think and what you want to see in future releases that will help you do more with software.

Friday, December 9, 2011

Create a Time-lapse Video with Debut

You've seen videos that condense hours and hours of time into a short clip: a flower blooms in 30 seconds, or a city scene showcases the busy flit of people and traffic as the shadows of buildings move slowly across the street.

You can easily create your own time-lapse video using your webcam and Debut video capture software. Here is what you need to do:
  1. Click the Edit Output button and select the devices tab.
  2. Select the option to Enable Time-lapse.
  3. Specify how often you want an image to be taken. For the charactaristic choppness of many time lapse videos, space image captures apart by a minute or longer. For a smoother result, take captures at shorter intervals.
When your recording is finished, it will be saved as one video clip rather than a series of images, so you can watch the time fly by in a resulting video.

Next, to turn your time-lapse into something really worth sharing, add a title screen using VideoPad video editor. Keep in mind that VideoPad can also do other time manipulations, such as speeding up or slowing down your video footage, in case you want to fine-tune your time-lapse results.

Wednesday, December 7, 2011

Lightning Fast PDF Creation

Bolt PDF Printer makes creating PDF files as easy as printing. See exactly how easy it is to print files to PDF in this short video introduction.


And if you need to convert a large number of documents to PDF, you will also want to try Doxillion Document Converter to batch convert thousands of files at once.

Friday, November 25, 2011

Create Your Own Photo Mosaics for the Holidays

Create Unique Holiday Photo Mosaics with PhotoPadGive a unique and personalized gift this holiday season as well as share and preserve memories, make a photo mosaic image with PhotoPad photo editing software. The photo mosaic feature is similar to the collage feature but it builds a larger, composite image out of your photo collection using many small images. Unlike the mosaic posters and photos you may have seen on sale at the mall, the mosaics you make with PhotoPad can contain dozens of pictures all of your family and friends.

This a really fun tool to play with since there are a lot of different options and settings to experiment with as you edit the photo mosaic to get the results you want. You can change the numbers of tiles, swap out the template image which is the "big picture," change the folder that the tile images will be taken from, and the size of the image. I changed the background color of the image and made the mosaic smaller to add border around my mosaic.

On the Insert tab of PhotoPad's menu, click the mosaic button and select the image that will be used as the template for the mosaic. The level of detail in the mosaic is proportional to the number of images in the Tile Collection folder and the number of tile columns and rows specified in the Mosaic Image Properties. The default amount of tiles is rather low, so I recommend increasing the initial numbers. I also encountered mixed results when I only had 20 images in my Tile Collection folder. I saw a much greater variation in my final mosaic image when I had dozens of images in the Tile Collection folder, so make sure you give PhotoPad a good variety of photos to choose from.

PhotoPad is free, so download PhotoPad today and try out the mosaic feature. And if you like PhotoPad, check out more of our software gift ideas including PhotoStage slideshow software for another fun way to combine your photos into a unique and personal gift.

Thursday, October 27, 2011

Easy Chroma Key Video Overlays

Chroma Key green screen video editing in videopadOften during editing you will want to remove the background from a video. This is commonly seen with television newscasts or interviews where the video of the person is overlaid onto a different video backdrop, or a logo animation is overlaid on a background. Chroma Key is also commonly referred to as green screen. Sometimes videos will have a transparency or alpha channel that you can adjust to remove the background, but more often than not, you will have to utilize Chroma Key tools in video editing software to remove the backgrounds.

Proper lighting makes using Chroma Keys far easier. Ensure the subject(s) and background are both well-lit. Solid color backdrops work the best. You can buy professional blue or green fabric backdrops or special Chroma Key paint. Avoid having shadows or hot spots on the background or unnecessary detail in the background as it will make it harder to “pull a key” later. Natural sunlight can often make the foreground subject bleed into the background when trying to key a color, so it’s best to use artificial lighting.

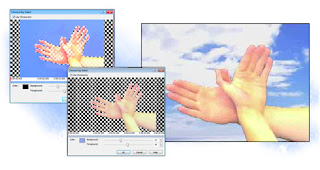
NCH Software’s VideoPad Video Editor has the ability to select a Chroma Key color with its Overlay feature. Add the video as an overlay track, and select the Use Chroma Key checkbox to bring up the Chroma Key preview window.

Select the Chroma Key color by clicking on the color you want to key out in the preview image. Then, using the preview image as a reference, adjust the Background and Foreground sliders until the desired transparency is achieved. Note you can click different positions on the timeline to see how the video will look. Click OK to apply changes.

If you would like to make changes later, first select the overlay in the list on the Overlay tab, and then click the Change button next to the Use Chroma Key checkbox.

Below is an example video we made using the Videopad Chroma Key feature. Download VideoPad for yourself to try this and the other easy video editing features for yourself.

Tuesday, August 30, 2011

Editing Video from a Cell Phone

Edit video recorded from a cell phoneWith the majority of cell phones today coming with not only a built-in camera but also video recording capabilities, the amount of video the average home user takes is skyrocketing. It's just one of the many reasons there are so many videos being posted to YouTube every day. But not every video you record is going to be ready for the big time right away, so if you need to do a little bit of editing here are two extremely useful tools you should using try to clean up your cell phone videos.

Rotate Video
With the variety of flip phones, slide phones, and other shapes of phones, keeping track of which way is up while filming could be a challenge. You may quickly find out all your video needs to be rotated so that you don't have to watch it with your head tilted to the side. Prism Video Converter offers an easy solution. Not only can you convert your video from 3gp, a common video format recorded on phones, to something more computer friendly like avi you can also choose to rotate the video by going into "Effects" before hitting Convert.

Stabilize Video
Another common problem you might have—that you might not have even known you can fix—is with video clips that are shaky from an unsteady hand. If your video reminds you a little too much of The Blair Witch Project, you can stabilize your video with the stabilization feature in VideoPad Video Editor to eliminate jitter. See an example of video stabilization in action in our post A Quick Fix for Shaky Video Clips.

If you are really feeling your inner movie director come to life there are a lot more video editing transitions and effects available in VideoPad, but I think you will be surprised how big a difference even just a few adjustments like these can make to your videos.

Monday, May 9, 2011

Record Video from Anywhere

Debut Video Capture Software records and captures video from webcams, recording devices, and from your computer screen. It’s great for recording tutorials you can post to online sites such as YouTube, for making company messages, for recording streaming video, and more. See for yourself how easy it is to get started capturing and recording videos in this Debut video tutorial:

Monday, May 2, 2011

Axon Windows PBX Tutorial

Putting together a phone system can be a daunting task. When you need to figure out phone lines and extensions, plus extras like on-hold music, things can quickly spiral out of control, especially if aren't well versed in Linux—which many PBX systems require. Fortunately, there is another option. With Axon, a Windows PBX system, as with all of our telephony software, we have done our best to keep everything simple and straight forward. Plus we have just finished a new quick start video tutorial to further guide you through the process of setting up your new PBX telephone system.


So if you are looking for a way to manage telephone calls and extensions across your business, and you don't have an IT team to do the grunt work for you, take a look at Axon virtual Windows-based PBX software. It will make getting your phones up and running as painless as possible, and you don't even need to learn a new operating system.

Thursday, April 28, 2011

Music Editing for Language Lessons

music editing softwareWe recently found a series of videos made by a WavePad user as a guide for people just getting started with audio editing, and for using sound editing software to support use of music in language lessons. While many of the basics are covered in our WavePad video tutorials as well, if there is one thing I have learned, it is that sometimes hearing the same thing in a slightly different way can really help you pick it up. If you are looking for another source to help you ease into audio editing, you should check out this series of 7 videos covering some WavePad audio editing basics:
  1. Select and cut
  2. Splitting and trimming
  3. Saving files in different sound formats
  4. Changing audio track speed
  5. Changing audio track pitch
  6. Using slower speeds and looping to teach sections of a song
  7. Copying edited clips to a new file
So whether you are teaching or learning songs in another language, or you have any other audio projects, be sure that you have WavePad Audio Editor on hand. You never know when it might come in handy.

Wednesday, April 13, 2011

Video Tutorial: Simple Slideshow Software in Action

See how easy it is to bring your digital photos to life and share your favorite memories with family and friends with PhotoStage slideshow creation software. Our recently finished PhotoStage video tutorial walks you through the process so you can see how easy it is to combine images, video clips, music and narration into a truly memorable slideshow movie.


Download PhotoStage slideshow software today to start making your own custom multimedia presentation to share with friends and family and preserve your memories.