Showing posts with label screen capture. Show all posts

Thursday, July 23, 2020

Record Video Like a Pro with Debut Video Capture Software


Gadgets Now, one of the largest tech news websites in India has just recently listed NCH’s video capture software, Debut as one of the best video capture tools for PC and Mac. Here are some of our favorite quotes from the article


“Every step of the way, you get many options to configure the camera, audio, color, exposure, scheduling, and more.”


“It is intuitive and comes with a manual and video tutorials to help you get acquainted.”


“If you want more control over what you want to capture, then you will need something like NCH’s Debut Video Capture software”


Debut Video Capture has already been heavily praised by various tech review giants such as Top Ten Reviews and Tech Radar as being a highly recommended stable and capable video capture and screen recording software, and we’re excited that Gadgets Now has joined the growing list of fans. Download Debut today and see for yourself why it has been getting a lot of positive attention.


Friday, January 18, 2019

How to Record Streaming Video

How to Record Streaming Video


We have all been watching a live-streamed video online at one time or another and wondered to ourselves, "How can I record this streaming video to watch again later?" There are many different tools and programs out there that are available to help you record streaming video on your computer. One of the most effective and easy-to-use streaming video recorders is our own Debut Video Capture and Screen Recorder Software. This simple software allows you to record and capture video from almost any source. In this article, we are going to take a look at how to use Debut to record streaming video on your PC or Mac.


Select Recording Source

Debut Screen Recorder Software is great for recording live-streamed videos on social media, Skype conversations, and other real-time moments that if missed, may never be seen again. To record a streaming video, first start by opening Debut on your computer and selecting the recording source. Debut is capable of capturing video from a wide variety of sources including various external video input devices, such as a webcam or IP Camera. Because we are recording a streaming video on our computer, that means that our recording source will be the Screen. Make sure the Screen option is selected in the main toolbar before continuing to the next step.


Select Recording Window

After selecting the Screen option as your recording source, you can select the Recording WindowDebut allows you to record your entire screen, a single window, or make a specific selection on your screen of what you want to be recorded. Choose from one of these three options on the left-hand side of the program, underneath the preview window. In this example, I have chosen to select my own recording window. You can click and drag to make a rectangular selection around your video and then fine-tune the dimensions in the window that appears afterward.


Video Recording Settings

Before you start recording streaming video, you will want to make sure that all of your recording settings are exactly how you want them. You can select the file type that you would like to record streaming video in as well as adjust encoder options and output options such as frame rate. Click on the drop-down menu that says Record Source As: to select your video file type.


Audio Settings

Click on the Options icon in the main toolbar to adjust your audio recording settings. This will launch the Debut Options window where you can click on the Audio tab and select how you would like to record audio while you are recording streaming videos. You can select an option to record audio from your speakers, from a microphone, or even record the clicks from your mouse. The speaker option will enable you to record the audio from your streaming video.

Record Streaming Video

Once you have selected your recording window and adjusted your video settings, you are ready to start recording streaming video. Simply click on the record button to begin recording and allow your video to start playing. Debut will capture both the audio and the video from your streaming video unless you make an adjustment in your settings to record just one or the other. When you are finished recording, simply click on the stop button and your newly recorded streaming video will be output into the Debut folder located in the Videos file on your computer. 


For more articles like this one, check out these posts:

Friday, March 17, 2017

Record Screen Capture with Webcam Overlay

Record Screen Capture with Webcam Overlay


Debut Video Capture: Screen Capture with Webcam Overlay

Debut Video Capture software is extremely useful for recording screen capture as well as external device capture. Debut can also be used to record a webcam overlay for product demonstrations, reaction videos, and gameplay recordings


Add a Webcam Overlay to a Screen Recording

Adding a webcam overlay to your screen capture is quick and easy with Debut. Webcam overlays can be used for reaction videos, or to add a more personalized video to a demo or walkthrough video. There are a few different ways to add a webcam overlay to a Debut recording.

To enable webcam overlay, you can click on the webcam overlay icon in the bottom right corner of the screen.
You can also enable webcam overlay by selecting "Camera Overlay" from the "Tools" menu drop down.


Video Overlay Options

After camera overlay has been enabled, an options menu will appear on the right side of the Debut window. These options will allow you to change the camera input,  position, and size of your video overlay. 

Camera and Microphone Options

In the Camera Overlay options menu, the "Camera" drop down will select the device that will be captured as a video overlay. The "Format" drop down will list all of the format options that your webcam supports, including resolution, frames per second, and pixel formats. The "Camera Settings" button will open a dialogue of camera-specific options, which are provided by the manufacturer. The "Microphone settings" button will open a dialogue where you can select and adjust microphone settings. 

Video Overlay Alignment Options

The "Alignment" options can be used to specify where the webcam overlay will be placed in the recording output. You can adjust the horizontal and vertical alignment of your video capture overlay. The "Size" slider can be used to adjust the size of the video overlay. This percentage is a percentage of the total output video frame size. The "Margin" drop down will adjust the margin between the edge of the webcam overlay and the edge of the final video output frame.

Common Uses of Webcam Overlay

Debut is extremely useful in capturing video demonstrations. The optional webcam overlay can create a more personalized video demonstration for clients and potential buyers. Debut is also commonly used to capture video gaming. A webcam overlay can be used to capture players reactions during gameplay screen capture.

Friday, August 12, 2016

Screen Capture Gameplay for Social Media with Debut


The "Let's Play," genre of videos has become a staple for internet viewers and social media. The opportunity to share the triumphs and defeats of the personal gaming experience with others has never been more available than today. Having a reliable program to record gameplay and an easy uploading process is essential to any LP member. NCH Debut provides quality screen capture software that can connect with social accounts and record high-resolution screens.


How To Capture Screen During Gaming

Step 1: Download NCH Debut and open the program. Select "Screen" in the toolbar directly at the top of the program. At this point it there will be a small window displaying what Debut will be recording. Select the type of video output desired and other video options directly below the screen display.

Step 2: Select a game to be recorded. It is important to record as much of the gameplay as possible,  helping immerse the viewer in the game alongside the gamer. If there are dual monitors, make sure the monitor displaying the game is selected.


Step 3: Begin recording by either selecting the "Record" button to the bottom left or under "File" in the menu bar. A prompt will ask if faster screen capture will be needed. If this a newer generation game, please select "Yes, switch to 'Fast Capture' mode." At this point begin to play the game.


Step 4: To finish, Stop the video or Ctrl + F10, then select "Recordings" in the top toolbar. This will display a popup window where the video can be viewed for quality. Now the video will already be saved to the computer's video folder.


Also, Debut can connect to social accounts directly, this can begin uploading the video to social media by selecting the "Share" button


NCH Debut can be downloaded for free.
Available for Mac and PC


Friday, November 2, 2012

Record Skype Calls - Easy Audio & Video Call Recording

call recording software We have posted before about recording phone calls through a TRX personal call recorder, recording multiple phone lines across a business network with VRS call recording software, or even saving conversations with the Express Talk softphone’s recording feature, but with the advent of internet technology like Skype, what if you want to record a phone conversation on your computer?

Record Skype Audio Calls
The solution to recording your voice-over-IP calls is our SoundTap streaming audio capture software. With SoundTap you can record any audio that is played on or through your PC or Mac, making it easy to record both sides of your conversation; instead of only your microphone input. It is akin to tapping your virtual phone and you can save the audio in .wav or .mp3 format.

Record Skype Video Calls
For video, we suggest you turn to Debut streaming video recording software. Debut is a powerful video capture program that can grab video from virtually any source, including your screen. Make sure your Debut options are enabled to record both video and audio, and then you can easily record your video calls, including Skype, to play back or edit later.

Wednesday, September 12, 2012

Screencasting For Better Communication & Teaching

Guest post by Eric Karkovack

Sometimes, your job title doesn't always necessarily explain the full extent of what you do. Personally, I'm a freelance web designer (and have been since 1996). But a great portion of my job is about doing things that have very little to do with design itself.

For example, one role I often find myself taking on is that of a teacher. Whenever I create a website that my clients will update themselves, I have to teach them how the process works. Sometimes it can be difficult to get my point across. It's especially hard when clients don't have much experience with technology.

For awhile, I offered manuals to my clients to use as a reference material. While that helped, it certainly wasn't as interactive as their website's content management system. I felt that I really had to find a better way of communicating.

Create screencast tutorials with Debut video capture software The idea of "screencasting," or recording my screen with a voice-over, came to me. If my clients can see what I'm doing on my screen and can hear my explanations of how to accomplish specific tasks, it could be of great benefit to all of us.

When I found Debut Video Capture Software, I was sold. It works exactly as advertised, it's affordable and easy to customize to my needs.

Probably my favorite part of Debut is that I can simply plug in my headset microphone, open up the software and start recording. That's really all there is to it. Within a half hour, I've created a few short tutorials that will help my clients. I've saved a ton of travel time and my client has an interactive reference that illustrates exactly how to update their website. It's hard to put a price on that kind of convenience.

Eric Karkovack is a freelance web designer with well over a decade of experience. He designs and maintains websites for clients in a wide range of industries. For more information, visit him on the web at www.karks.com

Tuesday, May 15, 2012

The TIVO of Internet Recording

internet video recording softwareOne of the great things about TIVO is that you schedule recording times and then you don't need to worry about missing your favorite show. Since Debut video recording software is perfect for capturing all digital video from, streaming video to video of your screen, you can easily turn Debut into a personal internet recording TIVO system by schedule recordings for when you are away from your computer.

Start by setting up your recording as you normally would by selecting your screen for the input, and setting the recording area. Then click the Schedule button followed by Add to set the date and time for your new scheduled recording. Once those details are saved all you need to do is make sure you leave the window or website you want to record cued up on your screen so it will be recorded at the appointed time. When you return the recording(s) can be found in the Find & Play list by clicking the Recordings button on the toolbar.

If there is something that you want your computer to record, while you are sitting at your desk or while you’re away, download Debut screen capture software today.

Friday, April 6, 2012

Super Features: Debut Video Capture

Debut Video Capture Software is one of the most feature-rich video capture programs available, allowing you to capture video from a variety of sources, including your screen, webcam, network camera, or external devices. If you haven’t had time to explore all the amazing ways Debut can make recording video easier for you, we’ve made a list of highlights.
    Debut Video Capture Software Tips, Tricks and Features
  • Add a text caption to your video. Choose the placement, enter the text, change the font, the font color, and add background color to make the text stand out. Be sure to add your caption before recording starts. (more ways to add text to video)
  • Add a watermark to your video to ensure you get credit for the video. Choose a watermark image that isn’t too large, adjust the transparency, and set the alignment. The margin percentage controls how far away the watermark is from the edge. Again, be sure to add your watermark before recording.
  • Create a time-lapse video. Station your camera and click the Edit Output button. On the tab specific for the type of camera you are using, make sure the Enable Time-lapse checkbox is checked. You can specify how often a frame is captured: the closer in time the images are taken to each other, the smoother your video will look. For a more choppy outcome, space images out further.
  • Capture a window or custom area. This is a very useful feature if you want to focus on one area of your screen, rather than the entire thing. Click the selection icon in the lower right corner, next to the caption, color, and watermark buttons. You can then drag the cursor to select a recording area, or highlight and select a specific window on your screen.
  • Schedule recordings. If you need to record while you're away from your computer, set up a scheduled recording. Click the Scheduler button on the toolbar to set a recording time.
  • Click the Edit Output button to resize the final video or to change the frame rate. Remember that a smaller size and a lower frame rate will make the file size smaller.
  • You can specify the file format for the recording from the Record as drop menu. Select the file type, or select which device you are making the recording for.
If you need to edit your recordings after they have been recorded, we recommend you use VideoPad Video Editing Software. With VideoPad, you can edit multiple screen captures or webcam recordings together, add background music and narration, and compile the final product in a format for viewing on your computer, television, portable device, or on the internet.

Wednesday, March 28, 2012

Recording Screencast Tutorials with Debut

Guest post by Dalvin Aboagye

Debut video screen recording softwareI'm sort of what you call a tech-oriented person and usually know my way around tech products. I maintain a YouTube channel dubbed Tech Time HD where I review and critique products sent by a myriad of companies, and cover tech rumors and news sometimes as well. I first started out on YouTube doing tutorials, so I needed a screen recording software solution to make these screen casting tutorials. I tried other software such as Cam Studio and Fraps but they didn't cut it for me. I stumbled upon Debut Video Recording Software whilst browsing Google. My first impression when I installed it was that it was a bit gimmicky and I wasn't impressed with the user interface, but after a couple weeks of using Debut I took back everything I said. The UI is very easy-to-use and intuitive, it doesn't gobble up on system resources as much as other programs I had tried, it supports a wide variety of video formats and has a great set of features—even the free version. I found myself hooked and would recommend it to anyone and everyone who needs to record a screencast, capture card or webcam. You won't regret downloading the trial, and you surely won't regret buying the software. My only wish is that the watermark feature was included in the free version, but it's a small price to pay for such great recording software.

Wednesday, August 17, 2011

Debut Top Video Capture Software

Debut Video Capture Software Award TopTenReviewsDebut Video Capture Software makes it possible for you to record or capture video from virtually any recording source. Rather than specializing in capturing video from a single source, Debut combines the recording capabilities of several programs, so whether you want to record streaming video, record from a networked IP camera, or connect your VHS player to your computer to digitize an old home movie, Debut is the only program you need.

The reviewers at TopTenReviews have agreed, awarding Debut the Silver award in their video capture software category, saying that they "were very impressed with how easy it was to use the interface and the tools available within Debut," going on to say:

"We were very impressed with the usability of Debut Video Capture Software and the well designed interface they created for their users, which is why it ranks as one of the top two products available. It also offers a number of recording tools and capturing abilities, and we found each tool easy to access and easy to use. We were pleased with the high quality results of the video captures as well as with the captured audio."

TopTenReviews

You can read the complete review of Debut Video Capture Software on the TopTenReviews website. Or, see how easy it is to use firsthand by downloading this both powerful and easy video recording program to your PC or Mac today.

Monday, May 9, 2011

Record Video from Anywhere

Debut Video Capture Software records and captures video from webcams, recording devices, and from your computer screen. It’s great for recording tutorials you can post to online sites such as YouTube, for making company messages, for recording streaming video, and more. See for yourself how easy it is to get started capturing and recording videos in this Debut video tutorial:

Monday, April 11, 2011

Mac Video Capture Software

I am thrilled to announce that Debut video capture software is now available for Mac as well as for Windows. I have long appreciated the features of Debut for recording video from a webcam or video screen capture, even capturing video from an external video capture device. We use Debut in our office on a regular basis to record video clips for the developers to show them bugs when testing products and recording video clips for our tutorial videos.

While I have used the Windows version of Debut numerous time, and even turned several friends and family members on to Debut (Ask Dad: Debut is a Simple Solution ), since I have a Mac at home I too have anxiously awaiting the release of the Mac version for those numerous occasions when it would be the perfect solution for grabbing a video clip. Now that my wait is finally over I hope that other Mac users out there will be as excited as I am about this addition to our Mac software line-up. Download Debut video capture software today and let us know what you think.

Sunday, January 2, 2011

7 Programs You Can't Live Without

Prism Video Converter
If you've ever had trouble opening a video file, you need Prism. Prism will let you quickly convert any troublesome video files into a more manageable format. With more formats supported than any other video converter, you'll be hard-pressed to come across a video file that Prism can't handle.
Prism Video Converter

Switch Audio ConverterSwitch Audio Converter
There are a lot of different audio file formats out there, and a lot of places you might want to keep your favorite music, from CDs and iPods to your computer or online, just to name a few. Make sure you always have the right format for every song and every application with the Switch Audio Converter.

FastFox Typing Expander
Ever find yourself typing the same things over and over? FastFox can be a huge helping hand at home or at work. Use keyboard shortcuts to expand to anything you commonly write and save time inserting signatures in email, filling out online forms, and writing long responses to customer questions.
FastFox Typing Expander

Debut Video CaptureDebut Video Capture
Whether you want to transfer the video from a camcorder to your computer, are trying to record a video from your webcam, or even recording your screen, Debut is your single software solution for capturing video.

Express Burn Disc Burning Software
Burn pictures, home movies, resumes, portfolios, or back up your files to CDs, DVDs and even Blue-Ray discs in a variety of file formats with Express Burn. Simply drag, drop and burn.
Express Burn Disc Burning Software

PhotoStage Slideshow CreatorPhotoStage Slideshow Creator
Bring your digital photos to life and share your favorite memories with family and friends. Tell a compelling story, display your best images, or show off your proudest moments. PhotoStage lets you combine images, video clips, music and narration in a fun and dynamic fashion.

WavePad Audio Editor
No list would be complete without one of our all-time favorites: WavePad. WavePad is the perfect application for any audio project in the sound studio or at home. The easy-to-use interface will have you up and running quickly with all the powerful tools you need at your fingertips.
WavePad Audio Editor

Wednesday, June 23, 2010

Let's (re)Make Parisian Love
How to reproduce Google's 2010 Super Bowl Ad

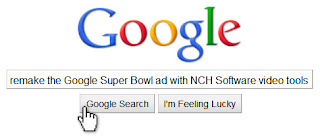
How to remake the Google Super Bowl ad with video tools from NCH Software

If you were one the millions of people who tuned in to watch the Super Bowl this past year, there’s a good chance you saw the Google ad, “Parisian Love”. If you haven’t, well, now’s your chance…
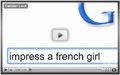
Google Parisian Love Super Bowl Ad

The simple concept set it apart from other Super Bowl ads, making it one of the more memorable commercials to play that night. Equally simple is the execution – with the right tools, anyone can make a similar ad. Here’s how:

Video Recording Your Google Search
The first thing you need is Debut for video screen recording. Once Debut is installed, click the aptly named “Screen” icon in the toolbar, and you’ll notice the stage on the program switches over to a mirror image of your computer screen. You’ll also notice a variety of options along the bottom, which let you choose which file type you want to save your video as, the size in which to capture, as well as the option to add video effects, adjust the color, cropping options and more. These options may come in handy later, but for now we can ignore them.
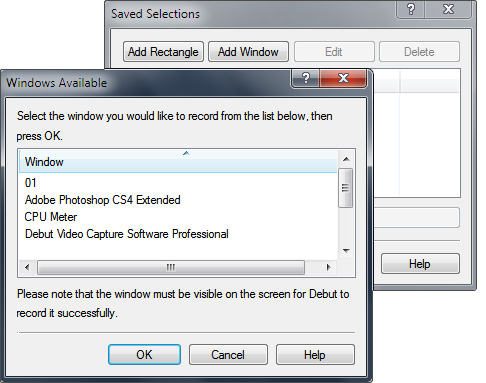
Set a selection area for video screen recording in DebutNow that we have our screen capture software ready, open your web browser and head over to www.google.com, and make sure to maximize your browser window. Now, head back into Debut and click the “Selections” icon in the toolbar to specify the portion of your screen to be recorded. Click the “Add Window” button at the top and select the Google browser window from the list of options. (Note: Make sure the browser window is visible on the screen or Debut won’t record it). Once we’ve squared that away, head into “Options” (in the toolbar) and on the “Devices” tab, click the box that disables recording the Debut window (eliminating the hall of mirrors effect). After that, click on the “Output” tab to choose where these recordings are going to be saved. You may want to make a dummy recording just to make sure things are functioning properly. Now you’re ready to record!

Back on the stage and with our browser window open, hit record, head back into the browser and start searching! Take your time; we’ll cut out any unnecessary parts later. The process of searching through Google may take awhile. Just keep at it with the end result in mind… All done? If so, head back into Debut and hit the stop button. This will (obviously) stop our recording.

With that out of the way, let’s head to our output folder and view our recorded movie. Watching this, you may be wondering how we’re going to separate the parts we need from the parts we don’t. To achieve the end result we want, we’re going to have to incorporate some light video editing. Enter VideoPad. Even if you’ve never edited video before, there’s no need to be scared - VideoPad is very user-friendly and is designed with the beginner in mind.

Cutting Your Recorded Video Down to Size
With VideoPad installed and opened, the first thing we’re going to do is import our recording by clicking the “Add Media” icon in the toolbar and navigating to where the file is saved. Click “Open” to import the footage and you’ll see that the file now appears in your Media List. Click on the file, and it will immediately appear in the Clip window (the bigger of the two windows on the left). This window acts as a preview window – here you can set in/out points, view the timeline and save files. For now, let’s select the footage from the Media List and drag it onto the first empty area under the windows; this is the Video Track timeline and is where we’ll be doing our editing to remove any unwanted sections.
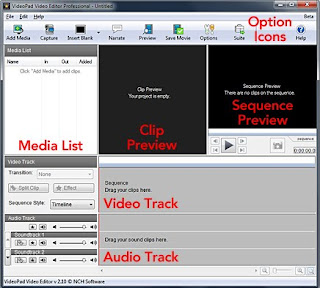
VideoPad main screen editing navigationYou should now see a thumbnail preview of your video in the timeline. Underneath the video, you’ll see audio waveforms in the Audio Track section. When you import any video media that has audio attached, they’ll be linked (meaning you can’t edit them separately) until you tell the program otherwise. You can do this by right-clicking on the waveform and selecting “Unlink Sound Clip(s)”. Now that the audio is separated, select just the audio and hit “Delete,” removing the audio from the video. Don’t worry; we’ll be replacing it with our own audio later.

We now have one long video track that needs to be cut down to size. Before we begin cutting, it’s important that we familiarize ourselves with the timeline marker. You’ll notice when you move the timeline marker, a preview of the final product appears in the right window (the Sequence Window). This is an important reference tool in which we can use to make smarter, more accurate editing decisions.

We’re going to again reference the Google ad to get a feel for what we want to keep. This way, we can start trimming the video down to size. Drag the marker to the beginning of an area that we want to omit and click “Split Clip,” located to the left of the Video Track. Now, navigate the marker to the end of the undesired area and click “Split Clip” again. Our timeline will now be segmented into three. Select the undesired clip section, and hit “Delete” to remove it. Congratulations, you have just made your very first cut and are well on your way to recreating the Google ad! This might be a good time to save your project, which you should keep doing periodically from here on out. It’d be a shame to lose all that hard work…

After making a few more cuts, hopefully you’re getting close to the look of the Google ad. When you’re done trimming the fat and are happy with your final product, the last step is adding the audio. It works very much the same as adding video. Click on the “Add Media” button once more and select a piece of music; click “Open” and the audio will be added to your Media List. Select it and, similar to the video track, drag it to the empty area in Audio Track section labeled “Soundtrack 1.” Waveforms will now be visible on the timeline, just as before. If need be, you can also move and cut the track at your leisure in the same way we cut the video. Now when you preview the final product in the Sequence Window, you’ll have audio too. Horray for progress!

Save and Share your Masterpiece
Now that your masterpiece is done, the last step is to save the movie; Click ”Save Movie” in the toolbar, and an output window will appear. From here, you can export for DVD, YouTube, portable media, etc. Select your desired format using the tabs at the top and the drop-down menus below them and click “OK” to begin the export process. It may take several minutes depending on the format and length, but once completed, your video will be ready to share with the world! Pat yourself on the back!

Congratulations, you’ve now successfully (re)made Parisian Love!

Monday, February 8, 2010

Ask Dad: Debut is a Simple Solution

My dad works for a major computer manufacturer as an electrical engineer, and even in that large corporate environment there are times when getting a simple software solution from outside the company is preferable to reinventing the wheel and creating something in house.

debut video screen recorder software When I was using a little vacation time to visit my dad, he happened to mention not being really happy with the video capture program that he had been using for an experiment. He had been using a product called FreezeScreen that he said didn't seem as stable as he might like, and the recorded video wasn't always as clear as the original. Naturally, I recommended he try our program, Debut Video Capture Software, to see if he had better results with NCH's solution.

For a little bit of background I asked him if he could tell me more about what he was using the screen recording software for. He is using a collection of extremely high speed strobe lights and high magnification optics to image the operation of MEMS devices in motion with near nanosecond time resolution. There are no off-the-shelf systems that can do this type of analysis, so he put together the equipment himself. And, since there isn't a software front end, the only results he gets are on the on-screen display. So, if he wants to save any of the images to send to a colleague or to analyze further later, he needs a screen recording software like Debut.

I am happy to report that he has been very pleased with results that he has been able to get using Debut. To quote him, "The Debut software does exactly what I need. I even use the sound capture to annotate my observations in real time so I do not forget any of the things I changed during each test. When I play the video back I get a video recording of what happened, along with any measurements that were being taken, and my annotation is all synchronized in time in one video."

This is just one example of how a simple software solution like Debut can be a useful tool for research and industrial testing. Someone like my dad can put together a custom test environment with a number of individual software packages such as a digital camera interface, a timer program, a program that reads and displays the voltage, temperature, or some other information that is relevant to the test. By positioning the windows from each of the separate programs on screen before recording, Debut can capture a video record of all of the pieces in a single video. So even a piecemeal custom test can produce results that look like they were generated by a single, highly integrated system.

Wednesday, June 3, 2009

Do we use our own software?

In one word... Yes.

NCH SoftwareNCH Software has two office locations, one in Denver Colorado and the other in Canberra, Australia. Both locations are set up with the Axon Virtual PBx and the IVM Call Attendant. In some cases employees have extensions on both PBx systems. This allows us to call between the offices on IP Phones for no cost at all.

Someone in the Australian office can just pick up their phone and dial and extension allocated to me in the Denver office, the same if we were only located on different floors of the same building.

If I need to make a call to another business in Australia I can pick up my phone, press my Australian extension and dial a number in Australia and the call we be charged at local call rates instead of international call rates.

FastFox Text Expander is an application that nearly all staff have installed on their PCs and Macs. Our support and marketing teams use it for common responses, signatures, URLs, phone numbers and addresses.

FlexiStation is installed on all computers and we can track our work hours, log leave requests and generally see how our time is spent at work.

Our finance department works with Express Accounts to keep track of incoming and outgoing cash flow for the companies and our sales department uses Express Invoice to create quotes and invoices.

I personally use Debut Video Capture to record webcasts and KeyBlaze Typing Tutor typing tutor because sometimes two fingers for a keyboard just doesn't quite cut it. In one way or another we all use some of the software at home and in the office. Even though we have a testing department sometimes the best way to find a hidden problem, or the best suggestion, when it comes to software is to use it on a day to day level.