How to Make a Transparent PNG in PhotoPad
What is a PNG image?
PNG stands for Portable Network Graphics. PNG files are great for use on the internet because they support transparency and because they are compact in size. They are commonly used for web design elements such as icons and logos. PNG graphics are incredibly versatile in their web applications. They can be used against any background and can make adding graphics to websites and other design projects extremely simple. PNG graphics are easy to use and they also happen to be easy to make. With photo editing software like PhotoPad, you can make your own transparent PNG images for use in your next website or graphic design project. |
| Example of a PNG logo improving a website |
How to Make a PNG Image with a Transparent Background
If you are starting from scratch and creating your own graphic, making a PNG image with a transparent background is easy. Open your latest version of PhotoPad and create a new file with a transparent background to work on. You can create a new project file from the New Image Menu by pressing Ctrl + N on your keyboard and then selecting the option that says Transparent for the background. If you have already made a new blank project file in PhotoPad, simply go to the Edit tab, then choose Background and select Transparent. You will see that your white background has now been replaced with a faint grey and white checkerboard. This checkerboard means that the image effectively has no background. Any work that you do on top of the checkerboard will be the only thing that gets saved.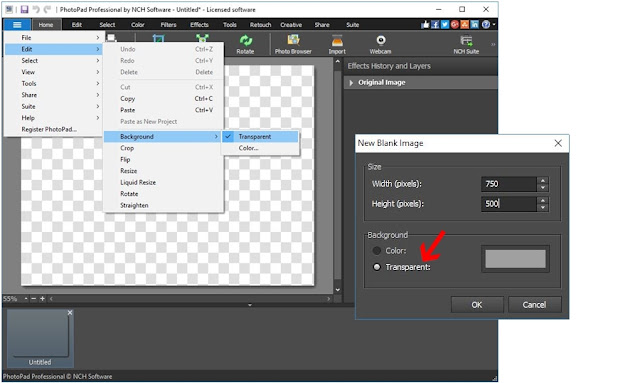 |
| Creating a New Image with a Transparent Background |
Try visiting the NCH Clipart Library under the Creative tab to add clipart to your transparent design project. The Clipart Library is filled with fun and interesting images that are great for use in logos and other graphic design projects.
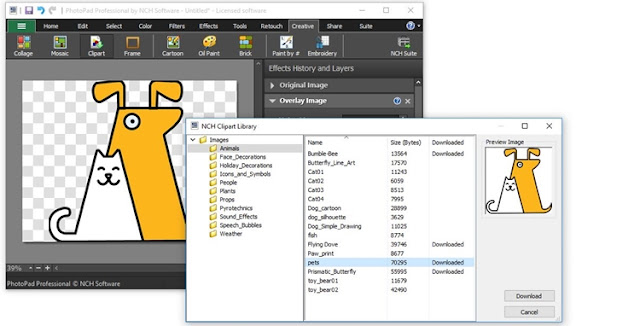 |
| NCH Clipart Library |
You can add text to your transparent background too. Under the Tools tab, you can select Text and then change the font, color, size, and placement of your text on your new graphic. Many modern logos use two different fonts or two different font sizes for their company name and tagline.
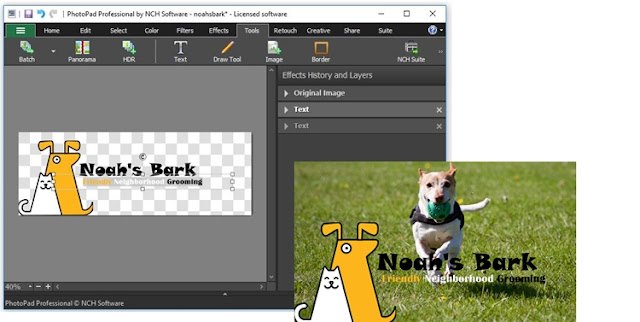 |
| Adding text onto a transparent background |
Removing the Background from an Image
If you already have an existing logo or graphic that you would like to make into a PNG image with a transparent background, no sweat. Open your file into PhotoPad and select the Wand Tool. The wand tool makes a selection by looking for the contrast between colors against the edge of your graphic and its background. You can adjust the level of sensitivity of the Wand Tool depending on how sharp the contrast between your image against its background is. Click on the background of your image with the wand tool to select it. We are trying to select everything that we want to get rid of. The wand tool makes one selection around the outline first. To select any additional elements you wish to remove, hold down the shift key while you click on those other areas in the image. It helps to zoom in close in order to select the smaller details such as the spaces inside letters like "O" and "D."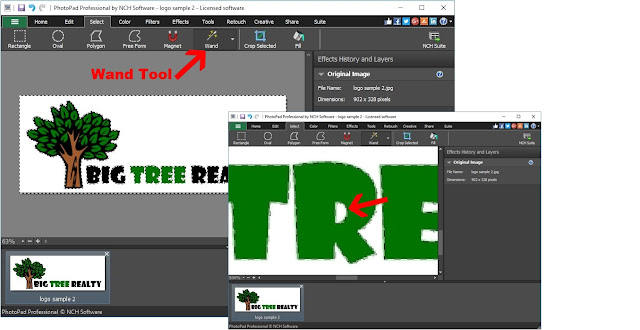 |
| Making a Wand Selection |
Now that we have our background selected, we are going to simply press the delete key on our keyboard or right-click and select "delete". This will delete all of the selected areas in the image. In our case, that means it will delete everything except our logo. You will immediately see that the background has disappeared and in its place, there is now a white and grey checkerboard. The checkerboard means that there is nothing there anymore. So when we go to save our image, only the graphic will be saved and nothing else.
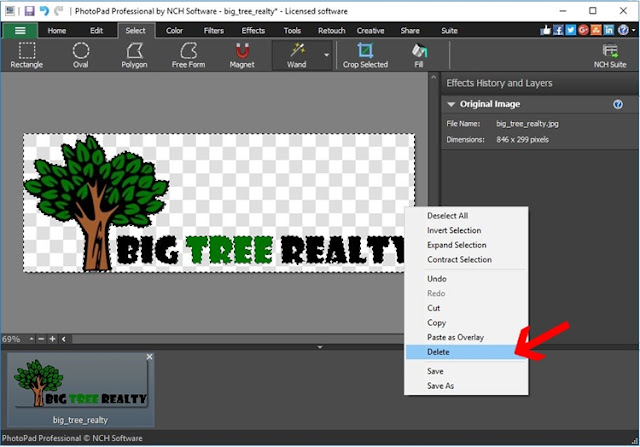 |
| Delete Your Background Selection |
Saving an Image as a PNG File
Once we are finished making our background transparent, we are ready to save the image as a PNG file. Saving an image as a PNG in PhotoPad is very simple. Go to the File tab in the upper left-hand corner of the program and then select the option Save As... You can also get there by simply pressing Ctrl + Shift + S on your keyboard. Change the Save as Type: from the drop-down menu to PNG (*.png) and then click Save.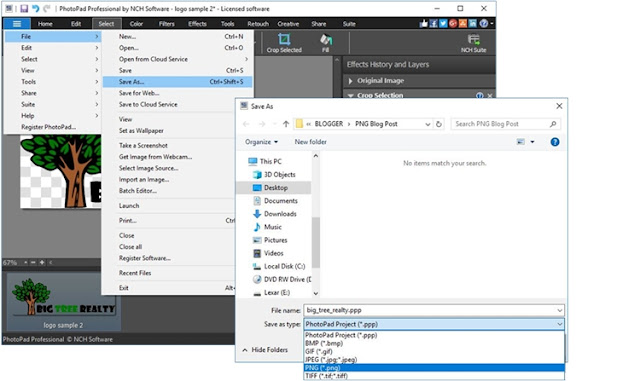 |
| Saving a file as a PNG |
Using Your PNG Image File
Now that we have successfully saved our graphic as a PNG file, it is ready for use on the web or in your next graphic design project. You will notice that when you preview the file on your computer, the background is completely gone. This will remain the case wherever you choose to use your new PNG image. Drag it directly back into PhotoPad to place it on any other image or background you would like, or upload it to the web for seamless integration on your website. |
| Transparent PNG logos on photo backgrounds |


Whenever I post an image with a transparent background anywhere, the background is just white. Any ideas?
ReplyDeleteExcellent article! Photo Pad to the rescue for transparent background. Even I know how to make a transparent background in Photoshop, So this is a great other solution for me. Thank you!
ReplyDeletegreat piece of software, guys and excellent how-to writeup, it really helped me to do my first transparent background logos. many thanks!
ReplyDeleteWow, So amazing information share this post. Actually i have photoshop drop shadow website and this post are so help me improve for my work. I appreciate you sharing this blog article.
ReplyDeleteImportant things to create a transparent.
ReplyDelete