Showing posts with label graphic design. Show all posts

Thursday, January 3, 2019

The Best Editing Software of 2019

The Best Editing Software of 2019


The new year has begun and so has the search for the best editing software of 2019. We all strive to find the latest and greatest when it comes to editing software and with each new year comes new updates, new features, and new players in the game. With so many great editing software options out there, we decided to put together a selection of the best editing software of 2019. The world of editing software grows more competitive each year and so in order to stand out a program needs to be feature packed, user-friendly, and affordable. The following programs we feel meet and exceed that criteria, making them the best editing software packages of 2019.


Best Audio Editing Software of 2019


WavePad Top Features

  • Easy to use interface with non-destructive audio editing
  • Supports almost all audio & music file formats (mp3, wav, vox, gsm, wma, au, aif, flac, real audio, ogg, aac, m4a, mid, amr, & many more)
  • Edit the audio from video files
  • Batch processing allows you to apply effects and/or convert thousands of files as a single function
  • Audio restoration features including noise reduction & click/pop removal
  • DirectX & VST plugin support gives producers access to thousands of additional tools & effects

WavePad Audio Editing Software

WavePad Audio Editing Software has been a major player in the audio editing software industry for many years. With each new release comes game-changing new features and abilities. WavePad's simple yet professional interface allows for quick learning for beginners with easy access to advanced features for pros. WavePad includes just about every effect and function you could ask for in an audio editor. It is for these reasons that we think that WavePad Audio Editor is the best audio editing software of 2019.

Best Video Editing Software of 2019


VideoPad Top Features

  • Supports all popular video formats seamlessly
  • One of the fastest video stream processors on the market
  • Over 50+ visual effects and transitions to add a professional touch to your movies
  • 3D video editing and 2D to 3D stereoscopic conversion
  • Upload to Facebook, YouTube & Flickr directly from the program
  • Edit 360 videos for YouTube & VR headsets
  • Create visual effects templates to use on any project
  • Create title text animations in seconds with templates

VideoPad Video Editing Software

Last year VideoPad was named the Best Value Video Editing Software of 2018 by TopTenRevews. However, it is not the affordable price alone that will make it the best video editing software of 2019. Some of the most recent updates have brought the program on par with the top video editors in the industry. These include 360 video editing, direct sharing from the program, and the support of almost every major file format. VideoPad's sleek and simple design allows for easy editing and application of transitions and effects while maintaining professional quality and standards. This is why VideoPad is the best video editing software of 2019.

Best Music Mixing Software of 2019


MixPad Top Features

  • Mix an unlimited number of audio, music, sounds, & voice tracks
  • Record single or multiple tracks simultaneously
  • More supported formats than any other mixer
  • Includes a royalty-free sound effect & music library
  • Use sample beats or craft your own using the beat designer
  • VST plugin support for added studio effects and instruments
  • Very low latency, ASIO support for sample accurate recording
  • Export at all popular bit depths up to 32 bits floating point audio
  • Upload directly to SoundCloud, Dropbox, or Google Drive

MixPad Multitrack Recording Software

MixPad Audio Mixer will minimize the time it takes to mix your next project while optimizing audio quality. MixPad provides you access to all of the power of professional recording and mixing equipment through a single platform that streamlines the process and makes mixing a breeze. This program allows you to record instruments and vocals for music production, create mixes and mashups with existing files, or even use midi controllers and the beat designer to create music in the program from scratch. The versatility of this program is what truly makes it the best music mixing software of 2019.

Best Photo Editing Software of 2019


PhotoPad Top Features

  • Millions of effect combinations available through photo effects and filters
  • Supports editing RAW photos directly from your DSLR Camera
  • Non-destructive editing enables you to easily undo, re-order and edit existing effects on the layers list
  • Merge multiple exposures to create stunning HDR photographs
  • Change the aspect ratio of an image without distorting key features using the liquid resize effect
  • Upload edited pictures directly to Twitter, DropBox, Google Drive & Flickr
  • Insert clipart from the included clipart library

PhotoPad Photo Editing Software

Whether you’re a professional photographer or just want to edit your personal photos, PhotoPad is one of the best photo editors on the market today. It has all of the powerful tools and features you need to easily edit digital photos and other pictures. PhotoPad brings both photo editing and graphic design capabilities together with a fast and simple user interface. With this program, you can have all of the bells and whistles of any professional photo editor at a fraction of the cost. This is why we think that PhotoPad Photo Editing software is the best photo editing software of 2019. 

Best Motion Graphics Editor of 2019


Motion Graphics Top Features

  • Free and easy to use
  • Objects can be moved, resized, rotated & more
  • Digital effects, such as brightness, contrast, negative and more may be applied to objects
  • Keyframes can be applied to each object and parameter
  • Create animated text and text bubbles
  • Add audio tracks or record audio
  • Apply effects to audio tracks
  • Group objects for easy editing
  • Add masks to an object
  • Export as video, flash, html5 or an animated GIF

Express Animate Motion Graphics Editor

Express Animate is a free animation program that gives you the ability to animate shapes, text and imported images. You are also able to enhance your movie projects in post-production using key-frame motion animation, masking, dummy objects and more. The program really is completely free without a catch too, which is a rare find these days. This is why we feel like Express Animate is the best animation editor of 2019. 

Friday, October 26, 2018

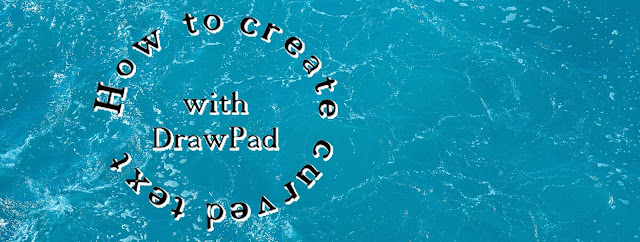
How to Make Curved Text in DrawPad

How to Make Curved Text in DrawPad


How to Make Curved Text in DrawPad Graphic Editor


Download DrawPad to get started: https://www.nchsoftware.com/drawpad/index.html

To view more DrawPad tutorials, visit: https://www.nchsoftware.com/drawpad/tutorial.html


How to Make Curved Text

  1. Click Curved Text on the Home toolbar
  2. Draw a path for your text to follow
  3. Type your text on the path
For more information and additional tips and tricks, watch the full tutorial video above.


To view more DrawPad Graphics Editor tutorial videos, visit: https://www.nchsoftware.com/drawpad/tutorial.html


Do you need help using DrawPad?

View the help manual: http://help.nchsoftware.com/help/en/drawpad/win/help.pdf

Visit the DrawPad Help Forum: http://nch.invisionzone.com/forum/175-drawpad/

Contact DrawPad Technical Support: https://www.nch.com.au/support/supportcontact.html?software=drawpad

Friday, August 24, 2018

How to Resize a Picture

How to Resize a Picture


There are often times when we end up with photos that are larger than we need them to be. Many websites will only allow images of a certain size to be used or uploaded. Meanwhile, here you are with your giant photo wondering how to resize a picture. If you encounter an error on the web or another situation where you would need to know how to resize a picture, don't sweat it. With a simple photo editing software such as PhotoPad Photo Editor you can easily learn how to resize a picture or graphic on your own.


Import Your Photo into PhotoPad

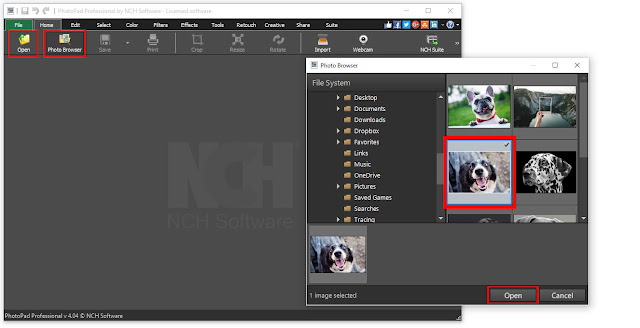
The first step to resizing your picture is to bring your image into PhotoPad. After you have opened your copy of PhotoPad on your computer, there are several options for importing images. Click on the option that says Open when you first launch the program and you can immediately start using the Photo Browser. Otherwise, under the Home tab, you may click on the Photo Browser icon or the Open Files icon to select the image you wish to resize. Under the File tab, you can also choose to open an image into the program from a cloud service, such as Google Drive or DropBox.

PhotoPad Photo Browser 


Resize the Canvas and Layers

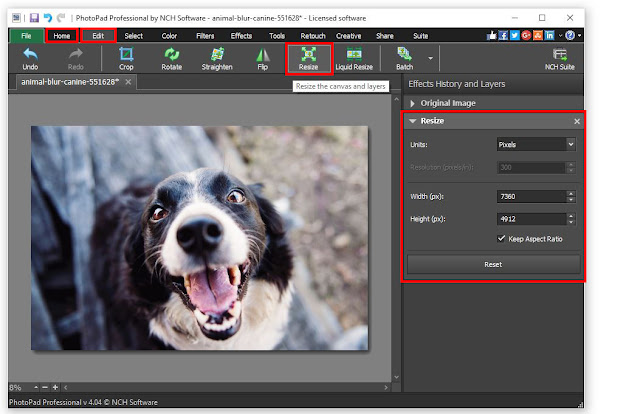
The Resize icon exists both under the Home tab and under the Edit tab. With your image in the program, click on the Resize icon to resize your photo. You will notice that a resize effect layer has now opened in the Effects History and Layers panel on the right-hand side of the program.

Resizing canvas and layers in PhotoPad

Select Your Scale

There are four options for how to resize a picture in PhotoPad. You can set your scaling units to resize based on Pixels, Percentage, Inches, or Millimeters. For images on the web, Pixels, and Percentages are the more common units used for resizing photos. If you choose to resize by inches, you can access the Resolution option and set the pixels per inch of your photo. You will notice the checked box at the bottom of the layer that says "Keep Aspect Ratio." This means that while you are adjusting the image's size, your width to height ratio will remain the same. This is commonly known as "Constrained Proportions." It is usually best to keep this option checked.


How to Resize an Image

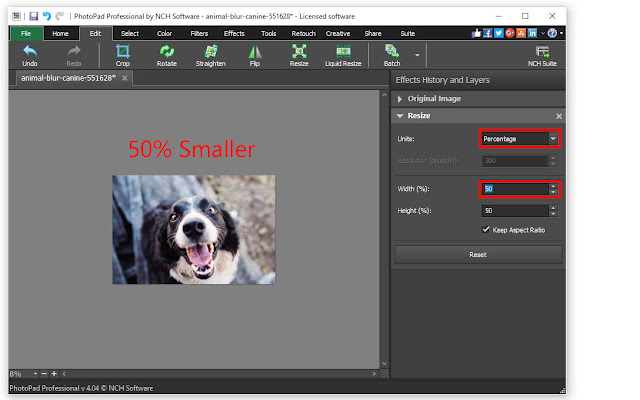
For this example, I have chosen to resize a picture using the percentage option for my units. This is an easy way to conceptualize how to resize a picture. I want my image to be exactly half the size it is right now, so I have set my units to Percentage and then typed in 50% for the value in the width box. You will see that my image is now half the size it previously was. Some websites give you specific dimension requirements for photos in pixels. For this, you would simply change the units to pixels instead of percentage and type in the dimensions you were given into the width and height boxes.

Resize Photo by Percentage 

Save Your Image

Now that you are finished resizing your image, you are ready to save your work and use your newly resized photo. Under the File tab, select the option that says Save As...This will launch the explorer window and allow you to select your output destination and choose your output file type.


Resize by Compressing

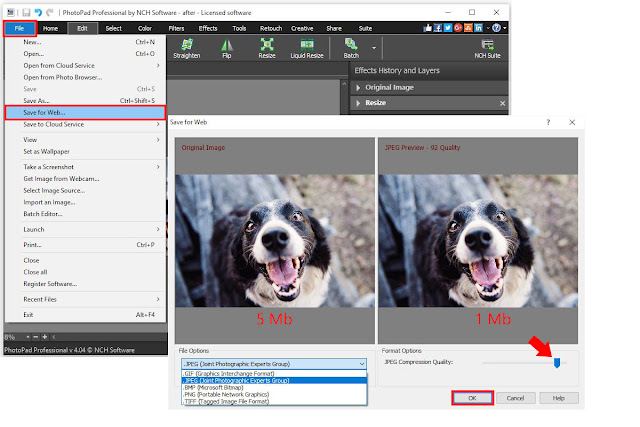
Sometimes when people ask how to resize a picture, what they are actually referring to is the file size in terms of storage. This is also known as file compression and can be done just as easily in PhotoPad. With your photo opened in the program, simply go to the File tab and select the option that says Save for web... This will launch a window that will allow you to use a slider to adjust the compression quality of your image and preview the result in real-time. In this example, I have reduced the file size by 80% with almost no observable loss in quality. Click on the OK button when you are finished and your newly compressed image can be saved to your chosen output destination.

Save for Web...


For more on photo editing, check out these posts:

Friday, July 20, 2018

Resize a Picture Easily with Pixillion Image Resizer

Resize a Picture Easily with Pixillion Image Resizer


There are times when you may have needed to upload or email a picture you have, only to find out that the file size is too large. Many websites and email clients have restrictions on how large an image can be. Large images take up a lot of space and may not be necessary for all purposes. Learning how to resize a picture is valuable knowledge to have when you encounter a situation like this. With Pixillion Image Conversion Software, you can quickly learn how to resize images with ease.


Import Image

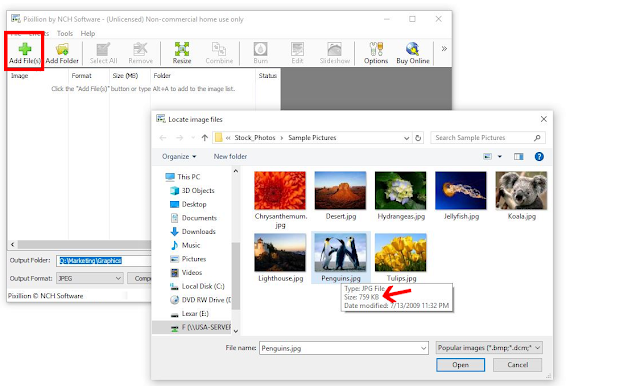
To resize a picture, launch your copy of Pixillion on your computer and open the image file you would like to resize. Click on the green plus sign that says Add Files and select your file or files from their location on your computer. You can resize a single image or batch resize multiple pictures at once.
759 KB image file size imported into Pixillion

Output Folder and Format

Next, select your output format and output destination folder at the bottom of the program. If you wish to change the file format of the picture you are resizing, this is where you can select a new file type. Once you have chosen the output folder where you would like your resized picture to be sent, you are ready to resize.

Resizing Options

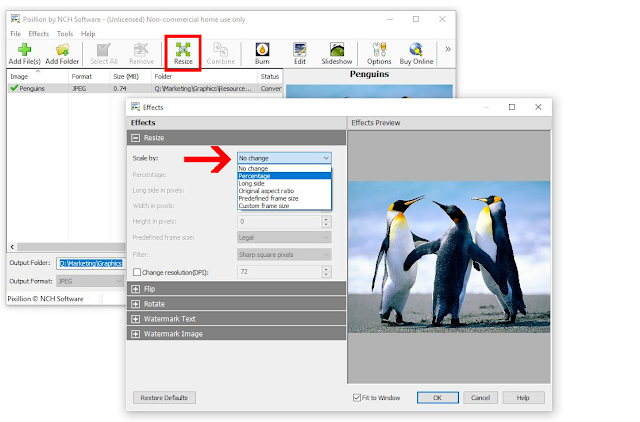
With your image imported into Pixillion and your export format and destination folder selected, you can now click on the green Resize icon in the main toolbar. This will launch the Effects window where the resize tab will open by default. There are 5 different resizing options available to you in Pixillion.
  1. Scale by Percentage
  2. Scale by Long Side
  3. Scale by Original Aspect Ratio
  4. Scale by Predefined Frame Size
  5. Scale by Custom Frame Size 
Scale by options 

Scale by Percentage

Using the Scale by Percentage option is one of the quickest and easiest methods to resize a picture. If you have been given a specific file size you need to achieve with your resize, you can easily adjust the percentage scale to bring your file down to that size. 
Resizing an image by Percentage Scale

Pixels and Resolution

When resizing a picture, the resolution of the image will change. The lower the resolution of an image, the fewer pixels the image will be made up of. Pixillon allows you to decide how it should handle those pixels when resizing an image. You can choose to have sharp square pixels or choose for them to come out smooth and blurry. The sharp and square option will make your picture more in focus, but the pixels may be more noticeable. The smooth blurry option will smooth out the harsh edges of pixelation more.
Square Pixels (left) vs. Smooth Pixels (right)

Effects

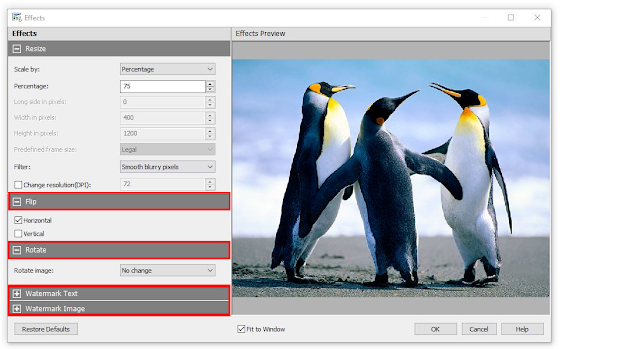
There are several other effects that can be applied to an image while resizing it. You can flip and rotate your image as well as add text and image watermarks. Use the Effect Preview window to view the effects before applying them.
Other Pixillion effects 

Finished Product

When you are finished applying the resize scale and any effects to your picture, click the OK button at the bottom of the effects window to save the settings. With the picture, you want to resize selected, click the Convert button in the bottom right corner of the program. You will see a pop-up window informing you that your conversion is complete. You can either open it then to view your resized image, or view it in the output folder you chose. Notice that our picture that started out at 759 KB has now been resized down to 160 KB with almost no loss in quality.
Resized image file size is 160 KB


Friday, July 6, 2018

Add Text to a Photo Easily with PhotoPad

Add Text to a Photo Easily with PhotoPad

Adding text to a photo is a great way to send a message that a picture on its own might not get across. Learning how to add text to a photo can help you make your own advertisements, postcards, memes, and more. Using a simple photo editing program such as PhotoPad Photo Editing Software, you can easily add text to images of your own with ease.


Adding a Text Layer

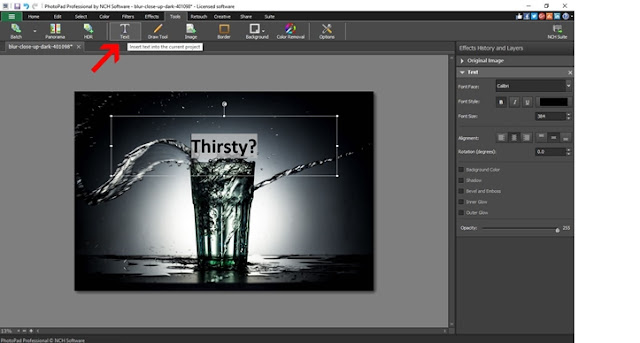
To add text to a photo, open the image that you would like to use in PhotoPad. Under the Tools tab, you will find the Text button. When you click on the text button, your new text layer will open in the layers panel on the right-hand side of the program and your text box will appear on your photo. Use your keyboard to type your text directly into the text box. You can add as many text layers as you would like in order to move individual words or sentences around independently.
Adding a text layer

Adjusting Your Text

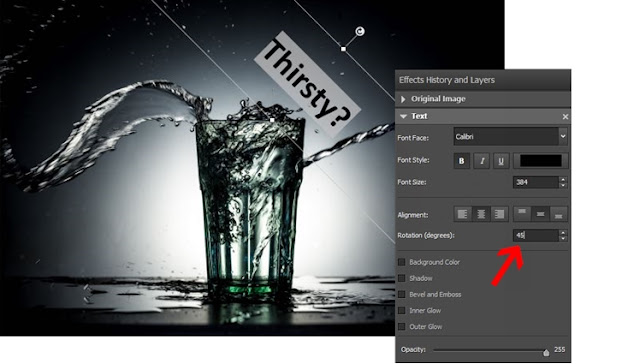
You can move the text around your image by hovering the mouse over the edge of your text box until you see the 4 sided arrow. Then simply click and drag your text box into the position you would like. Use your mouse to resize the text box by clicking and dragging the white squares on the corners and in the center of your text box. You can also rotate your text using the curved arrow at the top of the text box. For a more precise rotation, you can type in the numerical value on your text layer in the layers and effects panel on the right.
Moving and rotating text

Changing fonts

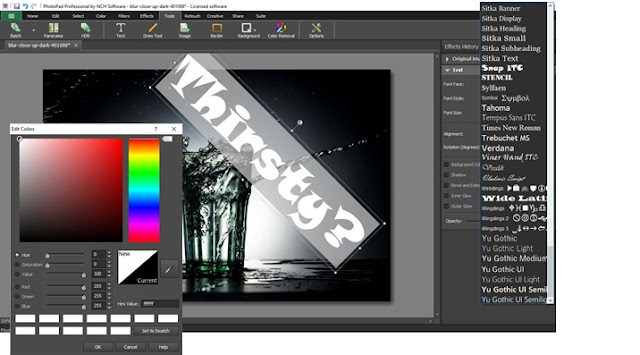
To change your font, select a new font option from the drop-down menu on your text layer in the layers panel. You can choose from a variety of font styles and types and then adjust the font size. You can select to have your font in bold, italics, or underlined and then adjust the alignment of your font left and right and up and down within the text box. Changes made to your text are only made to text that is selected or that has just been typed after making the change.
Changing fonts

Styling Your Text

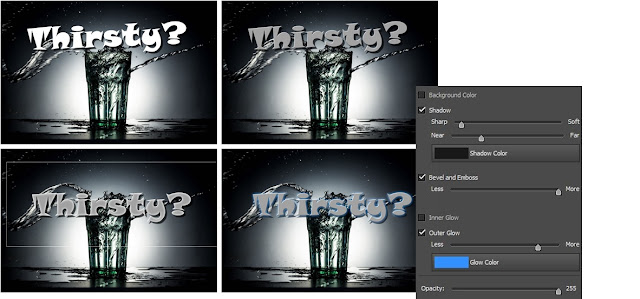
There are several different options for styling your text on your image in PhotoPad. You can add a drop shadow effect to your text by selecting the Shadow option on your text layer. You can adjust the sharpness and the distance of your shadow effect as well as change the color of the shadow. Use the Bevel and Emboss option to give your text more of a 3D look with rounded edges. You can choose to add an Inner Glow, and Outer Glow, or both to the text on your image. Choose the glow color from the color palette and adjust the intensity of the glow to your preference.
Adding text styles and effects

Making Your Text Transparent

You can adjust the opacity or transparency of your text from the layer effects panel too. Changing the opacity of your text is a great option when you want your text to be a little more subtle against your image or when you would like to be able to see through it to the background.
Adjusting text opacity 

Adding A Background Color to Text

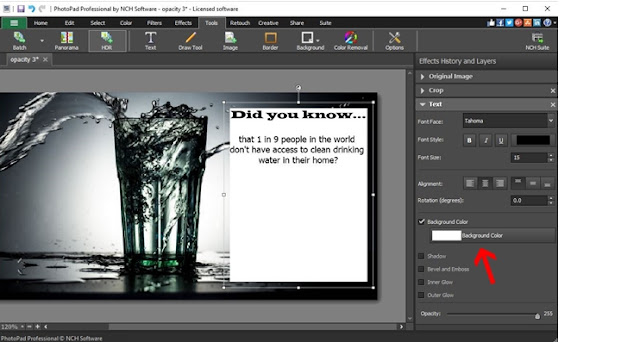
You can also select to have your text appear against a colored background. Checking the Background Color box will fill your text box with a solid colored background that your text will appear on top of. You can change the color of the background and adjust the alignment of your text against it.

Adding text background-color 


For more on photo and image editing, check out some of our other posts:

Friday, June 8, 2018

How to Make a Transparent PNG in PhotoPad

How to Make a Transparent PNG in PhotoPad

What is a PNG image?

PNG stands for Portable Network Graphics. PNG files are great for use on the internet because they support transparency and because they are compact in size. They are commonly used for web design elements such as icons and logos. PNG graphics are incredibly versatile in their web applications. They can be used against any background and can make adding graphics to websites and other design projects extremely simple. PNG graphics are easy to use and they also happen to be easy to make. With photo editing software like PhotoPad, you can make your own transparent PNG images for use in your next website or graphic design project.

Example of a PNG logo improving a website


How to Make a PNG Image with a Transparent Background

If you are starting from scratch and creating your own graphic, making a PNG image with a transparent background is easy. Open your latest version of PhotoPad and create a new file with a transparent background to work on. You can create a new project file from the New Image Menu by pressing Ctrl + N on your keyboard and then selecting the option that says Transparent for the background. If you have already made a new blank project file in PhotoPad, simply go to the Edit tab, then choose Background and select Transparent. You will see that your white background has now been replaced with a faint grey and white checkerboard. This checkerboard means that the image effectively has no background. Any work that you do on top of the checkerboard will be the only thing that gets saved.
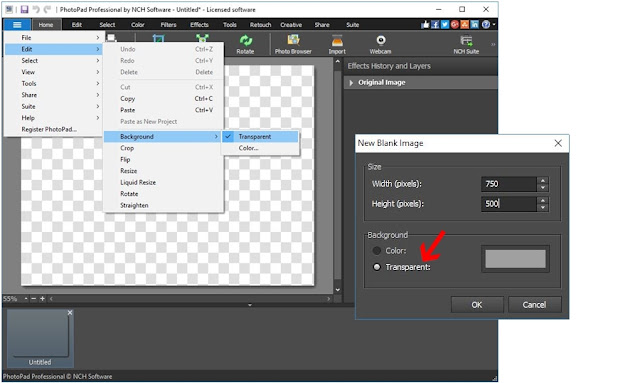
How to remove the background of an image in PhotoPad
Creating a New Image with a Transparent Background


Try visiting the NCH Clipart Library under the Creative tab to add clipart to your transparent design project. The Clipart Library is filled with fun and interesting images that are great for use in logos and other graphic design projects.
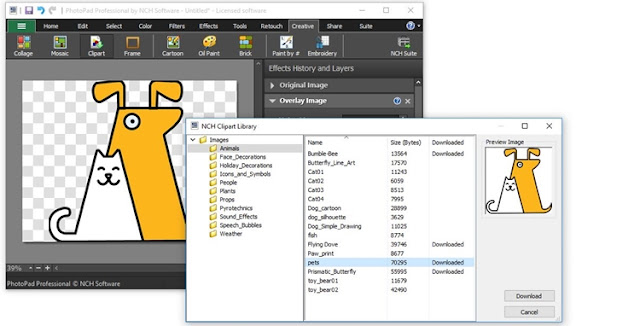
NCH Clipart library with PNG images
NCH Clipart Library 

You can add text to your transparent background too. Under the Tools tab, you can select Text and then change the font, color, size, and placement of your text on your new graphic. Many modern logos use two different fonts or two different font sizes for their company name and tagline.
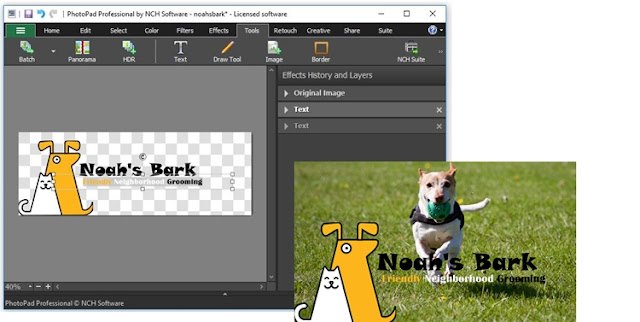
Example of a PNG image being used on a photograph
Adding text onto a transparent background


Removing the Background from an Image

If you already have an existing logo or graphic that you would like to make into a PNG image with a transparent background, no sweat. Open your file into PhotoPad and select the Wand Tool. The wand tool makes a selection by looking for the contrast between colors against the edge of your graphic and its background. You can adjust the level of sensitivity of the Wand Tool depending on how sharp the contrast between your image against its background is. Click on the background of your image with the wand tool to select it. We are trying to select everything that we want to get rid of. The wand tool makes one selection around the outline first. To select any additional elements you wish to remove, hold down the shift key while you click on those other areas in the image. It helps to zoom in close in order to select the smaller details such as the spaces inside letters like "O" and "D."
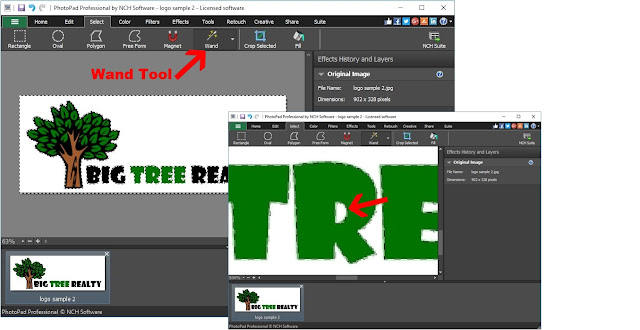
Making a Wand Selection

Now that we have our background selected, we are going to simply press the delete key on our keyboard or right-click and select "delete". This will delete all of the selected areas in the image. In our case, that means it will delete everything except our logo. You will immediately see that the background has disappeared and in its place, there is now a white and grey checkerboard. The checkerboard means that there is nothing there anymore. So when we go to save our image, only the graphic will be saved and nothing else.
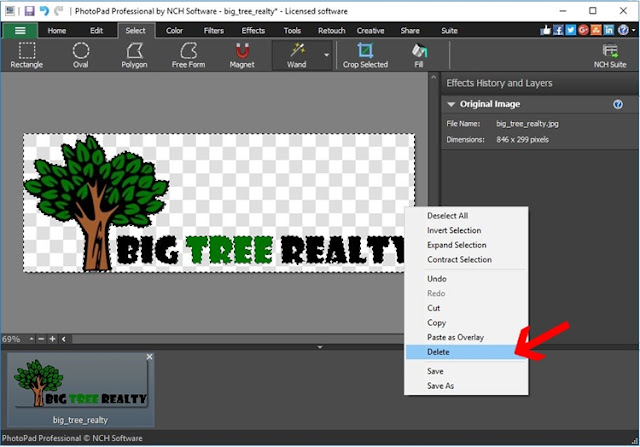
Delete Your Background Selection

Saving an Image as a PNG File

Once we are finished making our background transparent, we are ready to save the image as a PNG file. Saving an image as a PNG in PhotoPad is very simple. Go to the File tab in the upper left-hand corner of the program and then select the option Save As... You can also get there by simply pressing Ctrl + Shift + S on your keyboard. Change the Save as Type: from the drop-down menu to PNG (*.png) and then click Save.
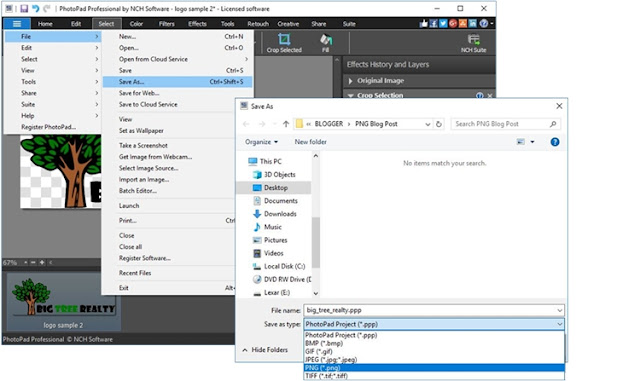
Saving a file as a PNG

Using Your PNG Image File

Now that we have successfully saved our graphic as a PNG file, it is ready for use on the web or in your next graphic design project. You will notice that when you preview the file on your computer,  the background is completely gone. This will remain the case wherever you choose to use your new PNG image. Drag it directly back into PhotoPad to place it on any other image or background you would like, or upload it to the web for seamless integration on your website.

Transparent PNG logos on photo backgrounds


Thursday, March 15, 2018

Combine Black and White With Color In PhotoPad

How to Make A Photo With Color and Black and White


You have probably seen one of these dramatic-looking images and wondered how it was created. It is a clever and imaginative way to draw attention to a particular color or section of an image and give it that artistic look and feel. The coolest part about these stylish images is that you don't have to be a photo editing expert to make one of your own. The process of making a photo that combines black and white with color can be broken down into three easy steps:
  1. Select the area you want to color 
  2. Invert the selection 
  3. Apply the Grayscale filter 
After reading this tutorial, you too will be able to create an attractive image of your own using the latest version of PhotoPad photo editing software.


Making A Selection

The first step will be to select the part of your image that you wish to keep in color. PhotoPad features 6 different tools for making selections and they each have their own benefits. 
PhotoPad has six different selection tools


Select a region along its outline 

Selecting With The Magnet Tool

The Magnet tool is the tool that is best suited for this project. The Magnet tool works by finding the edges on the object you are selecting. The tool looks for the abrupt color change that is typical of the edge of an object against a background and then uses those detected edges to make an incredibly precise selection.


Select a region with similar colors 

Selecting With The Wand Tool

The Wand tool is another perfectly acceptable option. The wand tool uses color detection to make a selection. You can adjust the sensitivity of the tool so that it selects more or fewer colors on the spectrum of colors you are trying to select. Hold down the shift key while making your selection to add more to it. The Wand tool works best when the background is a different color than the object you are selecting and when the object you are selecting doesn't consist of too many different color tones.


Inverting A Selection

I used the Magnet select tool to select the petals around this flower. You want to make sure you zoom in close to ensure that you are making your selection as precise as possible.

Once the object is selected, it is time to make everything else black and white. Since we want everything except our selected object to change, we are going to invert our selection.

With your object still selected, right-click on the selection and choose the option on the drop-down menu that says "Invert Selection." You will notice that now, instead of our flower being selected, everything EXCEPT the flower is selected. That is just what we want.


Using The Grayscale Filter


With our background selected, we are going to visit the Filters tab, which is located at the top of the PhotoPad application. Click on the Filters tab and then look for the Grayscale filter on the far left. Grayscale means that only shades of gray will be used to color your image. It is more commonly referred to as "black & white." Now, click on the Grayscale filter option.

Because we have something selected, this will launch a prompt asking if we want to apply the Grayscale effect to the entire image or just to the selected region. Because we now have just the background selected, we will choose to apply the effect to the Selected Region.


The Finished Product

As you can see in this image, the Grayscale Filter effect has been applied to the background while leaving the balloons and their bright colors untouched. The finished product is a beautiful image that jumps right out at you.


Tuesday, October 3, 2017

Create your own Cartoons and Comics using our New Speech Bubbles Feature in DrawPad


Cartoon created using DrawPad's New Feature - Speech Bubbles


Design your own Cartoon or Comic with DrawPad

To get started creating your own cartoon, you will need:
Now that you're ready, it's time to get creative!


To create a cartoon using DrawPad Graphic Design Software, open the program and select 'New Project'. Optionally, select the 'Advanced' option if you wish to enter specific dimensions for your project.


Create the setting for your cartoon

Select the background color and start gathering the image assets to create the context for your cartoon.


Download icons, silhouettes and more from the included Clipart library in DrawPad, or,


import your own images using the 'Add Image' option.


If you are feeling artistic, draw or sketch using the wide variety of drawing tools available - Pen, Pencil, Brush, Marker, Crayon, Spray Paint and set shapes. Each tool can further be customized to suit your requirements.

For example, the brush tool includes options such as color, brush size, softness and smoothing in the properties panel. With shapes, you can set the fill to use one of the included patterns.


Once you have all of of the pieces ready, arrange them using drag and drop to create the setting for your comic or cartoon.


Add in the characters

Add, import, draw or sketch the characters for your cartoon.


Add Speech Bubbles

Use DrawPad's newest feature Speech Bubbles to add narratives for the characters. The speech bubble can be added using the 'Bubble' option under the 'Home' Tab.

Before drawing your speech bubble, adjust the settings in the Bubble Options panel on the right. Select the size of the speech bubble border, the direction the callout is pointing and whether the callout is on the right or the left of the speech bubble.


The Clipart library also includes a variety of speech bubble styles. The only drawback being that they are not as easy to customize.


Add Text in the speech bubbles

Use the text tool to add your narration to the speech bubbles.

Cartoon created using DrawPad's New Feature - Speech Bubbles

Share your Cartoon or Comic

After following these simple steps, you will have a cartoon or comic that you will be excited to share with your friends, family and the world. Share it via email, social media or order a professional print.

The options are as endless as your imagination.