Showing posts with label graphics. Show all posts

Friday, June 8, 2018

How to Make a Transparent PNG in PhotoPad

How to Make a Transparent PNG in PhotoPad

What is a PNG image?

PNG stands for Portable Network Graphics. PNG files are great for use on the internet because they support transparency and because they are compact in size. They are commonly used for web design elements such as icons and logos. PNG graphics are incredibly versatile in their web applications. They can be used against any background and can make adding graphics to websites and other design projects extremely simple. PNG graphics are easy to use and they also happen to be easy to make. With photo editing software like PhotoPad, you can make your own transparent PNG images for use in your next website or graphic design project.
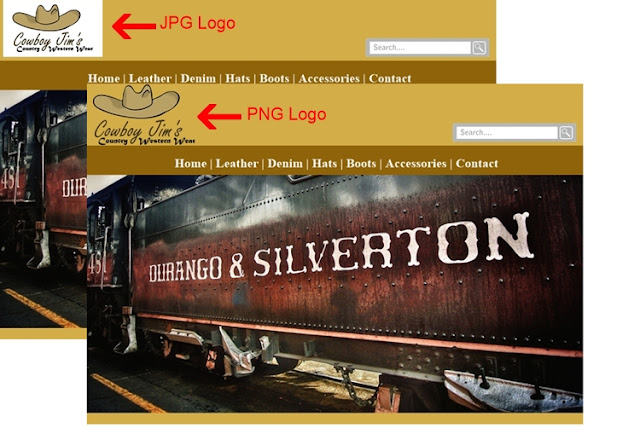
Example of a PNG logo improving a website


How to Make a PNG Image with a Transparent Background

If you are starting from scratch and creating your own graphic, making a PNG image with a transparent background is easy. Open your latest version of PhotoPad and create a new file with a transparent background to work on. You can create a new project file from the New Image Menu by pressing Ctrl + N on your keyboard and then selecting the option that says Transparent for the background. If you have already made a new blank project file in PhotoPad, simply go to the Edit tab, then choose Background and select Transparent. You will see that your white background has now been replaced with a faint grey and white checkerboard. This checkerboard means that the image effectively has no background. Any work that you do on top of the checkerboard will be the only thing that gets saved.
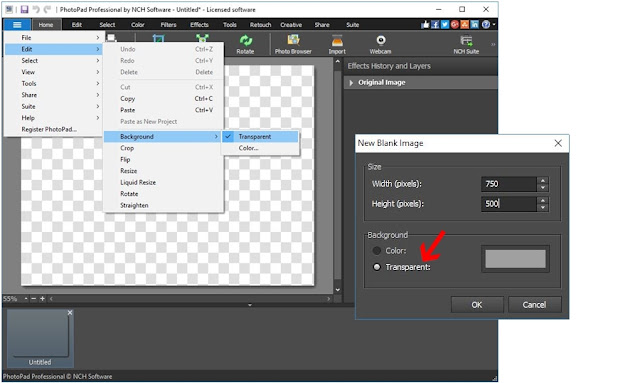
How to remove the background of an image in PhotoPad
Creating a New Image with a Transparent Background


Try visiting the NCH Clipart Library under the Creative tab to add clipart to your transparent design project. The Clipart Library is filled with fun and interesting images that are great for use in logos and other graphic design projects.
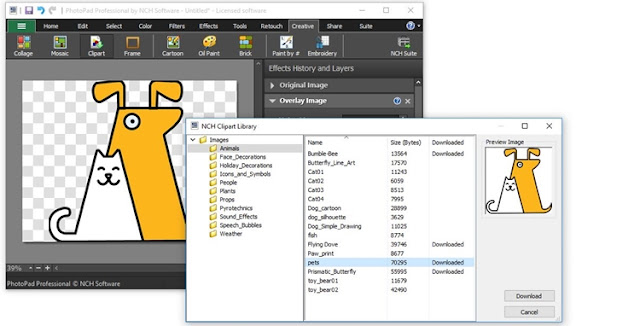
NCH Clipart library with PNG images
NCH Clipart Library 

You can add text to your transparent background too. Under the Tools tab, you can select Text and then change the font, color, size, and placement of your text on your new graphic. Many modern logos use two different fonts or two different font sizes for their company name and tagline.
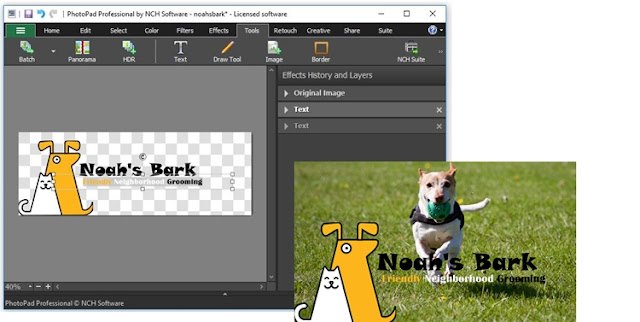
Example of a PNG image being used on a photograph
Adding text onto a transparent background


Removing the Background from an Image

If you already have an existing logo or graphic that you would like to make into a PNG image with a transparent background, no sweat. Open your file into PhotoPad and select the Wand Tool. The wand tool makes a selection by looking for the contrast between colors against the edge of your graphic and its background. You can adjust the level of sensitivity of the Wand Tool depending on how sharp the contrast between your image against its background is. Click on the background of your image with the wand tool to select it. We are trying to select everything that we want to get rid of. The wand tool makes one selection around the outline first. To select any additional elements you wish to remove, hold down the shift key while you click on those other areas in the image. It helps to zoom in close in order to select the smaller details such as the spaces inside letters like "O" and "D."
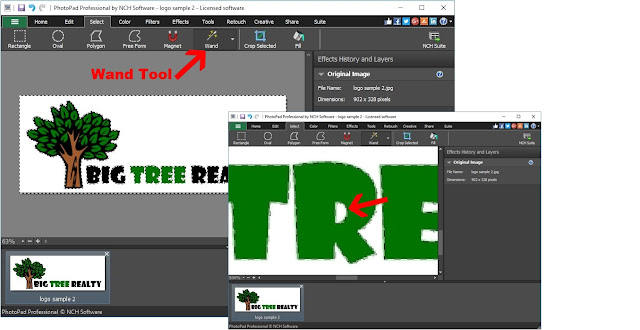
Making a Wand Selection

Now that we have our background selected, we are going to simply press the delete key on our keyboard or right-click and select "delete". This will delete all of the selected areas in the image. In our case, that means it will delete everything except our logo. You will immediately see that the background has disappeared and in its place, there is now a white and grey checkerboard. The checkerboard means that there is nothing there anymore. So when we go to save our image, only the graphic will be saved and nothing else.
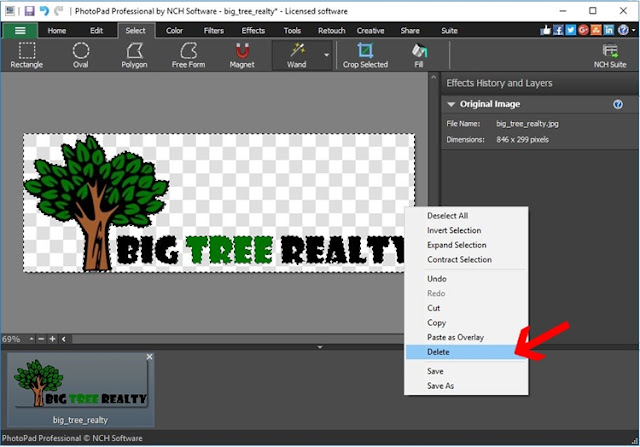
Delete Your Background Selection

Saving an Image as a PNG File

Once we are finished making our background transparent, we are ready to save the image as a PNG file. Saving an image as a PNG in PhotoPad is very simple. Go to the File tab in the upper left-hand corner of the program and then select the option Save As... You can also get there by simply pressing Ctrl + Shift + S on your keyboard. Change the Save as Type: from the drop-down menu to PNG (*.png) and then click Save.
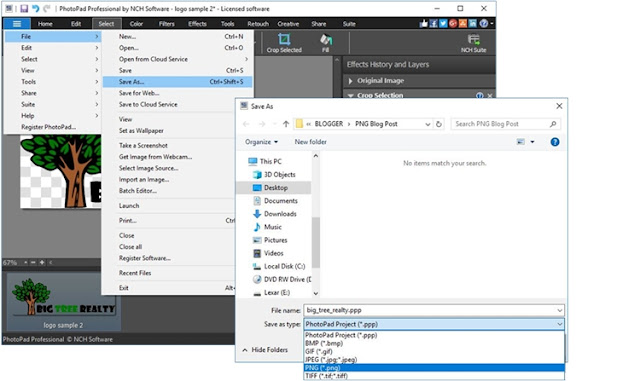
Saving a file as a PNG

Using Your PNG Image File

Now that we have successfully saved our graphic as a PNG file, it is ready for use on the web or in your next graphic design project. You will notice that when you preview the file on your computer,  the background is completely gone. This will remain the case wherever you choose to use your new PNG image. Drag it directly back into PhotoPad to place it on any other image or background you would like, or upload it to the web for seamless integration on your website.

Transparent PNG logos on photo backgrounds


Tuesday, October 3, 2017

Create your own Cartoons and Comics using our New Speech Bubbles Feature in DrawPad


Cartoon created using DrawPad's New Feature - Speech Bubbles


Design your own Cartoon or Comic with DrawPad

To get started creating your own cartoon, you will need:
Now that you're ready, it's time to get creative!


To create a cartoon using DrawPad Graphic Design Software, open the program and select 'New Project'. Optionally, select the 'Advanced' option if you wish to enter specific dimensions for your project.


Create the setting for your cartoon

Select the background color and start gathering the image assets to create the context for your cartoon.


Download icons, silhouettes and more from the included Clipart library in DrawPad, or,


import your own images using the 'Add Image' option.


If you are feeling artistic, draw or sketch using the wide variety of drawing tools available - Pen, Pencil, Brush, Marker, Crayon, Spray Paint and set shapes. Each tool can further be customized to suit your requirements.

For example, the brush tool includes options such as color, brush size, softness and smoothing in the properties panel. With shapes, you can set the fill to use one of the included patterns.


Once you have all of of the pieces ready, arrange them using drag and drop to create the setting for your comic or cartoon.


Add in the characters

Add, import, draw or sketch the characters for your cartoon.


Add Speech Bubbles

Use DrawPad's newest feature Speech Bubbles to add narratives for the characters. The speech bubble can be added using the 'Bubble' option under the 'Home' Tab.

Before drawing your speech bubble, adjust the settings in the Bubble Options panel on the right. Select the size of the speech bubble border, the direction the callout is pointing and whether the callout is on the right or the left of the speech bubble.


The Clipart library also includes a variety of speech bubble styles. The only drawback being that they are not as easy to customize.


Add Text in the speech bubbles

Use the text tool to add your narration to the speech bubbles.

Cartoon created using DrawPad's New Feature - Speech Bubbles

Share your Cartoon or Comic

After following these simple steps, you will have a cartoon or comic that you will be excited to share with your friends, family and the world. Share it via email, social media or order a professional print.

The options are as endless as your imagination.


Thursday, December 1, 2016

Edit and Order Professional Prints with PhotoPad

Order Prints directly from PhotoPad Photo Editing Software


We are very excited to announce that you can now order professional prints of your photos directly from PhotoPad Photo Editor! 


After editing your photos with PhotoPad, you can order photo prints, calendars, canvas prints, mugs, t-shirts, luggage tags, mousepads, posters, greeting cards, aluminum prints and more!


Custom Photo Prints

To order prints or customized products featuring your photos and images, begin by opening the photos that you would like to edit and print with PhotoPad. 


Edit, crop, and add effects to your photos as you see fit. When you are happy with your photo, click on the File menu, and select "Order Prints...".

PhotoPad will prompt you to enter a password to protect your photos. This password will be automatically copied to your clipboard every time you order prints so that you can use "Crtl" + "V" to paste your saved password. 


In the custom print gallery, you will be able to select a number of methods and products to print your photos. Click on "Buy" or "Select Product" to navigate to the gallery of custom print items.

To finalize your order, simply select the product that you would like to purchase, and add it to your cart. You can add multiple prints and product styles to your cart before finalizing your purchase. 


You may also like:


Thursday, March 13, 2014

New Graphic Editor Software

DrawPad Graphic Editor is the newest product from NCH Software and adds another fantastic product to a great lineup of Graphic Software and Tools. This software is ideal for creating images, paintings, and drawings.

DrawPad is an easy-to-use image composition and manipulation program. We created it to function as an alternative to some of the top drawing/painting/image creation tools on the market. If you want something with more features than traditional paint programs, but don't have the expertise (or budget) to use a premium illustrator product, this is the perfect software for you. It is an essential tool for many different graphic design projects such as banner ads, icons, logos, invites, diagrams, paintings, sketches, and many more.

DrawPad features a wide variety of tools including
  • Pencils and brushes for sketching, drawing, or painting.
  • Tablet and touchpad sensitivity
  • Raster and vector images
  • Custom effects and textures.
  • Object/shape insertions.
  • Compatability with standard fonts.
  • Image manipulations (cropping, resizing, flipping, etc.)
  • Ability to save in a wide variety of formats.
If you are looking for a great free tool that any artist or designer can enjoy, try DrawPad Graphic Editor. If you have already had the chance to try DrawPad, let us know what you think. You can leave us feedback or suggestions for future features and take part in improving a product you already enjoy.

Tuesday, March 11, 2014

New Home and Landscape Planning and Design Software

NCH Software has a great new addition to our graphics software toolkit, DreamPlan Home Design Software. This product adds a unique tool to our already diverse line of graphic software products that allows users to visually represent any number of remodeling projects before construction begins.

Before you start a new home improvement project, or begin creating blue-prints for a new home, perfect the design and floor plan with the help of this easy-to-use software product. DreamPlan helps you create the floor plan of your house, condo, or apartment. It makes remodeling easy by including features that allow you to view what furniture, fixtures, appliances, and other decorations will look like in the new layout. You can also use DreamPlan to design outdoor landscaping such as walls, gardens, or trees. This product features 3D, 2D, and blueprint view modes depending on what is needed by you or your contractor for easy execution. Next time you are planning a home improvement, landscaping, or remodel project, try DreamPlan Home and Landscape Design Software and let us know what you think!

Have you already tried DreamPlan? Do you have suggestions for how we can improve the features within the product? Let us know so we can incorporate your thoughts into the next version we release by visiting our DreamPlan support page.

Tuesday, September 17, 2013

ClickCharts New Flowchart Diagram Maker

Our developers have been busy expanding to our list of software programs. Most recently we came out with a new product for creating flowcharts. This new program is named ClickCharts flowchart software and in just a few clicks it will help you make any type of flow diagram from a company organization chart to an entity relationship diagram. So if you have a processes to outline or an idea to brainstorm a mind map of, download ClickCharts free flowchart maker to create a visual representation of that information that you can easily print out or save as an image file to share with others.

Tuesday, August 27, 2013

New Mac Digital Photo Slideshow Software

New Mac version of PhotoStage slideshow maker software One of our most popular programs, PhotoStage Slideshow Maker is now not only the best slideshow software for Windows but also an easy way to make slideshows with music, photos, video clips, narration and more on Mac OS X. Slideshows are a great way to keep your memories alive and creating dynamic video slideshows couldn't be easier. From Camera to DVD or posting online to share with friends and family follow the easy steps to add your media, enhance your photos and add effects for a professional touch in minutes. Download PhotoStage today to start making your own video picture slideshows and see how easy it is for yourself.

Friday, June 28, 2013

PhotoPad Photo Editor New for Mac OS X

PhotoPad mac photo editor now available PhotoPad photo editing software is now available for Mac OS X. If you own an Apple computer and have digital photos or pictures you would like to touch up before you share them or print them out you will want to try PhotoPad for a free and easy way to edit your pictures.

Not every photo needs a full-blown airbrushing session. And, just like how not everyone who snaps a photo is a professional; not everyone who wants to edit a photo should have to use software that takes professional know-how. That's where PhotoPad steps in, providing features to touch up blemishes, remove red-eye, adjust the color or brightness, crop or rotate, and more all at your fingertips. So you can make your edits and post your photos before you could even download another photo editor.

Whether you are a Mac or a PC, if you have pictures to edit download PhotoPad picture editing software for your computer today to make your digital photos shine.

Thursday, April 18, 2013

Best Method to Easily Resize Photos with Pixillion

how to easily batch resize photos and imagesIf you have a bunch of photos from your last vacation or night out, you may want to share them all with friends and family. But, you may find that your batch of photos is too large to email. The solution is easy, you can resize or rotate all your digital photos in bulk with a Pixillion image resizer and converter. If you will be editing photos you could resize them as you go, but the more pictures you have, the more time you can save by doing a batch photo resize.

So, to resize your photos, simply add them all to the list in Pixillion. At the bottom of the window click on Effects to open the format options. Here you can use the drop-down menu under Scale to set the photo resizing options. Once that is selected click OK to save your options. You only need to set this once, the effect(s) will be applied to all of the photos being converted in a batch, so Select All—or all the photos you want to apply those changes to—and click Convert. That is all there is to it. Pixillion photo converter will process all of the selected photos and save the newly resized photos for you ready for you to email, upload, and share.