How to Change JPG to PDF with Pixillion JPG Converter

JPG files are the most common image file type for photographers, designers, and hobbyists alike. However, sometimes it is useful to convert a JPG image to a PDF file so that it can easily be shared and stored while maintaining the same high quality as the original JPG format. Learning how to change JPG to PDF is a useful skill for anyone dealing with image files and with
Pixillion Image Conversion Software, it has never been easier to do.
Import JPG Files
To begin converting JPG to PDF, start by adding your JPG files to
Pixillion. You can do this by clicking on the green
Add Files icon at the top of the program, or by dragging and dropping your JPG image files directly into the
Pixillion.

JPG Converter Options
Click on the
Options icon located in the main toolbar to view some of the JPG to PDF conversion options available to you in Pixillion. Here you can make adjustments to the image resolution, add image metadata, background colors, and more. This is also where you can decide how the program should handle duplicate files and folders when/if they are created.

Add JPG Conversion Effects
Click on the
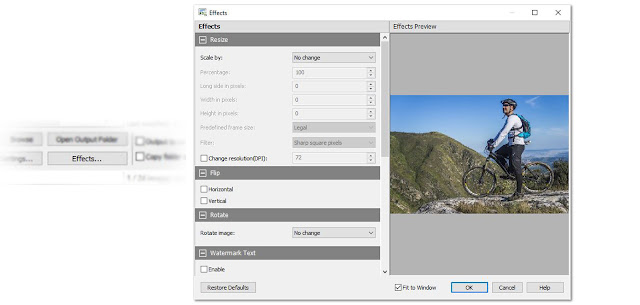
Effects button located at the bottom of the program to open the JPG conversion effects window. From here you can select from various image effects that you would like to have applied at the time of conversion when changing your JPG files to PDF. Pixillion allows you to resize your images, flip and rotate them, apply watermarks, and more. Click
OK after you have set and selected your desired effects and they will be applied to all of the JPG to PDF conversions you perform.

Set Output Destination
Next, we need to choose our output folder. This is where your converted PDF files will go once you have changed them from JPG to PDF. You can use the dropdown menu to quickly select an output folder option or click on the
Browse button to launch the file finder window and locate an output folder anywhere on your computer.

Set Output File Type to PDF
After you have chosen an output destination, you will need to set your output format. Because we want to change JPG to PDF, we are obviously going to set the output format to PDF. Click on the dropdown menu and select PDF from the list of output file types. From this point forward any conversions that you perform will be made to the PDF file type.

Change JPG to PDF
With our effects added, our output folder is chosen, and our output format set to PDF, we are now ready to convert our JPG images to PDF files. Click on the
Select All button, located at the top of the program, to select all of the files at once and perform a batch conversion. You can also select and convert one file at a time. Hold down the
Ctrl key while clicking on the files you wish to convert to select them. With your JPG files selected, click on the
Convert button in the bottom left-hand corner of the program to start the conversion process. Your selected JPG files will quickly be changed to PDF and appear in your output folder as new PDF files.

Combine Multiple Images in a PDF
If you would like to combine multiple JPG images into a single PDF file, you can do so by selecting those images and then clicking on the
Combine icon located in the main toolbar. This will open the
Combine Images window where you can view your selected images. Click the button at the bottom of the window that says
Combine images... to open the file finding window where you can choose an output folder and name your new combined PDF file. Once you click
Save, a new PDF file will appear that contains all of the selected JPG images within it.

 JPG files are the most common image file type for photographers, designers, and hobbyists alike. However, sometimes it is useful to convert a JPG image to a PDF file so that it can easily be shared and stored while maintaining the same high quality as the original JPG format. Learning how to change JPG to PDF is a useful skill for anyone dealing with image files and with Pixillion Image Conversion Software, it has never been easier to do.


In fact, it is the reverse process of pdf to image, which is very worthy of study.
ReplyDelete