
Showing posts with label photo editing. Show all posts
Showing posts with label photo editing. Show all posts
Wednesday, March 18, 2026

Sunday, November 9, 2025
Cross-Stitch Your Photos into Seasonal Works of Art
Create Embroidery Designs from Photos

As the leaves turn and the air grows crisp, fall inspires us to slow down and get creative with handmade projects. This season, bring that cozy, handcrafted feel to your favorite photos with PhotoPad’s Embroidery Tool - a feature that transforms digital images into real embroidery patterns you can print and stitch yourself. Whether you’re decorating your home with fall-themed art, stitching a beloved family photo or planning your next handmade gift, this tool makes it easy to turn any image into something beautifully tactile.
Turn a Photo into an Embroidery Pattern in Minutes
Creating your own cross-stitch or embroidery design takes just a few clicks. Open your image, select Tools > Embroidery, then adjust the number of colors and stitches to match your preferred level of detail. The pattern preview updates instantly, showing exactly how your stitched design will look. The printed pattern includes a color key with official DMC Embroidery Floss codes, so matching thread colors is effortless.
You can print your pattern or save it as a PDF to work from digitally. Whether you’re stitching a family portrait, a pet photo, or a favorite landscape, PhotoPad’s Embroidery Design Software makes it easy to turn any picture into a unique, handmade piece of art - no extra software required.
- Tip: Crop or adjust your photo’s brightness and contrast in PhotoPad before generating the pattern for even clearer stitch results. Note: The Embroidery Tool creates real, stitchable patterns - you will need an embroidery hoop, needle, and thread if you plan to stitch the design by hand.
- Tip: Try fewer colors for a minimalist outline or increase the stitch count for detailed results.
Save Your Photo as an Embroidery Pattern
Once your pattern looks just right, select how you want to save or print it.

The Embroidery Tool offers several output options:
- Original - keeps your photo as reference
- Colored Pattern - shows thread colors directly on the image
- Symbol Pattern - great for classic cross-stitch layouts
- Color Key - lists all thread colors and codes for easy stitching
Print your Embroidery Pattern and Start Stitching
When you’re ready, simply save your pattern as a PDF or send it straight to print. Grab your embroidery hoop, needle, and thread - your design is now ready to come to life, one stitch at a time.

Digital Images Reimagined as Embroidery Art
Whether it’s a snapshot from a fall hike, a cozy family photo, or a candid portrait, turning your images into embroidery patterns is a creative way to preserve memories with a personal touch.
With PhotoPad Embroidery Pattern Maker, your photos don’t just stay on a screen - they become something you can truly hold, display, and gift.
Happy Stitching,
The PhotoPad Team
Tuesday, August 25, 2020
Upscale and Enhance Photos with AI Super Resolution
If you have ever tried to increase the size of your photo, you know that one of the biggest challenges with this is that the quality of the photo decreases and becomes unsharp and blurry.
This has to do with the resolution of an image. Since image resolution refers to the number of pixels within an image, this number is fixed. The number of pixels does not increase when you enlarge an image as there is no new image information added, thus decreasing the image quality.
If you wanted to increase the size of your photo without highlighting the poor photo quality, the only solution was to take a brand new photograph at a higher resolution.
But what if I told you that with PhotoPad you could now enlarge an image and increase its resolution at the same time?
Yes, you heard that right. Those scenes you see in police television dramas where detectives zoom into an image and it magically improves the quality and details start appearing is now a reality thanks to PhotoPad Photo Editor.
PhotoPad has released a new feature called “Super Resolution”, an AI and machine-learning tool that makes it possible to enhance and upscale images without losing quality.
How does Super Resolution work?
Using cutting-edge technology, Photopad’s Super Resolution is a fully automated process that uses artificial intelligence and machine learning to recognize patterns and recreate contents of an image including edges, patterns, and textures.
The Super Resolution algorithm has been trained on large data sets of images so that it understands how physical objects such as land, buildings, people, etc. look and what their typical features are.
So when Super Resolution is used to enlarge an image, it scans the image, recognizes these general features, and then adds the extra pixels to create a high-quality resized photo, all in a couple of seconds.
How to use Super Resolution in PhotoPad?
1. The first step if you haven't already, is to download and install PhotoPad Photo Editor.
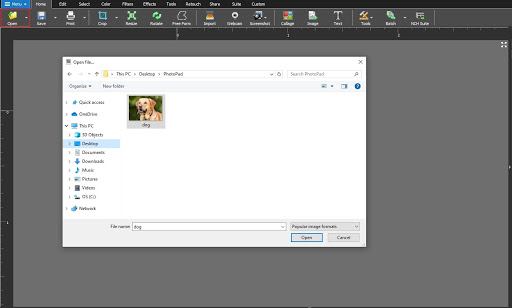
2. Click on the Open icon to upload your low-resolution image that needs to be enlarged. For best results, ensure your image is in JPG or PNG format.
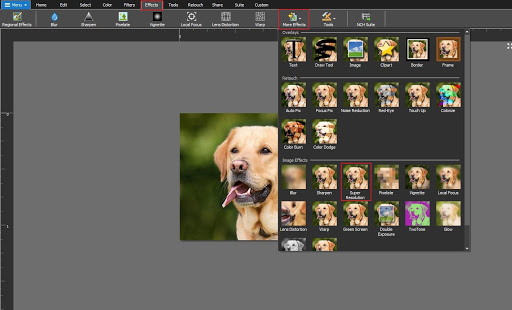
3. Navigate to the Effects section in the main toolbar, click on More Effects. In the drop-down below, select Super Resolution.
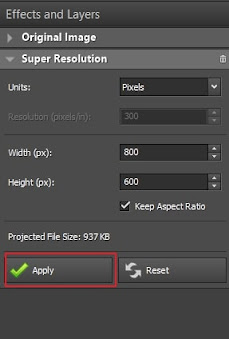
3. In the Effects and Layers section on the right, type in the Width and Height measurements to the desired size and click Apply.

Congrats you have successfully harnessed the power of machine learning to create your enlarged high-resolution image! Whether you need to create HDR images, edit travel photos, or blend images together, photo editing has never been easier. Download PhotoPad and create your first Super Resolution image today.
Tuesday, July 28, 2020
Best Tool to Make HDR Images in Minutes
 |
Picture this.
You’ve taken a trip to the forest and you come across this beautiful spot with the river gently flowing and the afternoon sunlight peeking through the forest trees.
You take out your camera but you are unsure how to best capture the scene in its full detail. Do you light the dark shadows on the river? Or do you light the trees in the background? The high-contrast scene can prove an impossible task for a camera to capture but not to worry, there is a solution. That solution is called PhotoPad and its sophisticated HDR processing tool.
What does HDR mean?
In a simplified definition, HDR photography or High Dynamic Range photography is the technique of fusing different exposure images to create a single image with overall correct exposure. PhotoPad, one of the most comprehensive photo editors and HDR software available, takes all the complications away in a couple of clicks to create an image with so much dynamic range and detail that couldn't otherwise be achieved with a normal photo.
How to Make HDR Images with PhotoPad
The first step is to capture at least three images with different exposures. The first image is to capture a mid-range exposure shot, the second captures the highlights with higher exposure and the third one is a lower exposure shot that captures the shadows. Feel free to capture additional photos that represent exposures between the two extremes.


Once you have your images, the next step is to install PhotoPad which takes less than a couple of minutes to install.
Open PhotoPad and navigate to the Tools tab in the toolbar and select the HDR icon.

Select the dark, medium, and bright exposure images by holding the Ctrl key and click Open.

PhotoPad will now automatically align and combine your images into a single HDR image.


Your eye-popping National Geographic-worthy HDR photo is complete. If you don’t want to take multiple photographs, you can also create an HDR from one RAW image format with neutral lighting and then later create different exposure images digitally with PhotoPad.
Once your HDR image is complete, continue to edit your image like any other PhotoPad project. Maybe try out the advanced double exposure tool or why not some of our top travel photography editing tips? Download PhotoPad HDR photo editor below and check it out yourself.
Thursday, July 9, 2020
Top 5 Travel Photography Editing Tips

We’ve all seen fashion magazine images edited with fake backdrops, flashy text, and intense skies. When it comes to travel photography, it’s recommended to keep editing simple and realistic.
Whether you’re a backpacker, a travel blogger, or a vacationer, you know travel is all about the experience, the journey, the beautiful places and amazing people you’ve met along the way. Unfortunately on many occasions, your travel photos fail to deliver the same experience behind the captured moment.
Not to worry, here are 5 simple travel photography tips that will turn your photos into something special with the help of PhotoPad, one of the easiest and most comprehensive photo editors available.
Crop
While traveling, you won’t always be in the right place at the right time to capture the perfect moment. This leads to photos including unwanted elements which can be distracting. Cropping your image is another way of composing your shot by highlighting the subject.
Take this image of the hot air balloons in Cappadocia, Turkey for example. You can crop the image to focus on a particular subject or make it suitable for social media. To crop the image in PhotoPad, select the Crop button in the toolbar, and adjust your selection. You can also adjust the aspect ratio and resize your crop selection.


AutoFix
Exposure, Resolution, Saturation, Color Correction, Contrast - the photography lingo is endless and can take a while to wrap one’s head around it.
One of the best features of PhotoPad is its one-click AutoFix function, which automatically fixes the most common photo problems and enhances your travel photo in seconds. To apply AutoFix, navigate to the Retouch tab in the toolbar, and select AutoFix. It’s that simple!


Color Boost
Don’t you wish you could take photographs with your eyes? You might notice that the vibrancy of colors in your travel photos looks a bit dull. This is where PhotoPad’s one-click Color Boost function will automatically make your pictures pop.
Head to the Filters tab and select Color Boost. You can also adjust the brightness and strength of the Color Boost accordingly.


Touch Up
All too often when you’re traveling to a place to photograph, other tourists have the same idea and are likely to end up in your photo. Luckily, you can remove tourists from your photo with PhotoPad’s Touch Up tool. This however only works well as long as there isn’t a crowd of people or a lot of elements that need to be removed and the elements are against an unbroken and repeating background like the image of a tourist beside a field of grass below.
To use the Touch-Up tool, go to the Retouch tab and select Touch Up. The tool works by stamping material from one part of a picture onto whatever other parts you choose. Hold down the Ctrl key and click on the part of the picture that will cover up the tourist, in this case - more grass. This tool is also useful for removing dust spots, blemishes, and other imperfections. Works like magic.


Lens Distortion
If you have ever noticed your travel photos to be unnaturally curved inwards or outwards, your image is distorted. Commonly caused by a myriad of reasons such as the use of wide-angle/telephoto lenses, camera positioning or camera tilts. Regardless of the distortion type, you can easily correct it with PhotoPad’s Lens Distortion feature.
Under the Effects tab, select Lens Distortion where you can manually adjust the distortion correction accordingly, giving your pictures a more professional look.


There’s so much more to editing your travel photos than just choosing a filter and posting your photo on Instagram. While these are just some of the quick and easy-to-use features listed in this article, PhotoPad is a comprehensive travel photo editor with many more tools and effects available that will take your travel photography to the next level. Happy editing!
Friday, March 22, 2019
How to Change JPG to PDF with Pixillion JPG Converter
How to Change JPG to PDF with Pixillion JPG Converter
 JPG files are the most common image file type for photographers, designers, and hobbyists alike. However, sometimes it is useful to convert a JPG image to a PDF file so that it can easily be shared and stored while maintaining the same high quality as the original JPG format. Learning how to change JPG to PDF is a useful skill for anyone dealing with image files and with Pixillion Image Conversion Software, it has never been easier to do.
Import JPG Files
To begin converting JPG to PDF, start by adding your JPG files to Pixillion. You can do this by clicking on the green Add Files icon at the top of the program, or by dragging and dropping your JPG image files directly into the Pixillion.
JPG Converter Options
Click on the Options icon located in the main toolbar to view some of the JPG to PDF conversion options available to you in Pixillion. Here you can make adjustments to the image resolution, add image metadata, background colors, and more. This is also where you can decide how the program should handle duplicate files and folders when/if they are created.
Add JPG Conversion Effects
Click on the Effects button located at the bottom of the program to open the JPG conversion effects window. From here you can select from various image effects that you would like to have applied at the time of conversion when changing your JPG files to PDF. Pixillion allows you to resize your images, flip and rotate them, apply watermarks, and more. Click OK after you have set and selected your desired effects and they will be applied to all of the JPG to PDF conversions you perform.
Set Output Destination
Next, we need to choose our output folder. This is where your converted PDF files will go once you have changed them from JPG to PDF. You can use the dropdown menu to quickly select an output folder option or click on the Browse button to launch the file finder window and locate an output folder anywhere on your computer.
Set Output File Type to PDF
After you have chosen an output destination, you will need to set your output format. Because we want to change JPG to PDF, we are obviously going to set the output format to PDF. Click on the dropdown menu and select PDF from the list of output file types. From this point forward any conversions that you perform will be made to the PDF file type.
Change JPG to PDF
With our effects added, our output folder is chosen, and our output format set to PDF, we are now ready to convert our JPG images to PDF files. Click on the Select All button, located at the top of the program, to select all of the files at once and perform a batch conversion. You can also select and convert one file at a time. Hold down the Ctrl key while clicking on the files you wish to convert to select them. With your JPG files selected, click on the Convert button in the bottom left-hand corner of the program to start the conversion process. Your selected JPG files will quickly be changed to PDF and appear in your output folder as new PDF files.
Combine Multiple Images in a PDF
If you would like to combine multiple JPG images into a single PDF file, you can do so by selecting those images and then clicking on the Combine icon located in the main toolbar. This will open the Combine Images window where you can view your selected images. Click the button at the bottom of the window that says Combine images... to open the file finding window where you can choose an output folder and name your new combined PDF file. Once you click Save, a new PDF file will appear that contains all of the selected JPG images within it.
Thursday, January 3, 2019
The Best Editing Software of 2019
The Best Editing Software of 2019

The new year has begun and so has the search for the best editing software of 2019. We all strive to find the latest and greatest when it comes to editing software and with each new year comes new updates, new features, and new players in the game. With so many great editing software options out there, we decided to put together a selection of the best editing software of 2019. The world of editing software grows more competitive each year and so in order to stand out a program needs to be feature packed, user-friendly, and affordable. The following programs we feel meet and exceed that criteria, making them the best editing software packages of 2019.
Best Audio Editing Software of 2019

|
WavePad Top Features
|
WavePad Audio Editing Software
WavePad Audio Editing Software has been a major player in the audio editing software industry for many years. With each new release comes game-changing new features and abilities. WavePad's simple yet professional interface allows for quick learning for beginners with easy access to advanced features for pros. WavePad includes just about every effect and function you could ask for in an audio editor. It is for these reasons that we think that WavePad Audio Editor is the best audio editing software of 2019.Best Video Editing Software of 2019

|
VideoPad Top Features
|
VideoPad Video Editing Software
Last year VideoPad was named the Best Value Video Editing Software of 2018 by TopTenRevews. However, it is not the affordable price alone that will make it the best video editing software of 2019. Some of the most recent updates have brought the program on par with the top video editors in the industry. These include 360 video editing, direct sharing from the program, and the support of almost every major file format. VideoPad's sleek and simple design allows for easy editing and application of transitions and effects while maintaining professional quality and standards. This is why VideoPad is the best video editing software of 2019.Best Music Mixing Software of 2019

|
MixPad Top Features
|
MixPad Multitrack Recording Software
MixPad Audio Mixer will minimize the time it takes to mix your next project while optimizing audio quality. MixPad provides you access to all of the power of professional recording and mixing equipment through a single platform that streamlines the process and makes mixing a breeze. This program allows you to record instruments and vocals for music production, create mixes and mashups with existing files, or even use midi controllers and the beat designer to create music in the program from scratch. The versatility of this program is what truly makes it the best music mixing software of 2019.Best Photo Editing Software of 2019

|
PhotoPad Top Features
|
PhotoPad Photo Editing Software
Whether you’re a professional photographer or just want to edit your personal photos, PhotoPad is one of the best photo editors on the market today. It has all of the powerful tools and features you need to easily edit digital photos and other pictures. PhotoPad brings both photo editing and graphic design capabilities together with a fast and simple user interface. With this program, you can have all of the bells and whistles of any professional photo editor at a fraction of the cost. This is why we think that PhotoPad Photo Editing software is the best photo editing software of 2019.Best Motion Graphics Editor of 2019

|
Motion Graphics Top Features
|
Express Animate Motion Graphics Editor
Express Animate is a free animation program that gives you the ability to animate shapes, text and imported images. You are also able to enhance your movie projects in post-production using key-frame motion animation, masking, dummy objects and more. The program really is completely free without a catch too, which is a rare find these days. This is why we feel like Express Animate is the best animation editor of 2019.Friday, August 24, 2018
How to Resize a Picture
How to Resize a Picture

There are often times when we end up with photos that are larger than we need them to be. Many websites will only allow images of a certain size to be used or uploaded. Meanwhile, here you are with your giant photo wondering how to resize a picture. If you encounter an error on the web or another situation where you would need to know how to resize a picture, don't sweat it. With a simple photo editing software such as PhotoPad Photo Editor you can easily learn how to resize a picture or graphic on your own.
Import Your Photo into PhotoPad
The first step to resizing your picture is to bring your image into PhotoPad. After you have opened your copy of PhotoPad on your computer, there are several options for importing images. Click on the option that says Open when you first launch the program and you can immediately start using the Photo Browser. Otherwise, under the Home tab, you may click on the Photo Browser icon or the Open Files icon to select the image you wish to resize. Under the File tab, you can also choose to open an image into the program from a cloud service, such as Google Drive or DropBox. |
| PhotoPad Photo Browser |
Resize the Canvas and Layers
The Resize icon exists both under the Home tab and under the Edit tab. With your image in the program, click on the Resize icon to resize your photo. You will notice that a resize effect layer has now opened in the Effects History and Layers panel on the right-hand side of the program. |
| Resizing canvas and layers in PhotoPad |
Select Your Scale
There are four options for how to resize a picture in PhotoPad. You can set your scaling units to resize based on Pixels, Percentage, Inches, or Millimeters. For images on the web, Pixels, and Percentages are the more common units used for resizing photos. If you choose to resize by inches, you can access the Resolution option and set the pixels per inch of your photo. You will notice the checked box at the bottom of the layer that says "Keep Aspect Ratio." This means that while you are adjusting the image's size, your width to height ratio will remain the same. This is commonly known as "Constrained Proportions." It is usually best to keep this option checked.
How to Resize an Image
For this example, I have chosen to resize a picture using the percentage option for my units. This is an easy way to conceptualize how to resize a picture. I want my image to be exactly half the size it is right now, so I have set my units to Percentage and then typed in 50% for the value in the width box. You will see that my image is now half the size it previously was. Some websites give you specific dimension requirements for photos in pixels. For this, you would simply change the units to pixels instead of percentage and type in the dimensions you were given into the width and height boxes. |
| Resize Photo by Percentage |
Save Your Image
Now that you are finished resizing your image, you are ready to save your work and use your newly resized photo. Under the File tab, select the option that says Save As...This will launch the explorer window and allow you to select your output destination and choose your output file type.
Resize by Compressing
Sometimes when people ask how to resize a picture, what they are actually referring to is the file size in terms of storage. This is also known as file compression and can be done just as easily in PhotoPad. With your photo opened in the program, simply go to the File tab and select the option that says Save for web... This will launch a window that will allow you to use a slider to adjust the compression quality of your image and preview the result in real-time. In this example, I have reduced the file size by 80% with almost no observable loss in quality. Click on the OK button when you are finished and your newly compressed image can be saved to your chosen output destination. |
| Save for Web... |
For more on photo editing, check out these posts:


