Showing posts with label nch software. Show all posts

Tuesday, December 3, 2024

Giving Tuesday 2024 with NCH Software


Join NCH Software for Giving Tuesday 2024

In celebration of Giving Tuesday, NCH Software will donate 10% of all purchases made on Tuesday December 3, 2024 to Médecins Sans Frontières (Doctors without Borders).

Médecins Sans Frontières (Doctors without Borders) provides lifesaving medical humanitarian care to patients in need around the world. To learn more, please visit https://www.doctorswithoutborders.org/

We are incredibly excited to participate in the Giving Tuesday movement of global generosity for the 5th year, and we hope that you will join us to make a difference today online or in your local community!
-The NCH Software Team


Friday, May 24, 2019

How to Change WMA to MP3 with Switch Audio Converter

How to Change WMA to MP3 with Switch Audio Converter


Windows Media Audio files, or WMA files, are a common audio file format, primarily meant to be opened and played on Windows Media Player and other Microsoft audio players. You can play WMA files with some other third-party software, but many audio players and devices (iPhone) will not support them. That is why it is useful to know how to change WMA to MP3. MP3 files are a much more commonly supported file type and are arguably a superior format anyways. You can easily change WMA files to MP3 format with an audio file conversion program such as Switch WMA File Converter Software.


Download Switch

Download Switch Audio File Converter software. Follow the installation instructions and launch the program on your computer.
Download Switch Audio File Conversion Software

Import WMA Files

Click on the green Add File(s) button located in the main toolbar to open the file finder window. Find and select the WMA files on your computer and click Open to bring them into Switch to convert them to MP3 format. You can also drag and drop WMA files directly into the program to change.
Import WMA files to Change them to MP3

Options Menu

Click on the Options icon in the main toolbar to open the Options window. This is where you can add and make adjustments that will be performed on your WMA files during the conversion. You can add metadata to your converted MP3 audio files as well as change settings to handle duplicate files and formats. Once you are finished adjusting these options, click OK.
Audio File Converter Options

Select Output Destination

Set the output destination where you would like your converted files to go after you have converted them from WMA to MP3 format. Click on the Save to folder drop-down menu to select a folder from this list, or click on the Browse button to open the file finder window and select a folder on your computer.
Set Output Destination for MP3 Files

Set Output Format to MP3

With your output folder set, you can now set the output format to MP3. Click on the drop-down menu on the left side of the program next to the words "Output Format" to view the list of available audio file formats. To change your WMA files to MP3 files, simply select the option from this list that says, "MP3." All conversions performed will now be in the MP3 audio file format.
Set Output Format Type to MP3

Encoder Options

Click on the Encoder Output Settings... button to launch the window for WMA Output Settings. Here you can make adjustments and change audio encoder settings such as metadata, sample rate, bitrate, and amplify/normalizing audio. These settings will be applied during the conversion process while your WMA files are being changed to MP3 files.
WMA Encoder Options


Change WMA to MP3

Once everything is set up, you are ready to change your WMA files to MP3. Simply click on one of the Convert buttons, located in the bottom right-hand corner of the program and in the main toolbar. This will start the conversion process. You can select only one file to convert them one at a time or you can select all of them to perform easy batch MP3 conversions.


Finished

After the WMA to MP3 conversion is complete, you will see a green banner at the bottom of the program that says "Conversion Complete." You can click the button on the banner to open the output folder and view your newly converted MP3 files. You have now successfully learned how to changed WMA to MP3 using Switch Audio File Converter Software.


To read more about Switch and other audio topics, check out these similar posts:

Friday, May 10, 2019

Create Floor Plans with Trace Mode in DreamPlan Home Design Software

Create Floor Plans with Trace Mode in DreamPlan Home Design Software


DreamPlan floor plan maker allows you to import an existing floor plan file, use trace mode to duplicate it into the program, and then edit your house plan design quickly and easily. Visualize floor plans in 3D or as house blueprints. You can plan out all of your home remodeling designs with this simple floor plan design software.

Download DreamPlan to get started, or click here to learn more: www.nchsoftware.com/design


Import Floor Plans in DreamPlan


How to Trace a Floor Plan

  1. On the Tools tab, click Start Trace Wizard
  2. Select the story that you will start with and click Next.
  3. Browse for your image file and open it into the program (jpg, png, or pdf)
  4. Click Start Calibration to enter measurements of a known length of a wall
  5. Go to the building tab and add your walls
  6. When you are finished tracing your floor plans, you can toggle this view off or on using the Hide/Show Trace Image button
  7. Repeat the process to add and trace floor plans for additional stories


Friday, May 3, 2019

How to Change AVI to MP4 with Prism AVI Video Converter

How to Change AVI to MP4 with Switch Audio File Converter


MP4 files and AVI files are two of the most popular video file formats used today. They are both common multimedia container file types and they both have their various advantages. AVI files are most often used for playback on your PC via Windows Media Player, while MP4 files are more commonly used for video playback everywhere else. If you have a video player that does not support AVI files, then you are going to want to know how to change AVI to MP4. Converting AVI to MP4 is a very simple process for anyone and can be done by using Prism AVI to MP4 Converter Software in just a few clicks.


Download & Install Prism

Download and install Prism Video File Converter on your computer. Prism can be used to convert a variety of video file formats, compress video file sizes, add effects, and make other adjustments while performing video file conversions. You can download Prism by clicking on the download button below and following the installation steps.

Import Files

The first step to change AVI to MP4 is to import your AVI video files into the program. You can do this by dragging and dropping your video files directly into the program or by clicking on the green Add File(s) icon to launch the Locate Video File(s) window and selecting and importing your AVI video files this way.


Video Conversion Options

Click on the Options tab, located at the top of the program to view the various video file conversion options available in Prism. This is where you can adjust the overwrite settings as well as add metadata to your converted video file properties. This is also where you can add or remove Prism to/from the Windows Explorer right-click menu so that you can perform conversions without even opening the program.


Output Settings

Click on the Output Format dropdown menu to set the output file format to MP4. This will make all of the file conversions performed be to the MP4 video file format. Use the Save to Folder dropdown menu to select the output destination for your newly converted MP4 files. You may also click on the Browse button to launch the file finder window and select a more specific output destination folder on your computer or external device.


Encoder & Video Options

Click the Encoder Options button to adjust the encoding settings of your video files before you convert them. You can adjust the video quality/bitrate as well as adjust the compression settings and sound format. Click on the Video Options button to adjust the frame rate of your converted video files as well as resize them when they are converted.


Video Effects

Click on the Effects button to open the Video Effects window. Here you can add text captions to your converted video files, rotate and flip your videos, adjust color/brightness, & add watermarks. The Edit Video tab in the Video Effects window will allow you to trim down your videos as well.


Preview

Click on the Preview button to watch a preview of your video file in the format you will be converting it to. This is useful to keep an eye on the quality of the video if you are compressing it and also just to double check that you are working on the correct files if your file names aren't very descriptive.


Change AVI to MP4

Once you have chosen your output destination and set the output file type to MP4, you are ready to change your AVI files to MP4. Select the files that you would like to convert and click on the Convert icon in the bottom right-hand corner of the program or in the main toolbar. You can convert your files individually or hold down shift to click and select multiple files to convert all at once. The conversion process is extremely fast and your new MP4 files can then be found in your chosen output destination.


For more on articles on video and video editing, check out these posts:


Friday, April 26, 2019

How to Take a Panoramic Picture in PhotoPad

How to Make a Panoramic Photo in PhotoPad


Most smartphones today come equipped with camera settings for taking panoramic photos. The result is always a nice big image that captures much more than a typical photo would. But what if you want to take a panoramic picture with your digital camera or another camera? There is an easy way to create stunning panoramic images yourself even if you don't have a phone with the feature. Lucky for you, a panorama can be created using the Create Panoramic Image dialog in PhotoPad Photo Editing Software


How it works

The dialog provides an easy way to combine multiple images with overlapping views to create a single, larger, seamless image. When taking your pictures, stand in one place and move your camera from one side to the other, taking photos as you move along. Overlap is good because PhotoPad will use it to layer the images together. As a general rule of thumb, make sure that each image overlaps the others by about 1/4. The images should be the same size, taken from the same camera and from the same position. This will make it easier for the program to stitch them together.


Download & Install PhotoPad


PhotoPad is a great photo editing software with many fun features to explore. The panoramic image feature is just one of many projects you can accomplish with this feature-packed program. In order to get started creating your panoramic photo, download and install PhotoPad onto your computer by clicking the button below.


Open The Panorama Dialog

Open PhotoPad Photo Editing Software on your computer. From the main menu, click on the Tools tab to view the tool options. Select the option that says Panorama to open the Create Panoramic Image dialog.


Add Images

Click on the button in the dialog that says Add Image(s) to launch the file finder window and import your images into the program. Once loaded, the images will appear in the preview window of raw images. You can change the order of the images from within the dialog as well as add or remove images.

Preview Panorama

Before constructing the final image, the dialog will allow you to preview the results. Click on the button that says Update Preview to view a preview of the final product. Remember, at least two images are needed to create a panorama. If everything looks good, you can click OK and a new project with the stitched panorama will be created and opened for further editing in PhotoPad.


Crop Your Image

As a result of how the camera moves when taking the individual pictures, there may be some excess black space left around the final product. From the Home tab, you can select the Crop tool and crop the image to get rid of this. After you have cropped your panorama, you can apply any additional effects to your image before exporting.


Save & Share

Now that you have successfully created a beautiful panoramic image in PhotoPad Photo Editing Software, you are ready to save it and share it with the world. Click on the Share tab in the main menu to view some of the various sharing options that can be used directly within the program. Alternatively, you can select the File tab and choose Save As...to select where and how you would like to save your image onto your computer. 


For more on PhotoPad, check out these articles:

Friday, April 19, 2019

How to Split Audio with WavePad

How to Split Audio Files


Learning how to split audio tracks is an important skill to have for anybody editing audio and sound files. You may want to split your tracks to rearrange them in an audio or video project or perhaps you want to split them just to trim off the excess in your recording. In either case, WavePad Audio Editing software will allow you to split audio tracks with ease.

Download WavePad here to get started: https://www.nch.com.au/wavepad


Splitting Audio Files in WavePad


How to Split Audio

  1. Add an audio file into the WavePad 
  2. Click the Split button on the Edit toolbar and select an option.
  3. Split at the cursor or Split into component channels will cause the splitting to occur immediately.
  4. Choose another option to open the Split File into Multiple Parts dialog.
  5. Complete the dialog and click Split to split the audio file.
  6. Save or export your project


Friday, April 12, 2019

The Best Video Editor for YouTube

The Best Video Editor for YouTube


In the age of social sharing, everyone has a voice and a message that they want to be heard. YouTube has remained the major platform for those voices for many years and as a result, it has propelled many musicians, comedians, filmmakers, & thrill-seekers into the spotlight. In fact, did you know that YouTube even has awards that it sends out to its best "YouTubers" after they achieve certain numbers of views and subscribers? All the more reason to get started creating your own viral video content! It does take more than just uploading a video to achieve YouTube fame, though. Most YouTubers will tell you that basic video editing skills are a necessity if you want to succeed.


What Makes a Good YouTube Video?

Obviously, how "good" a video is is entirely subjective. Beauty is in the eye of the YouTube viewer. However, YouTube does have an algorithm for ranking videos and the best videos are usually those that are edited well. This is why I say that having good YouTube video editing software is very important. The YouTube algorithm places a heavy emphasis on engagement, which means that keeping your viewers' attention is key to your videos climbing the ranks and getting that golden YouTube award. The best YouTube video editing software is going to have to have the below features to be considered a good YouTube video editor.


Cutting & Trimming
Cutting out the less exciting parts of a video will make it more enjoyable to watch and keep viewers engaged. YouTube does favor longer videos in their algorithm, but they should belong because they are full of great footage, not because you included all thirty-one attempts that it took to stick a good-looking backflip into the pool.

Transitions & Effects

Transitions help to make video clips play together seamlessly. Smooth transitions can help make the switch between clips with different scenery a lot more subtle and easier on the eyes. Additionally, adding effects to your YouTube videos such as Ken Burns (pan and zoom) can help make basic clips like still scenery a little more lively.

Audio & Sound
Many YouTuber's create videos with just pictures and then they provide a voice-over to accompany the images. When done right, these types of videos are every bit as engaging as actual video clips. Having music playing throughout your video adds another layer of engagement as well. A cooking video with a long clip of someone stirring cake batter in complete silence will lose viewers a lot quicker than if there were music being played in the background.

Add Text to Video
The use of text in YouTube videos for titles and captions can help keep the viewer informed and engaged. Text can be used to create subtitles if the speaker's voice in a video can't be heard clearly, as well as to show language translations. You can also use text as an attention-getter to have an important word that was said display on the screen.

Proper Formatting
Properly formatted videos will receive more clicks and views than those that aren't because they are exposed to the right audience. Using the appropriate thumbnails, titles, descriptions, & tags will help make sure that a video is put in front of relevant viewers. A good YouTube video editing software will have features that make formatting your YouTube videos a breeze.


So, What is the Best Video Editor for YouTube?

If you are looking for the best video editor for YouTube, then look no further than VideoPad Video Editing Software. VideoPad checks all of the above boxes and more when it comes to producing quality YouTube videos. This full-featured, professional video editor allows you to create movie masterpieces in minutes that will be shared by your followers over and over again. VideoPad works with just about any file type you can think of, so editing 4K footage, 360 videos, GoPro footage, or video from your mobile phone has never been easier. The simple drag and drop interface makes compiling and organizing clips easy and adding text, transitions & effects is a breeze. It is for these reasons that VideoPad was recently named "The Best Video Editor for YouTube" by TomsGuide.com

Other YouTube Video Editing Features

VideoPad YouTube Editor comes equipped with settings designed specifically with YouTube video editing in mind. It allows you to save your login credentials so that you can upload videos directly to YouTube from the program. When you are finished with a video you can simply select Export to YouTube from the export options menu. The export window will allow you to select a YouTube video category, add keywords, titles and descriptions, and select the output format from right inside the application. The program supports editing all kinds of video types including 360 video editing for 360 YouTube videos and HD videos. You can easily adjust the aspect ratio for YouTube videos too, with choices ranging from 480p all the way up to 4k.


For more on VideoPad, check out these posts:

Friday, March 22, 2019

How to Change JPG to PDF with Pixillion JPG Converter

How to Change JPG to PDF with Pixillion JPG Converter

JPG files are the most common image file type for photographers, designers, and hobbyists alike. However, sometimes it is useful to convert a JPG image to a PDF file so that it can easily be shared and stored while maintaining the same high quality as the original JPG format. Learning how to change JPG to PDF is a useful skill for anyone dealing with image files and with Pixillion Image Conversion Software, it has never been easier to do.


Import JPG Files

To begin converting JPG to PDF, start by adding your JPG files to Pixillion. You can do this by clicking on the green Add Files icon at the top of the program, or by dragging and dropping your JPG image files directly into the Pixillion.

JPG Converter Options

Click on the Options icon located in the main toolbar to view some of the JPG to PDF conversion options available to you in Pixillion. Here you can make adjustments to the image resolution, add image metadata,  background colors, and more. This is also where you can decide how the program should handle duplicate files and folders when/if they are created.


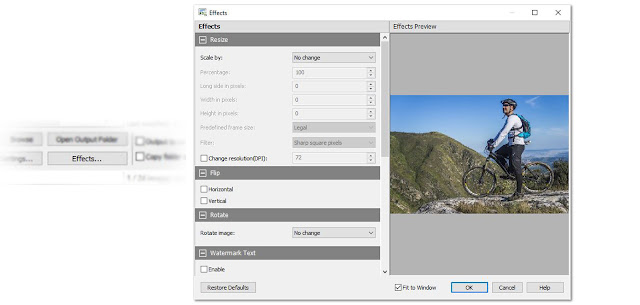
Add JPG Conversion Effects

Click on the Effects button located at the bottom of the program to open the JPG conversion effects window. From here you can select from various image effects that you would like to have applied at the time of conversion when changing your JPG files to PDF. Pixillion allows you to resize your images, flip and rotate them, apply watermarks, and more. Click OK after you have set and selected your desired effects and they will be applied to all of the JPG to PDF conversions you perform.


Set Output Destination

Next, we need to choose our output folder. This is where your converted PDF files will go once you have changed them from JPG to PDF. You can use the dropdown menu to quickly select an output folder option or click on the Browse button to launch the file finder window and locate an output folder anywhere on your computer.


Set Output File Type to PDF

After you have chosen an output destination, you will need to set your output format. Because we want to change JPG to PDF, we are obviously going to set the output format to PDF. Click on the dropdown menu and select PDF from the list of output file types. From this point forward any conversions that you perform will be made to the PDF file type.


Change JPG to PDF

With our effects added, our output folder is chosen, and our output format set to PDF, we are now ready to convert our JPG images to PDF files. Click on the Select All button, located at the top of the program, to select all of the files at once and perform a batch conversion. You can also select and convert one file at a time. Hold down the Ctrl key while clicking on the files you wish to convert to select them. With your JPG files selected, click on the Convert button in the bottom left-hand corner of the program to start the conversion process. Your selected JPG files will quickly be changed to PDF and appear in your output folder as new PDF files.


Combine Multiple Images in a PDF

If you would like to combine multiple JPG images into a single PDF file, you can do so by selecting those images and then clicking on the Combine icon located in the main toolbar. This will open the Combine Images window where you can view your selected images. Click the button at the bottom of the window that says Combine images... to open the file finding window where you can choose an output folder and name your new combined PDF file. Once you click Save, a new PDF file will appear that contains all of the selected JPG images within it.


Friday, March 15, 2019

How to Make Character Animations with Express Animate

How to Make Character Animations with Express Animate


Character animation allows you to bring animated characters to life using simple software and your own creativity. You can animate anything you would like such as clipart, computer drawings, text and more. Character animation used to be a very time-consuming and complicated process that only professional animators could do. However, now it is easier than ever for anyone to create this type of art and make character animations of their own. With simple and easy-to-use 2D animation software such as Express Animate, you can quickly learn how to make animations of your own in no time.


In this first video, you will learn how to create a character "puppet" or character from scratch to animate with Express Animate Animation Software. Use the pen tool to draw shapes and the Fill tool to add color to them.


This second video will demonstrate how to animate the character puppet that you created in the previous tutorial. Add anchor points to your object to create parent-child relationships and create keyframes to mark a changed state of any parameter in time.


And there you have it. Simply follow the steps demonstrated in the above tutorials and you too can create your own animation. Character animation is fun and easy and you will likely find yourself making them more and more now that you have learned how.

Friday, March 1, 2019

Best Method to Rotate Videos with Prism Video Converter Software

Best Method to Rotate Videos with Prism Video Converter Software


In a world where more and more videos are taken on mobile devices, the struggle is real when it comes to making sure that all of your videos are oriented correctly for your video projects. Knowing how to rotate videos is a great skill to have and it will help you make sure that your videos are viewed at their best. With a simple video converter software, such as Prism Video Converter, you can quickly and easily rotate your video for your viewing pleasure.


Import Video Files

Download Prism Video Converter by clicking on one of the red download buttons on this page. Follow the installation instructions and open the application on your computer. Import the video files that you would like to rotate by clicking the "Add Files" button or by pressing Alt+A on your keyboard. Locate and select the video files on your computer and click "Open" to bring them into the program. 

Preview Videos

To preview a video before rotating it or converting it to another format, simply double click on the file name in the program to launch the preview window. You can also select a file and then click on the "Preview" button, located at the bottom of the program.


Video Effects

Click on the "Effects..." button at the bottom of the program to launch the video effects window. Here you can choose from a variety of video effects that you would like to have applied to your videos at the time of the conversion. Prism allows you to adjust the lighting in your videos, add text captions, watermarks and you guessed it, rotate and flip your videos. You can also get to any of these options by simply right-clicking on a file and choosing one from the cursor menu. 

Rotate Videos

To rotate a video, click on the video file you wish to rotate to select it. Then click on the "Effects..." button shown in the previous step. Click on the tab in the Video Effects window that says "Rotate and Flip" to view the options for rotating videos. You can also right-click on a file and select the same option from the right-click menu. Click the green arrow buttons to determine how many times you want to turn your video, either clockwise or counterclockwise. You can also choose to flip or mirror your video from this same menu. At the bottom of the window, you can choose to apply the rotation to only the selected files or to all of the files in the program. A small checkmark will appear in the effects column next to the file that the rotation effect will be applied. 

Output Settings

Before converting your files and rotating your videos, choose where you want your newly rotated video files to appear after the conversion process. At the bottom of the program, use the "Save to folder" dropdown menu or click on the "Browse" button to select a location on your computer where you would like Prism to output your new video files. Prism Video Converter can convert video files to a variety of formats. If you wish to change file types while rotating your videos, you can do so by selecting a new format from the list in the dropdown menu next to the words "Output Format."

Convert Video File(s)

Once you have chosen your output settings and applied the rotation effect to the video files you wish to rotate, you can simply click the "Convert" button, located in the main toolbar or in the bottom right-hand corner of the program. The rotation effect, as well as any other effects or changes in formats you chose, will be applied to your selected video files and appear in your chosen output folder/location.

How to Rotate Videos

You have now learned how to successfully rotate videos using Prism Video Converter Software. You can open and view your rotated videos from your output folder and if you want you can go even back and rotate them again. You can rotate your videos until you are dizzy. You can also take your rotated video files and create your next movie masterpiece with VideoPad Video Editing Software.


For more on video editing, check out these posts: