Showing posts with label 3D design. Show all posts

Wednesday, May 9, 2018

DreamPlan’s Newest Tool Allows for Unlimited Design Possibilities

DreamPlan’s Newest Tool Allows for Unlimited Design Possibilities

Header image with examples of the DreamPlan Block tool

We are pleased to announce the addition of a brand new tool to the DreamPlan Home Design Software menu. If you haven't already, check for an update to reveal this new feature in your version of DreamPlan. We are always trying to improve our software with new and exciting features. The Block Tool is a great addition to DreamPlan and will help you take your home design projects to the next level. Try it out today.


What is the DreamPlan Block Tool?

The Block Tool is a new tool available for DreamPlan Home Design Software. This powerful and versatile tool allows you to create your own shapes in DreamPlan and use them to make customized home design masterpieces. You can add colors and textures to your newly drawn objects and adjust them as you please. You can also stack and connect multiple Block Tool objects to make truly unique additions to your projects.

How to locate the DreamPlan Block tool
The DreamPlan Block Tool


How do I use the Block Tool?

The block tool can be located under the Building tab where it is simply called “Block.” The tool works by drawing straight lines to create the outline of your shape. When you connect your shape's outline back to your starting point, the area of your shape will fill in. Once you have created your object, you can then adjust its shape even more by clicking and dragging the red and pink spherical touchpoints along the edges. The pink spheres allow you to make your shape convex or concave on any side of your drawing, while the red ones allow you to stretch and adjust corners. You can change the height of the shape and its elevation (distance off the ground) in the Platform Properties window.


Menu options for using the DreamPlan block tool
Using the DreamPlan Block Tool

What can I make with the Block tool?

The Block tool can be used to make a variety of new objects in DreamPlan. This tool puts the power in the hands of the user. If the content you want for your project doesn't already exist in DreamPlan, the Block Tool opens the door for you to create it yourself. Here are just a few examples of some of the great things that you can do with the new Block Tool.

Customized cabinets created in DreamPlan Home Design Software
Custom cabinets 

Build Custom Cabinets

The Block Tool can be used for creating your own custom cabinets. Use short walls for the cabinet sides and then use the block tool to make the top. You can adjust the texture and color to your liking and then add cabinet doors.


A modern floating staircase designed in DreamPlan
Floating staircase

Make a Floating Staircase

Make that floating staircase you've always wanted to give your home that modern feel. Use the Block Tool to create each step. Then adjust their elevation to your desired step height. Finally, move them onto the wall where you would like your stairs.

A brick fireplace hearth designed in DreamPlan
Fireplace Hearth

Add a Fireplace Hearth

The brick area around a fireplace is called the "hearth." Not only do they make your home more fire safe, but they also look great. Use the Block Tool to make your own. Draw it the size you would like, select a brick texture, and adjust the height of the object.

A C-shaped minibar designed in DreamPlan
Minibar 

Build A Stylish Mini-Bar

You can adjust the shapes you have made with the Block Tool to be less block-like if you would like. Try making a funky mini bar for your entertainment room.


A platform bed designed in DreamPlan
Platform bed

Make a Platform Bed

You can make a true platform bed with the new block tool. Combining blocks of different sizes allows you to build a platform and box in your bed. Then you can add the steps up to your new platform bed.


Retaining walls

Build a Retaining Wall

Use the Block Tool to build a retaining wall for your landscape projects. Make your retaining wall out of bricks and then fill it with plants and flowers from the content library.


Staircase landings

Make a Staircase Landing

With the Block Tool, you can now create a variety of different staircase landings. Decide if you want your stairs to switch back or make a right angle. You can place a staircase landing in the middle or at the bottom of your stairs.


Wednesday, July 5, 2017

Design Backyard Chicken Coops with DreamPlan

Design Backyard Chicken Coops with DreamPlan

Create a Chicken Coop Design Plan with DreamPlan

Raising backyard chickens brings joy and bountiful egg harvests to urban farmers across the world. When first adopting chickens, one of the first orders of business will be to build a chicken coop to home your chickens so that they will be safe and sheltered. DreamPlan offers an easy way to design a 3D chicken coop plan.


Planning a Chicken Coop Design

Chicken coops provide chickens with protection from both inclement weather and local predators. A chicken coop will generally contain both areas with open-wire as well as covered roosting areas for the chickens to sleep and lay eggs. When planning a chicken coop design, you will want to keep in mind the number of chickens that you plan on raising, the space in which you can build the coop, and the utility that you would like the coop to provide. You will want to supply both a covered roosting space and a safe, fenced-in outdoor space for your chickens.


Create a 3D Chicken Coop Plan

3D modeling software can make chicken coop design simple, and chicken coops can be designed to scale. You can also use DreamPlan to build a 3D model of your backyard in order to see how your chicken coop will fit in your current space.

Design the Roost

To create a chicken coop with DreamPlan, you will want to begin by sketching up the roost for your chickens. You can use multiple stories to build an elevated roost or a roost with a pitched roof.  You can change the wall height for each story in your project in the lower left-hand corner of the screen.


To draw the walls for the roost, simply select the wall tool and draw walls to match your size specifications. To build a chicken coop design plan that is elevated off the ground on risers, use stories and footings. When you are finished designing the walls for your chicken roost, finish your design with a roof and add a ramp to your design for chickens to access the roost.


Design a Fenced Area

To fence in the area around your chicken coop roost, use the railing tool to draw your chicken yard. You can edit the railing properties in the left-hand program menu to create fencing. You can increase the railing height to create a tall fence and then change the "Infill Type" to mesh to simulate chicken wire. You can also change the color, spacing, style, size, and design of your fence posts in the railing options.


Finish your Chicken Coop Design

To finalize your chicken coop design, you can import 3D models of chickens into DreamPlan. You can download the chickens and rooster that we used in our projects from archive3d.net here:
We used the chicken model above to create three different chicken species by changing the size and color of the chicken models as we added them to our project. 


Tuesday, June 27, 2017

Add 3D Models to DreamPlan Home Design Projects

Import 3D Models into Home Design Software


Add 3D Models to DreamPlan Home Design Projects

With DreamPlan home design software, you can plan, create, style, and decorate your dream home. DreamPlan is very useful for planning remodeling projects, testing home design choices before purchasing paint or furniture, and landscaping. As 3D home design software, DreamPlan includes basic cabinetry, furniture, and other home design pieces, however, these pieces may not fit into the design scheme that you had imagined for your dream home. To augment the included content and add-on content packages, you can import 3D models of couches, cabinets, kitchen islands, statues, and many more objects.  


Download New 3D Content for DreamPlan

You can download 3D objects for your home design projects from websites such as archive3d.net online. You can select from hundreds of furniture, decor, appliances, building supplies to match your decor concepts. DreamPlan will support the majority of the 3D models that are available for download on archive3d.net in addition to 3D models in 3DS, STL, and PLY formats. 3D model files may need to be unzipped before you can import them into DreamPlan.

Choose a 3D model to import into your home design project


How to Import a 3D Model 

After you have downloaded and unzipped a 3D model that you would like to add to your home design project, you will need to import it into DreamPlan. To import a 3D model, click on the button that says "Add Content" in the top menu bar. 

Click on "Add Content" to import a 3D Model

To select a 3D model from your computer to import into DreamPlan, click on the "Import 3D Model..." option from the drop-down menu. 

Import 3d models into home design software
Import a 3D Model

3D Model Preview and Properties

After you have selected a 3D file to import from your computer, the Import Model dialogue will open. This window will display the 3D model that you are importing in the model preview on the left-hand side of the window. Properties of the 3D model can be set on the right-hand side of the window. You can change the display name of the 3D model you are importing, select an object category, and set the object type, size, and display measurements in this window. The properties that you select in the Import Model dialogue will set the default properties for the object when it is added to a home design project.


Object Category

To set the Object Category, select an option from the drop-down list. This will determine where your 3D model will show up in the DreamPlan Object Categories.

Object Type

The Object Type is an important property for the imported 3D model. This property will determine how the 3D object is placed in a home design project. Object type can be standard, surface, floating, ceiling, or wall.
  • Standard - "The object has no special rules and will always be placed on the ground" Examples include couches, statues, and floor lamps.
  • Surface - "The object, e.g. a table or counter, can have other objects placed on top of it. The object will be placed on the floor or ground." Examples include tables, counters, kitchen islands, tv stands, and other objects that include a surface where other objects can be placed.
  • Floating - "The object can be placed on top of Surface objects, e.g. a table. Otherwise, it will be placed on the floor or ground" Examples include table lamps, small plants, televisions, and other decor objects that sit on top of tables, countertops and other surfaces in the home.
  • Ceiling - "The object will always be attached to the ceiling." Examples include ceiling fans and ceiling lights.
  • Wall - "The object will always be attached to a wall" Examples include paintings, wall shelving, wall-mounted televisions, and other wall decors. 

X - Y - Z-Axis Rotation

If you would like to change the default axis orientation of the 3D model that you are importing, you can use the X, Y and Z-Axis rotation options to change the default orientation of the object in home design projects. As you change the rotation on the right-hand side of the Import Model screen, the Model preview will move to reflect the changes as you make them. The blue line in the preview (Z-Axis) will show the front face of the model. 


Set the Display Measurements

The Display Measurements will determine the real size of your model in your home design project. Simply enter any known measurement- width, height, or depth, and DreamPlan will automatically calculate the remaining values. If you are importing a large object such as a couch or dresser, you can select Feet (or Meters) instead of Inches (or Centimeters) as the display measurement to make it easier to set the display measurements. For smaller objects, such a plants or table lamps, it may be easier to enter a known measurement in inches or centimeters.  This feature can be very useful to set exact specifications for furniture pieces in order to be sure that they will fit perfectly in your home design or remodeling project.


Import the 3D Model

When you are finished setting the model properties and display measurements, click on the "Import Model" button to import the model into DreamPlan. 


Adding a 3D Model to a Home Design Project

After you have imported the 3D model, you can add the 3D model to your house design project by navigating to the category you selected while importing your 3D model. Your 3D model will be named the Display Name that you selected during the import process. You can add your 3D model to your home design project by selecting the object and then moving the object to your desired placement in your 3D home design.
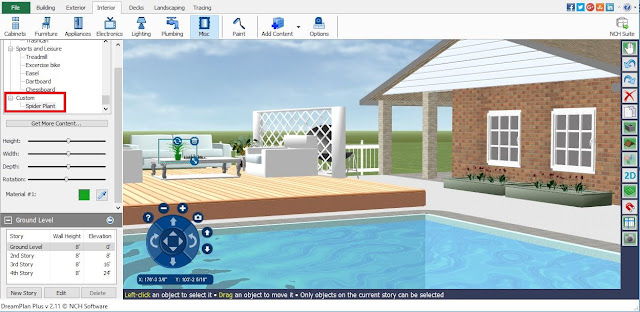

You can rotate or resize objects before or after moving them in your home design project. You can also change the color of the 3D models that you have imported when you add them to your design project, which can be very useful when testing color schemes on specific rooms or home exteriors. 3D models can be used to add all sorts of new design elements to DreamPlan, including furniture, decor, gardening items, statues, and even buildings.


Friday, February 17, 2017

Resize, Rotate and Delete DreamPlan Objects

Move, Resize, Rotate and Delete Objects in DreamPlan


When creating a home design project in DreamPlan Home Design Software, you can edit, resize and move objects that you have added to your project. Objects in DreamPlan include interior and exterior furniture, accessories, plants, and more. Objects such as walls and paths that are drawn cannot be resized, however, they can be deleted and re-drawn.

Select an Object to Edit

Adding a New Object

To add an object to your DreamPlan project, select the object from the left-hand menu and then left-click in your project where you would like the object to be placed. After an object is placed, it will automatically be selected to resize, rotate or delete. A selected object will be identified by a blue box surrounding the object, like this:

Select an Object

If the object you would like to edit is not selected, you will need to select it in order to resize, move, rotate or delete the object. To select an object, simply click on the Selection Tool hand symbol in the right-hand menu to enter selection mode. When selection mode is active, the hand symbol in the right-hand menu will have a green background. You can also enter selection mode by hitting the spacebar on your keyboard.
When selection mode is active, you will be able to left-click on any object in your project to select the object for editing.

Resize, Rotate and Delete Objects

Once you have selected an object, you can use the options displayed in the selection frame to resize, rotate or delete the selected object. Objects that are drawn in your home design project, such as walls and paths, can not be rotated or resized and must be re-drawn. Objects such as walls and paths can be selected in order to be deleted.

Move Objects

To move a selected object, simply left-click and drag the object to its desired location in your project. Moving an object can be done at any point during the home design process.

Resize Objects

To resize furniture, trees, plants, and other objects in DreamPlan, simply left-click on the icon in the bottom right-hand corner of the selection frame and drag your mouse outward to make an object larger. To make an object smaller, click and drag your mouse towards the object slightly.

Rotate an Object

You can easily rotate furniture, plants, cabinets, and other DreamPlan objects when decorating your home. Rotating objects is also very useful for exterior design aspects, such as adding a ladder to a pool or rotating a swing in a backyard design project. To rotate an object, left-click on the top-left icon in the selection frame and drag your mouse left or right to rotate the object as needed.

As you rotate an object, DreamPlan will show the rotation in degrees.


Delete an Object

To delete an object, simply click on the trash can symbol in the upper right-hand corner of the selection frame. If you accidentally delete an object, you can use the undo button in the right-hand menu to reverse your changes.


You may also like:

Download DreamPlan to Get Started