Showing posts with label 3D. Show all posts

Wednesday, May 9, 2018

DreamPlan’s Newest Tool Allows for Unlimited Design Possibilities

DreamPlan’s Newest Tool Allows for Unlimited Design Possibilities

Header image with examples of the DreamPlan Block tool

We are pleased to announce the addition of a brand new tool to the DreamPlan Home Design Software menu. If you haven't already, check for an update to reveal this new feature in your version of DreamPlan. We are always trying to improve our software with new and exciting features. The Block Tool is a great addition to DreamPlan and will help you take your home design projects to the next level. Try it out today.


What is the DreamPlan Block Tool?

The Block Tool is a new tool available for DreamPlan Home Design Software. This powerful and versatile tool allows you to create your own shapes in DreamPlan and use them to make customized home design masterpieces. You can add colors and textures to your newly drawn objects and adjust them as you please. You can also stack and connect multiple Block Tool objects to make truly unique additions to your projects.
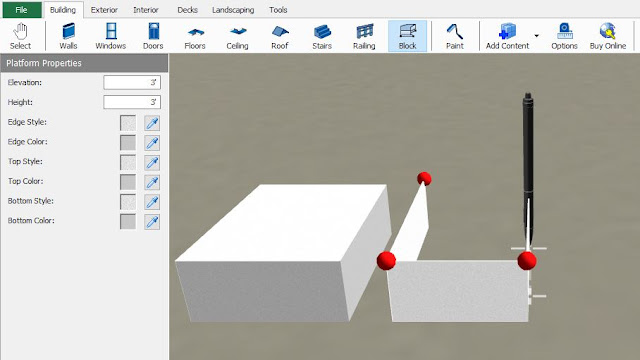
How to locate the DreamPlan Block tool
The DreamPlan Block Tool


How do I use the Block Tool?

The block tool can be located under the Building tab where it is simply called “Block.” The tool works by drawing straight lines to create the outline of your shape. When you connect your shape's outline back to your starting point, the area of your shape will fill in. Once you have created your object, you can then adjust its shape even more by clicking and dragging the red and pink spherical touchpoints along the edges. The pink spheres allow you to make your shape convex or concave on any side of your drawing, while the red ones allow you to stretch and adjust corners. You can change the height of the shape and its elevation (distance off the ground) in the Platform Properties window.
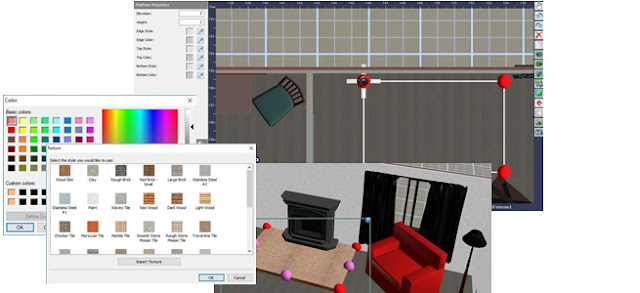

Menu options for using the DreamPlan block tool
Using the DreamPlan Block Tool

What can I make with the Block tool?

The Block tool can be used to make a variety of new objects in DreamPlan. This tool puts the power in the hands of the user. If the content you want for your project doesn't already exist in DreamPlan, the Block Tool opens the door for you to create it yourself. Here are just a few examples of some of the great things that you can do with the new Block Tool.
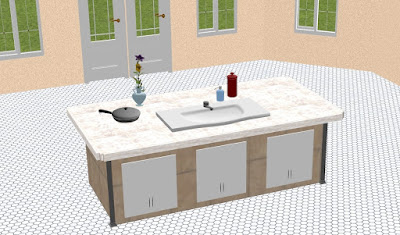
Customized cabinets created in DreamPlan Home Design Software
Custom cabinets 

Build Custom Cabinets

The Block Tool can be used for creating your own custom cabinets. Use short walls for the cabinet sides and then use the block tool to make the top. You can adjust the texture and color to your liking and then add cabinet doors.
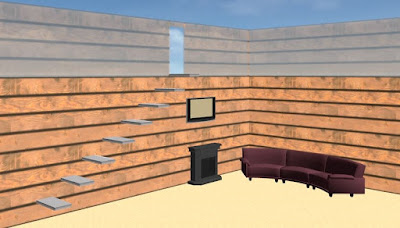


A modern floating staircase designed in DreamPlan
Floating staircase

Make a Floating Staircase

Make that floating staircase you've always wanted to give your home that modern feel. Use the Block Tool to create each step. Then adjust their elevation to your desired step height. Finally, move them onto the wall where you would like your stairs.
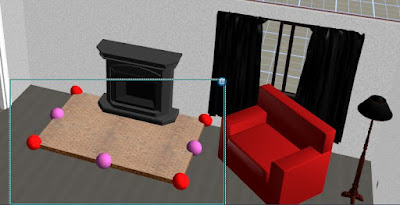
A brick fireplace hearth designed in DreamPlan
Fireplace Hearth

Add a Fireplace Hearth

The brick area around a fireplace is called the "hearth." Not only do they make your home more fire safe, but they also look great. Use the Block Tool to make your own. Draw it the size you would like, select a brick texture, and adjust the height of the object.
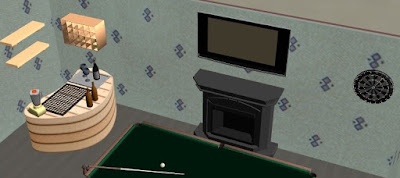
A C-shaped minibar designed in DreamPlan
Minibar 

Build A Stylish Mini-Bar

You can adjust the shapes you have made with the Block Tool to be less block-like if you would like. Try making a funky mini bar for your entertainment room.
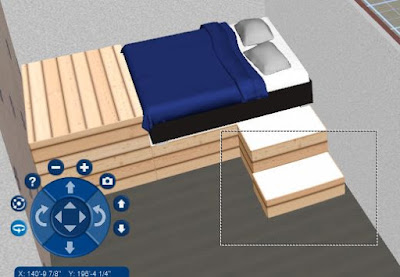

A platform bed designed in DreamPlan
Platform bed

Make a Platform Bed

You can make a true platform bed with the new block tool. Combining blocks of different sizes allows you to build a platform and box in your bed. Then you can add the steps up to your new platform bed.
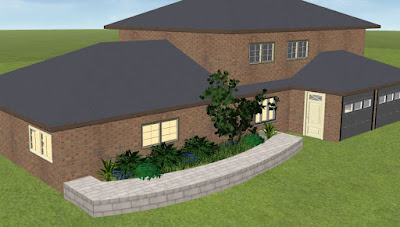


Retaining walls

Build a Retaining Wall

Use the Block Tool to build a retaining wall for your landscape projects. Make your retaining wall out of bricks and then fill it with plants and flowers from the content library.
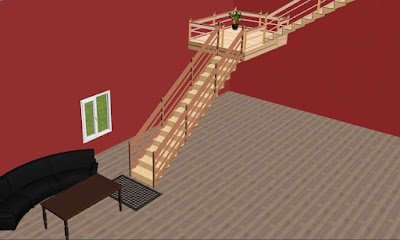


Staircase landings

Make a Staircase Landing

With the Block Tool, you can now create a variety of different staircase landings. Decide if you want your stairs to switch back or make a right angle. You can place a staircase landing in the middle or at the bottom of your stairs.


Friday, August 5, 2016

Swimming Pool Design Software: New DreamPlan Options

DreamPlan Adds Swimming Pool Design Software


We are very excited to announce the newest feature of DreamPlan home design software: Swimming Pool Design Options!


DreamPlan will now allow users to plan and design outdoor swimming pools. Swimming pool design has been a common request from our users, and we are excited to announce that DreamPlan will now allow users to design their own backyard pools.


Swimming Pool Design

Adding an outdoor swimming pool is a dream of many homeowners, and now DreamPlan can help make that dream a reality. DreamPlan is a 3D home design software that can help homeowners effectively plan their remodeling projects and construction projects. Now, you will have one more tool to help you visualize your dream home.

Adding a Pool to Your Home Design Project

To add an outdoor pool to your home design project, click on the "Exterior" tab on the top menu bar. This will open a list of exterior options that can be added to your home design. Click on the button labeled "Pools" to open the Pool Properties window.  

DreamPlan Pool Design Properties

The Pool Properties menu will allow you to paint your pool various colors, edit the pool depth, and apply textures. 

With the red cursor, you can now create a 3D model of your future pool project. Simply click the mouse where you would like your pool to begin, and click again to add corners and to finalize your pool.

Create a Rounded Pool

Once you have finalized your pool, you can drag the red markers to create rounded edges. 

Additional pool features, such as diving boards and pool ladders are available within the "Misc" section of the "Exterior" tab.


Wednesday, February 17, 2016

File Preparation for 3D Printing - 3D Modeling and Conversion

3D Printing Tips: Making Your First Model Print Easier

Make the Model With Printing in Mind

  • This is the main focus in terms of making your first print job go smoothly. If you model accommodating for the intricacies of 3D printing, you'll never have problems.
    • Make sure the model is a continuous mesh

      It is often easier to build complicated shapes in 3D modeling programs by making them composed of multiple, less complicated shapes; unfortunately, this does not work for 3D printing - for the printer to work, the object being printed must be a single continuous shape/mesh.

      To print out shapes you have built previously using multiple shapes, you must go through the often long and tedious process of merging vertices and edges until it is a solid object.
    • Eliminate non-manifold geometry

      From Shapeways:
      "Generally, there are two types of non-manifold errors:

      1. Open Objects: When there are holes in the object (think: the opposite of 'watertight').
      2. Unwanted Faces: When a model has unwanted extra faces or edges. Sometimes this extra geometry is hard to spot by only looking at the outside of the model. "

      Most vendors require all edges to be 2 manifold - as in, each edge has exactly two faces attached to it. These errors, often caused by open (unconnected) edges or overlapping vertices/faces, can be very difficult to find.

      Read this article from Shapeways for more in-depth information on how to fix manifold errors:
      http://www.shapeways.com/tutorials/fixing-non-manifold-models
    • Check surface normal vector directions

      The surface normal (sometimes called a face normal) is the directional vector perpendicular to the surface of a 3D model. Every face has its own surface normal, and it should be facing outward, away from the model's surface.

      These issues should be easy to find and fix using lighting display settings (Each software is different, but generally):
      • Find lighting settings, turn off 2-sided lighting
      • Reversed surface normals will look black
      • Reverse the normals on those surfaces
    • Check vendor's printing requirements

      This step is one you should take early on to do both comparison shopping and to figure out what your design needs are based on available materials and minimum thicknesses. If you are using your own printer, the manual should have this information.

    Convert the File to a 3D Printer Ready Format

    • You've made your model following the guidelines above, and you're just about ready to print! As an extension of the last point, check your vendor as to what 3D file formats are accepted. Usually, application-specific formats will not be accepted, and you will need to use universal file types. The two most common formats will be OBJ and STL.
    If you need to convert an existing 3D model into OBJ/STL, try Spin3D, our 3D file converter program. Spin 3D converts between STL, 3DS, 3DP, 3MF, OBJ and PLY mesh file formats. No matter which program you use to create your 3D models and 3D designs, you can convert to your desired output format.

    Spin3D also allows for batch formatting, perfect if you have several 3D files you need to format for printing!

    Click on the link to download or purchase:


    Friday, February 22, 2013

    VideoPad: Video Editing Excellence

    Excellent video editing software We are very proud of the fact that even though VideoPad hasn't broken into the top three on TopTenReviews' list—yet—they have awarded our video editor for excellence. With each new release, we strive to add more of the advanced features professionals crave, and just as importantly stay easy to use. That user-friendly quality that allows everyone to make movies is in a large part what TopTenReviews has noticed and is recognizing:

    "Using VideoPad requires little effort. Before we even looked at the manual, we were able to create a video. To add transitions, effects and more, all you have to do is drag and drop them in place ... Overall, VideoPad has some excellent features. It can import files directly from many types of devices and it has 3D and green-screen capabilities. It is easy to use and has basic editing tools."
        –  TopTenReviews

    If you haven't tried VideoPad video editing software yet, why not download a copy today. We think you will agree that VideoPad is both an excellent and easy video editor. Those of you who are already VideoPad users remember you can always send us suggestions on how we can make VideoPad even better. With your help, those other video editors better watch out, because we plan to keep moving VideoPad forward and raising the bar on video editing excellence.

    Monday, December 3, 2012

    Do More with Audio - Blog Carnival December 3, 2012

    Here are this edition's entries to Do More with Audio:

    Lambert Varias presents 3D Printed Records for Fisher Price Toy Player posted at Technabob, saying, "Instructables member Fred27 figured out a way to play pretty much any tune on a Fisher Price toy record player with a little bit of code and a 3D printer."

    Mitchell Morris presents Helping Your Child Choose a Musical Instrument posted at Full Time Nanny, saying, "Musical instruction can help your child master more than just how to play an instrument over the course of their education"

    Jeff Moore presents 10 Signs Your Child Thinks Your Taste in Music is Lame posted at Babysitting Jobs, saying, "Hating your parents taste in music seems to be a rite of passage these days."

    Anisha presents How I Minimized My College Debt as a DJ posted at NerdWallet, saying, "A self-taught DJ tackled college debt by spinning records at college parties. Get creative and get paid."

    Neil presents What was the number one song the day you were born? posted at This Day in Music.

    Bobby McFerrin plays... the audience! posted on TED: Ideas worth Spreading:


    You might also be interested in: That concludes this edition of Do More with Audio. If you have an audio story to share or advice, tips or tricks to share, we hope you will submit your audio posts and articles to the next edition.

    Monday, November 5, 2012

    Do More with Video - Blog Carnival November 5, 2012

    do more with video To continue in the footsteps of the Do More with Audio blog carnival that we have been hosting for the last two years we have decided to add a Do More with Video blog carnival giving people the chance to share any video filming, recording, editing, production, projects, tips and more. To get things started I did some online to find some interesting posts to share in this first edition, and we hope you will submit your own video posts for the next edition.

    So with our further ado here is the first edition of Do More with Video:

    Teaching Video Storytelling. If a picture is worth a thousand words, what must a video be worth? Read about one professor's formula for video storytelling.

    2012 CamcorderInfo Best of Year Awards. If you are looking for equipment here is what the professionals at camcorderinfo.com would recommend to family, friends and you.

    Can I Edit Video from a DVD? An interesting post about the possible compression problems that can arise from extracting video from DVD and then compressing it again.

    How to Create 3D Videos. A post about both converting 2D videos into 3D and filming with 3D in mind for better results.

    10 Most Popular Types of Viral Videos. If you are hoping to make your own viral video it might help to know what the top are viral video categories.

    Music and Video in Windows 8: a work in progress. Promising first steps, but latest offerings don't always play well with others.

    What Filmmakers Need To Know About Video on Demand. Traditional theatrical and DVD film distribution models are being replaced by video on demand platforms which will forever alter the ways movies are seen and sold.

    Optimizing Videos Embedded on Your Site for Search Engines. When you are putting a video online you want people to find it, and that is where SEO comes in to play to help make sure your video is found and viewed.

    You might also be interested in: That concludes the first edition of Do More with Video. If you have a video story to share from home movies to video production submit your video blog posts for the next edition.

    Friday, April 22, 2011

    Add New Dimension to your VideoPad Projects

    Stereoscopic 3D viewing from VideoPad video editorTwo dimensions got you down? Wishing you could add a little something extra to your videos to make them stand out? In addition to new chroma key options, VideoPad now lets you export your finished movie for stereoscopic 3D viewing, yet another example that big things do come in small packages. Simply select the "Stereoscopic 3D" icon at the far right of the "Save Movie" window and set your options below - it's that easy. You'll have several options for stereoscopic output depending on your preference, although the default anaglyph imagery selection is the often the most effective way to produce a stereoscopic 3D.

    While you won’t need a fancy new television to view your eye-popping creations, you will need two things: one is a set of 3D glasses with red and blue lenses and the other is a suitable way to view your content. For desktop viewing, I recommend Steroscopic Player. It’s both free and is well suited to view any 3D content you export out of VideoPad.

    For more information about VideoPad or any other of our acclaimed video software products, visit www.nchsoftware.com/software/video.html

    Friday, April 15, 2011

    Now In 3D

    xkcd 3DOne of the favorite comics here in the office is xkcd, a somewhat geeky webcomic with math, science and technology themes.

    For April Fool’s Day the site went 3D (XK3D). Since this foray into the third dimension lined up so closely with NCH Software's own 3D addition, with the new stereoscopic 3D video content support that was added in the most recent release of VideoPad (version 2.30), I thought it was the perfect opportunity to introduce any of our readers who are not familiar with xkcd to its wonders.

    Note: if you're new to xkcd, make sure you don't to miss the hover over text on each comic as you surf through their archives.