Showing posts with label slideshow with music. Show all posts

Tuesday, September 15, 2020

How to Make a Slideshow with Music using PhotoStage


Slideshows are great. Slideshows with music are even better. Learning how to make a slideshow with music and pictures can liven up the montage and help make your beautiful memories more exciting. With PhotoStage Slideshow Maker, you can make a slideshow with music in a couple of steps. Combine pictures, video, and audio with effects, text, captions, and more to create a memorable slideshow that you can easily share with family and friends. 

Making a Slideshow with Music Easily using PhotoStage


  1. Click on the Wizard Icon to have PhotoStage quickly create a slideshow from a folder of images for you.

  2. Set the Image Display Length to determine how long each image in your slideshow will play.

  3. Add music from a local file or choose something out from the NCH Sound Library. You can also add your own narration.

  4. Select a theme and add your intro and outro titles.

  5. Add transitions and set their durations.

  6. When you’re finished with your settings, click Create.

  7. Preview your slideshow with music and click Export to save it to file, disc, or upload to YouTube, Vimeo & more.


Simply follow the steps demonstrated in the above YouTube tutorial and you too can create your own slideshow with music in a matter of minutes, using PhotoStage Slideshow Software. Available for PC, Mac, iPad, Android and Kindle, download PhotoStage for free below. To view more PhotoStage slideshow tutorials and tips, click here.

Friday, December 28, 2018

Make an End of Year Slideshow with PhotoStage

Make an End of Year Slideshow with PhotoStage


What better way to wrap up the year than with an end-of-year photo slideshow filled with all of your favorite memories? You can easily put together a slideshow with all of the great pictures you took this past year and add your favorite songs to go along with it. With a simple and easy-to-use slideshow-making software such as PhotoStage Slideshow Software, you can quickly create your own year-end slideshow to save and share for years to come.


Slideshow Wizard

The easiest way to make an end-of-year slideshow in PhotoStage is by using the Slideshow Wizard. Open PhotoStage Slideshow Software on your PC or Mac and click on the Wizard icon, located in the main toolbar. This will launch the Quick Create Slideshow window where you can get assemble your pictures, audio, theme, and transitions and get them all ready for your slideshow in one place.


Locate Your Images

Click on the Browse button to locate the images you would like to use in your slideshow. This will open the file finder window where you can select the folder that contains the images you would like to use. Select the folder that contains the images you want in your slideshow and in the next step, we will select the actual images.


Select Your Photos

Next, you can choose to either use all of the images in your selected folder or pick the images you want in your slideshow one at a time. Choose the option from the dropdown that says Use Selected to pick individual photos out from your folder. Click the button that says Select to open the folder and choose which photos you want to use in your slideshow. You can click the button that says Select All and then hold down the Ctrl key on your keyboard while clicking on the photos you don't want. You can also click the option that says Select None and hold down Ctrl on your keyboard and select the images you do want. When you are finished selecting images, click OK.


Add Audio

Now it's time to add some audio to your slideshow. Maybe it's that song you had playing on repeat all year long or maybe it's a song that gets you pumped for the year to come. Either way, a good song is a great way to make a photo slideshow come to life. Click on the drop-down menu next to the word Sound and choose from where you would like to import your audio file. If the audio file is on your computer, you can select this option, locate your sound file and click Open. You can also find a number of great sound files in the NCH Sound Library.


Select a Theme

PhotoStage allows you to select a theme for your slideshow that will act as a background behind your images. This is useful when your photos are not all the same size or when you have a mix of landscape and portrait photos as we all often do. Choose a theme option from the drop-down menu to launch the Background Theme window. You can also add Intro and Outro Title Text to your slideshow by clicking in the title text boxes and typing in the Text Overlay window that appears.


Add Transitions

Finally, select the type of transitions you would like to have between the photos in your slideshow from the transitions drop-down menu. You can set their duration in the box beneath the menu. If you would like to use a variety of transitions, check the box that says Randomize Transition Type, and different transitions will appear between your photos in random order.


Create Slideshow

Once you have made all of your selections using the PhotoStage Wizard, click Create to open your slideshow into the main program. You can rearrange the order of your images by simply clicking on the image in the timeline at the bottom of the program and dragging it to any position you would like. You can also click on the transition box between any two clips to change and adjust the transitions. Clicking on the number in the box will allow you to adjust the duration of the transition while clicking on the image icon in the box will display the other transitions available under the transition tab.


Add Text

You can add text to any image/slide in your slideshow by simply clicking on that image in the timeline and then clicking on the Text tab on the top left-hand side of the program. Select the type of text you would like to use, such as Text Overlay, and then click and type in the text box that appears as a new layer beneath the Applied Effects section.


Add Effects

You can add effects to any of the photos in your slideshow by selecting a photo from your timeline and then clicking on the Effects tab to select an effect to apply to that photo. Effects will appear as layers underneath the applied effects section and can be layered on top of each other to create unique and exciting effects of your own.


Export Slideshow

When you are finished making the final adjustments to your slideshow and you are ready to export, simply click on the Export icon located in the main menu at the top of the program. You can select from a variety of export and sharing options such as burning to a DVD, saving to your computer and even uploading directly to YouTube.


Save to Your Computer

To save your slideshow movie to your computer, simply choose the Video File option and use the Video Output Setup window to choose an output file type, destination, and resolution. Name your slideshow whatever you would like then click Create to start the export process. Your year-end slideshow movie will appear in your chosen output destination and you can now share your year with whoever you would like, however you would like. Now you can start off your New Year with the resolution to make more slideshows!


Happy New Year from all of us here at NCH Software!

Friday, April 6, 2018

Create a Video from Photos with Slideshow Software

Create a Video from Photos with PhotoStage Slideshow Maker

Create a Video from Photos

From baby's first steps to graduation tears of joy, family vacations, weddings, and honeymoons, we take and save photos of our memories every day. At times it may seem impossible to organize and share such a wealth of memories with your friends and family. Social media is a great way to share everyday photos, however, you may want to create a more polished production for your most cherished memories. To easily organize and share your photos, you can create a video slideshow from photos.

How to Make a Video from Photos

Creating videos from your photos of specific events can be a beautiful and meaningful way to organize your photos. Create annual DVDs to chronicle family ski trips, reunions, and summer beach getaways. Make a slideshow to organize all of the fabulous photos from your European vacation in one place. Create the perfect gift to send to grandma and grandpa, or a cherished memento DVD for your children to look back on as they grow up. For newlyweds, a wedding slideshow is a popular way to showcase your favorite photos from your big day. Creating a video from photos is a quick and easy process when using slideshow software, such as PhotoStage SlideShow Maker.


You can create a slideshow video from photos in three easy steps:

  1. Select your favorite photos
  2. Arrange photos in the slideshow
  3. Add Music, Effects, Animations, or Text

Step 1: Select your Favorite Photos

To select the photos that you would like to add to your slideshow, begin by importing the media that you would like to use in PhotoStage. To do this, click on the "Add Media" button in the top menu bar and select the photos that you would like to use from your computer. Alternatively, you can use the "Add Photos", "Add Video" and "Add Audio" buttons to upload media to your slideshow. Photos, videos, and music will be added to the "Media" tab.


If you are using lots of photos in your video, you may want to check to make sure that all of the images which were imported into the Media tab have been included in your video. When a photo has been added to the slideshow, a green checkmark will appear over the photo in the Media tab.


Step 2: Arrange Photos in Video

To add photos to your slideshow, drag and drop photos from the Media bin onto the Slideshow at the bottom of the program window where it says "Drag your image and video clips here". You can also drag and drop photos to re-arrange them in your slideshow video.

Adjust Photo Duration

To adjust the duration of a photo in the slideshow, click on the time icon at the bottom of a slide, or double click on the slide. In the slide adjustment window, you can set the photo duration in seconds. You can also change the duration of all of the slides in your slideshow by checking the box to "Apply to all".


Select a Photo Transition

You can easily change the transition animations that appear between the photos in your video slideshow. Transitions can fade from one photo to the next in a variety of exciting ways.
Transitions can help make your video of photos more interesting. To change a transition, click on the icon that appears between your photos in the slideshow, and select your desired transition from the 'Transitions' tab.


Step 3: Add Music, Effects, Animation, or Text to Perfect Your Video

Edit Your Photos

PhotoStage slideshow software includes a number of photo editing effects that can quickly crop, adjust, brighten, and rotate the photos that you add to your video slideshow. To edit a photo, click to select the photo in the slideshow, and then click on the "Edit" tab. 

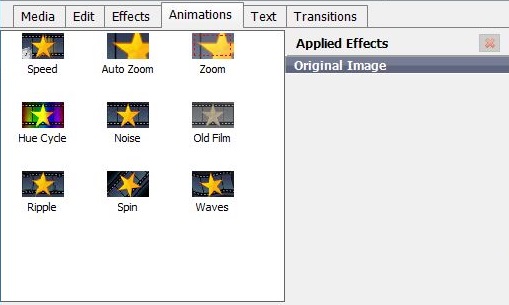
Bring your Photos to Life with Effects and Animations

PhotoStage slideshow creator also includes a variety of effects that can be applied to photos.

Add a touch of nostalgia with a sepia filter, add a border, or transform your photos into oil paintings with these easy-to-apply effects. 


For more advanced effects, you can add animations to your photos. Animations can be added to photos in your slideshow to create movement, such as a zoom effect. Animations can be applied to photos individually, or you can add multiple animations to a single photo to combine effects. 


Add a Title Slide

You can also add a blank slide to your video slideshow in order to create a title slide. To add a blank slide, click on the "Add Blank" button in the top menu bar. 

Select the color slide that you would like to add, and then drag and drop the blank slide to your desired location in the slideshow.

 Add Text to Photos

To add text to a photo in your slideshow video, select the photo that you would like to edit and click on the "Text" tab. There are several text options to choose from. 

Click to select the text option that you would like to add to your photo, and then adjust the font, alignment, size, and text color in the Applied Effects area of the Text tab.


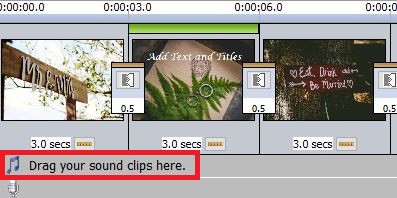
Add Music to Your Slideshow

Music is a quick and easy way to add emotion and ambiance to any video. To create a slideshow with music, you can upload music from your computer, or you can use the music in the NCH Audio Library. To add your own music, click on the "Add Music" button in the Media tab, or click on the "Add Media" button in the top menu bar. 
Audio tracks will be added to the Media tab. To add music to your slideshow, drag and drop the audio file that you would like to use from the Media tab to the slideshow where it says "Drag your sound clips here"

To add music from the NCH Sound Library, open the "Slideshow" menu, and open the NCH Sound Effect Library.
The sound effect library includes many sound effects and music tracks that you can use in your slideshow. 


Add a Narration

To personalize your slideshow video, you may wish to add a voice-over narration. To record a narration for your slideshow, click on the "Narration" button in the top menu bar. 

Save and Share Your Video

Video slideshows can be saved in a variety of common video file formats for easy sharing with friends and family. Export your photo slideshow video as a .gif, .mov, .mp4, .flv, or .mkv file. Videos can be shared on social media, sent to family members by email, or burned to a DVD.