Showing posts with label video tutorials. Show all posts

Tuesday, October 20, 2020

How to Make a Beat using MixPad


How to Make a Beat Easily

Everyone is making beats these days and it makes sense why - a catchy beat is the basis to any good song. You don't have to be an experienced producer or a DJ to make a great beat, with the best beat maker software, you can start making beats easily in a few minutes. Download MixPad Beat Maker Software for free and follow the below tutorial to create your first beat that even J Dilla would be proud of. 


Learn How to Make Beats with MixPad’s Beat Maker

1.Click Create Beat on the home toolbar to open the Beat Maker.

2. Double click on an empty bar to add a beat pattern to it.

3. Click on the bar division lines to add beats. The higher a beat is placed in the pattern, the louder it will be. 

4. Click Play to listen to your composition. 

5. Add your beat to a track in your mix by clicking the Export button.


Watch the below video tutorial for more information and tips. For more MixPad tutorials, click here


Tuesday, September 15, 2020

How to Make a Slideshow with Music using PhotoStage


Slideshows are great. Slideshows with music are even better. Learning how to make a slideshow with music and pictures can liven up the montage and help make your beautiful memories more exciting. With PhotoStage Slideshow Maker, you can make a slideshow with music in a couple of steps. Combine pictures, video, and audio with effects, text, captions, and more to create a memorable slideshow that you can easily share with family and friends. 

Making a Slideshow with Music Easily using PhotoStage


  1. Click on the Wizard Icon to have PhotoStage quickly create a slideshow from a folder of images for you.

  2. Set the Image Display Length to determine how long each image in your slideshow will play.

  3. Add music from a local file or choose something out from the NCH Sound Library. You can also add your own narration.

  4. Select a theme and add your intro and outro titles.

  5. Add transitions and set their durations.

  6. When you’re finished with your settings, click Create.

  7. Preview your slideshow with music and click Export to save it to file, disc, or upload to YouTube, Vimeo & more.


Simply follow the steps demonstrated in the above YouTube tutorial and you too can create your own slideshow with music in a matter of minutes, using PhotoStage Slideshow Software. Available for PC, Mac, iPad, Android and Kindle, download PhotoStage for free below. To view more PhotoStage slideshow tutorials and tips, click here.

Friday, June 22, 2018

How to Make Slow Motion Videos with VideoPad

How to Make Slow Motion Videos with VideoPad


Sometimes the action in a video just happens too fast for us to truly process what we are witnessing. That is why slow motion is commonly used in sports to help referees make accurate calls about what happened when it all happened so fast. Making a slow-mo video is a great way to observe the action in your footage without missing anything. With an easy-to-use video editing software such as VideoPad, you can slow down the speed of any video to make your own slow-motion movies and videos.


Changing the Speed of Your Clip

Making a slow-motion video really just means that you have adjusted the speed of your footage to playback slower than in real-time. To change the speed of your entire video clip so that it can be viewed in slow motion, start by dragging your clip into the timeline. From there it is as simple as right-clicking anywhere on that clip and then select the option that says "Change Clip Speed..." This will open the Speed Change window where you can adjust the speed and duration of your video clip.
How to make a slow motion video
Change Clip Speed
How to adjust the speed of a video clip in VideoPad
Clip speed is commonly represented as a percentage in video editing. By default, your video will have a speed of 100% That is to say that 100% is real-time playback, viewed exactly as it occurred. Anything less than that will be slower than real-time and anything greater will be faster. A good place to start for slow-motion videos is by cutting your clip's speed in half to 50% Once you have changed the speed of your clip in the Speed Change window, click on the Set button and your change will be applied. If you find that you want your video to be even slower you can always repeat these steps and set the speed (%) even lower.

Making Only a Section of a Video Slow Motion

Example of a slow motion gif made in VideoPad Making just a portion of your video slow motion is another cool and simple effect that you can try in VideoPad. This is great to use when the buildup to the action in your video is perhaps not as exciting as the action itself, or when it would be too time-consuming to play the entire clip in slow motion. To make just part of a video in slow motion, start by dragging the clip into your timeline. Move the red cursor along the timeline to the position where you want the slow-motion portion of the video to begin. Click on the scissors icon to split the clip at the cursor's current position. Then, drag the cursor to the point in your clip where you would like the slow-motion to end and click on the scissors to split the tracks at this point as well. This will give you an isolated segment of your video that you can make slow-motion without affecting the rest of the clip. Right-click on the section of your video that you have clipped to be in slow-mo and adjust the speed as demonstrated above.
Making a section of a video clip slow motion

For more tips on VideoPad:


Tuesday, May 29, 2018

How to Make A Time-lapse Video with VideoPad

How to Make a Time-Lapse Video with VideoPad


Time just doesn’t seem to move fast enough for some of us anymore. A time-lapse video is a great way to observe change over time without having to literally watch grass grow. You can make a time-lapse video of anything you would like, such as a sunset, a cross-country drive, a plant growing, or anything else that you can imagine. With a simple and easy-to-use video editing software such as VideoPad, you can make stunning time-lapse videos of your own and share them with the world.


What is a Time-lapse Video?

There are basically two types of videos that are considered time-lapse videos. The first type is made when a video is taken on a camcorder and then later that video is sped up to quickly show the passing of a long amount of time. This can make everything in the video appear to move quickly or just certain objects in the video, depending on where the activity was in your shot and if your camera was still while shooting. Think about a sped-up video of foot traffic in a train station or of snow building up during a winter storm. The second type of time-lapse video is made by taking a series of pictures of the same object over time and then playing them all together in rapid succession. This method creates a video-like effect of that object changing from picture to picture.


Setting Up Your Camera for a Time-lapse 

Ready...

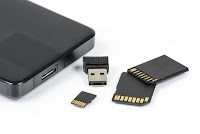
Make sure that your camera is fully charged and make sure that you have enough storage for the number of pictures you will be taking or the amount of time you will be filming. Make sure that your SD card is formatted and cleared so that there are no issues saving your images or recordings. When a camera is left on or left recording for long amounts of time, it can quickly drain the battery. Make sure that your battery is fully charged and that you have a spare ready just in case.

Aim...

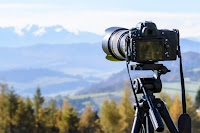
The most common element of almost all time-lapse videos is that the shot typically remains stationary, while one particular object or area within that shot moves. Using a tripod is the easiest way to achieve maximum camera stability. If you do not have one available, find a sturdy and secure place to set your camera so that it can remain completely still and untouched. Look through your viewfinder or on your camera’s playback screen and set markers just outside of the shot so that you can line that exact shot up again later if you do move your camera.

Fire!!!

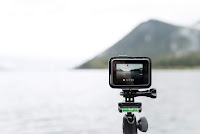
If you are taking a video, all you have to do is start your recording and remember to come back to stop it when you are finished. Making a time-lapse video with photos can be a little more labor-intensive. Depending on how fast your subject is moving or changing, you will want to use different intervals of time for taking pictures. Some modern cameras do have settings on them that enable you to set predefined increments of time to take a photo. Otherwise, you can set a timer and hang out with your camera. A couple of photos each minute is good for a sunrise, but for something like a plant growing, a couple of photos a day is better.

Photos or Video?

The main factor for this decision is time. How long is it going to take to capture everything you want in your time-lapse? Anything that takes longer than a day to capture would probably be better left to pictures. This is mainly because of storage. Video files are large, photo files are not. A 24 hour HD video won't even fit on most computers and would likely require 2-3 battery changes to film it all. Making a time-lapse with photos is great for capturing gradual change over time and then getting to watch it all at once in a matter of seconds. Using video is good when change happens quickly and you want to capture every second of it.

Making a Time-Lapse with Photos

Set up your camera on a tripod with your memory card formatted and your battery fully charged. Begin taking your pictures in even increments of time or allowing your camera to do so for you if it has the capability. Once you begin taking your pictures, do not move or disrupt your camera. When you get back to the lab, open the latest version of VideoPad Video Editing Software. There are two ways to make a time-lapse with photos in VideoPad.

Method #1

Add Images as Video in VideoPad 
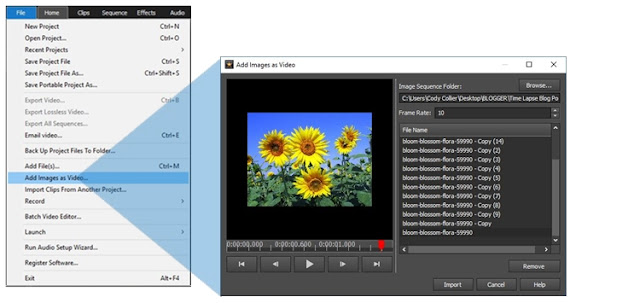
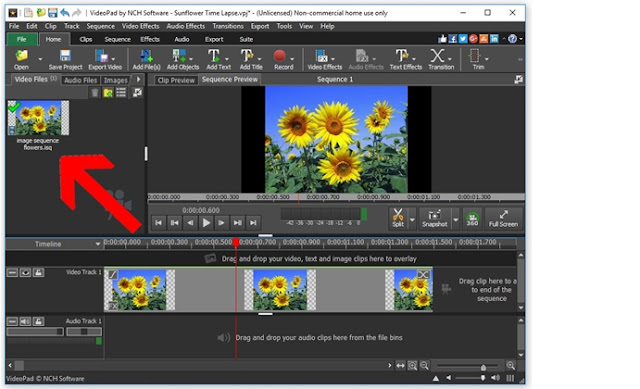
You can create a great time-lapse video with pictures using VideoPad's Add Images as Video function. From the File drop-down menu, select Add Images as Video... You will be prompted to select the folder on your computer containing all of your photos. After that, you can set the frame rate. This is a fast and efficient way to make a time-lapse video from your photos. The lowest frame rate that can be set is 10 fps, though. If this is too fast for your photo time-lapse, you will have to make your video using the second method.
Images as a Video Output File

Method #2

Drag all of your photos into the media bin in VideoPad. Then drag them all onto your timeline in the order that they were taken. To adjust the duration of all of your images at once, click on the first clip in the timeline, hold down the shift key, and then click on the last clip in your timeline. This will select all of your images at once. Right-click on any one of the selected images in your timeline and then select Change Duration from the dropdown menu. You will see under the clip preview window that the default duration of 3:00 sec is now highlighted in blue and can be adjusted. You can experiment with what feels right for your time-lapse. Typically, for a time-lapse made of images, the duration of each image doesn't need to be more than 1/2 a second long. Anything longer and your video will look choppy and slow.

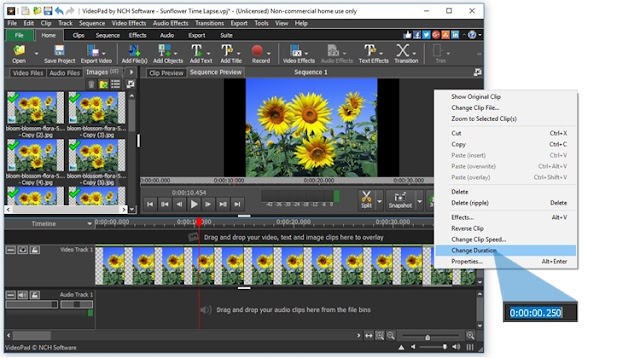
Change Duration of Multiple Images at once in VideoPad 


Making a Time-lapse with Video

Set up your camera on a tripod with your memory card formatted and your battery fully charged. Start your video recording. Once you start your recording, do not move or disrupt your camcorder or anything in your shot until you are finished. When you get back to the lab, open the latest version of VideoPad Video Editing Software. Drag your video clip into the media bin in VideoPad and then drag it onto the timeline. Right-click on your clip and select the option that says Change Clip Speed.

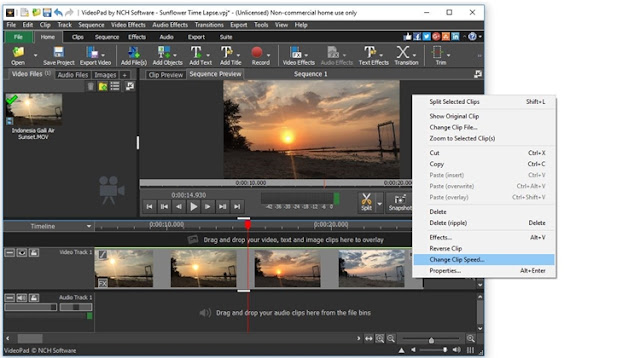
Change Clip Speed of a Video

That will open up the Speed Change function and allow you to adjust the speed of your clip as a percentage. It is default at 100% which is normal speed, so you can increase it from there. Remember that 200% is making your clip twice as fast, 400% is quadrupling the speed, and so on and so forth. You can adjust it to your liking and try out different speeds until it looks perfect. Click Set when you are finished and your time-lapse video is now ready for export. You can add music or captions to your time-lapse video and then export it to your preferred location or upload it directly to YouTube.
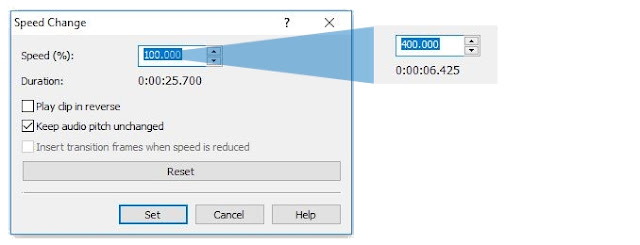
Increasing Clip Speed 4x


Monday, June 27, 2016

Apply the Ken Burns Effect with VideoPad - Pan and Zoom

What is the Ken Burns Effect?

In our newest release of VideoPad 4.45, we have added the Pan and Zoom Effect, also known as the Ken Burns Effect, to our Video Effects menu. The Ken Burns effect is a striking pan and zoom effect that is useful in bringing focus to specific elements in a static frame of a video. This method was used extensively by documentary filmmaker Ken Burns, for whom the technique is named. Burns used archival footage in his documentaries and applied a zoom effect to add interest and movement to his work. The Ken Burns Effect is often seen in YouTube videos and is an effective tactic to create the impression of movement in a static frame.

How To Pan and Zoom with VideoPad

Step 1: Prepare Video Clip 

To begin, identify the part of your video that you would like to focus on in your pan and zoom. Often, faces or background scenery are used as focus points. If you would like to apply the pan and zoom effect to a portion of your video, you will need to split the clip into sections before applying the Pan and Zoom effect. To split a clip, click on the timeline where you would like the effect to begin and select "Split". 

Step 2: Apply Pan and Zoom Effect

To apply the Ken Burns Effect, begin by selecting the clip that the effect will be applied to. From the "Video Effects" dropdown, select "Pan and Zoom". 


Step 3: Select Focus Point

When you select the Pan and Zoom effect, a small "FX" or Effects window will appear. Here you can elect to begin the Pan and Zoom Effect at the Start or the End of the selected clip. In the Clip Preview area, you can drag the outline to select part of the video frame as a focal point. 


Wednesday, August 21, 2013

Create Your Own Webcast

Have you ever wanted to make your own live TV show? More and more people watch their shows online, so you can join the trend and broadcast your own low budget show online with the help of video stream software. Whether you are editing your programming first, or streaming live, you can share your webcasts straight from your PC with BroadCam Streaming Video Server.

share and stream your own video webcasts With Broadcam installed you can set up either a live input or select your finished videos under settings, which is the easy part. What is a little more technical is setting up your computer's connection to the outside world so that viewers can access the video, but don't let that scare you away. To help guide you we have a BroadCam video tutorial available with includes instructions for configuring your router and firewalls for internet video streaming and more. For most people this will cover everything you need, but there is also a more detailed series on making your computer accessible from the public internet with information on port forwarding to allow connections to your computer for streaming and more.

Once you have the routing taken care of you can click "Connect" on main interface and a web page will open with the links you can then use to post your video streams on your website. Then all that is left for you to do is get some friends to test the connection from another location and start streaming.

Tuesday, December 18, 2012

Speed Up Typing Using Keyboard Shortcut Software

FastFox text expander software used to insert your most commonly used text quickly and easily. Expand words, phrases, images, and more to avoid typing things repeatedly and improve your typing speed and productivity.

FastFox is perfect for everyone whether you are saving shortcuts for the correct spelling of complex terminology, storing email templates and answers to FAQs, or even save your address to fill in online forms more quickly. To help you get started we just put together a tutorial video to walk you through setting up your own keyboard shortcuts and introduce you to the autocomplete text suggestion tool.


Download the free trial today. Once you get started using FastFox shorthand text expander to speed up your typing, you'll wonder what you ever did without it.

Wednesday, September 12, 2012

Screencasting For Better Communication & Teaching

Guest post by Eric Karkovack

Sometimes, your job title doesn't always necessarily explain the full extent of what you do. Personally, I'm a freelance web designer (and have been since 1996). But a great portion of my job is about doing things that have very little to do with design itself.

For example, one role I often find myself taking on is that of a teacher. Whenever I create a website that my clients will update themselves, I have to teach them how the process works. Sometimes it can be difficult to get my point across. It's especially hard when clients don't have much experience with technology.

For awhile, I offered manuals to my clients to use as a reference material. While that helped, it certainly wasn't as interactive as their website's content management system. I felt that I really had to find a better way of communicating.

Create screencast tutorials with Debut video capture software The idea of "screencasting," or recording my screen with a voice-over, came to me. If my clients can see what I'm doing on my screen and can hear my explanations of how to accomplish specific tasks, it could be of great benefit to all of us.

When I found Debut Video Capture Software, I was sold. It works exactly as advertised, it's affordable and easy to customize to my needs.

Probably my favorite part of Debut is that I can simply plug in my headset microphone, open up the software and start recording. That's really all there is to it. Within a half hour, I've created a few short tutorials that will help my clients. I've saved a ton of travel time and my client has an interactive reference that illustrates exactly how to update their website. It's hard to put a price on that kind of convenience.

Eric Karkovack is a freelance web designer with well over a decade of experience. He designs and maintains websites for clients in a wide range of industries. For more information, visit him on the web at www.karks.com

Wednesday, September 5, 2012

Q is for Quick

NCH Software ABCs Series

Q is for Quick SoftwareIf you are looking for a fast solution you have come to the right place. Just like our efforts to provide you with easy-to-use software, we are constantly striving to improve our programs so that they can get you up and running quickly. From speedy downloads, fast installations, quick start guides and wizards a lot of thought goes into getting you as close to the solution you were looking for in three minutes. For example, you can download any of our file converters and go from download to converted in minutes, if not seconds, because who has time to waste learning a program when what you really want is a file in a different format?

If you are not just looking for a fast solution but something that will speed up other day to day tasks we have a few programs that fit that bill as well. Take FastFox Text Expander Software, which allows you to set up your own shortcuts and macros to help you zip through typing or repeated tasks on your computer. Or any transcriptionist can tell you how much time they can save by using Express Scribe Transcription Playback Software when typing from an audio file, and that is just scratching the surface. For more Quick Software solutions be sure to check out the entire NCH Software collection.

<<< Previous: P is for PDFNext: R is for Recording >>>

Tuesday, January 3, 2012

Run Your Business from Anywhere

remote web access business softwareSmall business owners frequently wear different hats, run errands and are pulled in a million directions. That is one of the many reasons why we built the web access feature into our business software applications. We know you aren’t always at your desk when you need to update your records and accounts, check your inventory levels, or check the status of a client’s account. Here’s an overview of a few of our business programs that include the web access feature:
By setting up the web interface for any of these programs, you make it possible for other staff members to log into the system, and you can also log in and update information from your mobile phone or any remote computer. This means if you are at a meeting with a client you can make an invoice, and if you are at your warehouse you can update your inventory. To help make sure you take full advantage of this ability to access your data on the go, we created a video tutorial on setting up the Inventoria web access for easy access to your business inventory information wherever and whenever you need it. You can also view tutorials for setting up web access for Express Invoice and Express Accounts.

Wednesday, December 7, 2011

Lightning Fast PDF Creation

Bolt PDF Printer makes creating PDF files as easy as printing. See exactly how easy it is to print files to PDF in this short video introduction.


And if you need to convert a large number of documents to PDF, you will also want to try Doxillion Document Converter to batch convert thousands of files at once.

Monday, May 9, 2011

Record Video from Anywhere

Debut Video Capture Software records and captures video from webcams, recording devices, and from your computer screen. It’s great for recording tutorials you can post to online sites such as YouTube, for making company messages, for recording streaming video, and more. See for yourself how easy it is to get started capturing and recording videos in this Debut video tutorial:

Monday, May 2, 2011

Axon Windows PBX Tutorial

Putting together a phone system can be a daunting task. When you need to figure out phone lines and extensions, plus extras like on-hold music, things can quickly spiral out of control, especially if aren't well versed in Linux—which many PBX systems require. Fortunately, there is another option. With Axon, a Windows PBX system, as with all of our telephony software, we have done our best to keep everything simple and straight forward. Plus we have just finished a new quick start video tutorial to further guide you through the process of setting up your new PBX telephone system.


So if you are looking for a way to manage telephone calls and extensions across your business, and you don't have an IT team to do the grunt work for you, take a look at Axon virtual Windows-based PBX software. It will make getting your phones up and running as painless as possible, and you don't even need to learn a new operating system.

Thursday, April 28, 2011

Music Editing for Language Lessons

music editing softwareWe recently found a series of videos made by a WavePad user as a guide for people just getting started with audio editing, and for using sound editing software to support use of music in language lessons. While many of the basics are covered in our WavePad video tutorials as well, if there is one thing I have learned, it is that sometimes hearing the same thing in a slightly different way can really help you pick it up. If you are looking for another source to help you ease into audio editing, you should check out this series of 7 videos covering some WavePad audio editing basics:
  1. Select and cut
  2. Splitting and trimming
  3. Saving files in different sound formats
  4. Changing audio track speed
  5. Changing audio track pitch
  6. Using slower speeds and looping to teach sections of a song
  7. Copying edited clips to a new file
So whether you are teaching or learning songs in another language, or you have any other audio projects, be sure that you have WavePad Audio Editor on hand. You never know when it might come in handy.

Wednesday, April 13, 2011

Video Tutorial: Simple Slideshow Software in Action

See how easy it is to bring your digital photos to life and share your favorite memories with family and friends with PhotoStage slideshow creation software. Our recently finished PhotoStage video tutorial walks you through the process so you can see how easy it is to combine images, video clips, music and narration into a truly memorable slideshow movie.


Download PhotoStage slideshow software today to start making your own custom multimedia presentation to share with friends and family and preserve your memories.

Wednesday, March 9, 2011

Become a DJ: Learning the Software is Half the Battle

Zulu Virtual DJ Software is an easy-to-use dj software program for mixing track after track during live performances, or you can simply let Zulu be the DJ for you.

To make getting started even easier, we put together this introduction to Zulu DJ Software video tutorial to help aspiring DJs learn their way around the Zulu interface. The video covers the music list, auto play, using the deck, setting the beats per minute (BPM) and using auto-sync, the pitch slider and speed controls for smooth transitions between tracks. It also covers setting cue points, looping, applying effects, and using the headphone output.


Once you've learned some of the basics covered in this video, then all that's really left is picking out the songs to play and keep things moving at your next party.

Thursday, February 17, 2011

Getting Started With Music Transcription

TwelveKeys Music Transcription Software is a unique tool for musicians who want to learn how to play a piece of recorded music without the sheet music. If you recorded a piece of music and want to turn it into a personal composition or improvisation, you can use TwelveKeys to pick out the notes, along with Crescendo Music Notation Software to write your transcription out. Or maybe there is song you've been listening to on your iPod that you would love to learn how to play on the piano, guitar or any other instrument. You can use TwelveKeys to create a visual representation of the notes in that song, pick out the notes using the TwelveKeys keyboard, and slow the music down and loop the phrases you want to learn while you play along.

Transcribing music can be a great way to both learn songs and improve your ear. Download TwelveKeys to help you learn your next song, and watch the tutorial below for tips and tricks to make your transcription process faster and more accurate.

Friday, January 7, 2011

Video Editing Is Easier Than You Think

Don't leave your videos where no one can watch them, video editing is easier than you thinkAre you guilty of using your video camera to record and then letting all of those videos sit unused in a closet or on your hard drive? If the reason you put off doing anything with all of those video recordings is a fear of how much work it will be, then we have the answer for you—VideoPad Video Editing Software.

In early December we released a new version of VideoPad with more transitions and effects, plus a variety of other improvements including a new overlay track that will allow you to extend the same text over one or more video clips, making things like scrolling credits a breeze. And now we have just updated a two-part VideoPad video tutorial series to walk you through many of the features you will need to transform all that video footage into truly memorable home movies to cherish and share. VideoPad is easy to use in itself, and with these tutorials it’s now even easier.

The new tutorials cover the basics: adding media to your movie, working with the sequence, and exporting your finished movie. They also cover the fun stuff, like placing transitions between clips, and adding effects. You’ll also learn some tips for working with VideoPad, so you’ll always be able to achieve the finished product you imagined.

So what are you waiting for? Check out the VideoPad video tutorials, download VideoPad, collect up your SD Cards and other video recordings out of hiding, and get started. You will be making your own movie masterpiece within minutes.

Sunday, November 28, 2010

See How In Action

We have been working on expanding the number of video tutorials on NCH Software products. Since our post back in March we have added several more video software tutorials plus the series on to help you with some the programs that you might want to make available to others over the Internet. Be sure to check out these video tutorials, and let us know if you are itching for a tutorial on one product in particular so we can try to move it up in the queue.

So now in addition to the BroadWave, Golden Records and WavePad tutorials we previously announced, you can also find video tutorials on VideoPad, BroadCam, Troubleshooting server-based software applications and Setting up Web Access in Express Invoice.

These videos are part of our continuing effort to help users get our software up and running as quickly as possible. We hope that these videos will answer some of the common questions about basic functions, especially for people with a visual learning style. Stay in the know and see all of our tutorials by subscribing to the NCH Software YouTube Channel.

Thursday, September 30, 2010

WavePad the Movie

Here is a quick look at the always popular WavePad audio editor


WavePad is an established leader in professional audio editing software. Its diverse editing, effects, and toolset make it well suited for a wide scope of audio projects. And for those of you new to the wonderful world of audio editing you can find three WavePad video tutorials to help you learn the ropes and get started using this NCH classic.