Showing posts with label blog. Show all posts

Sunday, November 9, 2025

Cross-Stitch Your Photos into Seasonal Works of Art

Create Embroidery Designs from Photos


As the leaves turn and the air grows crisp, fall inspires us to slow down and get creative with handmade projects. This season, bring that cozy, handcrafted feel to your favorite photos with PhotoPad’s Embroidery Tool - a feature that transforms digital images into real embroidery patterns you can print and stitch yourself. Whether you’re decorating your home with fall-themed art, stitching a beloved family photo or planning your next handmade gift, this tool makes it easy to turn any image into something beautifully tactile. 


Turn a Photo into an Embroidery Pattern in Minutes

Creating your own cross-stitch or embroidery design takes just a few clicks. Open your image, select Tools > Embroidery, then adjust the number of colors and stitches to match your preferred level of detail. The pattern preview updates instantly, showing exactly how your stitched design will look. The printed pattern includes a color key with official DMC Embroidery Floss codes, so matching thread colors is effortless. 

You can print your pattern or save it as a PDF to work from digitally. Whether you’re stitching a family portrait, a pet photo, or a favorite landscape, PhotoPad’s Embroidery Design Software  makes it easy to turn any picture into a unique, handmade piece of art - no extra software required. 

  • Tip: Crop or adjust your photo’s brightness and contrast in PhotoPad before generating the pattern for even clearer stitch results. Note: The Embroidery Tool creates real, stitchable patterns - you will need an embroidery hoop, needle, and thread if you plan to stitch the design by hand.    
  • Tip: Try fewer colors for a minimalist outline or increase the stitch count for detailed results. 

Save Your Photo as an Embroidery Pattern 

Once your pattern looks just right, select how you want to save or print it. 

Output Options Embroidery

The Embroidery Tool offers several output options: 

  • Original - keeps your photo as reference 
  • Colored Pattern - shows thread colors directly on the image 
  • Symbol Pattern - great for classic cross-stitch layouts 
  • Color Key - lists all thread colors and codes for easy stitching 

Print your Embroidery Pattern and Start Stitching 

When you’re ready, simply save your pattern as a PDF or send it straight to print. Grab your embroidery hoop, needle, and thread - your design is now ready to come to life, one stitch at a time. 

From computer screen to embroidery project


Digital Images Reimagined as Embroidery Art

Whether it’s a snapshot from a fall hike, a cozy family photo, or a candid portrait, turning your images into embroidery patterns is a creative way to preserve memories with a personal touch.  

With PhotoPad Embroidery Pattern Maker, your photos don’t just stay on a screen - they become something you can truly hold, display, and gift. 

Happy Stitching,

The PhotoPad Team

Tuesday, May 23, 2023

Easily colorize your black and white photos with PhotoPad


Have you ever wondered how you can colorize black and white photos to breathe new life into them? You can quickly and easily do so with PhotoPad photo editor. In addition to its many powerful image enhancement and editing tools, PhotoPad comes with a built-in colorize feature that will allow you to literally add as much color as you want to any photo, including black and white ones. Who would benefit from such a feature? Those who are holding onto lots of memories in the form of old black and white photos can instantly take any one of those photos and make it fit for sharing. Whether it's for sharing offline by printing or by posting on social media, adding color to old photos can only be a good thing.

Sunday, May 21, 2023

Free photo touch up - Photo Retouching | Retouch Photos Online for Free


Quick, easy, and free photo touch up capabilities remain to be among the most important features in software programs like PhotoPad. While it has more than a dozen built-in photo enhancement features, its photo retouch tools continue to be some of the most powerful in its arsenal.

Wednesday, May 10, 2023

Increase Photo Resolution Online Free with PhotoPad


One of the most sought-after features in image editing software - perhaps next to the ability to instantly touch up photos as quickly as possible - is the ability to increase photo resolution without losing quality. As you can imagine, this feature can be extremely useful for a number of applications.

Tuesday, May 2, 2023

PhotoPad: Best Picasa Alternative for Editing Photos


When it comes to popular photo editing programs, there are only a few that can rival Google's old product called Picasa - so much so that plenty of people nowadays are searching for the best Picasa alternative. The biggest reason for that is because, for a time, it was one of the most powerful yet highly intuitive image editors available online.

Unfortunately for fans of Google's Picasa photo editor, it was discontinued in the mid-2010s. Luckily, there is no shortage of easy-to-use and capable replacements that can more than adequately handle various image editing tasks. 


In this article, we'll talk about one of the most appropriate alternatives to Picasa that you can download and install today: none other than NCH Software's very own PhotoPad Photo Editing Software. It comes with its own set of powerful image editing features, all wrapped up in an easy-to-use user interface that will allow you to enhance photos in no time. 

Thursday, April 27, 2023

Best Way to Enhance Audio with Windows 10 Audio Equalizer and DeskFX


On Windows 10, audio equalizers offer a quick and easy way to enhance the overall music-listening experience. If you can access an equalizer, you can not only enhance sound quality but also enjoy a higher level of customizability when it comes to your tunes.


You might be wondering, is a sound equalizer really necessary? Are there any other ways to improve audio quality on your computer by using other programs or types of software?


If you truly want to improve the sound quality on your computer, using a Windows 10 audio equalizer is definitely one of the first things you should try. 

Sunday, February 21, 2021

Looking to Transfer Videos from a Camcorder to a Computer?


Looking to Transfer Videos from a Camcorder to a Computer? Use VideoPad.

Have you come across an old camcorder? There’s a good chance you have used it to capture exciting moments and memories from the past that you would like to treasure for a lifetime. To make sure you preserve it, the best approach is to convert camcorder tapes to digital by transferring the videos from the camcorder to a computer. Download VideoPad Video Editor for free and follow the below tutorial to record and transfer videos from your camcorder. 


Learn How to Transfer Videos From Camcorder to Computer


  1. Plug your camcorder into your computer and turn the camera on in Play mode. 

  2. In VideoPad, navigate to the home toolbar and click the Record button and select Record Video to open the Capture Video dialog.

  3. Select your camcorder, add a filename and where you would like your video to be saved. Click the Capture button to begin recording your video from the camcorder. 

  4. When you have finished recording, click Stop and close the dialog. Your video will also appear in the VideoPad interface if you’d like to further edit the video.    


Watch the below video tutorial for more information and tips. For more VideoPad tutorials, click here


Thursday, November 26, 2020

Add a Note Beam with Crescendo Music Notation Software


Learning how to add a note beam is important for musicians as it makes sheet music significantly easier to read. A beam is a horizontal or diagonal line used to connect multiple consecutive notes to indicate rhythmic grouping. With Crescendo Music Notation Software, it is fast and easy to automatically add or remove a beam in note groups as this video tutorial will show you how. 

Adding note beams in 3 steps


  1. To toggle the automatic adding of note beams on or off, go to the Notation toolbar, click the Beams dropdown and toggle on or off the Automatic Beams Mode

  2. Beams will be automatically added to contiguous groups of short notes, such as sixteenth notes when the feature is On.  

  3. When the feature is off, beams will not be automatically added to short notes. 


There you have it! You have successfully learned how to add beam notes automatically or manually with Crescendo. Download Crescendo to try it out now! For more Crescendo tips and trips, check out more video tutorials here


Thursday, October 22, 2020

Express Accounts Voted one of the Best Accounting Software by Digital.com


Leading tech review site Digital.com has listed Express Accounts as one of the best accounting software for 2020. With over 130+ accounting software companies researched, we’re thrilled that Express Accounts was chosen as one the few accounting software to make the final list. 


Check out the full review here


Available on Windows and Mac, Express Accounts has a range of features including reporting on cash flow, tracking payments, recording recurring orders and more, making it a perfect option for small businesses. Download Express Accounts for free today and see how it can help your business. 


Tuesday, October 20, 2020

How to Make a Beat using MixPad


How to Make a Beat Easily

Everyone is making beats these days and it makes sense why - a catchy beat is the basis to any good song. You don't have to be an experienced producer or a DJ to make a great beat, with the best beat maker software, you can start making beats easily in a few minutes. Download MixPad Beat Maker Software for free and follow the below tutorial to create your first beat that even J Dilla would be proud of. 


Learn How to Make Beats with MixPad’s Beat Maker

1.Click Create Beat on the home toolbar to open the Beat Maker.

2. Double click on an empty bar to add a beat pattern to it.

3. Click on the bar division lines to add beats. The higher a beat is placed in the pattern, the louder it will be. 

4. Click Play to listen to your composition. 

5. Add your beat to a track in your mix by clicking the Export button.


Watch the below video tutorial for more information and tips. For more MixPad tutorials, click here


Thursday, October 15, 2020

5 Things To Consider When Choosing a YouTube Video Editor


Once just a job for Hollywood or video professionals, video editing can now be achieved by anyone who wants to post a video on YouTube. However with over 30,000 hours of video content uploaded to YouTube every hour, you know in order to stand out from the crowd and keep your viewers on the edge of their seats, you need to deliver engaging high-quality YouTube videos. 


However, with so many video editors available, picking the right video editor for YouTube can be overwhelming. You want to make sure you make the right decision. Below are 5 factors to consider when choosing a YouTube video editor:


How to choose a video editor for YouTube?

1. Ease of Use 

A good place to start is to consider how easy and intuitive the YouTube video editing software is. You do not want to pick a video editor that makes you refer to the user-guide each time you need to edit the video or apply an effect.


Some video software are complicated and take forever for you to even load the video. Since it is likely you will be recording and editing a lot of YouTube videos, you want to make sure your video post-production is as easy and enjoyable as possible. 


If you are looking to learn more about video editing, a good YouTube video editor should include lots of video tutorials so you can learn each feature and maximize your editing capabilities. In summary, ensure your video editor for YouTube has an intuitive workflow and puts all the tools at your fingertips.  


2. Video Format Support

Import

Before buying your video editing software for YouTube, make sure it supports the video format captured by your camera or recorder. This is especially important if you want to edit videos from 360 cameras, Stereoscopic cameras, 4K action cameras, drones, and more. 


Export

Imagine if you spent hours importing your video clips, trimming, adding effects, voice-overs, and video effects, only to realize that your exported video is low-definition or not in a video format supported by YouTube.


As an added bonus to save time, you also want to ensure your edited video can directly be uploaded to YouTube so you don’t have to waste time exporting the video onto your machine and then logging into YouTube and uploading the video. 


3. Advanced Editing Features

While most video editors have basic editing features that allow you to slice and dice videos, you know in order for your video to stand out on YouTube, you need to take your video to the next level! Some of the advanced video editing features for YouTubers to consider include:


  • Color correction

  • Video stabilization

  • External plugin support

  • Chroma key green screen

  • 3D and 360 video editing

  • Fast video rendering


4. Audio Tools

Often an overlooked key feature, make sure your YouTube video editor software has good audio editing capabilities. Things to consider include whether the audio is included in the timeline and the video editor has the ability to separate audio from video.


Most professional YouTube videos will need background music and depending on your video editor, this can be an added cost to either purchase the music and/or buy an expensive audio editing software/plugin. 


Ensure your video editor for YouTube has a royalty-free stock sound library and advanced audio features including:


  • Volume adjustments

  • Voice over recording

  • Noise removal

  • Surround sound

  • VST plugin support


5. Budget 

It is very easy to be overwhelmed by a list of features and fancy marketing videos, but an important consideration for picking a YouTube video editor is to assess how much you are willing to pay? There is a range of paid and free YouTube video editors available, some that even that cost a couple of thousand dollars. Depending on the range of features you require, performance, and ease of use, make a decision.


It is also a good opportunity to consider YouTube video editors that include free trials so you can test out all the features you require, performance, and ease of use, before making a purchase decision. 


Recommended YouTube Video Editor 

That’s all the key information you need in choosing a video editor for YouTube. If there’s one video editor we would recommend you try out, it’s VideoPad.

Not only is it easy-to-use and intuitive, it includes all the video and audio features listed in this article, supports all video formats including direct export to YouTube, and not going to cost you an arm and a leg. You have access to all the tools you need to edit videos for YouTube and make professional-looking videos in a matter of minutes.


With incredible reviews and having been voted as one of the best video editing software from leading review sites such as PC World, Top Ten Reviews, Tom's Guide and TechRadar VideoPad is one of the best options when it comes to YouTube video editing. But don’t take our word for it, download VideoPad for free and try it out yourself! Happy editing! 


Wednesday, September 30, 2020

Debut Voted Best Video Capture Software by Top Ten Reviews

Debut Voted Best Video Capture Software

Leading tech review site Top Ten Reviews has just listed Debut Video Capture as the best video capture software for 2020, beating the likes of Movavi Screen Recorder Studio, Camtasia Studio and Snagit to take the winning crown.  


Whether you’re looking to create video tutorials, show a problem to tech support, share video game moments with friends or record streaming video, a powerful video capture tool like Debut allows you to do just that and more. With editing functions, on-screen notes, color settings and improving audio quality, you will not find a better overall screen video recorder than Debut.

Here’s what the best video capture software 2020 review had to say about Debut. 


“Our favorite video capture software for footage, screenshots, and more”


“Debut is remarkably easy to use”


“Debut Video Capture Pro has the best set of editing tools of all the products we tested, enabling such things as fixing the colors of your captures and improving their audio quality”


You can check out the complete article on the TopTenReviews website, but the best way to really get a feel of the software and truly understand why TopTenReviews have named it the best screen recording software, download Debut video capture software for free and try it out yourself. Besides, as much as we love getting positive reviews like these from tech sites like TopTenReviews, the most important review is yours.

Tuesday, September 22, 2020

Express Invoice Review by Techradar


Leading tech news and reviews site Techradar has published a very positive review of Express Invoice invoicing software, awarding it 4/5 stars.


Express Invoice is one of the easiest invoicing and billing software with lots of functionality and integrations. But don’t take our word for it, check out the full review here. Here are some of our favorite quotes from the Techradar review.


“Express Invoice is impressive in terms of overall performance”


“NCH should be commended for developing such a powerful package of software, but keeping the price low too”


“If you’re at all daunted by using billing and invoicing software then NCH Express Invoice should do a decent job in calming any jittery nerves”


“Express Invoice is a great package and even more appealing if you still prefer to have a downloadable software product that you can store on a local machine” 


Available on Windows, Mac, iOS, Android, and Kindle, Express Invoice allows you to work seamlessly between desktop and mobile devices. Express Invoice is the perfect invoicing software for individuals, small businesses, and medium-sized companies who need a quick and efficient tool to process invoices and bills. Download for free and try out Express Invoice today! 

Tuesday, September 15, 2020

How to Make a Slideshow with Music using PhotoStage


Slideshows are great. Slideshows with music are even better. Learning how to make a slideshow with music and pictures can liven up the montage and help make your beautiful memories more exciting. With PhotoStage Slideshow Maker, you can make a slideshow with music in a couple of steps. Combine pictures, video, and audio with effects, text, captions, and more to create a memorable slideshow that you can easily share with family and friends. 

Making a Slideshow with Music Easily using PhotoStage


  1. Click on the Wizard Icon to have PhotoStage quickly create a slideshow from a folder of images for you.

  2. Set the Image Display Length to determine how long each image in your slideshow will play.

  3. Add music from a local file or choose something out from the NCH Sound Library. You can also add your own narration.

  4. Select a theme and add your intro and outro titles.

  5. Add transitions and set their durations.

  6. When you’re finished with your settings, click Create.

  7. Preview your slideshow with music and click Export to save it to file, disc, or upload to YouTube, Vimeo & more.


Simply follow the steps demonstrated in the above YouTube tutorial and you too can create your own slideshow with music in a matter of minutes, using PhotoStage Slideshow Software. Available for PC, Mac, iPad, Android and Kindle, download PhotoStage for free below. To view more PhotoStage slideshow tutorials and tips, click here.

Wednesday, September 9, 2020

Want to Transcribe Audio to Text in 5 Easy Steps?


Imagine if you have been tasked to transcribe a large audio file to text and you were hoping to open a word processor, play the audio file, and start typing away. Unfortunately, you would end up spending most of your time rewinding the audio, constantly switching tabs, or checking to see if you missed anything. Luckily the transcription process does not have to be this tedious.

With the help of professional transcription software, you can significantly reduce the time it takes to convert audio to text and make your life much easier in the process. Express Scribe is the most comprehensive audio transcription software and has everything you need to help you transcribe audio to text faster.

How to Transcribe Audio using Express Scribe

1. Download and Install Express Scribe

Download and install Express Scribe. It is free to download for PC and Mac and installation should only take less than a couple of minutes. 


2. Adjust Settings

Click on Options in the main menu bar to set and change all your transcribing settings. Set the audio playback to suit your typing skills or the quality of the recording. Additionally, you can also configure your foot pedal controller, hot-keys, speech-to-text software, and more. 


3. Load Dictation(s)

Once your settings have been configured, it is time to load your dictation file.  Load your audio file(s) by either uploading your file from your local machine, through an FTP server, LAN or even directly from a portable dictation recorder. 


4. Start Transcribing Audio to Text! 

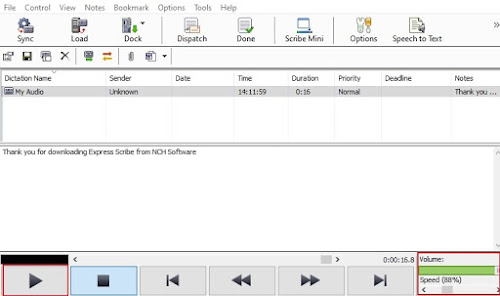
It’s transcription time! Select the loaded audio file and click the Play button to start. Open Microsoft Word or any other word processor to type the text. Alternatively, you can also use the note section in Express Scribe, under the main interface to type your text. If needed, you can slow down or speed up the playback using the speed control tool in the bottom right corner. Additionally, you can also adjust the volume of the playback. 


5. Share Transcription

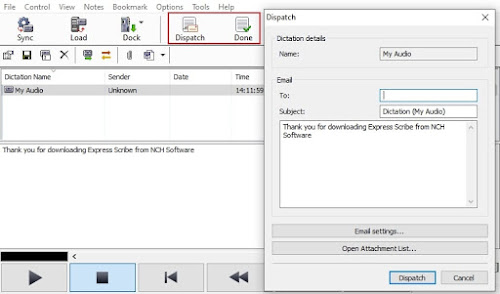
After you have finished transcribing your audio file to text, you can either select the “Done” button which will remove the file from your list, or select Dispatch to email your transcription along with your text attachment and remove the file from your list. 


So, there you have it. You have successfully transcribed an audio file to text in 5 easy steps. Whether you're an independent typist working for a Medical or Legal business, the Head of Marketing working on internal communication videos, or a secretary or needing to transcribe a recorded interview, Express Scribe has you covered. 


Wednesday, September 2, 2020

Prism Voted Best Video Converter by Digital Trends


It's time to celebrate! Leading tech review site Digital Trends has listed Prism Video Converter as one of the best free video converters for 2020. Here are some of our favorite quotes from the review.


"The best video converters, like Prism Video Converter, make the conversion process seamless and quick for users"


"Easy to pick up quickly"


"Works with all common video formats"


"Extra capabilities include adjusting filters, brightness, contrast, rotation, and other important features that you might need"


Available on Windows and Mac, Prism is a powerful video converter that is very easy to use and converts most video formats within minutes. Download Prism today and see for yourself why it has been voted the best video converter.