Showing posts with label software. Show all posts

Friday, August 24, 2018

How to Resize a Picture

How to Resize a Picture


There are often times when we end up with photos that are larger than we need them to be. Many websites will only allow images of a certain size to be used or uploaded. Meanwhile, here you are with your giant photo wondering how to resize a picture. If you encounter an error on the web or another situation where you would need to know how to resize a picture, don't sweat it. With a simple photo editing software such as PhotoPad Photo Editor you can easily learn how to resize a picture or graphic on your own.


Import Your Photo into PhotoPad

The first step to resizing your picture is to bring your image into PhotoPad. After you have opened your copy of PhotoPad on your computer, there are several options for importing images. Click on the option that says Open when you first launch the program and you can immediately start using the Photo Browser. Otherwise, under the Home tab, you may click on the Photo Browser icon or the Open Files icon to select the image you wish to resize. Under the File tab, you can also choose to open an image into the program from a cloud service, such as Google Drive or DropBox.
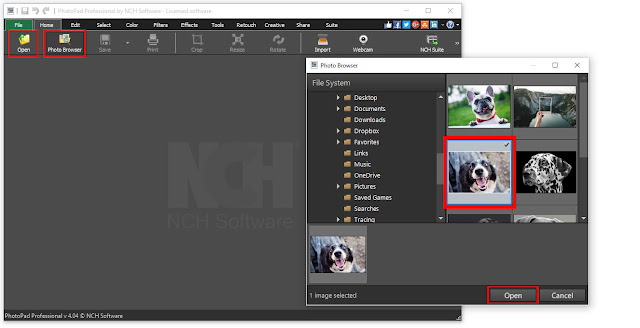
PhotoPad Photo Browser 


Resize the Canvas and Layers

The Resize icon exists both under the Home tab and under the Edit tab. With your image in the program, click on the Resize icon to resize your photo. You will notice that a resize effect layer has now opened in the Effects History and Layers panel on the right-hand side of the program.
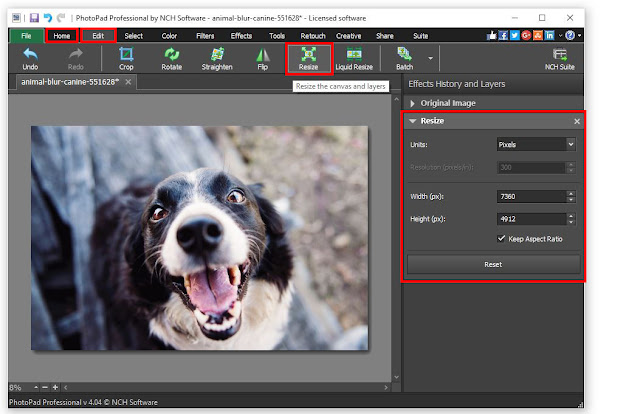
Resizing canvas and layers in PhotoPad

Select Your Scale

There are four options for how to resize a picture in PhotoPad. You can set your scaling units to resize based on Pixels, Percentage, Inches, or Millimeters. For images on the web, Pixels, and Percentages are the more common units used for resizing photos. If you choose to resize by inches, you can access the Resolution option and set the pixels per inch of your photo. You will notice the checked box at the bottom of the layer that says "Keep Aspect Ratio." This means that while you are adjusting the image's size, your width to height ratio will remain the same. This is commonly known as "Constrained Proportions." It is usually best to keep this option checked.


How to Resize an Image

For this example, I have chosen to resize a picture using the percentage option for my units. This is an easy way to conceptualize how to resize a picture. I want my image to be exactly half the size it is right now, so I have set my units to Percentage and then typed in 50% for the value in the width box. You will see that my image is now half the size it previously was. Some websites give you specific dimension requirements for photos in pixels. For this, you would simply change the units to pixels instead of percentage and type in the dimensions you were given into the width and height boxes.
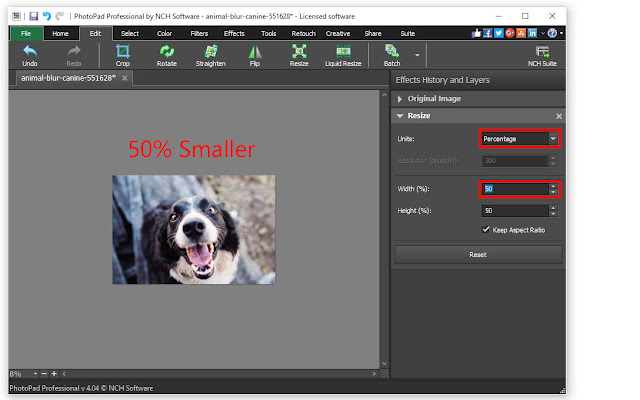
Resize Photo by Percentage 

Save Your Image

Now that you are finished resizing your image, you are ready to save your work and use your newly resized photo. Under the File tab, select the option that says Save As...This will launch the explorer window and allow you to select your output destination and choose your output file type.


Resize by Compressing

Sometimes when people ask how to resize a picture, what they are actually referring to is the file size in terms of storage. This is also known as file compression and can be done just as easily in PhotoPad. With your photo opened in the program, simply go to the File tab and select the option that says Save for web... This will launch a window that will allow you to use a slider to adjust the compression quality of your image and preview the result in real-time. In this example, I have reduced the file size by 80% with almost no observable loss in quality. Click on the OK button when you are finished and your newly compressed image can be saved to your chosen output destination.
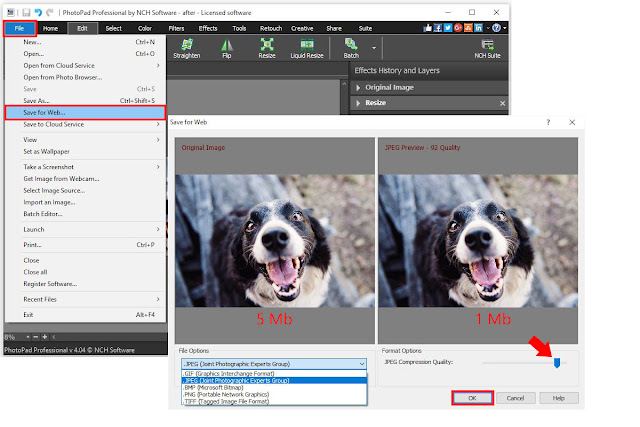
Save for Web...


For more on photo editing, check out these posts:

Friday, August 17, 2018

How to Create a Curved Path with DreamPlan Home Design Software

How to Create a Curved Path with DreamPlan Home Design Software


Creating a Curved Path with DreamPlan Home Design Software


This tutorial will show you how to create a curved path with DreamPlan Home Design Software.
For more information on DreamPlan, visit our website here: https://www.nchsoftware.com/design

For more DreamPlan Tutorials, visit: https://www.nchsoftware.com/design/tutorial.html


How to Create a Curved Path with DreamPlan Home Design Software

  1. Select the Path button on the Exterior tab and draw the edges of your path. 
  2. Select the path and you will see a red handle at each point you clicked with your mouse when drawing the path plus an additional pink handle between each pair of red handles.
  3. Left-click and drag either a red or pink handle to form a curved line.

For more information and additional tips and tricks, watch the full video tutorial above.


To view additional DreamPlan tutorials, visit https://www.nchsoftware.com/design/tutorial.html

Do you need help using DreamPlan?
View the DreamPlan Help Manual: http://help.nchsoftware.com/help/en/dreamplan/win/help.pdf

Visit the DreamPlan forum to ask other users for help or share your designs: http://nch.invisionzone.com/index.php?/forum/174-dreamplan/

Or contact DreamPlan Support: https://www.nch.com.au/support/supportcontact.html?software=DreamPlan

Friday, July 27, 2018

Change Audio to MP3 Format with Switch

How to Change to MP3 format


The MP3 format is one of the most common audio file formats in the world today. MP3 files are widely used for saving and sharing digital audio files because of their compression size and ability to maintain the high quality of their original format. This makes the MP3 file type great for storing and emailing because download speeds are quick and the files don't occupy much space. You may have found yourself in possession of audio files on your computer or on a disc that is in a different format that you would like to change to MP3. With a simple file conversion software such as Switch Audio File Converter Software, you can quickly learn how to change to Mp3 format in a matter of seconds.


Import Files into Switch

The first step to learning how to change to MP3 format is to open your copy of Switch and add/import the files that you would like to convert. Switch allows you to import individual audio files, video files, entire folders, or even import them from a DVD or audio CD. Click on the green Add Files button at the top of the program to begin adding your files. Once you have selected the files you wish to convert, click Open. You can also drag and drop files from your File Browser window directly into Switch.
How to change to Mp3 Format
Import files to convert to mp3 

Set Output Destination

Next, decide where you would like your new files to go once you have converted them. This is where your files will be located after they are changed to MP3 format. Use the drop-down menu or the Browse button at the bottom of the program to set your output folder. You can click on the Open Output Folder button to view the selected output folder and its contents. You can also check the box next to it to save your files to the same folder as the source files. This option will output your converted MP3 files right next to their original versions.
How to set output destination for changing to mp3 format
Set output destination 

Set Output Format

Switch is capable of converting to just about any audio file format you can think of. However, you are here because you want to know how to change to MP3 format, specifically. Click on the Output Format menu at the bottom of the program to open the drop-down menu. Select .mp3 as your output format. This will be applied to any and all files that you select.
How to change output format of audio files to mp3
Set output format 

Output Options

Click on the Options tab next to the Output Format menu to open the Options window. Here you can adjust some of the more advanced options such as the Bitrate and Channel Mode. You can also adjust the metadata that will be attached to your newly converted MP3 files. For more information on adjusting audio file meta tags, check out this blog post:
How to Edit MP3 Tags and Metadata with Switch Audio Converter
How to edit mp3 meta descriptions and mp3 meta data
Edit MP3 metadata 

Convert to MP3

Now that we have chosen our files and set the output format and destination, we are ready to convert our files to MP3. If you imported an entire folder or files from a disc and you only want to change some of them to MP3, simply go through and select those files. Otherwise, with all of your files selected, click on the Convert button at the bottom right of the program. The conversion will be performed and your new MP3 files can now be found in your chosen output folder.
How to convert files to mp3 with Switch
Conversion complete


For more on Switch, check out some of our other posts:

Thursday, March 24, 2016

How Text Expander Software Can Save You 100's of Hours a Year

How keyboard macro programs can increase productivity through typing shortcuts

If you work as a legal/medical transcriptionist, eBay reseller, customer relations manager, data entry clerk, programmer, or web designer - a simple text expander program can help you save many hours a week by creating text typing shortcuts to fill in common phrases or code strings in your workflow. Text expansion is a bit like auto-complete on a cell phone/Google — it allows you to enter a long string of text with a shorter string. When you’re using a text expansion app, it monitors your typing, and whenever you type a specific sequence of letters, it will replace those letters with a predefined piece of text. It could be your name, your address, or a full paragraph that you’ve saved.

Think of how many things you type over and over on a regular basis and the number of seconds it takes to write each phrase - text expansion allows me to type a few letters instead of that whole string of characters. Do the math - if you are in the medical transcription field, you are often typing long words that are hard to spell (and often don't register correctly with spell check). With a short setup period with the software, you can have several common diagnoses and descriptive sentences ready to go - a paragraph that would have taken a minute or two to type up can now be written in a few seconds!

With transcription usage covered, a couple of other examples:

eBay Seller:

Have a couple of different templates or common descriptions for your items? Save each one with a different string, and halve the time needed to make each listing and get more products up and running.

Customer Relations (CRM):

If you manage support emails or a business Facebook/Twitter account, you can have frequently used responses (Thank you for the comment, please leave us a review here; Sorry to hear about your issue with our product! For technical support, please go here; etc) saved and ready to go. It will certainly make qualifying for the Facebook Page Responsiveness Badge easier for your business page!

Data Entry/Programming/Web Design:

Have a particular formula, recursive loop, file location, or coding template that is referred to multiple times in your project? Text expanders don't just store letters, you can have common code snippets saved as well to save on development time.

Give our highly rated text expander a try: FastFox Text Expander for Windows and Mac

Features:

Text Expansion and Image Insertion
  • Expand keyboard shortcuts into words or phrases
  • Create an unlimited number of text shortcuts
  • No limit on expanded text length
  • Save plain text or formatted rich text expansions
  • Create a shortcut to insert images 
Shortcut and Macro Creation
  • Define macros for actions using special keys
    (i.e., Ctrl, Alt, and Shift)
  • Create shortcuts from multiple key commands
  • Use keyboard macros within any program
  • Utilize a shared shortcut file on a network to standardize stock text across your business
  • Back up and restore shortcut data and groups 
Intuitive Autocomplete
  • FastFox learns your most commonly typed phrases and suggests them to you as you type, so you can select and insert text on the fly.
For a quick lesson on using FastFox, read this tutorial from WikiHow

Click on the link to download or purchase:

Monday, February 1, 2016

Encrypting Medical Dictation for HIPAA Compliance

How to Use Express Dictate to Meet Federal HIPAA Security Rules in Your Medical Dictation Recordings


From the Health Insurance Portability and Accountability Act of 1996 (HIPAA):
A covered entity must, in accordance with §164.306… Implement a mechanism to encrypt and decrypt electronic protected health information.” (45 CFR § 164.312(a)(2)(iv))
HIPAA and HITECH address the security and privacy of PHI (patient health information) with more of a policy and procedures-oriented approach with no strict parameters for what type of technology to use, but encryption is typically considered a best practice when it comes to protecting sensitive data.

Using Express Dictate to Encrypt Medical Dictation Recordings

Follow these steps to send an existing dictation with Express Dictate using 256-bit encryption:
  1. First, you will need to purchase the Medical Legal User license and register Express Dictate to encrypt recordings. Once you have done that, close and restart the program.
  2. Drag-and-drop your audio file into the Express Dictate window.
  3. Next, open Options and go to the ‘Sending’ tab to create a Recipient
  4. Click the Create button to open the Recipient Properties Wizard. Enter the Recipient Name, then click Next.
  5. Select a send method (e-mail, LAN, FTP) and enter the required details, then click Next.
  6. This brings you to the File Format window of the Wizard. Select DCT as your file format.
  7. Finally, you need to select the checkbox labeled "Encrypt recordings for additional security and privacy". Enter the encryption key and click the Finish button.
  8. Click OK to close the Options dialog.
  9. Make sure that the dictation file is highlighted in the dictation window, then click the Send button on the toolbar.

Express Dictate Digital Dictation Software

Express Dictate software is a voice recording program that works like a dictaphone. It lets you use your PC or Mac to send dictation to your typist by email, Internet, or over the computer network.

Some of Express Dictate’s features include:
  • Digital audio recording with superb signal processing quality 
  • Ability to prompt for patient or file data before a recording starts 
  • Supports HIPAA compliant secure encryption for sending secure patient or client data 
  • Attach additional files or notes for your transcriptionist with the recordings 


Click on the link to download or purchase  

For more information on HIPAA Compliant Software, read:

Monday, June 23, 2014

HourGuard for Android Now Available

One of NCH Software's best Business Products is now available on Android devices.  HourGuard Timesheet Software for Android allows users to track time spent on customer projects. The app is simple and easy to use.

HourGuard on Android devices frees up focus on work without having to worry about logging hours or tracking time. The software includes reports on time spent on tasks and sub-tasks.  This is a great product for anyone billing by the hour.

HourGuard Features:
* Push a single button to start/stop time
* Mark tasks complete, active, or closed
* Runs in the background without interfering in other tasks
* Simple and easy to use interface

For anyone looking to improve focus, track time spent, and increase productivity HourGuard TimeSheet Software for Android is a must-have.  If you have already had the chance to try HourGuard, let us know what you like about the app or how we can improve future versions.

Monday, April 21, 2014

NCH Software's Newest Business Tool: Express Project Management Software

NCH Software is continuing to develop valuable tools and software for the Business Productivity space. Express Project Management Software is NCH Software's newest addition to the already great assortment of business tools and utilities.

Below is a quick video introduction for Express Project Management Software.


Express Project is an organization tool designed to simplify project and task management. This software ensures that there is a clear breakdown of what you and your team members need to accomplish along different stages in the project timeline. Express Project features several important features including visual Gantt Charts, scheduling, resources, and custom calendars to fit your needs.


Express Project Additional Features:
* Set task dependancies and constraints
* Identify key tasks using Gantt charts and critical path methodology
* Create project level and resource level schedules/calendars
* Output Gantt Chart information, as well as task and resource information


For more information or to try Express Project Management Software for yourself, visit our website. If you have already had the opportunity to try out Express Project, let us know what you think.  We always enjoy hearing feedback from our fantastic customers.

Thursday, March 20, 2014

New Music Practice Software from NCH Software

PlayPerfect Free Music Practice Software is the newest tool added to NCH Software's Audio Software and Tools.  It can help you practice, learn, and improve playing your favorite instrument using your Windows PC.


PlayPerfect Music Practice Software has visual cues, playback, and performance reports to help young musicians train their ears to detect wrong or out-of-tune notes.  It's a fun way to practice or learn your favorite instrument.


PlayPerfect Free Music Practice Software for Windows features:
- Moving cursor
- Color-changing notes indicating correct or incorrect
- Built-in metronome to help you keep tempo
- Practice sessions recorded as Mp3 files for future playback
- Set the tempo and speed of the piece you are practicing


For anyone looking to improve on their favorite musical instrument, PlayPerfect is a fun and exciting way to accomplish that goal.  If you have already had the chance to use PlayPerfect Free Music Practice Software, let us know how we can improve future versions, or what you really like about the product.