How to Make a Panoramic Photo in PhotoPad

Most smartphones today come equipped with camera settings for taking panoramic photos. The result is always a nice big image that captures much more than a typical photo would. But what if you want to take a panoramic picture with your digital camera or another camera? There is an easy way to create stunning panoramic images yourself even if you don't have a phone with the feature. Lucky for you, a panorama can be created using the Create Panoramic Image dialog in PhotoPad Photo Editing Software
How it works
The dialog provides an easy way to combine multiple images with overlapping views to create a single, larger, seamless image. When taking your pictures, stand in one place and move your camera from one side to the other, taking photos as you move along. Overlap is good because PhotoPad will use it to layer the images together. As a general rule of thumb, make sure that each image overlaps the others by about 1/4. The images should be the same size, taken from the same camera and from the same position. This will make it easier for the program to stitch them together.Download & Install PhotoPad
PhotoPad is a great photo editing software with many fun features to explore. The panoramic image feature is just one of many projects you can accomplish with this feature-packed program. In order to get started creating your panoramic photo, download and install PhotoPad onto your computer by clicking the button below.
Open The Panorama Dialog
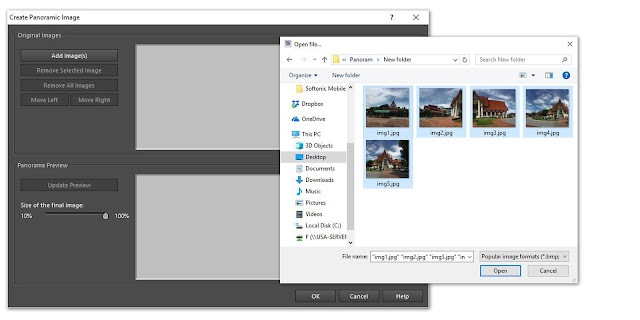
Open PhotoPad Photo Editing Software on your computer. From the main menu, click on the Tools tab to view the tool options. Select the option that says Panorama to open the Create Panoramic Image dialog.
Add Images
Click on the button in the dialog that says Add Image(s) to launch the file finder window and import your images into the program. Once loaded, the images will appear in the preview window of raw images. You can change the order of the images from within the dialog as well as add or remove images.
Preview Panorama
Before constructing the final image, the dialog will allow you to preview the results. Click on the button that says Update Preview to view a preview of the final product. Remember, at least two images are needed to create a panorama. If everything looks good, you can click OK and a new project with the stitched panorama will be created and opened for further editing in PhotoPad.Crop Your Image
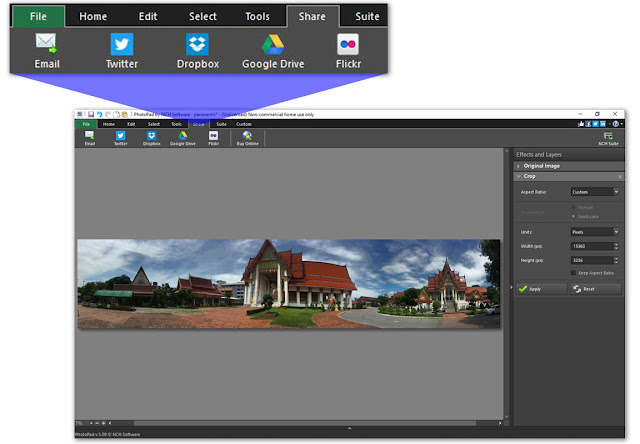
As a result of how the camera moves when taking the individual pictures, there may be some excess black space left around the final product. From the Home tab, you can select the Crop tool and crop the image to get rid of this. After you have cropped your panorama, you can apply any additional effects to your image before exporting.
Save & Share
Now that you have successfully created a beautiful panoramic image in PhotoPad Photo Editing Software, you are ready to save it and share it with the world. Click on the Share tab in the main menu to view some of the various sharing options that can be used directly within the program. Alternatively, you can select the File tab and choose Save As...to select where and how you would like to save your image onto your computer.
For more on PhotoPad, check out these articles:


No comments:
Post a Comment