Showing posts with label travel photography. Show all posts

Tuesday, July 28, 2020

Best Tool to Make HDR Images in Minutes

Picture this.


You’ve taken a trip to the forest and you come across this beautiful spot with the river gently flowing and the afternoon sunlight peeking through the forest trees. 


You take out your camera but you are unsure how to best capture the scene in its full detail. Do you light the dark shadows on the river? Or do you light the trees in the background? The high-contrast scene can prove an impossible task for a camera to capture but not to worry, there is a solution. That solution is called PhotoPad and its sophisticated HDR processing tool.


What does HDR mean?

In a simplified definition, HDR photography or High Dynamic Range photography is the technique of fusing different exposure images to create a single image with overall correct exposure. PhotoPad, one of the most comprehensive photo editors and HDR software available, takes all the complications away in a couple of clicks to create an image with so much dynamic range and detail that couldn't otherwise be achieved with a normal photo. 


How to Make HDR Images with PhotoPad

  • The first step is to capture at least three images with different exposures. The first image is to capture a mid-range exposure shot, the second captures the highlights with higher exposure and the third one is a lower exposure shot that captures the shadows. Feel free to capture additional photos that represent exposures between the two extremes.


  • Once you have your images, the next step is to install PhotoPad which takes less than a couple of minutes to install.

  • Open PhotoPad and navigate to the Tools tab in the toolbar and select the HDR icon.


  • Select the dark, medium, and bright exposure images by holding the Ctrl key and click Open


  • PhotoPad will now automatically align and combine your images into a single HDR image. 


Your eye-popping National Geographic-worthy HDR photo is complete. If you don’t want to take multiple photographs, you can also create an HDR from one RAW image format with neutral lighting and then later create different exposure images digitally with PhotoPad. 


Once your HDR image is complete, continue to edit your image like any other PhotoPad project. Maybe try out the advanced double exposure tool or why not some of our top travel photography editing tips? Download PhotoPad HDR photo editor below and check it out yourself.


Thursday, July 9, 2020

Top 5 Travel Photography Editing Tips


We’ve all seen fashion magazine images edited with fake backdrops, flashy text, and intense skies. When it comes to travel photography, it’s recommended to keep editing simple and realistic. 


Whether you’re a backpacker, a travel blogger, or a vacationer, you know travel is all about the experience, the journey, the beautiful places and amazing people you’ve met along the way. Unfortunately on many occasions, your travel photos fail to deliver the same experience behind the captured moment.


Not to worry, here are 5 simple travel photography tips that will turn your photos into something special with the help of PhotoPad, one of the easiest and most comprehensive photo editors available. 


Crop

While traveling, you won’t always be in the right place at the right time to capture the perfect moment. This leads to photos including unwanted elements which can be distracting. Cropping your image is another way of composing your shot by highlighting the subject. 


Take this image of the hot air balloons in Cappadocia, Turkey for example. You can crop the image to focus on a particular subject or make it suitable for social media. To crop the image in PhotoPad, select the Crop button in the toolbar, and adjust your selection. You can also adjust the aspect ratio and resize your crop selection. 


AutoFix

Exposure, Resolution, Saturation, Color Correction, Contrast - the photography lingo is endless and can take a while to wrap one’s head around it.


One of the best features of PhotoPad is its one-click AutoFix function, which automatically fixes the most common photo problems and enhances your travel photo in seconds. To apply AutoFix, navigate to the Retouch tab in the toolbar, and select AutoFix. It’s that simple!


Color Boost

Don’t you wish you could take photographs with your eyes? You might notice that the vibrancy of colors in your travel photos looks a bit dull. This is where PhotoPad’s one-click Color Boost function will automatically make your pictures pop.


Head to the Filters tab and select Color Boost. You can also adjust the brightness and strength of the Color Boost accordingly. 


Touch Up

All too often when you’re traveling to a place to photograph, other tourists have the same idea and are likely to end up in your photo. Luckily, you can remove tourists from your photo with PhotoPad’s Touch Up tool. This however only works well as long as there isn’t a crowd of people or a lot of elements that need to be removed and the elements are against an unbroken and repeating background like the image of a tourist beside a field of grass below. 


To use the Touch-Up tool, go to the Retouch tab and select Touch Up. The tool works by stamping material from one part of a picture onto whatever other parts you choose. Hold down the Ctrl key and click on the part of the picture that will cover up the tourist, in this case - more grass. This tool is also useful for removing dust spots, blemishes, and other imperfections. Works like magic. 


Lens Distortion

If you have ever noticed your travel photos to be unnaturally curved inwards or outwards, your image is distorted. Commonly caused by a myriad of reasons such as the use of wide-angle/telephoto lenses, camera positioning or camera tilts. Regardless of the distortion type, you can easily correct it with PhotoPad’s Lens Distortion feature.


Under the Effects tab, select Lens Distortion where you can manually adjust the distortion correction accordingly, giving your pictures a more professional look. 


There’s so much more to editing your travel photos than just choosing a filter and posting your photo on Instagram. While these are just some of the quick and easy-to-use features listed in this article, PhotoPad is a comprehensive travel photo editor with many more tools and effects available that will take your travel photography to the next level. Happy editing!


Wednesday, April 11, 2018

How to Edit Travel Videos with VideoPad

How to Edit Travel Videos with VideoPad


You have just returned home from one of the greatest adventures of your life. Your bags are unpacked, your passport is put away and your head is filled with unforgettable vacation memories. You are probably starting to think about all of those videos you took and are now wondering what you are going to do with them all. Making travel videos is a great way to preserve and share your travel memories. With an easy-to-use video editor like VideoPad you can create stunning travel video content that you will want to watch over and over again.


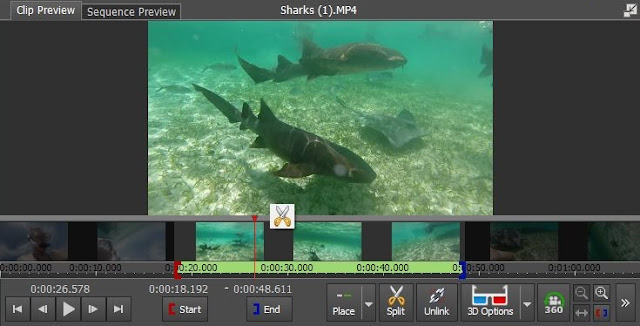
Trim Your Clips Down to the Good Stuff

The cold hard truth is that nobody is going to want to watch an hour-long clip of your boat ride or surf lesson, and once you get home neither will you. One of the first things you should do with your travel footage goes to and trim your clips down to the good stuff. If you are combining clips to make a travel video, 2-3 minutes is best for Facebook and YouTube. Anything longer and you will lose people's attention. Individual clips can usually be cut down to 5-15 seconds of action. A video with many different clips is always more engaging to watch than a video with a few extremely long clips.

Trim Down Your Clips and Video


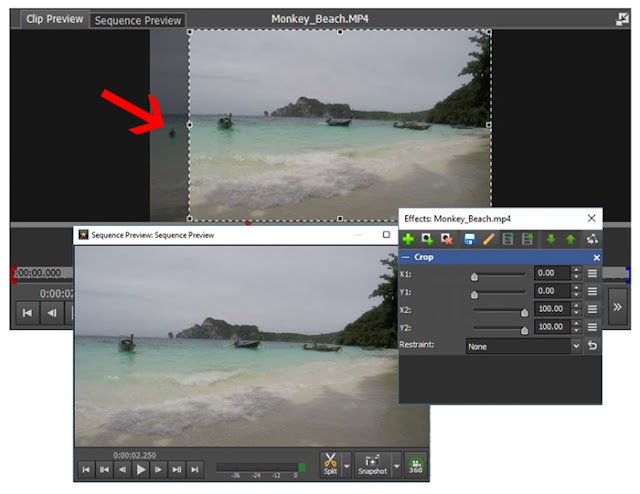
Crop Out Unwanted Objects

So there you were, filming the perfect shot of that vacant beach when a loan swimmer pops up out of nowhere and ruins it! Well, don't sweat it! VideoPad allows you to crop your videos so that you can keep what you want in the frame and cut out all of the distractions.

Crop Out Unwanted Objects


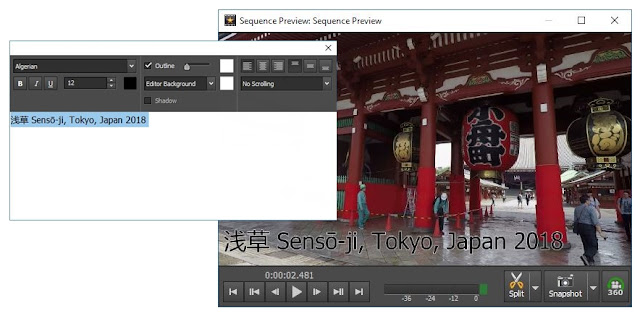
Add Titles and Captions

Adding titles and captions to your travel videos is a great way to make sure that you and your viewers get the extra info that may not be obvious just by looking at the scenery. It's a good idea to start a travel video with a title of the location and perhaps the date. Captions can also be used for displaying translations when someone is speaking a different language or when someone is speaking too quietly for your camera's microphone.
Add Titles and Captions to Your Travel Videos


Add Some Music

Music is an essential component of any travel video or travel movie. Music tells your viewers how to feel when they are watching your video. Nothing sets the mood for a travel video quite like a song that reminds you of your trip. Try to find a song that is actually from the place you visited or perhaps one that is sung in the language of that country. VideoPad allows you to import music from many different sources and then adjust and edit the track as you please.

Add Music to Your Travel Video


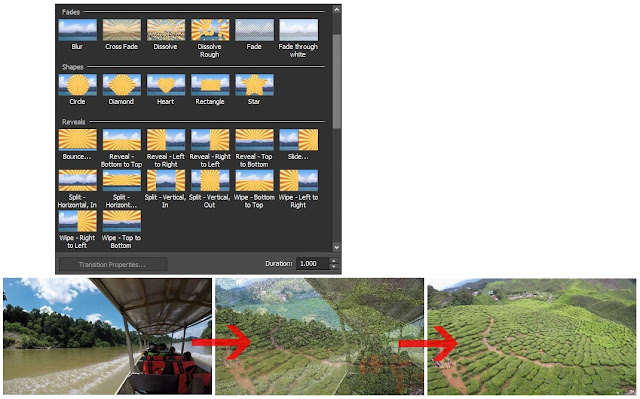
Use Transitions

Transitions are a great way to make your travel video feel more fluid and natural. Without transitions, the quick changes between clips will feel abrupt and jarring. VideoPad has many great transitions so that your clips flow together smoothly. Using transitions will help make your travel video look more professional and be overall more pleasant to watch.

Apply Transitions


Share Your Videos

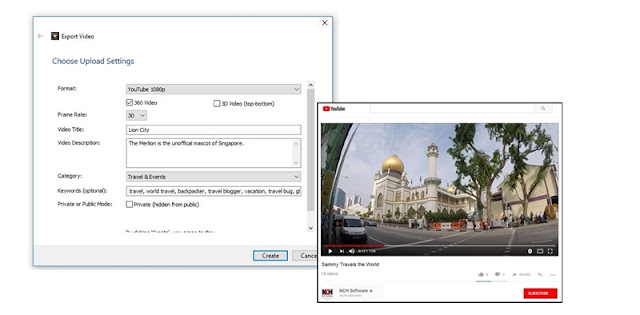
Now that you are finished editing your travel video, it's time to share it with the world. One of the best features of VideoPad for a vacation movie editor is that you can upload videos directly from the software to YouTube. This means you can skip filling out descriptions on YouTube and instead quickly fill them out in VidePad and post! Share your memories with the world and inspire others with your stunning world travel videos. Start a travel blog and post more travel videos as you create them and find others who share your passion.
Share Your Travel Video


Friday, July 14, 2017

5 Easy Vacation Photo Editing Tips

5 Easy Vacation Photo Editing Tips


Easy Vacation Photo Edits

When vacation photographs don't quite reflect the experience you remember, you can use a photo editing software to enhance and touch up your photos. Here are five easy ways to edit your travel photos.

1. Enhance with AutoFix

Simply enhance your photo to bring out the best colors and details with AutoFix. This takes just seconds to complete and can drastically improve your photo quality! To apply autofix with PhotoPad, select "Auto Fix" from the "Retouch" tab. 


2. Apply Color Boost

Color boost can bring life back to your bleached out beach photos and over-exposed family photos. This stunning one-click-fix is simple and easy to apply. To apply Color Boost with PhotoPad, click on the "Color Boost" button in "Filters" tab.


3. Edit Image Saturation

Increasing or decreasing saturation can have an impressive effect on vacation photos. Increasing saturation can also apply a tanning effect to personal photos. To edit the saturation of a photo in PhotoPad, select the "Saturation" option from the "Color" tab in the top menu bar. You can then increase or decrease the saturation by moving the slider left and right.


4. Apply a Vignette

Apply  a vignette to your vacation photos to focus the photo's attention on a central aspect or to blur unnecessary noise on the edges of the photo. To add a vignette to your photo, simply select the "Vignette" option from the "Effects" tab in PhotoPad, and adjust the size, strength and color of your vignette in the right hand options panel. 

Add vignette effect to vacation phtotos
Vignette Effect


5. Create an Oil Painting from a Photograph

To add a creative twist to your vacation photos, you can use PhotoPad to quickly and easily transform your photos into oil paintings. To add the oil painting effect to your photograph, select "Oil Painting" from the "Creative" tab in PhotoPad. You can add more or less detail to your digital photo oil painting by changing the brush size in the right hand options panel. 

Photo to oil painting
Create an oil painting from a vacation photo