Showing posts with label video editing software. Show all posts

Monday, July 13, 2020

Easiest Method to Add Text to Video in Minutes


Adding text to video can help make your video more attractive to viewers by adding some context or helping to get your point across. While video editing can sometimes get tricky with many video editors that are too complex for everyone, VideoPad Video Editor makes video editing including adding text to a video as easy as possible in just a few steps. 


Whether you need to add captions, descriptions, labels, quotations, or any other text, you can easily do so with VideoPad’s text overlay tool as this video tutorial will show you how.  


Adding text to a video with VideoPad


  1. Click the Add Text button on the Home tab toolbar.

  2. Select the text type whether it is a simple text overlay, animation, 3D, etc. 

  3. Enter your text in the Title text field and edit the clip attributes, such as font, color, and size.

  4. Click the X to close the Text Editor window.

  5. The text clip will be added to your images bin.

  6. When you are ready to add the text to your sequence, simply drag it to the track above the video clip you want it to overlay or click the Add button at the bottom of the window.


It's so easy to add text to video by following those simple steps. Download VideoPad to try it out now! For more VideoPad tips and tricks, check out more video tutorials here.


Friday, April 12, 2019

The Best Video Editor for YouTube

The Best Video Editor for YouTube


In the age of social sharing, everyone has a voice and a message that they want to be heard. YouTube has remained the major platform for those voices for many years and as a result, it has propelled many musicians, comedians, filmmakers, & thrill-seekers into the spotlight. In fact, did you know that YouTube even has awards that it sends out to its best "YouTubers" after they achieve certain numbers of views and subscribers? All the more reason to get started creating your own viral video content! It does take more than just uploading a video to achieve YouTube fame, though. Most YouTubers will tell you that basic video editing skills are a necessity if you want to succeed.


What Makes a Good YouTube Video?

Obviously, how "good" a video is is entirely subjective. Beauty is in the eye of the YouTube viewer. However, YouTube does have an algorithm for ranking videos and the best videos are usually those that are edited well. This is why I say that having good YouTube video editing software is very important. The YouTube algorithm places a heavy emphasis on engagement, which means that keeping your viewers' attention is key to your videos climbing the ranks and getting that golden YouTube award. The best YouTube video editing software is going to have to have the below features to be considered a good YouTube video editor.


Cutting & Trimming
Cutting out the less exciting parts of a video will make it more enjoyable to watch and keep viewers engaged. YouTube does favor longer videos in their algorithm, but they should belong because they are full of great footage, not because you included all thirty-one attempts that it took to stick a good-looking backflip into the pool.

Transitions & Effects

Transitions help to make video clips play together seamlessly. Smooth transitions can help make the switch between clips with different scenery a lot more subtle and easier on the eyes. Additionally, adding effects to your YouTube videos such as Ken Burns (pan and zoom) can help make basic clips like still scenery a little more lively.

Audio & Sound
Many YouTuber's create videos with just pictures and then they provide a voice-over to accompany the images. When done right, these types of videos are every bit as engaging as actual video clips. Having music playing throughout your video adds another layer of engagement as well. A cooking video with a long clip of someone stirring cake batter in complete silence will lose viewers a lot quicker than if there were music being played in the background.

Add Text to Video
The use of text in YouTube videos for titles and captions can help keep the viewer informed and engaged. Text can be used to create subtitles if the speaker's voice in a video can't be heard clearly, as well as to show language translations. You can also use text as an attention-getter to have an important word that was said display on the screen.

Proper Formatting
Properly formatted videos will receive more clicks and views than those that aren't because they are exposed to the right audience. Using the appropriate thumbnails, titles, descriptions, & tags will help make sure that a video is put in front of relevant viewers. A good YouTube video editing software will have features that make formatting your YouTube videos a breeze.


So, What is the Best Video Editor for YouTube?

If you are looking for the best video editor for YouTube, then look no further than VideoPad Video Editing Software. VideoPad checks all of the above boxes and more when it comes to producing quality YouTube videos. This full-featured, professional video editor allows you to create movie masterpieces in minutes that will be shared by your followers over and over again. VideoPad works with just about any file type you can think of, so editing 4K footage, 360 videos, GoPro footage, or video from your mobile phone has never been easier. The simple drag and drop interface makes compiling and organizing clips easy and adding text, transitions & effects is a breeze. It is for these reasons that VideoPad was recently named "The Best Video Editor for YouTube" by TomsGuide.com

Other YouTube Video Editing Features

VideoPad YouTube Editor comes equipped with settings designed specifically with YouTube video editing in mind. It allows you to save your login credentials so that you can upload videos directly to YouTube from the program. When you are finished with a video you can simply select Export to YouTube from the export options menu. The export window will allow you to select a YouTube video category, add keywords, titles and descriptions, and select the output format from right inside the application. The program supports editing all kinds of video types including 360 video editing for 360 YouTube videos and HD videos. You can easily adjust the aspect ratio for YouTube videos too, with choices ranging from 480p all the way up to 4k.


For more on VideoPad, check out these posts:

Friday, February 22, 2019

Best Video Editing Software of 2019

Best Value Video Editing Software of 2019


We are pleased to announce that our own VideoPad Video Editing Software has recently been named the Best Value Video Editing Software of 2019 by TopTenReviews.com. These picks are made through vigorous and thorough testing of multiple popular programs by a team of expert editors in order to help shoppers make well-informed purchasing decisions. We are glad that VideoPad stood out from the pack in performance but also in affordability.

"If you want a functional video editing program at a fraction of the price, consider VideoPad. This software has many of the tools we look for in the best video editing software." -TopTenReviews

We strive to keep our programs competitive with industry standards and our developers are working constantly to improve our software with each and every update. It is equally important to us, though. that we provide our software at a reasonable and affordable price so that everyone can have access to feature-packed professional software like VideoPad.
VideoPad is a fully featured video editor for creating professional quality videos in minutes. The program comes with over 50 visual and transition effects to add a professional touch to your movies. Drag and drop video clips for easy video editing and export movies in multiple resolutions including full HD, 2K and 4K (720p, 1080p, 1440p, 2160p and more. Save your login credentials to upload videos directly to YouTube, Facebook or Flickr from VideoPad. VideoPad is available for both PC and Mac and has mobile versions for Android and IOS as well. 


For more on VideoPad, check out these other posts:

Friday, August 31, 2018

Edit Videos on Windows Computers Easily

How to Edit Videos on Windows


There are many different things that you can do with all of those videos you have been taking. Maybe they have been piling up on your phone over the years, or maybe you are the type who films a vacation from the time you leave until the moment you get back. Whatever the reason, learning how to edit videos on Windows PC is a good way to get organized and make something great out of all of that footage. With a simple video editing software such as VideoPad Video Editor, you can quickly learn how to edit videos on Windows with ease.


Import Videos

To begin editing videos on Windows, you will first need to import your video files into VideoPad. Open the program on your PC and click on the icon that says Add files. This will open the file browser window where you can select the video clips that you would like to edit.

Adding video files to VideoPad 

Trim Videos

One of the first tasks when editing videos on Windows is to trim your clips down to the good stuff. From the media bin on the left-hand side of the program, click on the clip you want to trim. This will open the clip in the preview window. Drag the red and blue brackets along the timeline in this window to set the beginning and endpoints of your clip. To split your clip into two separate videos, simply drag the red cursor to the point you want to split and click on the scissors icon. This will create two new clips in the media bin.

How to trim a video clip

Apply Effects

VideoPad Video Editor comes loaded with great effects that you can add to your videos. You can easily touch up your videos by making color adjustments or take it a step further and add special effects to bring your videos to life. Effects can also be layered on top of one another to create a new and unique video effect of your own. Select the clip that you wish to add effects to, then click on the tab in the top menu that says Add Effects. This will launch the Effects Window where you can choose your first effect. After selecting an effect, the Effects Layers Panel will open up and you can adjust your effects and arrange their order.

Add effects to videos 

Timeline

Now that you have your clips trimmed and touched up, it is time to put them together. Drag and drop your clips from the media bin directly into the VideoPad timeline in any order you would like. You can drag them one at a time or all at once. You can always change their position in the timeline later if you decide that you want them in a different order. When a clip is in the timeline, it will have a green checkmark on it in the media bin.

Using the VideoPad timeline

Add Transitions

If you have several video clips that you would like to edit together, it is a good idea to use transitions to make the change between them smooth and seamless. VideoPad Video Editor is full of great video transitions to use when you are learning how to edit videos on Windows. Click on the X icon between any two video clips in your timeline to open the Transitions Window and select a transition. You can adjust the duration of your transition in the bottom right-hand corner of the transitions menu.
How to add transitions to videos

Add Audio

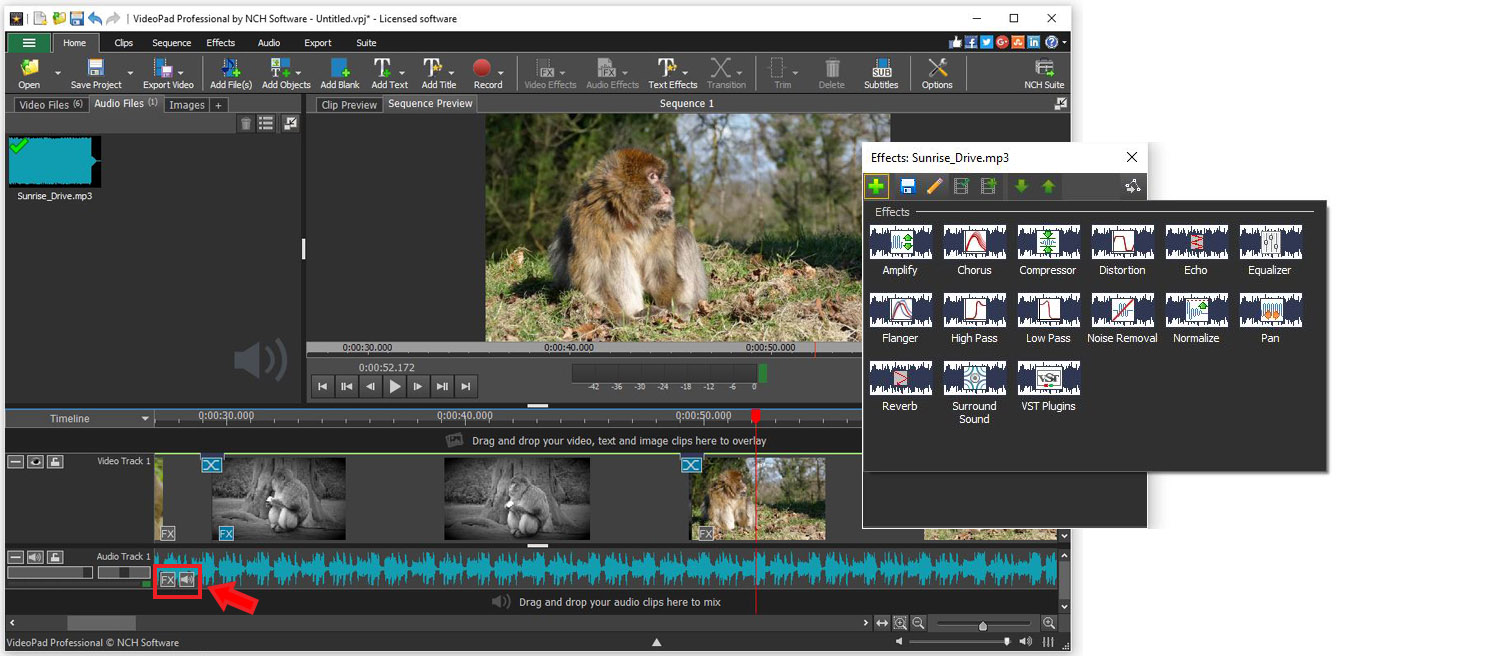
Now that your clips are running together smoothly in your timeline, you are probably wondering how to add audio to videos. Adding music or narration to videos makes for a professional-looking final product and helps your video to be more captivating and interesting to your audience. You can add audio files by clicking on the same Add File(s) button that was used to add your video files. Once imported, drag the audio clip from the media bin into the timeline and place it wherever you would like. Click on the FX or Speaker icons located on the audio clip to add audio effects and adjust the volume of your audio clip.

How to add audio to videos

Add Text

Adding text to a video is a great way to tell the viewer information that isn't otherwise available to them. Click on the Add Text button in the top menu to add text to your video. Type your text in the text box that appears and make any font and style adjustments you wish. When you exit out of the text window, you will see your new text as a clip on your timeline. You can move your text clip, add transitions and effects to it, and increase or decrease the duration of the text clip in your video.

How to add text to videos

Export

We have now successfully learned how to trim video clips and apply effects. We demonstrated how to combine video clips together in your timeline and how to add transitions to videos. We also learned how to add audio and text to videos and how to navigate the VideoPad interface while doing so. You now know how to edit videos on Windows PC and you are ready to export your final video product. Click the button that says Export Video in the top menu. You can choose from a variety of exporting options such as saving as a video file, burning to a disc, or uploading your video straight to YouTube.

Exporting videos from VideoPad 


For more of VideoPad and video editing, check out these posts:

Tuesday, May 29, 2018

How to Make A Time-lapse Video with VideoPad

How to Make a Time-Lapse Video with VideoPad


Time just doesn’t seem to move fast enough for some of us anymore. A time-lapse video is a great way to observe change over time without having to literally watch grass grow. You can make a time-lapse video of anything you would like, such as a sunset, a cross-country drive, a plant growing, or anything else that you can imagine. With a simple and easy-to-use video editing software such as VideoPad, you can make stunning time-lapse videos of your own and share them with the world.


What is a Time-lapse Video?

There are basically two types of videos that are considered time-lapse videos. The first type is made when a video is taken on a camcorder and then later that video is sped up to quickly show the passing of a long amount of time. This can make everything in the video appear to move quickly or just certain objects in the video, depending on where the activity was in your shot and if your camera was still while shooting. Think about a sped-up video of foot traffic in a train station or of snow building up during a winter storm. The second type of time-lapse video is made by taking a series of pictures of the same object over time and then playing them all together in rapid succession. This method creates a video-like effect of that object changing from picture to picture.


Setting Up Your Camera for a Time-lapse 

Ready...
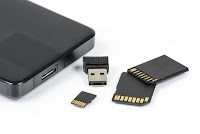
Make sure that your camera is fully charged and make sure that you have enough storage for the number of pictures you will be taking or the amount of time you will be filming. Make sure that your SD card is formatted and cleared so that there are no issues saving your images or recordings. When a camera is left on or left recording for long amounts of time, it can quickly drain the battery. Make sure that your battery is fully charged and that you have a spare ready just in case.

Aim...
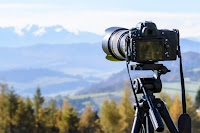
The most common element of almost all time-lapse videos is that the shot typically remains stationary, while one particular object or area within that shot moves. Using a tripod is the easiest way to achieve maximum camera stability. If you do not have one available, find a sturdy and secure place to set your camera so that it can remain completely still and untouched. Look through your viewfinder or on your camera’s playback screen and set markers just outside of the shot so that you can line that exact shot up again later if you do move your camera.

Fire!!!
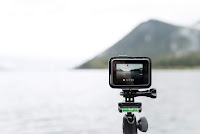
If you are taking a video, all you have to do is start your recording and remember to come back to stop it when you are finished. Making a time-lapse video with photos can be a little more labor-intensive. Depending on how fast your subject is moving or changing, you will want to use different intervals of time for taking pictures. Some modern cameras do have settings on them that enable you to set predefined increments of time to take a photo. Otherwise, you can set a timer and hang out with your camera. A couple of photos each minute is good for a sunrise, but for something like a plant growing, a couple of photos a day is better.

Photos or Video?

The main factor for this decision is time. How long is it going to take to capture everything you want in your time-lapse? Anything that takes longer than a day to capture would probably be better left to pictures. This is mainly because of storage. Video files are large, photo files are not. A 24 hour HD video won't even fit on most computers and would likely require 2-3 battery changes to film it all. Making a time-lapse with photos is great for capturing gradual change over time and then getting to watch it all at once in a matter of seconds. Using video is good when change happens quickly and you want to capture every second of it.

Making a Time-Lapse with Photos

Set up your camera on a tripod with your memory card formatted and your battery fully charged. Begin taking your pictures in even increments of time or allowing your camera to do so for you if it has the capability. Once you begin taking your pictures, do not move or disrupt your camera. When you get back to the lab, open the latest version of VideoPad Video Editing Software. There are two ways to make a time-lapse with photos in VideoPad.

Method #1
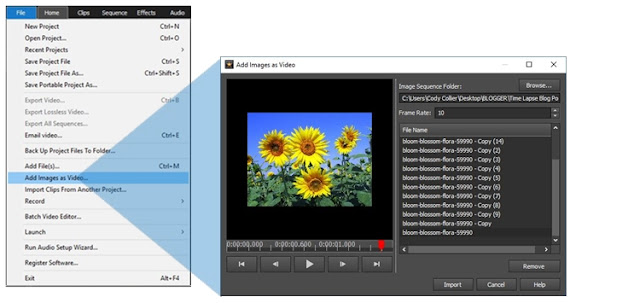
Add Images as Video in VideoPad 
You can create a great time-lapse video with pictures using VideoPad's Add Images as Video function. From the File drop-down menu, select Add Images as Video... You will be prompted to select the folder on your computer containing all of your photos. After that, you can set the frame rate. This is a fast and efficient way to make a time-lapse video from your photos. The lowest frame rate that can be set is 10 fps, though. If this is too fast for your photo time-lapse, you will have to make your video using the second method.
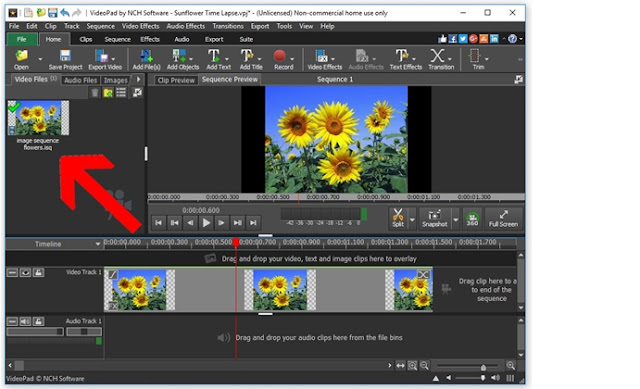
Images as a Video Output File

Method #2

Drag all of your photos into the media bin in VideoPad. Then drag them all onto your timeline in the order that they were taken. To adjust the duration of all of your images at once, click on the first clip in the timeline, hold down the shift key, and then click on the last clip in your timeline. This will select all of your images at once. Right-click on any one of the selected images in your timeline and then select Change Duration from the dropdown menu. You will see under the clip preview window that the default duration of 3:00 sec is now highlighted in blue and can be adjusted. You can experiment with what feels right for your time-lapse. Typically, for a time-lapse made of images, the duration of each image doesn't need to be more than 1/2 a second long. Anything longer and your video will look choppy and slow.
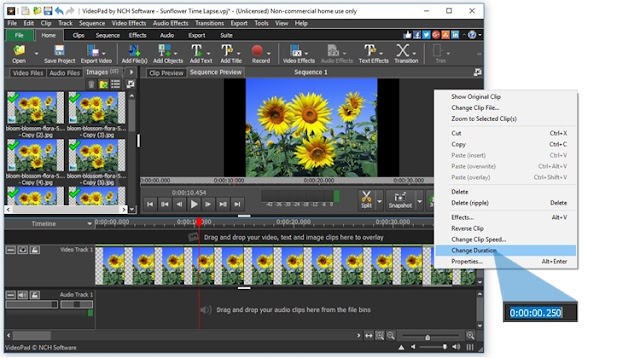
Change Duration of Multiple Images at once in VideoPad 


Making a Time-lapse with Video

Set up your camera on a tripod with your memory card formatted and your battery fully charged. Start your video recording. Once you start your recording, do not move or disrupt your camcorder or anything in your shot until you are finished. When you get back to the lab, open the latest version of VideoPad Video Editing Software. Drag your video clip into the media bin in VideoPad and then drag it onto the timeline. Right-click on your clip and select the option that says Change Clip Speed.
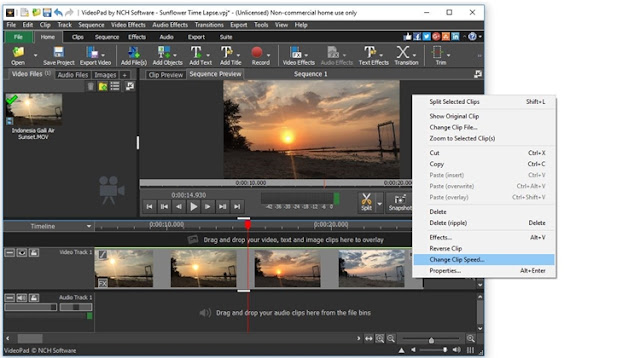
Change Clip Speed of a Video

That will open up the Speed Change function and allow you to adjust the speed of your clip as a percentage. It is default at 100% which is normal speed, so you can increase it from there. Remember that 200% is making your clip twice as fast, 400% is quadrupling the speed, and so on and so forth. You can adjust it to your liking and try out different speeds until it looks perfect. Click Set when you are finished and your time-lapse video is now ready for export. You can add music or captions to your time-lapse video and then export it to your preferred location or upload it directly to YouTube.
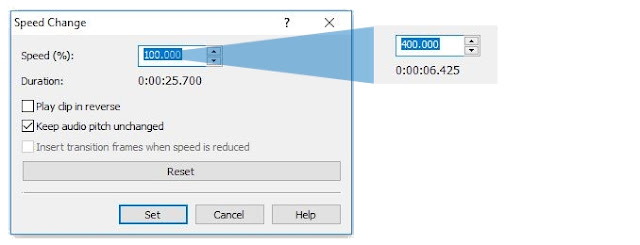
Increasing Clip Speed 4x


Wednesday, April 11, 2018

How to Edit Travel Videos with VideoPad

How to Edit Travel Videos with VideoPad


You have just returned home from one of the greatest adventures of your life. Your bags are unpacked, your passport is put away and your head is filled with unforgettable vacation memories. You are probably starting to think about all of those videos you took and are now wondering what you are going to do with them all. Making travel videos is a great way to preserve and share your travel memories. With an easy-to-use video editor like VideoPad you can create stunning travel video content that you will want to watch over and over again.


Trim Your Clips Down to the Good Stuff

The cold hard truth is that nobody is going to want to watch an hour-long clip of your boat ride or surf lesson, and once you get home neither will you. One of the first things you should do with your travel footage goes to and trim your clips down to the good stuff. If you are combining clips to make a travel video, 2-3 minutes is best for Facebook and YouTube. Anything longer and you will lose people's attention. Individual clips can usually be cut down to 5-15 seconds of action. A video with many different clips is always more engaging to watch than a video with a few extremely long clips.

Trim Down Your Clips and Video


Crop Out Unwanted Objects

So there you were, filming the perfect shot of that vacant beach when a loan swimmer pops up out of nowhere and ruins it! Well, don't sweat it! VideoPad allows you to crop your videos so that you can keep what you want in the frame and cut out all of the distractions.

Crop Out Unwanted Objects


Add Titles and Captions

Adding titles and captions to your travel videos is a great way to make sure that you and your viewers get the extra info that may not be obvious just by looking at the scenery. It's a good idea to start a travel video with a title of the location and perhaps the date. Captions can also be used for displaying translations when someone is speaking a different language or when someone is speaking too quietly for your camera's microphone.
Add Titles and Captions to Your Travel Videos


Add Some Music

Music is an essential component of any travel video or travel movie. Music tells your viewers how to feel when they are watching your video. Nothing sets the mood for a travel video quite like a song that reminds you of your trip. Try to find a song that is actually from the place you visited or perhaps one that is sung in the language of that country. VideoPad allows you to import music from many different sources and then adjust and edit the track as you please.

Add Music to Your Travel Video


Use Transitions

Transitions are a great way to make your travel video feel more fluid and natural. Without transitions, the quick changes between clips will feel abrupt and jarring. VideoPad has many great transitions so that your clips flow together smoothly. Using transitions will help make your travel video look more professional and be overall more pleasant to watch.

Apply Transitions


Share Your Videos

Now that you are finished editing your travel video, it's time to share it with the world. One of the best features of VideoPad for a vacation movie editor is that you can upload videos directly from the software to YouTube. This means you can skip filling out descriptions on YouTube and instead quickly fill them out in VidePad and post! Share your memories with the world and inspire others with your stunning world travel videos. Start a travel blog and post more travel videos as you create them and find others who share your passion.
Share Your Travel Video


Monday, May 15, 2017

How to make a YouTube Video Like a Pro in 5 Easy Steps


Things you need

  • Media for your video - This could be anything from a video recording, webcam recording, stock video, just some video that you shot on your phone or camcorder, photos, slides, collages, animation clips, or a mix of any of the stated options.

  • A Video Editor - An intuitive, easy to use video editing software (Download VideoPad, an award-winning video editor, which now has an exciting new feature - 360 editing)


Now let's get started

Step 1
Import your media into Video Editing Software. If the media is already a video, you can upload it to YouTube as is, but it's always a good practice to clean up the video to make it sharp, crisp, and web-friendly before upload. Also, to make it more visually appealing by adding stunning video transitions and effects.

VideoPad - Add Media

Step 2
Once you import your footage, the next step is to make it more exciting by editing the various media pieces together so it plays like a movie.

You may want to do one or more of the following
  • Adjust the resolution - For an HD video, 1280*720 is a good resolution to work with whereas for places where you want to load the video quickly you may want to opt for a lower resolution.
  • Edit Clip Speed - Get rid of unnecessary frames, play the video slower where more detail and emphasis is required.
  • Add Transitions and Effects - Apply transitions when switching from frame to frame, add effects for a professional touch.
  • Content Frames - If you plan to divide your video into different sections then adding content frames is a good idea, it lets the viewer know what the next part of the video is all about.
  • Add background score, audio recording, music, commentary, or narration to your video.
  • Overlay text for captions and movie credits
You can find tutorials for adding media, effects, changing clip speeds, adding a logo or watermark, and adding text to your video here: https://www.nchsoftware.com/videopad/tutorial.html?ref=blog

Step 3
Take a final look at the To-be YouTube video and enhance it - fine-tune colors and visual effects, slow down, speed up or reverse video clip playback, reduce camera shakes. Make sure you get the same experience as you get while watching a movie.

Step 4
Export your video to YouTube, some video editors let you export the video directly to YouTube if you have connected the account already.

VideoPad - Export Video

Otherwise, you can just save the video in the best-suited format - a format that is accepted by Youtube and one which is lossless.

Step 5
Log into your YouTube account and upload the video. Optimize the video for YouTube and the web by adding notations, annotations, and captions. You can also add a transcript that appears below the YouTube video as well.

Now you are all set to show the world your movie-making skills - Go ahead and share it with the world using FB, Instagram or share the YouTube link on other sites.

Wasn't that EASY ... :)


Friday, May 5, 2017

Choosing the Right Movie Making Software

Want to try your hand at Movie Making or Video Production? Start here - Choosing the Right Software

Video Editing - Combining Videos to form a Sequence


It will just be a big fat lie if anyone of us said that we had never thought even once of making a video.

It may be for a loved one, for yourself, desire to become a professional, as a hobby, or just to test your own video or movie-making skills after you saw a video and believed you could have done a better job. And mind you, with the plethora of extremely easy to use movie maker options now available, you may have proven yourself right as well.

Also, the cost of testing your skills or giving yourself a chance is next to zilch now with plenty of free video/movie editing software available for your hands.

With the age of technology, we spend a whole lot of time on screen and one of the most effective ways in which we absorb information is through videos. Video is a medium that touches more than one human sensory.

So then comes a point on what all should you consider before selecting and downloading a movie maker. You will get the nth number of factors, but I would like to stick to the topmost essential factors.

  1. Foremost and utmost important - HARDWARE - Does the movie maker support your hardware. Anything else comes later. This is one thing you can't really change as it's more permanent and expensive to change. Until and unless you are a thorough professional in the movie-making and editing space.

  2. SUPPORT - I put this in BIG and BOLD as SUPPORT in itself encompasses a lot of aspects.

    • Supports the format of your video - The next important factor to consider is the support for various formats. Does the software support your desired input and output format? I give this lesser importance than hardware as this can still be dealt with with the use of a video converter. Not the most ideal option, however a manageable option, if required.

    • Supports the resolution that you desire - Does the editor/Moviemaker support the output resolution you so desire? Does the video software give you the ability to toggle between output resolutions?
    • Adjusting Resolution for YouTube

    • Technical Support - Does the software provider have a good help desk and support? How long has the software maker been in the video editing space? How seasoned is the software provider? These factors also translate into the software stability and the upgrades you will receive going forward. This may not seem very vital just upfront but you realize the importance of it if you get stuck editing your video or movie.

  3. Budget for the Video/Movie editing software - This is applicable to all levels of users of a video editor. It is very easy to be swayed or overwhelmed by a list of features, fancy marketing videos, and tutorials that some software companies showcase. What is important for you is to assess what you are willing to pay for such software as the range is wide. You can get an editor for as little as $30 or it can even stretch to a couple of thousand dollars. So where do you fit in the range? Define a price range for yourself. I say a range and not a point as it allows you an opportunity to evaluate software around your price point.

  4. What features do you value the most - What is that you can't do without in the movie-making endeavor. To name just a few - is it the use of transitions? or is it pan and zoom? or is it picture in picture split? Or multi-track video effects? A novice to video editing may or may not be able to assess this at the start, which makes me come down to the point of Trial versions. Any reliable, reputable video editing software provider will most definitely provide a free trial version of its software which you can use to determine which features you value most.  For professional and seasoned users of video editors/movie makers, this part is fairly easy as they know the features they expect from a video editing software.
  5. Adding Visual Effects
    Adding Effects

  6. Cost-Benefit Analysis - Combine both the points mentioned above - Budget and features and you will get to a conclusion as to which is the best-suited editor for you. One which fits your pocket and requirements.

Now get clicking to find the best movie-making software for your needs and produce the movies that you always wanted.


Thursday, April 13, 2017

Edit 360 Video with VideoPad Video Editor

Edit 360 Video with VideoPad Video Editor


NEW FEATURE ANNOUNCEMENT

Edit 360 Video with VideoPad Video Editor

We have just released a new feature for VideoPad - 360 Video Editing. VideoPad will now support editing for 360-degree video clips, also known as spherical or immersive video. With this new release, you will be able to edit both monoscopic and stereoscopic 360 video clips.

360-degree video is often referred to as VR video or spherical video. While these terms are often used interchangeably, they do describe slightly different viewing modes. Technically, VR video describes a computer-generated environment. 360 video is captured by multiple cameras simultaneously, allowing users to move throughout a video as they would in 3D. 

Preview 360 Degree Video in VideoPad

When editing a 360-degree video in VideoPad, you can preview your video in the VideoPad editor. To preview your video with a 360-degree view, toggle on the "360" button in the bottom right corner of the video preview window. You can click and drag on the video preview to move the camera angle in order to view all 360 degrees of your video clip.

Add Music to 360 Video

With VideoPad you can add background music or other audio tracks to your 360 video projects. To add audio to a video, simply load the audio clip that you would like to add into VideoPad, and then drag and drop your audio clip onto the timeline where it says "Drag and drop audio tracks here to mix". You can mix background music to your 360-degree video with this method, or you can replace the original audio. To remove an audio track from a video clip, click on the "unlink" button that appears on the original audio track when the video clip is added to the timeline. This will unlink the original audio from the video clip. You can remove the original audio by right-clicking on the audio track and selecting "Delete" from the right-click menu. 

Add Stunning Effects to 360 Video

As with regular video clips, you can apply VideoPad's video effects to 360-degree videos. You can use this to create unique coloration in your video using the coloring effects, or you can add motion effects or overlays to your video. Most effects, such as color filters and transitions, can be applied to 360-degree video clips with no issues. However, overlays and text clips will be skewed by spherical 360-degree videos. To add overlays to 360 videos, simply apply the "Place in 360" effect from the Video Effects menu.  

Add Text to 360 Video

Adding text to a 360 video is easy with VideoPad. To add a text overlay to a 360-degree video clip, create a text clip by clicking on the option labeled "Add Text". Use the editing options to change the text color, font, and size of your text clip. Once you are finished, you can drag and drop your text clip onto the VideoPad timeline where it says "Drag and drop your video, text and image clips here to overlay". Once your text clip is placed, you can extend or reduce the duration of the text clip by dragging the text clip edges left or right on the timeline. You can also move the text clip to different locations in your video by dragging the whole clip left or right.
When you add a text clip to a 360-degree video, be sure to apply the "Place in 360" effect from the Video Effects menu to make text clips appear naturally in 360 video clips.

Share 360 Video Projects Directly to YouTube and Facebook

VideoPad can connect directly to Facebook and YouTube to post 360 videos as soon as you have finished editing them. Both Facebook and YouTube have been on the cutting edge as two of the first networks to support 360 videos, and VideoPad can connect and share video projects with just a few clicks. Once you have finished editing your 360 video project in VideoPad, click on the arrow to the right of "Export Video File" to open the export dropdown menu. To share your video to YouTube or Facebook, click on the menu option for the network that you would like to share to. Follow the prompts to log in to your account and share your video with your subscribers or friends.


360 videos capture video in multiple directions, allowing viewers to move the camera angle in the same way they would view the 3D world. Viewers can move the camera angle in 360 videos in order to see their surroundings.

Common Use of 360 Video

360 video can be extremely advantageous for realtors, property managers, and other real estate professionals. 360 video can be used to create tours to show apartment floor plans or to allow potential buyers to easily view the sale and rental properties prior to physically visiting the property. 360 tours offer viewers a more comprehensive impression of a property than images alone and can be used as successful marketing materials to spur interest in properties.

360 video is also popular for adventurers, hikers, skiers, and more. 360 videos can boost engagement on social sites where 360-degree video has been adopted, such as Facebook and YouTube.