Showing posts with label PhotoPad Photo Editor. Show all posts

Tuesday, August 25, 2020

Upscale and Enhance Photos with AI Super Resolution


If you have ever tried to increase the size of your photo, you know that one of the biggest challenges with this is that the quality of the photo decreases and becomes unsharp and blurry.
This has to do with the resolution of an image. Since image resolution refers to the number of pixels within an image, this number is fixed. The number of pixels does not increase when you enlarge an image as there is no new image information added, thus decreasing the image quality. 

If you wanted to increase the size of your photo without highlighting the poor photo quality, the only solution was to take a brand new photograph at a higher resolution. 

But what if I told you that with PhotoPad you could now enlarge an image and increase its resolution at the same time?

Yes, you heard that right. Those scenes you see in police television dramas where detectives zoom into an image and it magically improves the quality and details start appearing is now a reality thanks to PhotoPad Photo Editor.
 
PhotoPad has released a new feature called “Super Resolution”, an AI and machine-learning tool that makes it possible to enhance and upscale images without losing quality. 

How does Super Resolution work? 


Using cutting-edge technology, Photopad’s Super Resolution is a fully automated process that uses artificial intelligence and machine learning to recognize patterns and recreate contents of an image including edges, patterns, and textures. 

The Super Resolution algorithm has been trained on large data sets of images so that it understands how physical objects such as land, buildings, people, etc. look and what their typical features are. 

So when Super Resolution is used to enlarge an image, it scans the image, recognizes these general features, and then adds the extra pixels to create a high-quality resized photo, all in a couple of seconds.  

How to use Super Resolution in PhotoPad? 

1. The first step if you haven't already, is to download and install PhotoPad Photo Editor.


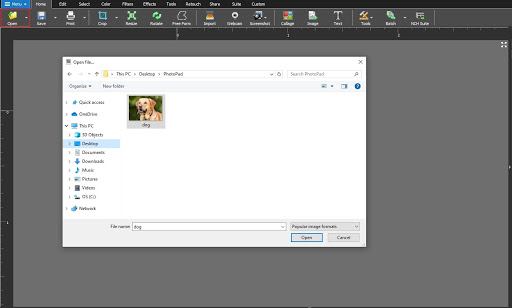
2. Click on the Open icon to upload your low-resolution image that needs to be enlarged. For best results, ensure your image is in JPG or PNG format.
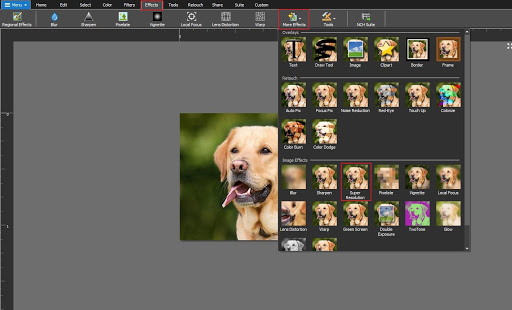
3. Navigate to the Effects section in the main toolbar, click on More Effects. In the drop-down below, select Super Resolution.

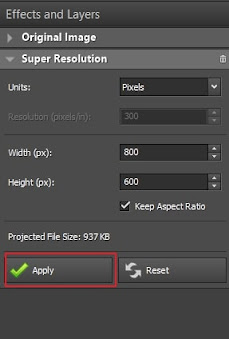
3. In the Effects and Layers section on the right, type in the Width and Height measurements to the desired size and click Apply


Congrats you have successfully harnessed the power of machine learning to create your enlarged high-resolution image! Whether you need to create HDR images, edit travel photos, or blend images together, photo editing has never been easier. Download PhotoPad and create your first Super Resolution image today. 


Tuesday, July 28, 2020

Best Tool to Make HDR Images in Minutes

Picture this.


You’ve taken a trip to the forest and you come across this beautiful spot with the river gently flowing and the afternoon sunlight peeking through the forest trees. 


You take out your camera but you are unsure how to best capture the scene in its full detail. Do you light the dark shadows on the river? Or do you light the trees in the background? The high-contrast scene can prove an impossible task for a camera to capture but not to worry, there is a solution. That solution is called PhotoPad and its sophisticated HDR processing tool.


What does HDR mean?

In a simplified definition, HDR photography or High Dynamic Range photography is the technique of fusing different exposure images to create a single image with overall correct exposure. PhotoPad, one of the most comprehensive photo editors and HDR software available, takes all the complications away in a couple of clicks to create an image with so much dynamic range and detail that couldn't otherwise be achieved with a normal photo. 


How to Make HDR Images with PhotoPad

  • The first step is to capture at least three images with different exposures. The first image is to capture a mid-range exposure shot, the second captures the highlights with higher exposure and the third one is a lower exposure shot that captures the shadows. Feel free to capture additional photos that represent exposures between the two extremes.


  • Once you have your images, the next step is to install PhotoPad which takes less than a couple of minutes to install.

  • Open PhotoPad and navigate to the Tools tab in the toolbar and select the HDR icon.


  • Select the dark, medium, and bright exposure images by holding the Ctrl key and click Open


  • PhotoPad will now automatically align and combine your images into a single HDR image. 


Your eye-popping National Geographic-worthy HDR photo is complete. If you don’t want to take multiple photographs, you can also create an HDR from one RAW image format with neutral lighting and then later create different exposure images digitally with PhotoPad. 


Once your HDR image is complete, continue to edit your image like any other PhotoPad project. Maybe try out the advanced double exposure tool or why not some of our top travel photography editing tips? Download PhotoPad HDR photo editor below and check it out yourself.


Thursday, July 9, 2020

Top 5 Travel Photography Editing Tips


We’ve all seen fashion magazine images edited with fake backdrops, flashy text, and intense skies. When it comes to travel photography, it’s recommended to keep editing simple and realistic. 


Whether you’re a backpacker, a travel blogger, or a vacationer, you know travel is all about the experience, the journey, the beautiful places and amazing people you’ve met along the way. Unfortunately on many occasions, your travel photos fail to deliver the same experience behind the captured moment.


Not to worry, here are 5 simple travel photography tips that will turn your photos into something special with the help of PhotoPad, one of the easiest and most comprehensive photo editors available. 


Crop

While traveling, you won’t always be in the right place at the right time to capture the perfect moment. This leads to photos including unwanted elements which can be distracting. Cropping your image is another way of composing your shot by highlighting the subject. 


Take this image of the hot air balloons in Cappadocia, Turkey for example. You can crop the image to focus on a particular subject or make it suitable for social media. To crop the image in PhotoPad, select the Crop button in the toolbar, and adjust your selection. You can also adjust the aspect ratio and resize your crop selection. 


AutoFix

Exposure, Resolution, Saturation, Color Correction, Contrast - the photography lingo is endless and can take a while to wrap one’s head around it.


One of the best features of PhotoPad is its one-click AutoFix function, which automatically fixes the most common photo problems and enhances your travel photo in seconds. To apply AutoFix, navigate to the Retouch tab in the toolbar, and select AutoFix. It’s that simple!


Color Boost

Don’t you wish you could take photographs with your eyes? You might notice that the vibrancy of colors in your travel photos looks a bit dull. This is where PhotoPad’s one-click Color Boost function will automatically make your pictures pop.


Head to the Filters tab and select Color Boost. You can also adjust the brightness and strength of the Color Boost accordingly. 


Touch Up

All too often when you’re traveling to a place to photograph, other tourists have the same idea and are likely to end up in your photo. Luckily, you can remove tourists from your photo with PhotoPad’s Touch Up tool. This however only works well as long as there isn’t a crowd of people or a lot of elements that need to be removed and the elements are against an unbroken and repeating background like the image of a tourist beside a field of grass below. 


To use the Touch-Up tool, go to the Retouch tab and select Touch Up. The tool works by stamping material from one part of a picture onto whatever other parts you choose. Hold down the Ctrl key and click on the part of the picture that will cover up the tourist, in this case - more grass. This tool is also useful for removing dust spots, blemishes, and other imperfections. Works like magic. 


Lens Distortion

If you have ever noticed your travel photos to be unnaturally curved inwards or outwards, your image is distorted. Commonly caused by a myriad of reasons such as the use of wide-angle/telephoto lenses, camera positioning or camera tilts. Regardless of the distortion type, you can easily correct it with PhotoPad’s Lens Distortion feature.


Under the Effects tab, select Lens Distortion where you can manually adjust the distortion correction accordingly, giving your pictures a more professional look. 


There’s so much more to editing your travel photos than just choosing a filter and posting your photo on Instagram. While these are just some of the quick and easy-to-use features listed in this article, PhotoPad is a comprehensive travel photo editor with many more tools and effects available that will take your travel photography to the next level. Happy editing!


Friday, April 20, 2018

Photo Browser in PhotoPad Photo Editor

PhotoPad Photo Editing Software - Import Photo Browser


NEW - Photo Browser in PhotoPad Photo Editing Software


We are very excited to announce a new Photo Browser option in PhotoPad Photo Editing Software. This highly requested Photo Browser includes larger thumbnail icons which make locating and opening photos a breeze.


How to use PhotoPad Photo Browser


The Photo Browser option in PhotoPad will allow you to browse the images on your computer in a gallery view. This can be very useful when locating a particular photo among a batch of photos on your computer, or when importing multiple photos at one time. To open a photo using the thumbnail gallery view, click on the "Photo Browser" button in the Home tab.

Navigate and Select Photos Easily

On the left-hand side of the Photo Browser, you can select a folder from your computer to view. The Photo Browser allows you to open photos from multiple folders. The images from the selected folder will appear as thumbnails on the right-hand side of the Photo Browser window.


Drag and Drop to Select Photos to Edit

To select a photo to open, drag and drop the photo from the gallery to where it says "Drag photos here to edit with PhotoPad".


Confirm Selected Photos

Photos that have been selected will have a checkmark overlay visible in the photo browser. The checkmark icon appears in the upper right-hand corner of photos which will be opened to edit in PhotoPad. This can be useful when opening many photos at once.


You can click on the checkbox in the upper right-hand corner of a photo in the Photo Browser to select or deselect the photo to be opened. If the checkbox has a checkmark, the image has been selected to be opened. To remove a photo from the bottom row of selected photos which will be opened, deselect this checkbox.


Photos can also be removed from the row of selected photos at the bottom of the Photo Browser by clicking on the "X" in the upper right-hand corner of the photo.


Open Selected Photos to Edit

To open the selected photos from the photo browser, click on the "Open" button at the bottom of the screen. All of your selected photos will be opened in PhotoPad where they can be edited and adjusted as needed.


After opening your photos, you can use PhotoPad to apply filters, adjust lighting, crop, retouch, and resize photos. We have a series of PhotoPad Photo Editing Tutorial Videos to help you get started editing.


After you have mastered the basics of photo editing with PhotoPad, you may enjoy: