How to Change to MP3 format

The MP3 format is one of the most common audio file formats in the world today. MP3 files are widely used for saving and sharing digital audio files because of their compression size and ability to maintain the high quality of their original format. This makes the MP3 file type great for storing and emailing because download speeds are quick and the files don't occupy much space. You may have found yourself in possession of audio files on your computer or on a disc that is in a different format that you would like to change to MP3. With a simple file conversion software such as
Switch Audio File Converter Software, you can quickly learn how to change to Mp3 format in a matter of seconds.
Import Files into Switch
The first step to learning how to change to MP3 format is to open your copy of
Switch and add/import the files that you would like to convert. Switch allows you to import individual audio files, video files, entire folders, or even import them from a DVD or audio CD. Click on the green
Add Files button at the top of the program to begin adding your files. Once you have selected the files you wish to convert, click
Open. You can also drag and drop files from your
File Browser window directly into Switch.
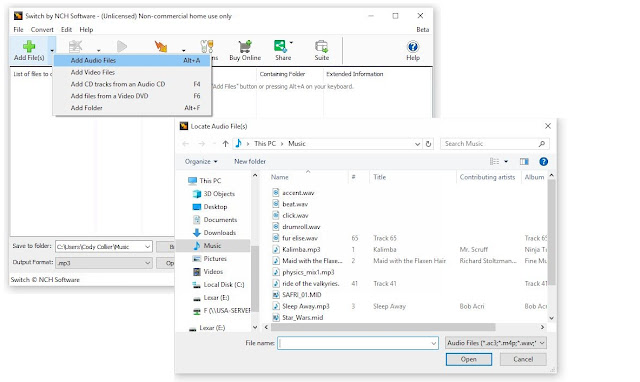 |
| Import files to convert to mp3 |
Set Output Destination
Next, decide where you would like your new files to go once you have converted them. This is where your files will be located after they are changed to MP3 format. Use the drop-down menu or the
Browse button at the bottom of the program to set your output folder. You can click on the
Open Output Folder button to view the selected output folder and its contents. You can also check the box next to it to
save your files to the same folder as the source files. This option will output your converted MP3 files right next to their original versions.
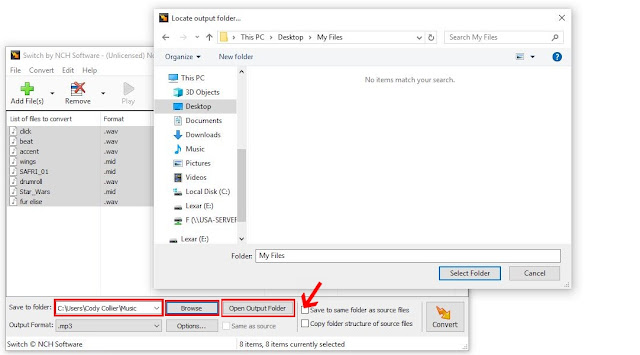 |
| Set output destination |
Set Output Format
Switch is capable of converting to just about any audio file format you can think of. However, you are here because you want to know how to change to MP3 format, specifically. Click on the
Output Format menu at the bottom of the program to open the drop-down menu. Select
.mp3 as your output format. This will be applied to any and all files that you select.
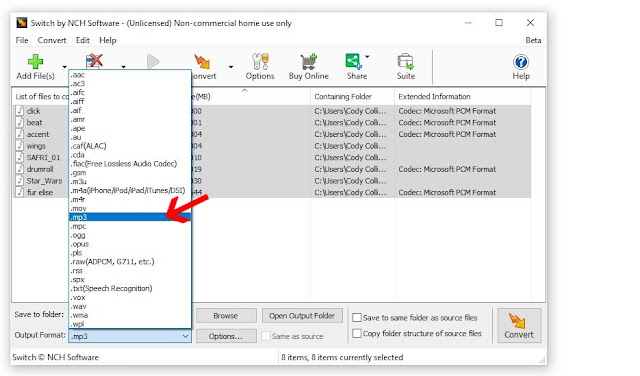 |
| Set output format |
Output Options
Click on the
Options tab next to the Output Format menu to open the
Options window. Here you can adjust some of the more advanced options such as the
Bitrate and
Channel Mode. You can also adjust the metadata that will be attached to your newly converted MP3 files. For more information on adjusting audio file meta tags, check out this blog post:
How to Edit MP3 Tags and Metadata with Switch Audio Converter
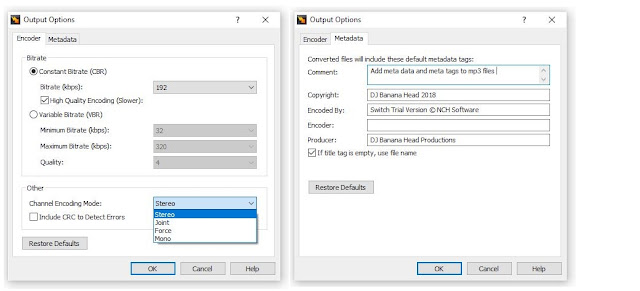 |
| Edit MP3 metadata |
Convert to MP3
Now that we have chosen our files and set the output format and destination, we are ready to convert our files to MP3. If you imported an entire folder or files from a disc and you only want to change some of them to MP3, simply go through and select those files. Otherwise, with all of your files selected, click on the
Convert button at the bottom right of the program. The conversion will be performed and your new MP3 files can now be found in your chosen output folder.
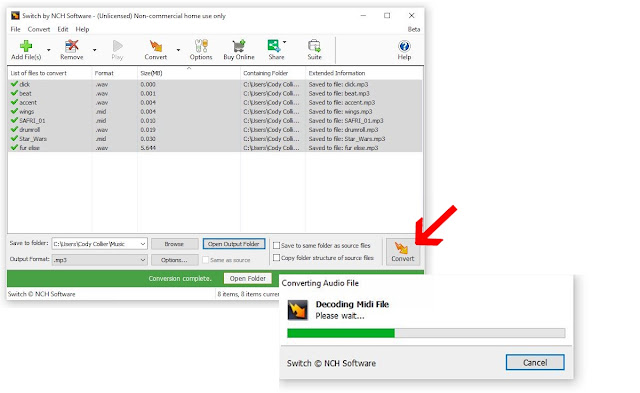 |
| Conversion complete |
For more on Switch, check out some of our other posts:


No comments:
Post a Comment