Showing posts with label music. Show all posts

Friday, May 24, 2019

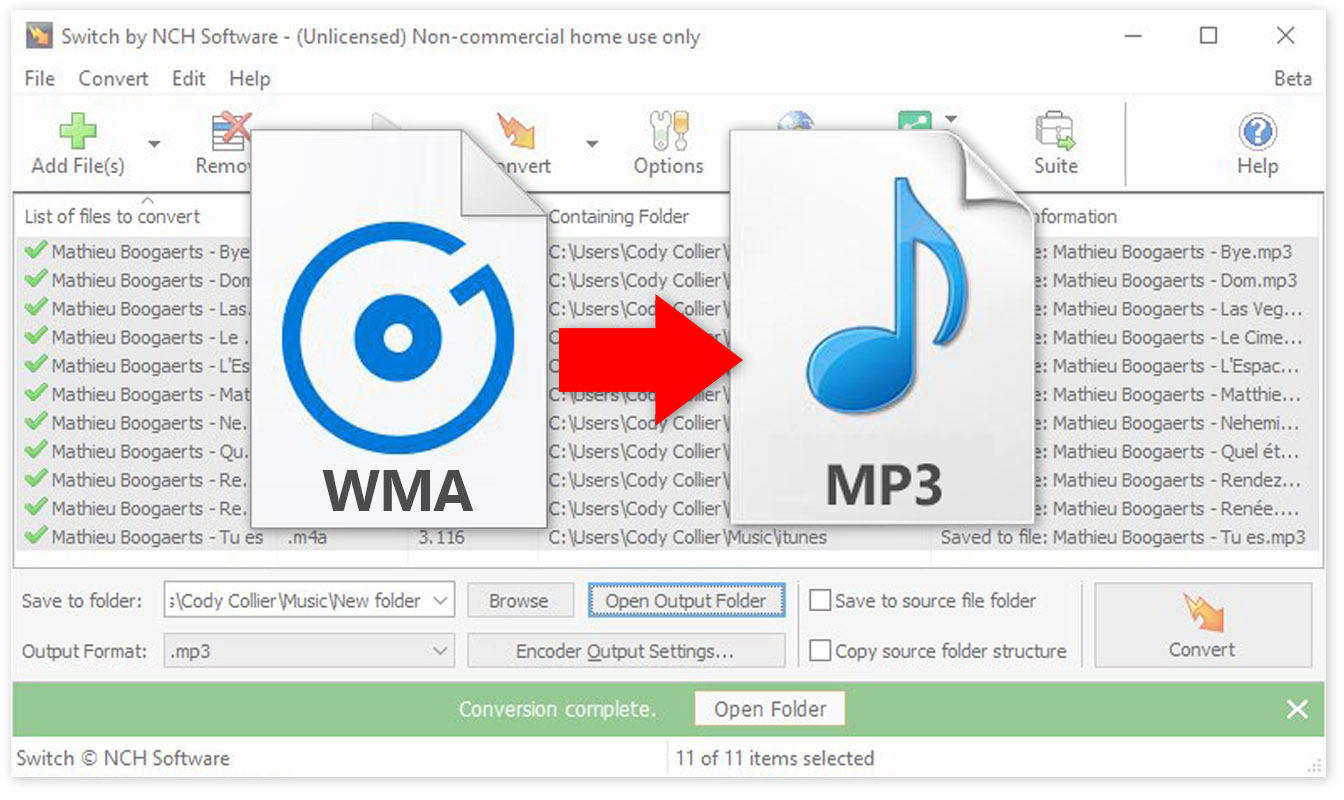
How to Change WMA to MP3 with Switch Audio Converter

How to Change WMA to MP3 with Switch Audio Converter


Windows Media Audio files, or WMA files, are a common audio file format, primarily meant to be opened and played on Windows Media Player and other Microsoft audio players. You can play WMA files with some other third-party software, but many audio players and devices (iPhone) will not support them. That is why it is useful to know how to change WMA to MP3. MP3 files are a much more commonly supported file type and are arguably a superior format anyways. You can easily change WMA files to MP3 format with an audio file conversion program such as Switch WMA File Converter Software.


Download Switch

Download Switch Audio File Converter software. Follow the installation instructions and launch the program on your computer.
Download Switch Audio File Conversion Software

Import WMA Files

Click on the green Add File(s) button located in the main toolbar to open the file finder window. Find and select the WMA files on your computer and click Open to bring them into Switch to convert them to MP3 format. You can also drag and drop WMA files directly into the program to change.
Import WMA files to Change them to MP3

Options Menu

Click on the Options icon in the main toolbar to open the Options window. This is where you can add and make adjustments that will be performed on your WMA files during the conversion. You can add metadata to your converted MP3 audio files as well as change settings to handle duplicate files and formats. Once you are finished adjusting these options, click OK.
Audio File Converter Options

Select Output Destination

Set the output destination where you would like your converted files to go after you have converted them from WMA to MP3 format. Click on the Save to folder drop-down menu to select a folder from this list, or click on the Browse button to open the file finder window and select a folder on your computer.
Set Output Destination for MP3 Files

Set Output Format to MP3

With your output folder set, you can now set the output format to MP3. Click on the drop-down menu on the left side of the program next to the words "Output Format" to view the list of available audio file formats. To change your WMA files to MP3 files, simply select the option from this list that says, "MP3." All conversions performed will now be in the MP3 audio file format.
Set Output Format Type to MP3

Encoder Options

Click on the Encoder Output Settings... button to launch the window for WMA Output Settings. Here you can make adjustments and change audio encoder settings such as metadata, sample rate, bitrate, and amplify/normalizing audio. These settings will be applied during the conversion process while your WMA files are being changed to MP3 files.
WMA Encoder Options


Change WMA to MP3

Once everything is set up, you are ready to change your WMA files to MP3. Simply click on one of the Convert buttons, located in the bottom right-hand corner of the program and in the main toolbar. This will start the conversion process. You can select only one file to convert them one at a time or you can select all of them to perform easy batch MP3 conversions.


Finished

After the WMA to MP3 conversion is complete, you will see a green banner at the bottom of the program that says "Conversion Complete." You can click the button on the banner to open the output folder and view your newly converted MP3 files. You have now successfully learned how to changed WMA to MP3 using Switch Audio File Converter Software.


To read more about Switch and other audio topics, check out these similar posts:

Friday, November 16, 2018

How to Change CDA to MP3 with Switch CDA Converter

How to Change CDA to MP3 with Switch CDA Converter


A CDA file is an extension for an audio file on a CD. That means that CDA files do not actually contain sound data, but they reference a file that does. You may load CDA files onto your computer only to find that you cannot play them on your audio player. Learning how to change CDA to MP3 is the best way to get your CDA files into a universally recognized format that can be played anywhere. With a simple audio conversion tool, such as Switch Audio File Converter Software, you can quickly change CDA to MP3 and use the files from your CD in many different applications.


Add CDA Files

Open Switch Audio File Converter Software on your computer and click on the Add File(s) button. Click on the drop-down arrow to view a list of import location options. Clicking directly on the green plus sign will launch the file finder window. From here you can locate and select the CDA files that you wish to convert to MP3. Once your files are selected, click the button that says Open to bring them into Switch.


Listen to CDA Files

You can listen to your CDA files in Switch before converting them to MP3. Simply double click on any file in the program to listen or select a file and click on the Play button at the top of the program. This is a useful way to make sure that you have the correct audio file selected if your files do not have names.


Output Format

To change CDA to MP3 using Switch, use the Output Format drop-down menu to select MP3 from the list of output formats. This will make it so that any CDA files that you convert will be converted to MP3. The MP3 audio file format is the most common and widely accepted audio file type and converting your CDA files to MP3 will make it so that you can listen to them practically anywhere.


Encode Metadata

With Switch Audio File Converter Software, you can easily add meta tags and metadata to your MP3 files. Click on the Encoder Output Settings...button to launch the MP3 Output Options window. From here, you can choose from several audio file encoding options that the program has to offer. Click on the Metadata tab and enter any desired metadata content you would like in your MP3 files.


Encode Volume Settings

You can also adjust the audio settings while you convert using the Encoder Output settings button. Click on the tab that says Volume to make audio adjustments to your files as they are being converted such as Normalize, Amplify, and Noise Reduction.

Change CDA to MP3

With your CDA files imported into the program and your encoder settings set, you are now ready to change your CDA files to MP3. Click on the box that says Save to Folder and choose an output destination from the drop-down menu. This is where your converted CDA files will appear as MP3 files once the conversion has been performed. Select the CDA files you wish to change to MP3 and then click on the large Convert button, located in the bottom right-hand corner of the program.


Write Audio Tags

If your CDA files are coming directly from a CD, they may contain track info that can be included in the converted MP3 files. This can be very useful for keeping your music organized and adding your MP3 files to your music library. If you are prompted with this window, you can click Write Tags to have the audio track tag information from your CDA files included in your converted MP3s.


View Converted MP3 Files

When the conversion is complete you will see that all of your CDA files will have a green checkmark next to them in the program, meaning that they were all converted successfully. You can click on one of the two folder buttons that appear after a conversion to view your MP3 files and you can now play them anywhere you would like.


For more on audio conversion, check out these posts:

Friday, September 7, 2018

How to Use VSTi with Crescendo Music Notation Software

How to Use VSTi with Crescendo Music Notation Software


Using VSTi with Crescendo Music Notation Software

This tutorial will show you how to use VSTi with Crescendo Music Notation Software.
Download Crescendo to get started: https://www.nch.com.au/notation/index.html

To view more Crescendo Music Notation tutorials, visit: https://www.nch.com.au/notation/tutorial.html


How To Use VSTi with Crescendo Music Notation Software

  1. To select a VSTi instrument, click the Parts Setup button on the Score toolbar to open the Parts and Staves dialog. 
  2. Select the part or staff from the list, then, select the VSTi radio button. 
  3. Select your instrument from the dropdown.
Watch the full video tutorial above for additional tips and tricks.


To view more Crescendo Music Notation tutorials, visit: https://www.nch.com.au/notation/tutorial.html

Do you need help using Crescendo?


Friday, July 27, 2018

Change Audio to MP3 Format with Switch

How to Change to MP3 format


The MP3 format is one of the most common audio file formats in the world today. MP3 files are widely used for saving and sharing digital audio files because of their compression size and ability to maintain the high quality of their original format. This makes the MP3 file type great for storing and emailing because download speeds are quick and the files don't occupy much space. You may have found yourself in possession of audio files on your computer or on a disc that is in a different format that you would like to change to MP3. With a simple file conversion software such as Switch Audio File Converter Software, you can quickly learn how to change to Mp3 format in a matter of seconds.


Import Files into Switch

The first step to learning how to change to MP3 format is to open your copy of Switch and add/import the files that you would like to convert. Switch allows you to import individual audio files, video files, entire folders, or even import them from a DVD or audio CD. Click on the green Add Files button at the top of the program to begin adding your files. Once you have selected the files you wish to convert, click Open. You can also drag and drop files from your File Browser window directly into Switch.
How to change to Mp3 Format
Import files to convert to mp3 

Set Output Destination

Next, decide where you would like your new files to go once you have converted them. This is where your files will be located after they are changed to MP3 format. Use the drop-down menu or the Browse button at the bottom of the program to set your output folder. You can click on the Open Output Folder button to view the selected output folder and its contents. You can also check the box next to it to save your files to the same folder as the source files. This option will output your converted MP3 files right next to their original versions.
How to set output destination for changing to mp3 format
Set output destination 

Set Output Format

Switch is capable of converting to just about any audio file format you can think of. However, you are here because you want to know how to change to MP3 format, specifically. Click on the Output Format menu at the bottom of the program to open the drop-down menu. Select .mp3 as your output format. This will be applied to any and all files that you select.
How to change output format of audio files to mp3
Set output format 

Output Options

Click on the Options tab next to the Output Format menu to open the Options window. Here you can adjust some of the more advanced options such as the Bitrate and Channel Mode. You can also adjust the metadata that will be attached to your newly converted MP3 files. For more information on adjusting audio file meta tags, check out this blog post:
How to Edit MP3 Tags and Metadata with Switch Audio Converter
How to edit mp3 meta descriptions and mp3 meta data
Edit MP3 metadata 

Convert to MP3

Now that we have chosen our files and set the output format and destination, we are ready to convert our files to MP3. If you imported an entire folder or files from a disc and you only want to change some of them to MP3, simply go through and select those files. Otherwise, with all of your files selected, click on the Convert button at the bottom right of the program. The conversion will be performed and your new MP3 files can now be found in your chosen output folder.
How to convert files to mp3 with Switch
Conversion complete


For more on Switch, check out some of our other posts:

Thursday, March 17, 2016

How to Use MixPad as a Free Virtual Drum Beat Maker

Beat Designer - Free Digital Beat Maker/Drum Kit Software in MixPad


MixPad's Beat Designer is a built-in tool that lets users create a beat or drum tracks for their songs or any audio project. Users can take any audio file as a source for the Beat Designer (even record your own drums as a source!), but today, we'll cover how to access and use the free drum kit sound pack that comes with our top-rated multitrack recording software.

To open Beat Designer and download the free drum kit:

  1. Open MixPad
  2. Tools -> Beat Designer
  3. In the Beat Designer window, File -> Download Kits and Patterns
  4. A downloader will popup and automatically install the sound pack

This kit includes the following percussion sounds:

  • Kick
  • Snare (Off/On)
  • Flam
  • Hi-Hat (Open/Closed)
  • Pedal Hi-Hat
  • Side Stick
  • Rim Shot
Now you're ready to start creating your drum beat track!

By clicking along the timeline, users can add cues for each instrument - the red bar in each cue is the volume/intensity/velocity of each drum strike that can be dragged up or down.


Tool Panel
The tool panel is located in the bottom-left corner beside the timeline and contains controls for adjusting the tempo (BPM), time signature, and length (in bars) of the beat clip you are creating. Changing their value will change the scale of the timeline.

Beat Divisions
You can subdivide each beat in a track to create smaller beat durations. So, for your kick drum, you may have a kick every 1/4 quarter note, but for your hi-hat, you may have a hit every 1/8 note. To change the beat divisions click on the spanner icon of the track and change the number of divisions.

Adding a Beat
 The sound a track makes is determined by the sound that is assigned to it. You can create and manage sounds using the Sound tab from the main toolbar. You can assign a sound to a track by clicking on the button with the trumpet icon. You add sounds to your track by simply clicking on the division you would like to place a sound.

Adjusting the Volume
 You can change the volume of each individual sound by dragging the small fader control in the center of each beat up or down. If the sound you are using consists of only one file then the volume will be attenuated by processing the audio. You can however configure your sound to use multiple files assigned to different volume ranges. In this case MixPad will choose the file which most closely fits the fader volume and then apply further processing to adjust the volume as required.

Tapping a Rhythm
 If you'd like to tap a rhythm into the Beat Designer while playing back, you can bind a key to each track so that when you hit the key, a sound will be placed in the division at the current cursor position. You can assign a key binding by clicking on the spanner icon of the track.

Loading your Beat Clip Back Into MixPad
 Once you are finished building your beat clip, click the Create Clip button on the toolbar and MixPad will create a new audio clip in the selected track of MixPad's main window.

Pattern Library
 A pattern is just a sequence of events played across the tracks of your beat clip. You can save and load your favorite patterns from the pattern library by using the Save Pattern and Load Pattern buttons. Patterns can be re-used with different sounds and kits. So you may have a standard 4/4 rock pattern that you like to begin with, but you can change it up quickly by assigning different sounds to the tracks.


Enjoy creating! If you'd like to get creative, remember that any sound recording/audio file can be used as a sound source for the Beat Designer.

Click on the link to download or purchase:

Wednesday, February 10, 2016

Write the Perfect Valentine's Day Love Song

Best Words for Your Love Song Lyrics

acoustic guitar

Writing your Valentine a love song? Have writer's block?

Don't worry, here is some inspiration for you!

From an analysis of the Billboard Top 50 Love Songs of All Time, here are the 60 most commonly used words in alphabetical order:
  1. ago 
  2. around 
  3. baby 
  4. belong 
  5. best 
  6. better 
  7. boom 
  8. breaking 
  9. care 
  10. cause 
  11. deny 
  12. diamonds 
  13. every 
  14. eyes 
  15. feel 
  16. found 
  17. girl 
  18. give 
  19. go 
  20. gonna 
  21. got 
  22. happy 
  23. heart 
  24. hold 
  25. hopeless 
  26. hours 
  27. know 
  28. let 
  29. like 
  30. living 
  31. long 
  32. love 
  33. loved 
  34. made 
  35. make 
  36. mind 
  37. need 
  38. oh 
  39. one 
  40. place 
  41. protection 
  42. really 
  43. see 
  44. selection 
  45. show 
  46. side 
  47. silly 
  48. stop 
  49. suposed 
  50. tell 
  51. til 
  52. time 
  53. useless 
  54. want 
  55. way 
  56. whoa 
  57. wish 
  58. world 
  59. yeah 
  60. yesterday

Now Combine the Lyrics with the Music

When you're done writing your new masterpiece, give it that professionally produced sound by using mixing software - give MixPad a try.

MixPad allows users to:

  • Mix an unlimited number of music, vocal and audio tracks
  • Record single or multiple tracks simultaneously
  • Load any audio file to mix with your new project
  • Use audio effects to give your Valentine Song that professional flair 
  • Add sound effects and music to your live mix with the built-in royalty-free music library
  • Add additional studio effects and instruments with VST plugin support

  • Recent user review:

    "Dear NCH SOFTWARE/ Mix Pad Team, I would like to say thank you for all of the team members to create Mix Pad, You made a great job. It was a great tool to made my first promotional video sound editing, easy and fast. No doubts, this is my tool for next time as well"
    -Gabor Szilagyi, www.relaxbeer.com

    Click on the link to download or purchase:


    Friday, February 5, 2016

    Affect the Mood of the Crowd Through BPM/Tempo - DJ Tips

    DJ Tips and Tricks: How to Affect a Crowd Through Music

    3 Major Tips to Consider:

    1. Anticipate the crowd's preference before building your playset (refer to this famous scene from the Blues Brothers)
    2. Intentionally create lulls in the beat, as the audience members have to use the lavatories, buy refreshments (make the venue happy!), and take a rest from the action.
    3. Step up or down the action in stages using BPM - too high or too low of a shift in BPM from one song to the next will feel unnatural and might break the mood of the crowd.

    How Zulu DJ Mixer Can Help You With #3

    DJs can go from the memory of what the tempo of songs is like to transition from song to song and stagger the mood up or down, but modern software advances make this job much easier by automatically calculating BPM for you.


    If you have been making your playlists for parties or events through iTunes or some other music software, you'll have a hard time going back after trying DJ software designed for the purpose. Try Zulu, and see the difference.

    What is Tempo?

    Tempo is the pace of a song, the rate at which beats occur in the music. It is measured in Beats Per Minute, abbreviated as BPM.

    How Music Affects the Brain

    Music can affect us in surprising ways. One study showed that after hearing a short piece of music, participants were more likely to interpret a neutral expression as happy or sad, to match the tone and tempo of the music they heard.

    Another aspect of how our emotions are affected by music is that there is two kinds of emotions related to music: perceived vs felt. This means that we can understand the emotions of a piece of music without actually feeling them, which explains why some of us find listening to sad music enjoyable, rather than depressing.

    Type of Music vs Personality Types

    Researchers at Heriot-Watt University undertook one of the largest studies of how music affects us by asking over 30,000 volunteers what types of music they preferred, then having them take a personality test to associate genres with personality types. Their results have been mapped in the picture below (click to enlarge):

    Tempo and the Heart/Mood

    The musical community has long held that the tempo of a piece of music affects the heartbeat associated with the corresponding physical state or emotion which the music suggests. From the link above:
    The range 60-80 beats per minute is calm and relaxed, less than 60 is often very relaxed, introspective or even depressed. 80-100 is moderately alert and interested. 100 upwards is increasingly lively, excited or agitated and, since we crave some degree of excitement from our entertainment, 80-120 is quite a common tempo, and even 120-160 is common in some energetic situations. We're not saying that there is an absolute correspondence between heartbeat and music tempo, but there is a strong degree of suggestion between the two. 
    To put that in perspective, here are the general BPMs of different genres - one can at least anecdotally see if this theory holds sway on an individual level:
    • Ballad / Slow: 50 to 85 BPM
    • Mid-Tempo: 90-105 BPM
    • Up-Tempo: 110-125 BPM
    • Fast: 130 BPM and up
    • Blues: 50 BPM and up
    • Ambient/Movie Score: 80 BPM
    • Down-Tempo: 65-95 BPM
    • Reggae: 60-90 BPM
    • Hip-Hop: 85-110 BPM
    • Rock: 90-100 BPM
    • Alternative Rock: 120 BPM
    • RnB/Motown: 75-100 BPM
    • Dance/House: 110-130 BPM
    • Trance: 120-140 BPM
    • Techno: 130-150 BPM
    • Dubstep: 130-145 BPM
    • Drum n’ Bass: 150-170 BPM
    • Punk Rock: 140-200 BPM
    • Bluegrass: 120-240 BPM

    How to Use This as a DJ:

    Most DJs know that one of the core responsibilities of a DJ is to keep the crowd satisfied, but not all DJs know that responsibility must be taken on as a give-and-take relationship: the DJ determines the tone as much as the audience does.


    Click on the link to download or purchase  

    Thursday, March 20, 2014

    New Music Practice Software from NCH Software

    PlayPerfect Free Music Practice Software is the newest tool added to NCH Software's Audio Software and Tools.  It can help you practice, learn, and improve playing your favorite instrument using your Windows PC.


    PlayPerfect Music Practice Software has visual cues, playback, and performance reports to help young musicians train their ears to detect wrong or out-of-tune notes.  It's a fun way to practice or learn your favorite instrument.


    PlayPerfect Free Music Practice Software for Windows features:
    - Moving cursor
    - Color-changing notes indicating correct or incorrect
    - Built-in metronome to help you keep tempo
    - Practice sessions recorded as Mp3 files for future playback
    - Set the tempo and speed of the piece you are practicing


    For anyone looking to improve on their favorite musical instrument, PlayPerfect is a fun and exciting way to accomplish that goal.  If you have already had the chance to use PlayPerfect Free Music Practice Software, let us know how we can improve future versions, or what you really like about the product.