

Saturday, September 29, 2018
New Release: ClickCharts Diagram Flowchart Software for Windows
Friday, September 28, 2018
Crescendo Music Notation Tutorial - How To Add a Slur
How to Add a Slur to Music Notation with Crescendo

How to Add a Slur to Music Notation
This video will show you how to add a slur to a music notation project with Crescendo Music Notation Software.Download Crescendo to get started: https://www.nch.com.au/notation/index.html
To view more Crescendo Music Notation tutorials, visit: https://www.nch.com.au/notation/tutorial.html
How to Add a Slur to Sheet Music with Crescendo
- On the Notation tab, click S to activate the Slur tool.
- Click on the first note then click on the last to add the slur.
For more information and additional tips and tricks, watch the full video tutorial above.To view more Crescendo Music Notation tutorials, visit: https://www.nch.com.au/notation/tutorial.html
Do you need help using Crescendo?
View the Help Manual: http://help.nchsoftware.com/help/en/crescendo/win/help.pdf
Visit the Crescendo Help Forum: http://nch.invisionzone.com/forum/123-crescendo-music-notation/
Contact Crescendo Technical Support: https://www.nch.com.au/support/supportcontact.html?software=Crescendo
New Release: RecordPad Sound Recorder for Windows

Friday, September 21, 2018
Record Streaming Audio Easily with SoundTap
How to Record Streaming Audio

There are many different reasons why you may want to know how to record streaming audio on your computer. Learning how to record streamed audio will allow you to record and save audio from VoIP calls, videos, internet radio, and more. With a simple audio stream recording software such as SoundTap Streaming Audio Recorder, you can easily record any audio playing on your computer.
Install SoundTap
First, you will have to install SoundTap Streaming Audio Recorder onto your computer. This install requires that you restart your computer after downloading so that SoundTap can use your computer's audio driver to record audio playing on your computer. After your computer has rebooted, you will see SoundTap opened on your desktop.
Set the Output Destination & File Type
Click on the Options button in the program to open the SoundTap options window. Here you can select where you would like to save your streamed audio recordings. You can also set your desired output format for your audio files. Once you are finished adjusting your settings, click OK.
Find an Audio source to Record
Locate the streaming audio source that you would like to record on your computer. SoundTap can record a variety of internet streamed audio, such as internet radio, audio from videos and audio from Voice over IP programs such as Skype. Any audio that can be played on your computer can be recorded with Soundtap. Open the application or file that you would like to capture the audio from on your computer.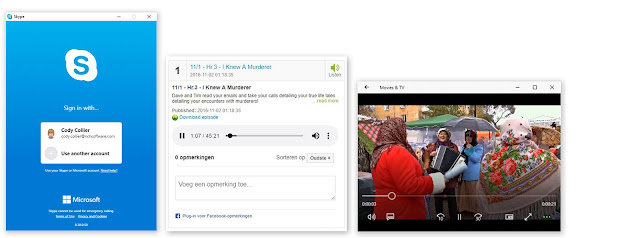
Record Streaming Audio
Click on the button that says Start Recording to begin recording streamed audio on your computer. While SoundTap is recording, the program will record any audio that is playing on your computer. If you would like to record audio from your computer's microphone in addition to the audio playing on your computer, simply check the box that says "Also record from microphone."
Export & Save
When you are finished recording your streamed audio, simply click the button that says Stop Recording. Your audio file will be saved in the default location that you set earlier. Click on the Find & Play button to launch the Find and Play Recordings window. From here you can listen to your recordings, see where they are saved, or save them to a new location by clicking the "Save As" button.
New Release: Express Zip File Compression for Windows

Wednesday, September 19, 2018
Just Released: Crescendo Music Notation Editor for Android

Friday, September 14, 2018
How to Make Beats Using the MixPad Beat Maker

Whether you consider yourself an experienced producer or a just a beginner at making music, knowing how to make beats is an important part of your process. MixPad Multi-Track Recording Software is a great recording software for audio and music production, but did you know that it also has an easy and exciting beat making feature? With the MixPad Beat Maker, you can quickly learn how to make beats for all types of music projects.
Beat Maker
After opening MixPad on your computer, click on the Create Beat button in the main toolbar underneath the Home tab. This will launch the Beat Maker window. You will be able to use the beats that you make with the beatmaker in the main program for future mixing projects.
Edit Kits
Before you begin learning how to make beats in MixPad, you need to set up your drum kit. Click on the Edit Kits tab to pick and choose different drums and sounds to add to your kit. You can import sounds of your own to use or work with the existing sounds in the program. MixPad comes with two different kit options that are filled with a variety of different drums and cymbals. You can add as many components to your kit as you would like. Once you have built your kit, exit out of the Edit Kit window to begin using it.
Adding New Bars to Your Measure
To create a new bar, click on the empty space in your track to highlight it blue. Then click on the Add + button underneath the Home tab. This will add an empty bar to your selected track. You can add all of the bars to your tracks before you start placing beats or you can wait and add them as you go. You can delete a bar you have added by simply clicking on the bar in your track and then clicking on the Delete button.
Beats Per Bar
Now that you have placed your bars on your tracks, you can adjust how many beats per bar you would like. You can add 1-16 beats per bar by selecting your bar and then typing the value into the box titled Beats Per Bar on the right-hand side of the program. Simple beats and slower beats require fewer beats per measure while more complicated beats will require more.
Bar Division
You can adjust your timing and further divide your bars by clicking on the Bar Divisions button underneath the Home tab. This allows you to have extra control and use extreme precision when creating your beats.
Adding Beats
Now that you have added bars to your tracks and you have set the number of beats per bar, you are ready to start adding beats. To add beats to your tracks, simply left click in the vacant boxes on your bars to place beats. You can drag the white beat markers up or down to determine the volume at which they are played back. The higher the beat marker is in your bar, the louder it will be played.
Making Beat Loops
Learning how to make loops using the MixPad Beat Maker tool is simple. The Beat Maker loops your tracks by default, but you can adjust the duration and placement of the loop however you would like. Simply change the values in the Loop Start and Loop End boxes on the right-hand side of the program to determine where your loop begins and ends. A green line will appear above the tracks that will be included in your loop. This will playback your tracks on repeat only at those specific bars.
Adding Tracks
You can add unlimited tracks with the MixPad Beat Maker tool. Simply click on the Add Track button in the top toolbar under the Home tab to add a new track. New tracks will appear at the bottom of your mix and you can use the drop-down arrows to select which drum or instrument you want to use on that track.
Beat Patterns
MixPad has a number of pre-existing beat patterns that you can use as well. Choose one from the pattern menu on the right side of the beat maker. Click on an empty bar, select the pattern you would like to add, and then click the Use button to add the pattern to your track. You can adjust these patterns with the settings above and add to them as well.
Exporting Beats
When you are finished making your beat, you can export it directly to the main program. Simply click on the Export button in the main toolbar or go to File and then click Export. You can then exit out of the Beat Maker window and your newly created beat will appear in the first available track in the regular MixPad program. From there you can use it in a new mix or export the mix as is with just your beat in it.
For more on music-making software, check out these posts:
Friday, September 7, 2018
How to Use VSTi with Crescendo Music Notation Software
How to Use VSTi with Crescendo Music Notation Software

Using VSTi with Crescendo Music Notation Software
This tutorial will show you how to use VSTi with Crescendo Music Notation Software.
Download Crescendo to get started: https://www.nch.com.au/notation/index.html
To view more Crescendo Music Notation tutorials, visit: https://www.nch.com.au/notation/tutorial.html
How To Use VSTi with Crescendo Music Notation Software
- To select a VSTi instrument, click the Parts Setup button on the Score toolbar to open the Parts and Staves dialog.
- Select the part or staff from the list, then, select the VSTi radio button.
- Select your instrument from the dropdown.
Watch the full video tutorial above for additional tips and tricks.
To view more Crescendo Music Notation tutorials, visit: https://www.nch.com.au/notation/tutorial.html
Do you need help using Crescendo?
View the Help Manual: http://help.nchsoftware.com/help/en/crescendo/win/help.pdf
Visit the Crescendo Help Forum: http://nch.invisionzone.com/forum/123-crescendo-music-notation/
Contact Crescendo Technical Support: https://www.nch.com.au/support/supportcontact.html?software=Crescendo
Tuesday, September 4, 2018
New Release: Pocket WavePad for iOS

Monday, September 3, 2018
Just Released: PhotoStage Slideshow Producer for Windows


