How to Resize a Picture

There are often times when we end up with photos that are larger than we need them to be. Many websites will only allow images of a certain size to be used or uploaded. Meanwhile, here you are with your giant photo wondering how to resize a picture. If you encounter an error on the web or another situation where you would need to know how to resize a picture, don't sweat it. With a simple photo editing software such as
PhotoPad Photo Editor you can easily learn how to resize a picture or graphic on your own.
Import Your Photo into PhotoPad
The first step to resizing your picture is to bring your image into
PhotoPad. After you have opened your copy of PhotoPad on your computer, there are several options for importing images. Click on the option that says
Open when you first launch the program and you can immediately start using the
Photo Browser. Otherwise, under the
Home tab, you may click on the
Photo Browser icon or the
Open Files icon to select the image you wish to resize. Under the
File tab, you can also choose to open an image into the program from a cloud service, such as Google Drive or DropBox.
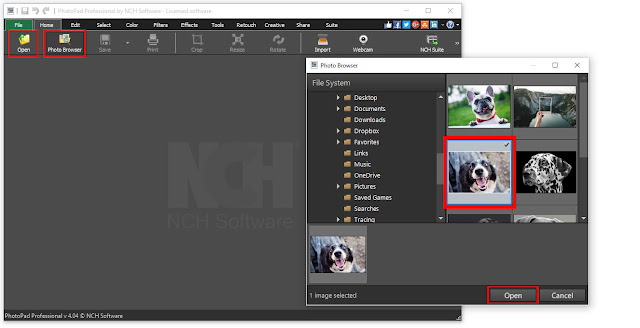 |
| PhotoPad Photo Browser |
Resize the Canvas and Layers
The
Resize icon exists both under the
Home tab and under the
Edit tab. With your image in the program, click on the
Resize icon to resize your photo. You will notice that a resize effect layer has now opened in the
Effects History and Layers panel on the right-hand side of the program.
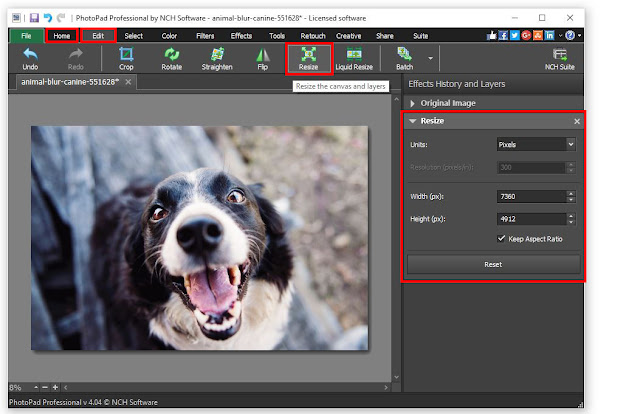 |
| Resizing canvas and layers in PhotoPad |
Select Your Scale
There are four options for how to resize a picture in PhotoPad. You can set your scaling units to resize based on
Pixels, Percentage, Inches, or Millimeters. For images on the web, Pixels, and Percentages are the more common units used for resizing photos. If you choose to resize by inches, you can access the
Resolution option and set the
pixels per inch of your photo. You will notice the checked box at the bottom of the layer that says
"Keep Aspect Ratio." This means that while you are adjusting the image's size, your width to height ratio will remain the same. This is commonly known as "Constrained Proportions." It is usually best to keep this option checked.

How to Resize an Image
For this example, I have chosen to resize a picture using the percentage option for my units. This is an easy way to conceptualize how to resize a picture. I want my image to be exactly half the size it is right now, so I have set my units to
Percentage and then typed in 50% for the value in the width box. You will see that my image is now half the size it previously was. Some websites give you specific dimension requirements for photos in pixels. For this, you would simply change the units to pixels instead of percentage and type in the dimensions you were given into the width and height boxes.
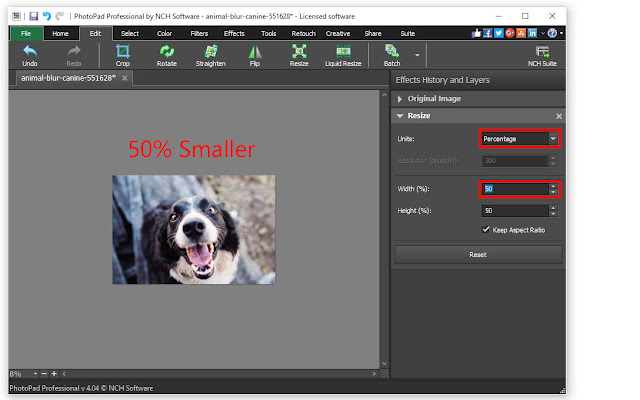 |
| Resize Photo by Percentage |
Save Your Image
Now that you are finished resizing your image, you are ready to
save your work and use your newly resized photo. Under the
File tab, select the option that says
Save As...This will launch the explorer window and allow you to select your output destination and choose your output file type.

Resize by Compressing
Sometimes when people ask how to resize a picture, what they are actually referring to is the file size in terms of storage. This is also known as file compression and can be done just as easily in PhotoPad. With your photo opened in the program, simply go to the
File tab and select the option that says
Save for web... This will launch a window that will allow you to use a slider to adjust the compression quality of your image and preview the result in real-time. In this example, I have reduced the file size by 80% with almost no observable loss in quality. Click on the OK button when you are finished and your newly compressed image can be saved to your chosen output destination.
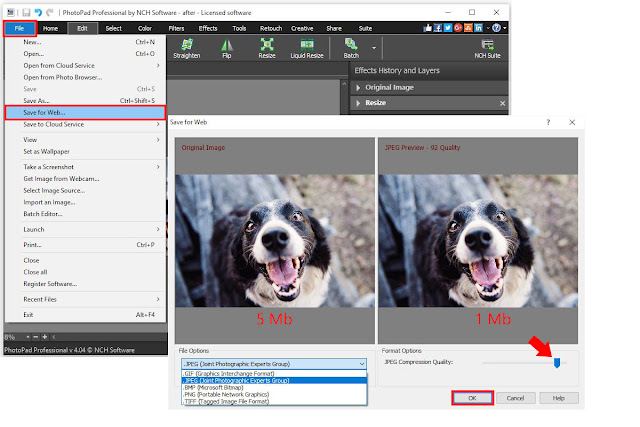 |
| Save for Web... |
For more on photo editing, check out these posts: