Showing posts with label video software. Show all posts

Friday, February 22, 2019

Best Video Editing Software of 2019

Best Value Video Editing Software of 2019


We are pleased to announce that our own VideoPad Video Editing Software has recently been named the Best Value Video Editing Software of 2019 by TopTenReviews.com. These picks are made through vigorous and thorough testing of multiple popular programs by a team of expert editors in order to help shoppers make well-informed purchasing decisions. We are glad that VideoPad stood out from the pack in performance but also in affordability.

"If you want a functional video editing program at a fraction of the price, consider VideoPad. This software has many of the tools we look for in the best video editing software." -TopTenReviews

We strive to keep our programs competitive with industry standards and our developers are working constantly to improve our software with each and every update. It is equally important to us, though. that we provide our software at a reasonable and affordable price so that everyone can have access to feature-packed professional software like VideoPad.
VideoPad is a fully featured video editor for creating professional quality videos in minutes. The program comes with over 50 visual and transition effects to add a professional touch to your movies. Drag and drop video clips for easy video editing and export movies in multiple resolutions including full HD, 2K and 4K (720p, 1080p, 1440p, 2160p and more. Save your login credentials to upload videos directly to YouTube, Facebook or Flickr from VideoPad. VideoPad is available for both PC and Mac and has mobile versions for Android and IOS as well. 


For more on VideoPad, check out these other posts:

Friday, November 9, 2018

Introducing: Vertical Video Editing with VideoPad

Introducing: Vertical video editing with VideoPad


Many of our favorite applications are beginning to place mobile-first when it comes to content priorities. Popular mobile apps implement the use of the vertical scroll to shuffle through content. If you scroll upon a video that is shot horizontally, you either have to view it at a very small size or adjust the position of your device to view it full screen. Videos that are filmed and edited to be viewed vertically create a much better user experience on mobile platforms, which are making up an increasingly larger share of video viewers. Learning how to edit vertical videos is a great way to get ahead of the game. VideoPad Video Editing Software provides great options for editing and exporting vertical videos that are simple and effective.


Vertical Videos

When our phones are on their side, or horizontal, the screen has the same aspect ratio as a standard TV or movie screen. Vertical videos are like taking that TV and flipping it on its side. So instead of a  widescreen video, it is a "tall-screen" video. Vertical videos are much more mobile-friendly than horizontal videos and they are a great way to capture tall subjects like people, buildings, and trees. These subjects would normally be cropped in a wide-angle shot. This is why social media platforms like Snapchat have adopted the use of vertical videos in their platforms. The more we turn to mobile to view video content, the more we will be shifting to vertical videos.

Import Vertical Videos

Editing vertical videos in VideoPad is a breeze. Start by importing your vertical videos into the program by clicking on the Add Files button, located underneath the Home tab. This will launch the file finder window where you may find and select the vertical videos that you would like to edit from wherever they are located on your computer. Select the videos you wish to edit, then click Open to bring them into the program.


Aspect Ratio

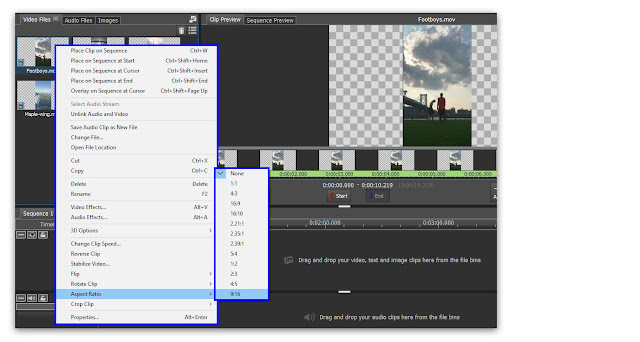
Aspect ratio refers to the ratio of width to height in a video frame. Vertical videos are videos where the height is greater than the width, typically because they were shot on a mobile phone where the screen is like this. To set the aspect ratio for a vertical video in VideoPad, right-click on a video clip in the media bin and hover the Aspect Ratio option to view the various aspect ratios. Select a vertical video aspect ratio from the list such as 4:5 or 9:16.


Edit Vertical Videos

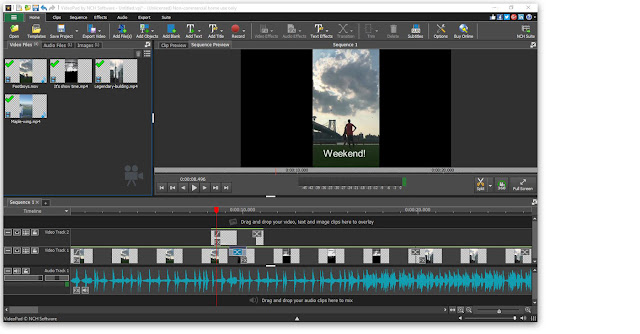
Now that you have set the proper aspect ratio for vertical video editing, you can drag your video clips into the timeline. Here you can perform any edits to your video you would like before exporting it as a movie. Arrange the order of your clips and add transitions between them. Add text and audio to your video and apply any video effects you would like.


Exporting Vertical Videos

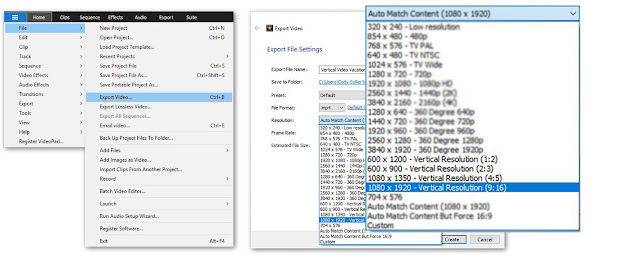
After you are finished editing your video, you are ready to export it and start sharing. To export a vertical video in VideoPad, click on the main File tab and select the option that says Export Video. This will launch the Export Video Window, where you can name your file, set the location and choose the output resolution. Set the Resolution to match your selected aspect ratio and then click Create when you are ready to export. Your vertical video will be exported to your chosen output destination and you are now ready to share it with the mobile video viewing world!


For more on VideoPad, check out these posts:

Friday, June 22, 2018

How to Make Slow Motion Videos with VideoPad

How to Make Slow Motion Videos with VideoPad


Sometimes the action in a video just happens too fast for us to truly process what we are witnessing. That is why slow motion is commonly used in sports to help referees make accurate calls about what happened when it all happened so fast. Making a slow-mo video is a great way to observe the action in your footage without missing anything. With an easy-to-use video editing software such as VideoPad, you can slow down the speed of any video to make your own slow-motion movies and videos.


Changing the Speed of Your Clip

Making a slow-motion video really just means that you have adjusted the speed of your footage to playback slower than in real-time. To change the speed of your entire video clip so that it can be viewed in slow motion, start by dragging your clip into the timeline. From there it is as simple as right-clicking anywhere on that clip and then select the option that says "Change Clip Speed..." This will open the Speed Change window where you can adjust the speed and duration of your video clip.
How to make a slow motion video
Change Clip Speed
How to adjust the speed of a video clip in VideoPad
Clip speed is commonly represented as a percentage in video editing. By default, your video will have a speed of 100% That is to say that 100% is real-time playback, viewed exactly as it occurred. Anything less than that will be slower than real-time and anything greater will be faster. A good place to start for slow-motion videos is by cutting your clip's speed in half to 50% Once you have changed the speed of your clip in the Speed Change window, click on the Set button and your change will be applied. If you find that you want your video to be even slower you can always repeat these steps and set the speed (%) even lower.

Making Only a Section of a Video Slow Motion

Example of a slow motion gif made in VideoPad Making just a portion of your video slow motion is another cool and simple effect that you can try in VideoPad. This is great to use when the buildup to the action in your video is perhaps not as exciting as the action itself, or when it would be too time-consuming to play the entire clip in slow motion. To make just part of a video in slow motion, start by dragging the clip into your timeline. Move the red cursor along the timeline to the position where you want the slow-motion portion of the video to begin. Click on the scissors icon to split the clip at the cursor's current position. Then, drag the cursor to the point in your clip where you would like the slow-motion to end and click on the scissors to split the tracks at this point as well. This will give you an isolated segment of your video that you can make slow-motion without affecting the rest of the clip. Right-click on the section of your video that you have clipped to be in slow-mo and adjust the speed as demonstrated above.
Making a section of a video clip slow motion

For more tips on VideoPad:


Monday, June 27, 2016

Apply the Ken Burns Effect with VideoPad - Pan and Zoom

What is the Ken Burns Effect?

In our newest release of VideoPad 4.45, we have added the Pan and Zoom Effect, also known as the Ken Burns Effect, to our Video Effects menu. The Ken Burns effect is a striking pan and zoom effect that is useful in bringing focus to specific elements in a static frame of a video. This method was used extensively by documentary filmmaker Ken Burns, for whom the technique is named. Burns used archival footage in his documentaries and applied a zoom effect to add interest and movement to his work. The Ken Burns Effect is often seen in YouTube videos and is an effective tactic to create the impression of movement in a static frame.

How To Pan and Zoom with VideoPad

Step 1: Prepare Video Clip 

To begin, identify the part of your video that you would like to focus on in your pan and zoom. Often, faces or background scenery are used as focus points. If you would like to apply the pan and zoom effect to a portion of your video, you will need to split the clip into sections before applying the Pan and Zoom effect. To split a clip, click on the timeline where you would like the effect to begin and select "Split". 

Step 2: Apply Pan and Zoom Effect

To apply the Ken Burns Effect, begin by selecting the clip that the effect will be applied to. From the "Video Effects" dropdown, select "Pan and Zoom". 


Step 3: Select Focus Point

When you select the Pan and Zoom effect, a small "FX" or Effects window will appear. Here you can elect to begin the Pan and Zoom Effect at the Start or the End of the selected clip. In the Clip Preview area, you can drag the outline to select part of the video frame as a focal point.