Showing posts with label movie maker. Show all posts

Monday, April 19, 2021

How to Make a Freeze Frame of a Video Clip

How to Take a Snapshot from a Video in VideoPad


This tutorial video will show you how to take a snapshot of a video and add it to the timeline with VideoPad Video Editing Software.

Download VideoPad to get started: https://www.nchsoftware.com/videopad/index.html


Take a Snapshot from a Video


How to Take a Snapshot from a Video

  1. Drag your cursor to the position in your timeline where you want to take your snapshot
  2. Right-click and select the option from the dropdown menu that says "Take Snapshot of Clip"
  3. Choose the size and resolution of your extracted image
  4. Your photo will appear under the images tab in the media bin
  5. Drag the image into your timeline to use as a still photo in your video


For more on VideoPad, check out these posts:

Friday, April 12, 2019

The Best Video Editor for YouTube

The Best Video Editor for YouTube


In the age of social sharing, everyone has a voice and a message that they want to be heard. YouTube has remained the major platform for those voices for many years and as a result, it has propelled many musicians, comedians, filmmakers, & thrill-seekers into the spotlight. In fact, did you know that YouTube even has awards that it sends out to its best "YouTubers" after they achieve certain numbers of views and subscribers? All the more reason to get started creating your own viral video content! It does take more than just uploading a video to achieve YouTube fame, though. Most YouTubers will tell you that basic video editing skills are a necessity if you want to succeed.


What Makes a Good YouTube Video?

Obviously, how "good" a video is is entirely subjective. Beauty is in the eye of the YouTube viewer. However, YouTube does have an algorithm for ranking videos and the best videos are usually those that are edited well. This is why I say that having good YouTube video editing software is very important. The YouTube algorithm places a heavy emphasis on engagement, which means that keeping your viewers' attention is key to your videos climbing the ranks and getting that golden YouTube award. The best YouTube video editing software is going to have to have the below features to be considered a good YouTube video editor.


Cutting & Trimming
Cutting out the less exciting parts of a video will make it more enjoyable to watch and keep viewers engaged. YouTube does favor longer videos in their algorithm, but they should belong because they are full of great footage, not because you included all thirty-one attempts that it took to stick a good-looking backflip into the pool.

Transitions & Effects

Transitions help to make video clips play together seamlessly. Smooth transitions can help make the switch between clips with different scenery a lot more subtle and easier on the eyes. Additionally, adding effects to your YouTube videos such as Ken Burns (pan and zoom) can help make basic clips like still scenery a little more lively.

Audio & Sound
Many YouTuber's create videos with just pictures and then they provide a voice-over to accompany the images. When done right, these types of videos are every bit as engaging as actual video clips. Having music playing throughout your video adds another layer of engagement as well. A cooking video with a long clip of someone stirring cake batter in complete silence will lose viewers a lot quicker than if there were music being played in the background.

Add Text to Video
The use of text in YouTube videos for titles and captions can help keep the viewer informed and engaged. Text can be used to create subtitles if the speaker's voice in a video can't be heard clearly, as well as to show language translations. You can also use text as an attention-getter to have an important word that was said display on the screen.

Proper Formatting
Properly formatted videos will receive more clicks and views than those that aren't because they are exposed to the right audience. Using the appropriate thumbnails, titles, descriptions, & tags will help make sure that a video is put in front of relevant viewers. A good YouTube video editing software will have features that make formatting your YouTube videos a breeze.


So, What is the Best Video Editor for YouTube?

If you are looking for the best video editor for YouTube, then look no further than VideoPad Video Editing Software. VideoPad checks all of the above boxes and more when it comes to producing quality YouTube videos. This full-featured, professional video editor allows you to create movie masterpieces in minutes that will be shared by your followers over and over again. VideoPad works with just about any file type you can think of, so editing 4K footage, 360 videos, GoPro footage, or video from your mobile phone has never been easier. The simple drag and drop interface makes compiling and organizing clips easy and adding text, transitions & effects is a breeze. It is for these reasons that VideoPad was recently named "The Best Video Editor for YouTube" by TomsGuide.com

Other YouTube Video Editing Features

VideoPad YouTube Editor comes equipped with settings designed specifically with YouTube video editing in mind. It allows you to save your login credentials so that you can upload videos directly to YouTube from the program. When you are finished with a video you can simply select Export to YouTube from the export options menu. The export window will allow you to select a YouTube video category, add keywords, titles and descriptions, and select the output format from right inside the application. The program supports editing all kinds of video types including 360 video editing for 360 YouTube videos and HD videos. You can easily adjust the aspect ratio for YouTube videos too, with choices ranging from 480p all the way up to 4k.


For more on VideoPad, check out these posts:

Friday, February 22, 2019

Best Video Editing Software of 2019

Best Value Video Editing Software of 2019


We are pleased to announce that our own VideoPad Video Editing Software has recently been named the Best Value Video Editing Software of 2019 by TopTenReviews.com. These picks are made through vigorous and thorough testing of multiple popular programs by a team of expert editors in order to help shoppers make well-informed purchasing decisions. We are glad that VideoPad stood out from the pack in performance but also in affordability.

"If you want a functional video editing program at a fraction of the price, consider VideoPad. This software has many of the tools we look for in the best video editing software." -TopTenReviews

We strive to keep our programs competitive with industry standards and our developers are working constantly to improve our software with each and every update. It is equally important to us, though. that we provide our software at a reasonable and affordable price so that everyone can have access to feature-packed professional software like VideoPad.
VideoPad is a fully featured video editor for creating professional quality videos in minutes. The program comes with over 50 visual and transition effects to add a professional touch to your movies. Drag and drop video clips for easy video editing and export movies in multiple resolutions including full HD, 2K and 4K (720p, 1080p, 1440p, 2160p and more. Save your login credentials to upload videos directly to YouTube, Facebook or Flickr from VideoPad. VideoPad is available for both PC and Mac and has mobile versions for Android and IOS as well. 


For more on VideoPad, check out these other posts:

Friday, December 7, 2018

How to Edit Videos on Mac
How to Edit Videos on Mac


If you find yourself wondering what to do with those videos you took on your family ski trip, then learning how to edit videos on Mac may just change your entire home movie game. Editing your videos on Mac is a great way to get all of that footage organized and put together something that you and the people around you will actually enjoy watching. With a simple video editing software for Mac, such as VideoPad Video Editor, you can easily learn how to edit videos on Mac like a pro.


Import Videos on Mac

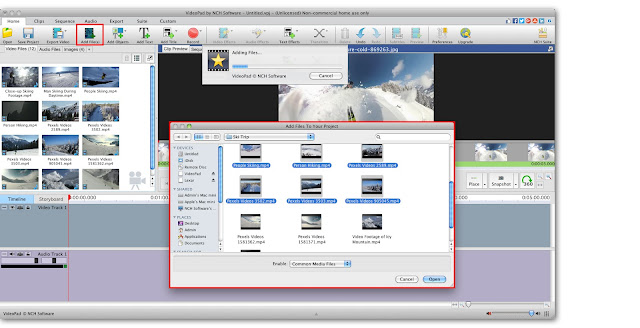
To begin editing videos on Mac, start by importing your video files into VideoPad. Open the program on your Mac and then click on the icon that says Add Files. This will open the file finder window where you can locate the video clips on your Mac that you would like to edit. Once you have selected the files you wish to use in your video, click Open to bring them into the program.


Trim Video Clips

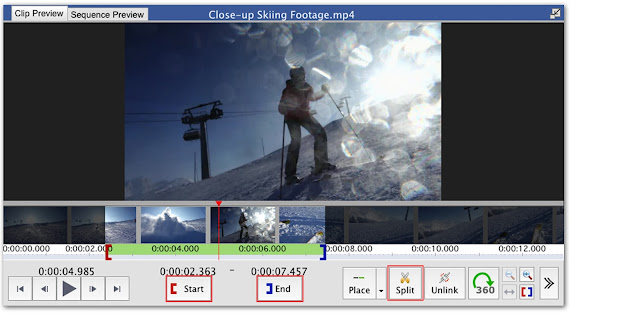
When editing videos on Mac, one of the first things you might want to do is trim your video clips down to the good stuff. From the media bin on the left-hand side of the program, click on a clip that you want to trim to open it in the clip preview window. Drag the red and blue brackets along the timeline in this window to set the beginning and endpoints of your clip. You can also let your video play, and click on the Start and End buttons where you want the beginning and end of the clip to be. To split your video into two separate clips, simply click on any point in the timeline and then click on the scissors icon. This will create two new clips in the media bin.


Add Video Effects

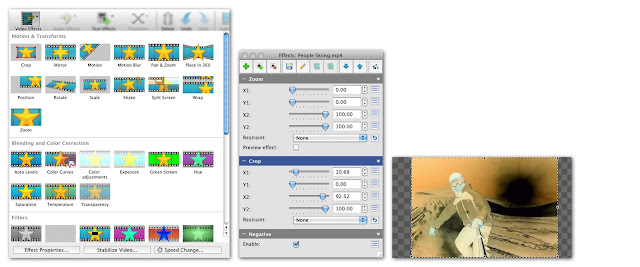
VideoPad Video Editor for Mac is full of great effects that you can add to your videos. Touch up and enhance your videos by making color and contrast adjustments. You can also choose from a variety of special effects to really bring your videos to life. To add a video effect, select a clip and then click on the Add Effects tab in the top menu. This will launch the Effects Window, where you can choose your first video effect. After selecting an effect, the Effects Layers Panel will open up and you can adjust your effects and arrange their order. Effects can be layered on top of each other to create your own new and unique video effect.


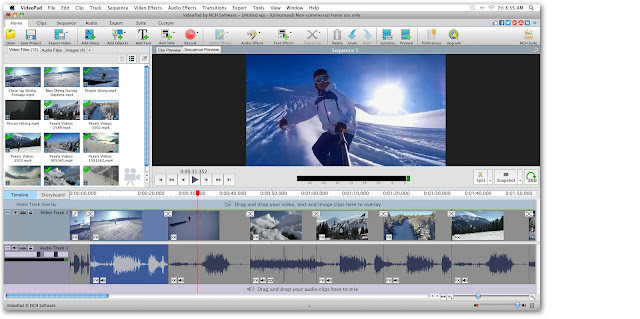
Video Editing Timeline

Once your video clips are trimmed and you have added your desired effects, you can then start putting them together to make your movie. Drag and drop your clips from the media bin directly into the VideoPad timeline in any order you would like. You can rearrange the order of your video clips in the timeline later or as you go. When a clip is in the timeline, it will have a green checkmark on it in the media bin.

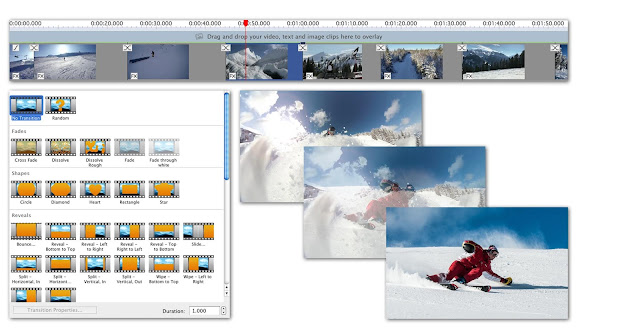
Add Video Transitions

VideoPad Video Editor is loaded with great video transitions to use when you are learning how to edit videos on Mac. If you have several video clips that you would like to edit together, it is a good idea to use transitions to make the change between them smooth and seamless. Click on the X icon between any two video clips in your timeline to open the Transitions Window and select a transition. You can adjust the duration of your transition in the bottom right-hand corner of the transitions menu, or by double-clicking on the transition bar that appears once it has been added.
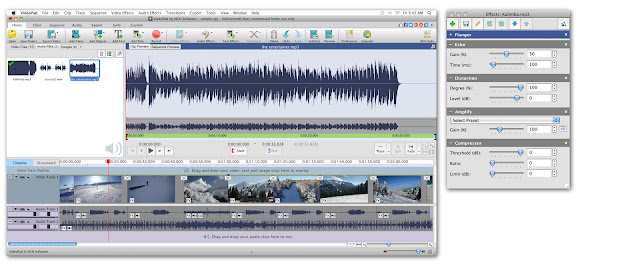
Add Audio to Video

Adding music or narration to videos on Mac makes for a professional-looking final product and helps your video to be more captivating and interesting to your audience. You can add audio files by clicking on the Add File(s) button in the main menu. Select the audio file or files you wish to add to your video and import them into the program. Once imported, your audio clips will appear in the media bin under the Audio Files tab. Click on an audio file to view it in the preview window and trim and adjust it as you like. Drag the audio clip from the media bin into the timeline and place it wherever you want. Click on the FX or Speaker icons that are located on the audio clip to add audio effects and adjust the volume of your audio clip.


Add Text to Video

Adding text to a video on Mac is a great way to provide your viewer with additional info that isn't otherwise available to them. Click on the Add Text button in the top menu to add text to your video. Type your text into the text box that appears and make any font and style adjustments you wish. When you exit out of the text window, you will see your new text as a clip on your timeline. You can move your text clip, add transitions and effects to it, and increase or decrease the duration of the text clip in your video. If you need to edit your text, double-click on the text clip in your timeline or click in the text box underneath the preview window.


Export Video on Mac

We have now successfully learned how to edit videos on Mac with VideoPad Video Editor. We demonstrated how to trim video clips and apply video effects. We learned how to combine video clips together in the timeline and add transitions between them. We also learned how to add audio and text to our videos and how to navigate the VideoPad interface while doing so. You are now ready to export your final video product to your Mac. To export your video, click on the button that says Export Video in the top menu. You can choose from a variety of exporting options such as saving as a video file, burning to a disk, or uploading your video straight to YouTube.


Friday, October 19, 2018

How to Add Subtitles to a Video or Movie

How to Add Subtitles to a Video or Movie

How to add subtitles to videos and movies with VideoPad


How to Add Subtitles to a Video or Movie with VideoPad Video Editor


Download VideoPad to get started: www.nchsoftware.com/videopad

To view more VideoPad Video Editor tutorials visit: www.nchsoftware.com/videopad/tutorial.html


How to Add Subtitles

  1. Add the clips you want to subtitle to the Timeline
  2. Click the Subtitles button on the Sequence toolbar to open the Subtitles dialog
  3. Position the cursor where you want the subtitle to appear in your video and type the subtitle into the subtitle entry box
  4. To add another subtitle, click Add on the toolbar, position the cursor and type in the subtitle
  5. Keep entering subtitles in this manner until you are happy, then click Apply
For more information and additional tips and tricks, watch the full video tutorial above.


To view more VideoPad Video Editor tutorials visit: www.nchsoftware.com/videopad/tutorial.html


Do you need help using VideoPad?

View the Help Manual: http://help.nchsoftware.com/help/en/videopad/win/help.pdf

visit the VideoPad Help Forum: http://nch.invisionzone.com/forum/85-videopad/

Contact VideoPad Technical Support: https://www.nch.com.au/support/supportcontact.html?software=videopad

Friday, August 31, 2018

Edit Videos on Windows Computers Easily

How to Edit Videos on Windows


There are many different things that you can do with all of those videos you have been taking. Maybe they have been piling up on your phone over the years, or maybe you are the type who films a vacation from the time you leave until the moment you get back. Whatever the reason, learning how to edit videos on Windows PC is a good way to get organized and make something great out of all of that footage. With a simple video editing software such as VideoPad Video Editor, you can quickly learn how to edit videos on Windows with ease.


Import Videos

To begin editing videos on Windows, you will first need to import your video files into VideoPad. Open the program on your PC and click on the icon that says Add files. This will open the file browser window where you can select the video clips that you would like to edit.

Adding video files to VideoPad 

Trim Videos

One of the first tasks when editing videos on Windows is to trim your clips down to the good stuff. From the media bin on the left-hand side of the program, click on the clip you want to trim. This will open the clip in the preview window. Drag the red and blue brackets along the timeline in this window to set the beginning and endpoints of your clip. To split your clip into two separate videos, simply drag the red cursor to the point you want to split and click on the scissors icon. This will create two new clips in the media bin.

How to trim a video clip

Apply Effects

VideoPad Video Editor comes loaded with great effects that you can add to your videos. You can easily touch up your videos by making color adjustments or take it a step further and add special effects to bring your videos to life. Effects can also be layered on top of one another to create a new and unique video effect of your own. Select the clip that you wish to add effects to, then click on the tab in the top menu that says Add Effects. This will launch the Effects Window where you can choose your first effect. After selecting an effect, the Effects Layers Panel will open up and you can adjust your effects and arrange their order.

Add effects to videos 

Timeline

Now that you have your clips trimmed and touched up, it is time to put them together. Drag and drop your clips from the media bin directly into the VideoPad timeline in any order you would like. You can drag them one at a time or all at once. You can always change their position in the timeline later if you decide that you want them in a different order. When a clip is in the timeline, it will have a green checkmark on it in the media bin.

Using the VideoPad timeline

Add Transitions

If you have several video clips that you would like to edit together, it is a good idea to use transitions to make the change between them smooth and seamless. VideoPad Video Editor is full of great video transitions to use when you are learning how to edit videos on Windows. Click on the X icon between any two video clips in your timeline to open the Transitions Window and select a transition. You can adjust the duration of your transition in the bottom right-hand corner of the transitions menu.
How to add transitions to videos

Add Audio

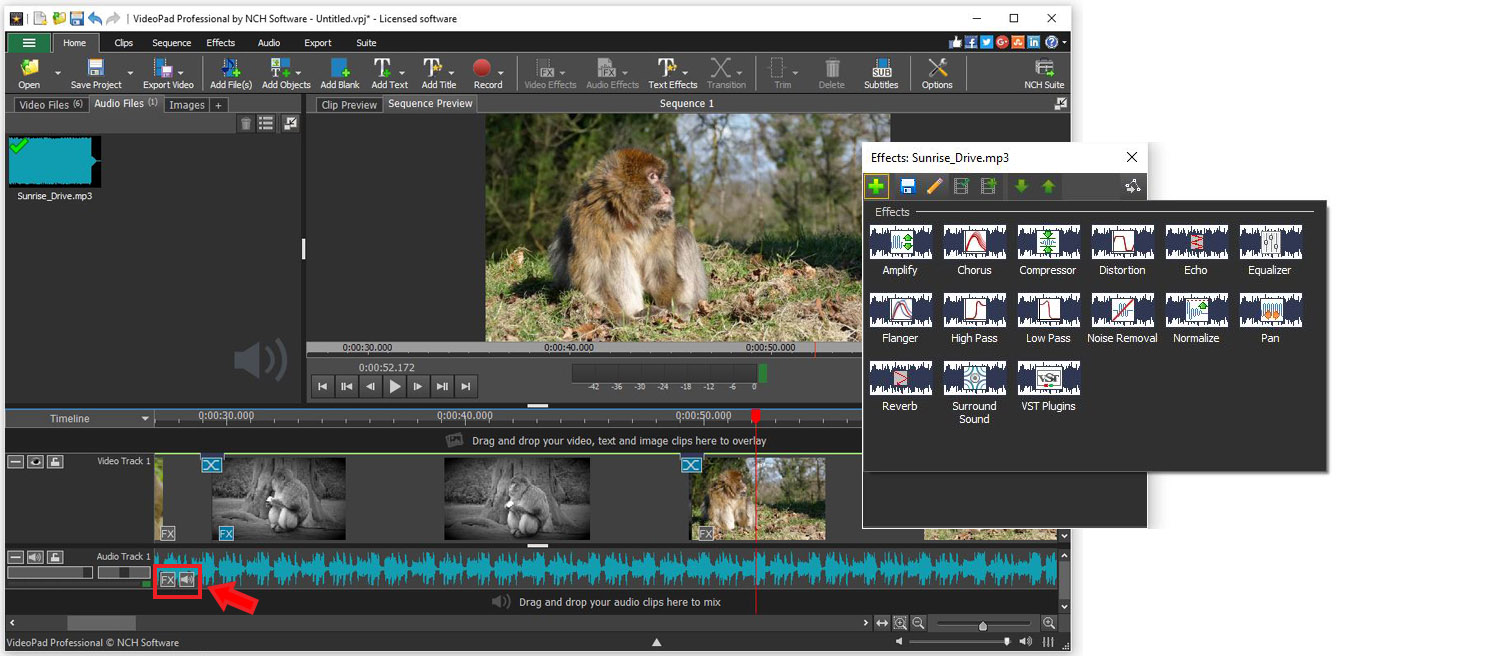
Now that your clips are running together smoothly in your timeline, you are probably wondering how to add audio to videos. Adding music or narration to videos makes for a professional-looking final product and helps your video to be more captivating and interesting to your audience. You can add audio files by clicking on the same Add File(s) button that was used to add your video files. Once imported, drag the audio clip from the media bin into the timeline and place it wherever you would like. Click on the FX or Speaker icons located on the audio clip to add audio effects and adjust the volume of your audio clip.

How to add audio to videos

Add Text

Adding text to a video is a great way to tell the viewer information that isn't otherwise available to them. Click on the Add Text button in the top menu to add text to your video. Type your text in the text box that appears and make any font and style adjustments you wish. When you exit out of the text window, you will see your new text as a clip on your timeline. You can move your text clip, add transitions and effects to it, and increase or decrease the duration of the text clip in your video.

How to add text to videos

Export

We have now successfully learned how to trim video clips and apply effects. We demonstrated how to combine video clips together in your timeline and how to add transitions to videos. We also learned how to add audio and text to videos and how to navigate the VideoPad interface while doing so. You now know how to edit videos on Windows PC and you are ready to export your final video product. Click the button that says Export Video in the top menu. You can choose from a variety of exporting options such as saving as a video file, burning to a disc, or uploading your video straight to YouTube.

Exporting videos from VideoPad 


For more of VideoPad and video editing, check out these posts:

Friday, August 10, 2018

Transfer Video to PC Easily in a Couple of Steps with VideoPad

How to Transfer Video to PC


Everybody loves taking videos these days. We like to film our lives and the things around us so that we can re-visit the memories time and time again. Watching these videos on your camera is great, but transferring videos to a PC allows you to do a lot more with them. Learning how to transfer video to PC will let you save your videos in a secure location, play them back on a much larger screen, edit them to make movies, and share them with whomever you would like. With a simple video editing software such as VideoPad Video Editing Software, you can edit and transfer video to PC with ease.


Transferring Video to PC from SD Card or Other External Device

Import Video Files into VideoPad 
Select Video Files to Transfer to PC
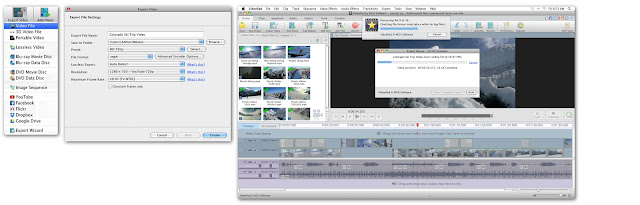
Open your copy of VideoPad Video Editing Software and select New Project. From there, click on the Add Files tab to open your computer's file browser. You can also go to the main menu in the program and select File > Add File(s) or simply use the keyboard command Ctrl + M to open the file finder window. Once this window is open, you can select your SD Card or another external device from where you would like to import your videos. Select the videos you would like to transfer to your PC and then click Open to bring them into VideoPad.

Edit Your Video Clip(s)

With your clips imported into VideoPad, you can now make any edits or adjustments you would like before transferring your videos to your PC. Apply effects, add text and transitions, and crop and trim your video clips so that your captured moments are action-packed and exciting. Drag your clip into the timeline to make any edits you would like and then move on to the next step.

Edit Your Video Clips 

Transfer Video to PC

When you are finished editing your clip, you are now ready to learn how to transfer video to PC. With your clip or clips in your timeline, go to the main menu and select File > Export video... You can also use the keyboard command Ctrl + B. This will launch the export video window and you can select the destination where you would like to transfer video to your PC. Use the Browse button to find a folder and then click Create to start the export. This will transfer whatever clip or clips you have in your timeline to your PC.
Transfer Video to PC


For more on VideoPad and video editing, check out these posts:


Friday, June 22, 2018

How to Make Slow Motion Videos with VideoPad

How to Make Slow Motion Videos with VideoPad


Sometimes the action in a video just happens too fast for us to truly process what we are witnessing. That is why slow motion is commonly used in sports to help referees make accurate calls about what happened when it all happened so fast. Making a slow-mo video is a great way to observe the action in your footage without missing anything. With an easy-to-use video editing software such as VideoPad, you can slow down the speed of any video to make your own slow-motion movies and videos.


Changing the Speed of Your Clip

Making a slow-motion video really just means that you have adjusted the speed of your footage to playback slower than in real-time. To change the speed of your entire video clip so that it can be viewed in slow motion, start by dragging your clip into the timeline. From there it is as simple as right-clicking anywhere on that clip and then select the option that says "Change Clip Speed..." This will open the Speed Change window where you can adjust the speed and duration of your video clip.
How to make a slow motion video
Change Clip Speed
How to adjust the speed of a video clip in VideoPad
Clip speed is commonly represented as a percentage in video editing. By default, your video will have a speed of 100% That is to say that 100% is real-time playback, viewed exactly as it occurred. Anything less than that will be slower than real-time and anything greater will be faster. A good place to start for slow-motion videos is by cutting your clip's speed in half to 50% Once you have changed the speed of your clip in the Speed Change window, click on the Set button and your change will be applied. If you find that you want your video to be even slower you can always repeat these steps and set the speed (%) even lower.

Making Only a Section of a Video Slow Motion

Example of a slow motion gif made in VideoPad Making just a portion of your video slow motion is another cool and simple effect that you can try in VideoPad. This is great to use when the buildup to the action in your video is perhaps not as exciting as the action itself, or when it would be too time-consuming to play the entire clip in slow motion. To make just part of a video in slow motion, start by dragging the clip into your timeline. Move the red cursor along the timeline to the position where you want the slow-motion portion of the video to begin. Click on the scissors icon to split the clip at the cursor's current position. Then, drag the cursor to the point in your clip where you would like the slow-motion to end and click on the scissors to split the tracks at this point as well. This will give you an isolated segment of your video that you can make slow-motion without affecting the rest of the clip. Right-click on the section of your video that you have clipped to be in slow-mo and adjust the speed as demonstrated above.
Making a section of a video clip slow motion

For more tips on VideoPad:


Tuesday, May 29, 2018

How to Make A Time-lapse Video with VideoPad

How to Make a Time-Lapse Video with VideoPad


Time just doesn’t seem to move fast enough for some of us anymore. A time-lapse video is a great way to observe change over time without having to literally watch grass grow. You can make a time-lapse video of anything you would like, such as a sunset, a cross-country drive, a plant growing, or anything else that you can imagine. With a simple and easy-to-use video editing software such as VideoPad, you can make stunning time-lapse videos of your own and share them with the world.


What is a Time-lapse Video?

There are basically two types of videos that are considered time-lapse videos. The first type is made when a video is taken on a camcorder and then later that video is sped up to quickly show the passing of a long amount of time. This can make everything in the video appear to move quickly or just certain objects in the video, depending on where the activity was in your shot and if your camera was still while shooting. Think about a sped-up video of foot traffic in a train station or of snow building up during a winter storm. The second type of time-lapse video is made by taking a series of pictures of the same object over time and then playing them all together in rapid succession. This method creates a video-like effect of that object changing from picture to picture.


Setting Up Your Camera for a Time-lapse 

Ready...

Make sure that your camera is fully charged and make sure that you have enough storage for the number of pictures you will be taking or the amount of time you will be filming. Make sure that your SD card is formatted and cleared so that there are no issues saving your images or recordings. When a camera is left on or left recording for long amounts of time, it can quickly drain the battery. Make sure that your battery is fully charged and that you have a spare ready just in case.

Aim...

The most common element of almost all time-lapse videos is that the shot typically remains stationary, while one particular object or area within that shot moves. Using a tripod is the easiest way to achieve maximum camera stability. If you do not have one available, find a sturdy and secure place to set your camera so that it can remain completely still and untouched. Look through your viewfinder or on your camera’s playback screen and set markers just outside of the shot so that you can line that exact shot up again later if you do move your camera.

Fire!!!

If you are taking a video, all you have to do is start your recording and remember to come back to stop it when you are finished. Making a time-lapse video with photos can be a little more labor-intensive. Depending on how fast your subject is moving or changing, you will want to use different intervals of time for taking pictures. Some modern cameras do have settings on them that enable you to set predefined increments of time to take a photo. Otherwise, you can set a timer and hang out with your camera. A couple of photos each minute is good for a sunrise, but for something like a plant growing, a couple of photos a day is better.

Photos or Video?

The main factor for this decision is time. How long is it going to take to capture everything you want in your time-lapse? Anything that takes longer than a day to capture would probably be better left to pictures. This is mainly because of storage. Video files are large, photo files are not. A 24 hour HD video won't even fit on most computers and would likely require 2-3 battery changes to film it all. Making a time-lapse with photos is great for capturing gradual change over time and then getting to watch it all at once in a matter of seconds. Using video is good when change happens quickly and you want to capture every second of it.

Making a Time-Lapse with Photos

Set up your camera on a tripod with your memory card formatted and your battery fully charged. Begin taking your pictures in even increments of time or allowing your camera to do so for you if it has the capability. Once you begin taking your pictures, do not move or disrupt your camera. When you get back to the lab, open the latest version of VideoPad Video Editing Software. There are two ways to make a time-lapse with photos in VideoPad.

Method #1

Add Images as Video in VideoPad 
You can create a great time-lapse video with pictures using VideoPad's Add Images as Video function. From the File drop-down menu, select Add Images as Video... You will be prompted to select the folder on your computer containing all of your photos. After that, you can set the frame rate. This is a fast and efficient way to make a time-lapse video from your photos. The lowest frame rate that can be set is 10 fps, though. If this is too fast for your photo time-lapse, you will have to make your video using the second method.
Images as a Video Output File

Method #2

Drag all of your photos into the media bin in VideoPad. Then drag them all onto your timeline in the order that they were taken. To adjust the duration of all of your images at once, click on the first clip in the timeline, hold down the shift key, and then click on the last clip in your timeline. This will select all of your images at once. Right-click on any one of the selected images in your timeline and then select Change Duration from the dropdown menu. You will see under the clip preview window that the default duration of 3:00 sec is now highlighted in blue and can be adjusted. You can experiment with what feels right for your time-lapse. Typically, for a time-lapse made of images, the duration of each image doesn't need to be more than 1/2 a second long. Anything longer and your video will look choppy and slow.

Change Duration of Multiple Images at once in VideoPad 


Making a Time-lapse with Video

Set up your camera on a tripod with your memory card formatted and your battery fully charged. Start your video recording. Once you start your recording, do not move or disrupt your camcorder or anything in your shot until you are finished. When you get back to the lab, open the latest version of VideoPad Video Editing Software. Drag your video clip into the media bin in VideoPad and then drag it onto the timeline. Right-click on your clip and select the option that says Change Clip Speed.

Change Clip Speed of a Video

That will open up the Speed Change function and allow you to adjust the speed of your clip as a percentage. It is default at 100% which is normal speed, so you can increase it from there. Remember that 200% is making your clip twice as fast, 400% is quadrupling the speed, and so on and so forth. You can adjust it to your liking and try out different speeds until it looks perfect. Click Set when you are finished and your time-lapse video is now ready for export. You can add music or captions to your time-lapse video and then export it to your preferred location or upload it directly to YouTube.
Increasing Clip Speed 4x