Showing posts with label audio. Show all posts

Friday, May 24, 2019

How to Change WMA to MP3 with Switch Audio Converter

How to Change WMA to MP3 with Switch Audio Converter


Windows Media Audio files, or WMA files, are a common audio file format, primarily meant to be opened and played on Windows Media Player and other Microsoft audio players. You can play WMA files with some other third-party software, but many audio players and devices (iPhone) will not support them. That is why it is useful to know how to change WMA to MP3. MP3 files are a much more commonly supported file type and are arguably a superior format anyways. You can easily change WMA files to MP3 format with an audio file conversion program such as Switch WMA File Converter Software.


Download Switch

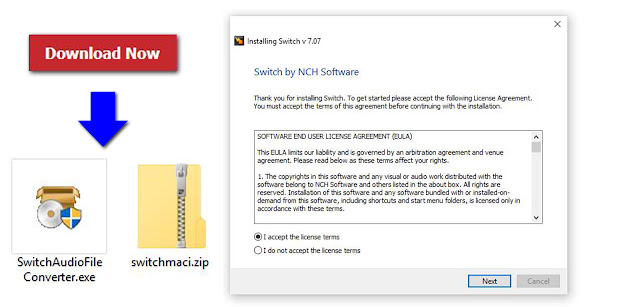
Download Switch Audio File Converter software. Follow the installation instructions and launch the program on your computer.
Download Switch Audio File Conversion Software

Import WMA Files

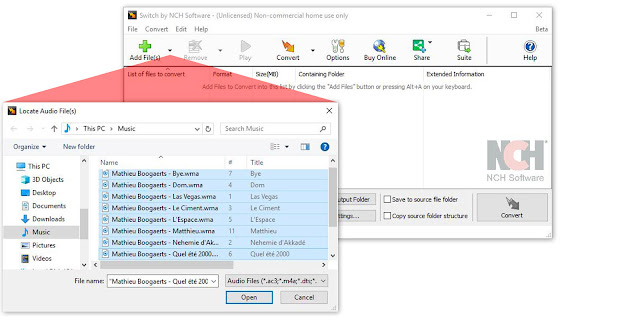
Click on the green Add File(s) button located in the main toolbar to open the file finder window. Find and select the WMA files on your computer and click Open to bring them into Switch to convert them to MP3 format. You can also drag and drop WMA files directly into the program to change.
Import WMA files to Change them to MP3

Options Menu

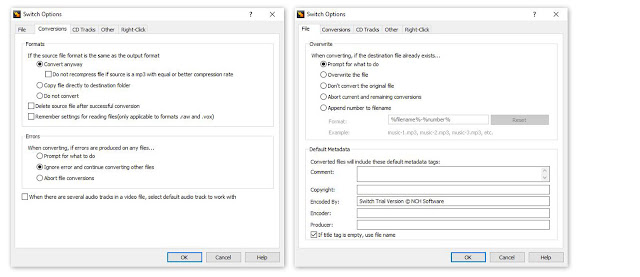
Click on the Options icon in the main toolbar to open the Options window. This is where you can add and make adjustments that will be performed on your WMA files during the conversion. You can add metadata to your converted MP3 audio files as well as change settings to handle duplicate files and formats. Once you are finished adjusting these options, click OK.
Audio File Converter Options

Select Output Destination

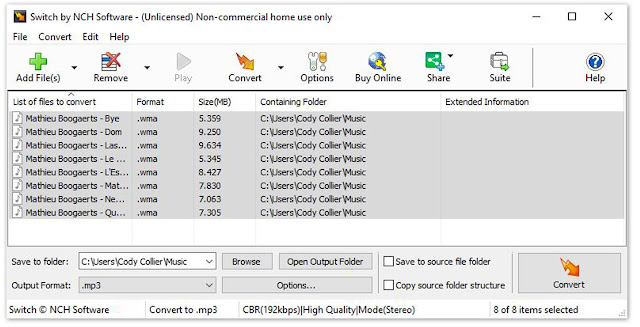
Set the output destination where you would like your converted files to go after you have converted them from WMA to MP3 format. Click on the Save to folder drop-down menu to select a folder from this list, or click on the Browse button to open the file finder window and select a folder on your computer.
Set Output Destination for MP3 Files

Set Output Format to MP3

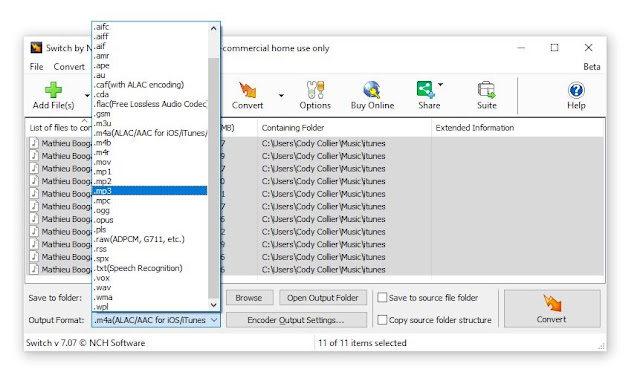
With your output folder set, you can now set the output format to MP3. Click on the drop-down menu on the left side of the program next to the words "Output Format" to view the list of available audio file formats. To change your WMA files to MP3 files, simply select the option from this list that says, "MP3." All conversions performed will now be in the MP3 audio file format.
Set Output Format Type to MP3

Encoder Options

Click on the Encoder Output Settings... button to launch the window for WMA Output Settings. Here you can make adjustments and change audio encoder settings such as metadata, sample rate, bitrate, and amplify/normalizing audio. These settings will be applied during the conversion process while your WMA files are being changed to MP3 files.
WMA Encoder Options


Change WMA to MP3

Once everything is set up, you are ready to change your WMA files to MP3. Simply click on one of the Convert buttons, located in the bottom right-hand corner of the program and in the main toolbar. This will start the conversion process. You can select only one file to convert them one at a time or you can select all of them to perform easy batch MP3 conversions.


Finished

After the WMA to MP3 conversion is complete, you will see a green banner at the bottom of the program that says "Conversion Complete." You can click the button on the banner to open the output folder and view your newly converted MP3 files. You have now successfully learned how to changed WMA to MP3 using Switch Audio File Converter Software.


To read more about Switch and other audio topics, check out these similar posts:

Friday, March 8, 2019

How to Mix Audio, Music and Voice Recordings

How to Mix Audio, Music and Voice Recordings with MixPad


This tutorial will show you how to mix audio, music and voice recordings with MixPad Multitrack Recording and Mixing Software.

Download MixPad to get started: https://www.nch.com.au/mixpad/


Mix Audio, Music and Voice Recordings


How to Mix Audio

  1. Load each track with your audio clips or record audio to a track
  2. Use the track tools to set the volume, settings and any effects for each track
  3. Use play controls to listen to the result
  4. When you are happy with your mix, click the Export Mix button
  5. Select your output file type for your mix and click Export
  6. Save your MixPad project for easy future editing


For more on MixPad, check out these posts:

Friday, November 16, 2018

How to Change CDA to MP3 with Switch CDA Converter

How to Change CDA to MP3 with Switch CDA Converter


A CDA file is an extension for an audio file on a CD. That means that CDA files do not actually contain sound data, but they reference a file that does. You may load CDA files onto your computer only to find that you cannot play them on your audio player. Learning how to change CDA to MP3 is the best way to get your CDA files into a universally recognized format that can be played anywhere. With a simple audio conversion tool, such as Switch Audio File Converter Software, you can quickly change CDA to MP3 and use the files from your CD in many different applications.


Add CDA Files

Open Switch Audio File Converter Software on your computer and click on the Add File(s) button. Click on the drop-down arrow to view a list of import location options. Clicking directly on the green plus sign will launch the file finder window. From here you can locate and select the CDA files that you wish to convert to MP3. Once your files are selected, click the button that says Open to bring them into Switch.


Listen to CDA Files

You can listen to your CDA files in Switch before converting them to MP3. Simply double click on any file in the program to listen or select a file and click on the Play button at the top of the program. This is a useful way to make sure that you have the correct audio file selected if your files do not have names.


Output Format

To change CDA to MP3 using Switch, use the Output Format drop-down menu to select MP3 from the list of output formats. This will make it so that any CDA files that you convert will be converted to MP3. The MP3 audio file format is the most common and widely accepted audio file type and converting your CDA files to MP3 will make it so that you can listen to them practically anywhere.


Encode Metadata

With Switch Audio File Converter Software, you can easily add meta tags and metadata to your MP3 files. Click on the Encoder Output Settings...button to launch the MP3 Output Options window. From here, you can choose from several audio file encoding options that the program has to offer. Click on the Metadata tab and enter any desired metadata content you would like in your MP3 files.


Encode Volume Settings

You can also adjust the audio settings while you convert using the Encoder Output settings button. Click on the tab that says Volume to make audio adjustments to your files as they are being converted such as Normalize, Amplify, and Noise Reduction.

Change CDA to MP3

With your CDA files imported into the program and your encoder settings set, you are now ready to change your CDA files to MP3. Click on the box that says Save to Folder and choose an output destination from the drop-down menu. This is where your converted CDA files will appear as MP3 files once the conversion has been performed. Select the CDA files you wish to change to MP3 and then click on the large Convert button, located in the bottom right-hand corner of the program.


Write Audio Tags

If your CDA files are coming directly from a CD, they may contain track info that can be included in the converted MP3 files. This can be very useful for keeping your music organized and adding your MP3 files to your music library. If you are prompted with this window, you can click Write Tags to have the audio track tag information from your CDA files included in your converted MP3s.


View Converted MP3 Files

When the conversion is complete you will see that all of your CDA files will have a green checkmark next to them in the program, meaning that they were all converted successfully. You can click on one of the two folder buttons that appear after a conversion to view your MP3 files and you can now play them anywhere you would like.


For more on audio conversion, check out these posts:

Friday, June 1, 2018

Best Tool to Edit MP3 Tags and Metadata with Switch Audio Converter

Edit MP3 Metadata with Switch Audio Converter


Best Tool to Edit Metadata and Tags when Converting to MP3

When converting a track to MP3, you can edit the track metadata and tags to include title, artist, track artwork, producer, rating, genre, comments, and more. If you record your own music, you may want to set up metadata and tags for your finished recordings before sharing. Editing your tags and metadata will ensure that your album artwork, artist name, and other tags show up correctly when your track is loaded into a new audio library. You can easily edit the metadata of MP3 and tags for audio files when converting with Switch Audio Converter.


Edit MP3 Tags

To edit the tags of an audio file, begin by loading the file into Switch Audio Converter. To import an audio file, click on the "Add Files" button in the top left-hand corner of the program window.


After you have imported an audio file, you can right-click on the file in Switch and select "Edit Audio Tags" to edit the audio tags.


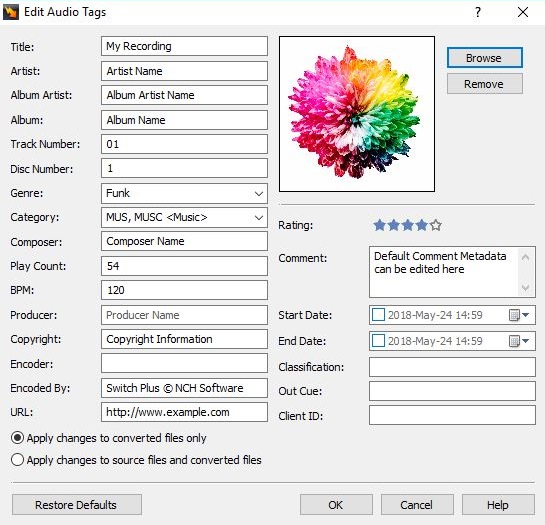
This will open the Tag Editor for the selected audio file. Here, you can edit the audio track title, artist, album, genre, BPM, producer, rating, artwork, and more. For new recordings, many fields will be blank. If the audio file that you are converting currently has audio tags, the existing tags will be displayed in the Tag Editor.


To edit a tag, click on the field that you would like to edit and type in the new tag information that you would like to save for your mp3 file. You can edit the song Rating by clicking on the star value that you would like to assign to the audio file.


Add Artwork to an MP3 File

To add the artwork to an MP3 file, click on the "Browse" button the right of the artwork image in the Tag Editor. Then, select a file from your computer to use as the artwork for your audio file. 

Apply Changes

You can apply changes to converted files only, or you can apply changes to source files and converted files. To apply tag edits to converted files only, select the option that says "Apply changes to converted files only". This option will leave the file tags for the source file in their original state while applying the tag edits to only converted files.


 To apply tag changes to the original source file as well as converted files, select the option that says "Apply changes to source files and converted files".


Convert to MP3 with New Tags

To convert your file to MP3 with the edited tags, click on the "Convert" button in the bottom right-hand corner of the Switch program window.


Friday, March 2, 2018

Bypass Voxal Voice Changer Effects

How To Switch Back to a Normal Voice with Voxal Voice Changer

Bypass Voice Effects with Voxal Voice Changer

With Voxal voice changing software, you can change your voice in real-time to sound like a girl, alien, robot, or stadium announcer. Voxal works with any chat program that uses a microphone.


In some cases, you may want to quickly switch back to your normal voice. With Voxal, you can easily switch back from a voice effect to your normal voice without exiting the program. To do this, simply use the "ByPass" option to momentarily remove all voice effects. 

How To Remove Voice Changer Effects

To switch back to your normal voice while using Voxal you can use the "Bypass" tool. The Bypass option is located in the Tools tab in the top bar menu. 


Selecting the Bypass tool will bypass the current voice, which will remove all effects from your voice. To switch back to a voice effect, simply deselect the Bypass tool. To deselect the Bypass tool, simply click on the Bypass button a second time. 

If the Bypass tool has a dark background, the Bypass tool is currently selected. 

Bypass tool selected:

Bypass tool not Selected:


Want to learn more about how to use Voxal? Check out our Voxal Video Tutorial Series.

Monday, January 30, 2017

Navigate Speech in WavePad

Navigate Speech in WavePad


Using the Navigate Speech Tool in WavePad

The Navigate Speech tool in WavePad Audio Editor will allow you to locate sections of audio quickly and easily. Using speech recognition, WavePad can generate a script of words spoken in an audio file and can navigate directly to the moment when a specific word was spoken in an audio file. This can be very useful in many different situations. For example, you can use the Navigate Speech tool to locate and navigate to a specific section in a large audio recording, such as a company meeting, college lecture recording, or audio file for transcription.

Using the Navigate Speech Tool

To begin, load your audio file into WavePad. You can do this by selecting "Open File" from the File menu, or by using the key command "Ctrl+O"


Once your audio file has been opened in WavePad, click on the Tools menu in the top bar menu, and Select "Navigate Speech" from the list of tools.


When you click on the Navigate Speech tool, WavePad will begin using speech recognition to generate an output of the words spoken in your audio file. Once your audio file script has been generated, you can use the file to navigate easily throughout the recording.

Search for a Keyword

To search for a specific word in your audio file, simply type the keyword into the box at the bottom of the Navigate Speech window, and click on the "Search" button to locate all instances of a specific word in the text file.


Locate a Specific Word in the Audio File

You can use the generated text to navigate to any point in your audio file. To navigate instantly to the point in your audio file when a specific word is spoken, simply double click on the word that you would like to navigate to.

Highlight a Region in the Audio File

You can also use the Navigate Speech tool to highlight a region of your audio file. To do this, highlight words or paragraphs in the generated text and the region will become selected in your audio file waveform. This can be useful when trimming audio files, or for breaking out specific sections in a larger audio file.


You may also like:


Friday, July 8, 2016

How to Change WAV to MP3 files with Switch WAV Converter

How to Change WAV to MP3 Files with Switch WAV Converter


Audio files exist in a wide variety of formats, each with its own benefits and potential drawbacks. When editing or playing audio tracks, you may need to convert from one format to another to suit your distribution needs.

What are WAV Audio Files?

WAVE files are uncompressed, lossless CD-quality music files. Though they are popularly known by their file extension, .wav, WAVE stands for Waveform Audio File Format. WAV files can contain compressed audio, however, they are more often used to take advantage of uncompressed audio. 

 When Should You Use WAV Audio Files?

Due to their uncompressed nature, .wav files are the best choice for radio, TV, DVDs, and other projects that require uncompromised high-quality audio tracks. As a result, it is uncommon to share WAV files on the internet because uncompressed audio files are often very large files and result in slow file transfer. WAV files are favorable for keeping archived versions of original recordings as they will retain original audio quality.

What are MP3 Audio Files?

MP3 is a compressed, lossy format that is widely used for audio tracks on the internet in web pages, web videos, audio sharing, and more. MP3 audio files are extremely popular because they take up very little disk space due to being compressed to roughly one-tenth of their original size. 

When Should You Use MP3 Audio Files? 

MP3 audio files are able to load quickly while retaining high audio quality, which makes them favorable for use on web pages, in embedded videos, in audio sharing, and in multimedia presentations.  However, this popularity is a double-edged sword as compressed MP3 audio tracks retain less information and as a result, can be more difficult to edit.

How To Change WAV to MP3 Files

After editing an original audio recording in WAV format, you may want to compress your file for easy sharing on the internet. Switch Audio Converter is a simple audio converter that can accomplish WAV to MP3 conversion quickly and easily. Switch also has the option to batch convert audio files, which is efficient and effective for audiophiles who need to change hundreds of audio tracks in a short period of time. 

Step 1: Load WAV Files

In order to change WAV to MP3 with Switch, begin by loading the WAV files that you would like to convert. To do this, open Switch Audio Converter and click on the "Add File(s)" button.


Step 2: Select Audio Output Format 

Once you have added the WAV audio files that you would like to convert, select the audio output format that you would like from the "Output Format" selector at the bottom left of the Switch window. 


You can also select a specific folder where the converted file will be saved, or check the box to output to the same folder as the source file. 

Step 3: Change Audio Files

Now that your file has been added to Switch and you have selected MP3 as your desired output format, simply click the "Convert" button to change your files!


Once your file has been converted, a prompt will appear allowing you to be taken directly to the output folder you selected, or to open the file directly. 


Congratulations! Your new MP3 file is now ready to be shared with the world.


Download Switch Audio Converter to Get Started!


More Audio Posts from NCH Software: 


Friday, February 26, 2016

WavePad Audio Editor Given an 8/10 by MicroMart Magazine UK

WavePad Review by MicroMart UK


MicroMart, one of the largest software/computing print magazines in the UK just reviewed NCH's audio editor, WavePad, for it's audio enthusiast's special this month and gave it a 8/10, "Definitely Recommended."

Some highlights:

"WavePad has an interface that makes all these tools easy to use. It's modern, and it places nearly all the functions you need on a ribbon toolbar."

"There are numerous VST plug-ins available for audio editors, and they add a wide range of extra features and functions. It gives WavePad almost unlimited capabilities."

"It's possible to remove the voice from a music track with a couple of mouse clicks, leaving just the music. You could make your own karaoke tracks or mix a different voice with the music."

"Feature-rich and great to use"

Read the full review here:

WavePad 6.38 Review by MicroMart UK

Click on the link to download or purchase:
WavePad by NCH Software

Tuesday, February 23, 2016

1 Hour of Pink Noise - MP3 Free Download

Free Download 1 Hour of Pink Noise in MP3 as a Concentration, Memory, or Sleep Aid 


You’ve likely heard of “white noise,” which is produced when the sounds of different frequencies are combined. Pink noise, on the other hand, is a type of sound in which every octave carries the same power.

A slightly more technical definition from Wikipedia:
Pink noise or 1f noise is a signal or process with a frequency spectrum such that the power spectral density (energy or power per Hz) is inversely proportional to the frequency of the signal. In pink noise, each octave (halving/doubling in frequency) carries an equal amount of noise power.
According to studies, pink noise, which includes sounds at lower, more consistent frequencies than white noise, seems to help people sleep better. Additionally, it's associated with memory improvement, which may be beneficial especially for those suffering from Alzheimer's disease or other conditions that affect the brain.

Below is a free download of an hour of pink noise in mp3 format, made in Tone Generator by NCH Software.

Click on the link to download:
1 Hour Pink Noise (Google Drive, MP3)


To create sound frequencies of your own, download Tone Generator today. Tone Generator allows you to generate sine, square, triangular, saw tooth, and impulse sound waves. It also comes with presets for white, pink, blue, brown, violet, and grey noise signals.

Click on the link to download or purchase:

Tone Generator by NCH Software


Thursday, October 10, 2013

Music Mixing on Android

If you weren't already excited enough about having WavePad Audio Editor available for your Android tablet, being able to install WavePad's long time partner in audio crime, MixPad Music Mixer, on your Android too may just put you over the edge.


MixPad is a powerful multi-track mixer. Move from perfecting individual audio files with WavePad to mixing, remixing or mashing up multiple audio files into a full-fledged soundtrack or any other audio production project no matter the size. The app may be small, but the possibilities are huge. Download the MixPad Audio Mixing App from Google Play to have ready for the next time you want to put together some audio, whether you are hanging out in a waiting room, or recording on location.

Monday, October 7, 2013

Do More with Audio - Blog Carnival October 7, 2013

Here are this edition's entries to Do More with Audio:

Erik Matlock presents Another fine fiasco | The Art of the Soundcheck posted at The Art of the Soundcheck, saying, "War stories from the pro audio world. This time, we are running a show where the rig has been rented from several different vendors. What could go wrong?"

Tim presents Acoustic Guitar Recording posted at Deacon Tim’s Audio Blog, saying, "Recording a great-sounding acoustic guitar track used to be a real challenge, but with today’s highly affordable hardware and software, you can have the power of a pro studio right in your computer on your desk.

Jon Tidey presents Tips For Recording Great Electric Guitar Without Amps posted at Pro Sound Web, saying, "With direct guitar recording into virtual amps you can rock out through a great guitar chain without the neighbors calling the cops. This article outlines a few tips and best practices for getting great guitar tones without amps or mics."

Marie Tueje presents SFX Independence posted at Designing Sound, saying, "A list of new SFX libraries that came out in September and are available to purchase/sample now."

Casie lane presents Electronic Music Labels Using Pinterest posted at DJ Casie Lane.

Assap presents Isolated EVPs mystery posted at The ASSAP Blog, saying, "Why do the most convincing EVP recordings all seem to be single words or short phrases with little or no accompanying noise?"

Lilach presents How, What, Where and Why Guide to Podcasting posted at Socialable, saying, "Have you ever considered starting your own podcast? Anyone with a computer and Internet access can start their own podcast, so get your microphones ready and check out these tools to help you get started." John Lee Dumas presents 3 Unique Ways to Get Started With Business Podcasting posted at Social Media Examiner, saying, "There are many ways to approach business podcasting without interrupting your schedule, budget and skills."


You might also be interested in: That concludes this edition of Do More with Audio. If you have an audio story to share or advice, tips or tricks to share, we hope you will submit your audio posts and articles to the next edition.

Tuesday, August 6, 2013

Do More with Audio - Blog Carnival August 5, 2013

Here are this edition's entries to Do More with Audio:

Erik Matlock presents Stuff you should know about your first recording session posted at The Art of the Soundcheck, saying, "Ongoing blog written for the new guys. Recently picked up and promoted by prosoundweb.com"

Stephanie Ciccarelli presents Audio Editing: From Razor Blades To Keystrokes posted at Audio Daily, saying, "Having come from the dark ages of radio production, digital audio production has been the most significant advance to me. The problem has been that audio recording software is mostly designed for music recording, so what's a voiceover artist to do?"

Susan Kaye Quinn presents How to Make a Book Trailer posted at Susan Kaye Quinn: Speculative Fiction Writer, saying, "The key to a good trailer isn't cameras and dollies, but story and execution. It has to WOW on an emotional level, and the only thing that turns those gears is a story well told. This should sound familiar; these are the things that make a good blurb, a good cover, a good movie, and a good book. And what better way to promote the audiobook than a sample of the narration?"

Jessica Clark presents 10 Phenomenal Musicians Named Ken posted at Kenney Myers, saying, "Musicians who share the name “Ken” are a dime a dozen. However, there are a select few who have made a significant impact on the music industry, and it is they who deserve special recognition."

Corey Walo presents What’s All This Noise About Dither? posted at ProSoundWeb, saying, "Unless you've put some serious effort into learning to master your audio, the concept of dither can be fairly bewildering. We've all been told to “do” it, but what are we actually doing?"

You might also be interested in: That concludes this edition of Do More with Audio. If you have an audio story to share or advice, tips or tricks to share, we hope you will submit your audio posts and articles to the next edition.

Friday, July 26, 2013

Why Do High Sample Rates Sound Better?

Guest post by Rupert Pfaff

Human hearing is generally defined as extending from 20Hz to 20kHz, and the Nyquist criteria state that a sampling rate of at least double the highest audio frequency must be used in order to accurately represent the signal. An unwanted side-effect of analog to digital conversion is 'aliasing', where musically unrelated signal noise enters the audio band, so an 'anti-aliasing' filter is used to prevent this, but because it is not possible to implement an infinitely steep filter, a slightly higher sample rate is used than is theoretically necessary. This is how the CD standard of 44.1kHz came about (a little more than double 20kHz), and DAT took this up to 48kHz to allow varispeed recording.

Set audio sample rate in WavePad audio editing software So if we can't hear above 20kHz, why record at very high sample rates such as 96kHz or even 192kHz? Some have suggested that although we don't actually hear 'supersonic' frequencies, we somehow perceive them by another means, but experiments that artificially add and remove these frequencies have shown this not to be the case. But 'golden eared' tests which have made A/B comparisons of the same equipment operating at standard and high sample rates have revealed that 96kHz & 192kHz recordings do sound subjectively better - so what's going on?

The answer lies primarily with the anti-aliasing filters - even the best-designed filters produce a certain amount of 'ripple' that extends downwards from the cut-off point and gradually tails off, and this is perceived as a 'smearing' of high frequencies and the stereo image. But by moving the cutoff point way up (say to 96kHz), the ripple has all but disappeared by the time it gets down to audio frequencies, and hence, substantially improved sound quality. Importantly though, it follows that this improvement is maintained even after the sample rate has been converted down to normal rates, as no new A/D conversion is required, and therefore, no anti-aliasing filter.

Experienced Recording Studio Engineer Guidelines
In the early days of high sample rate recording, there was a preference for using multiples of the 'CD' frequency (44.1kHz), i.e. 88.2kHz or 176.4Hz - this was because sample rate conversion was a very difficult thing to do at the time, and better quality could be achieved when converting down to 44.1kHz by using an integer multiple. However this is no longer the case, and our usual preferred rate for acoustic recording is 96kHz for a variety of reasons:
  • 96kHz is the native frequency of many DVD audio releases
  • Although 192kHz does sound a little better than 96kHz, the improvement is marginal
  • Some plug-ins do not handle 192kHz audio
  • Processing power is reduced to roughly a quarter of that available at 48kHz
That said, if you are working very largely with virtual instruments that have mostly only been sampled at 44.1kHz, and/or you like to use a lot of tracks and processing, it may be more sensible to stick to 44.1kHz. Or if you're making a small classical or jazz recording, you may only need a few tracks and little processing, and want to eke out every last bit of quality you can, then go for 192kHz - let your music make the decision for you.

Rupert Pfaff has worked in the music industry for over 20 years having operated a well known music shop in London before becoming a sound engineer and technical authority for mixing and mastering. Now involved with the day to day running and managing the online bookings for RecordingStudioLondon.