Monday, December 31, 2018
New Release: RecordPad Sound Recorder for Windows
Posted by
NCH Software
Download RecordPad 7.22 now at www.nch.com.au/recordpad/index.html. Also available for Mac OS X, iOS and Android at the same page
Friday, December 28, 2018
Make an End of Year Slideshow with PhotoStage
Posted by
Cody Collier
Make an End of Year Slideshow with PhotoStage

What better way to wrap up the year than with an end-of-year photo slideshow filled with all of your favorite memories? You can easily put together a slideshow with all of the great pictures you took this past year and add your favorite songs to go along with it. With a simple and easy-to-use slideshow-making software such as PhotoStage Slideshow Software, you can quickly create your own year-end slideshow to save and share for years to come.
Slideshow Wizard
The easiest way to make an end-of-year slideshow in PhotoStage is by using the Slideshow Wizard. Open PhotoStage Slideshow Software on your PC or Mac and click on the Wizard icon, located in the main toolbar. This will launch the Quick Create Slideshow window where you can get assemble your pictures, audio, theme, and transitions and get them all ready for your slideshow in one place.
Locate Your Images
Click on the Browse button to locate the images you would like to use in your slideshow. This will open the file finder window where you can select the folder that contains the images you would like to use. Select the folder that contains the images you want in your slideshow and in the next step, we will select the actual images.
Select Your Photos
Next, you can choose to either use all of the images in your selected folder or pick the images you want in your slideshow one at a time. Choose the option from the dropdown that says Use Selected to pick individual photos out from your folder. Click the button that says Select to open the folder and choose which photos you want to use in your slideshow. You can click the button that says Select All and then hold down the Ctrl key on your keyboard while clicking on the photos you don't want. You can also click the option that says Select None and hold down Ctrl on your keyboard and select the images you do want. When you are finished selecting images, click OK.
Add Audio
Now it's time to add some audio to your slideshow. Maybe it's that song you had playing on repeat all year long or maybe it's a song that gets you pumped for the year to come. Either way, a good song is a great way to make a photo slideshow come to life. Click on the drop-down menu next to the word Sound and choose from where you would like to import your audio file. If the audio file is on your computer, you can select this option, locate your sound file and click Open. You can also find a number of great sound files in the NCH Sound Library.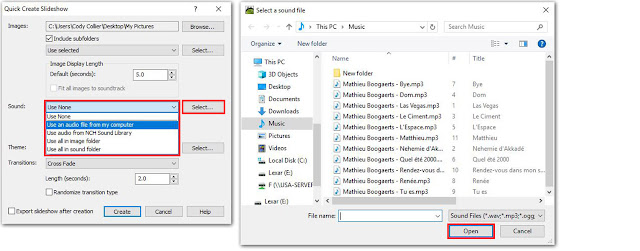
Select a Theme
PhotoStage allows you to select a theme for your slideshow that will act as a background behind your images. This is useful when your photos are not all the same size or when you have a mix of landscape and portrait photos as we all often do. Choose a theme option from the drop-down menu to launch the Background Theme window. You can also add Intro and Outro Title Text to your slideshow by clicking in the title text boxes and typing in the Text Overlay window that appears.
Add Transitions
Finally, select the type of transitions you would like to have between the photos in your slideshow from the transitions drop-down menu. You can set their duration in the box beneath the menu. If you would like to use a variety of transitions, check the box that says Randomize Transition Type, and different transitions will appear between your photos in random order.
Create Slideshow
Once you have made all of your selections using the PhotoStage Wizard, click Create to open your slideshow into the main program. You can rearrange the order of your images by simply clicking on the image in the timeline at the bottom of the program and dragging it to any position you would like. You can also click on the transition box between any two clips to change and adjust the transitions. Clicking on the number in the box will allow you to adjust the duration of the transition while clicking on the image icon in the box will display the other transitions available under the transition tab.
Add Text
You can add text to any image/slide in your slideshow by simply clicking on that image in the timeline and then clicking on the Text tab on the top left-hand side of the program. Select the type of text you would like to use, such as Text Overlay, and then click and type in the text box that appears as a new layer beneath the Applied Effects section.
Add Effects
You can add effects to any of the photos in your slideshow by selecting a photo from your timeline and then clicking on the Effects tab to select an effect to apply to that photo. Effects will appear as layers underneath the applied effects section and can be layered on top of each other to create unique and exciting effects of your own.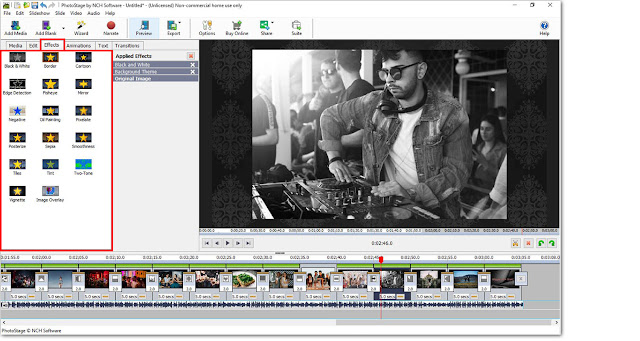
Export Slideshow
When you are finished making the final adjustments to your slideshow and you are ready to export, simply click on the Export icon located in the main menu at the top of the program. You can select from a variety of export and sharing options such as burning to a DVD, saving to your computer and even uploading directly to YouTube.
Save to Your Computer
To save your slideshow movie to your computer, simply choose the Video File option and use the Video Output Setup window to choose an output file type, destination, and resolution. Name your slideshow whatever you would like then click Create to start the export process. Your year-end slideshow movie will appear in your chosen output destination and you can now share your year with whoever you would like, however you would like. Now you can start off your New Year with the resolution to make more slideshows!
Happy New Year from all of us here at NCH Software!
New Release: DreamPlan Home Design Software for Windows
Posted by
NCH Software
Download DreamPlan 3.20 now at www.nchsoftware.com/design/index.html. Also available for Mac OS X and Android at the same page
Wednesday, December 26, 2018
New Release: Switch Sound File Converter for Mac OS X
Posted by
NCH Software
Download Switch 6.50 now at www.nch.com.au/switch/index.html. Also available for Windows and Android at the same page
Friday, December 21, 2018
Make the Perfect Holiday Greeting Cards with NCH Software
Posted by
Cody Collier
Make the Perfect Holiday Greeting Cards with NCH Software

This holiday season is the perfect time to get into the creative spirit and try making your own holiday greeting cards. Forget going to the store and choosing from the same old greeting card templates. With some simple and easy-to-use photo editing and graphic design software, you can make your own fun and meaningful holiday cards that will truly capture your holiday day cheer.
Edit Your Family Photo
The first step to making a great holiday card is to select a great family photo, and yes, the family does include pets. Open a copy of PhotoPad Photo Editing Software to edit and enhance your picture and make sure it is refrigerator-ready. Under the Edit tab, you can select from several important photo editing options, such as Rotating, Cropping, and Resizing. Try using the Straighten feature to make sure your photo is perfectly aligned.Enhance Your Family Photo
Next, you can perform some simple photo enhancements and touchups to bring out the best in your family photo. Under the Colors tab, you can adjust important lighting aspects such as the Brightness and Contrast in your photo. You can also adjust the Color Balance, Color Curves, and Color Levels of your image to achieve that professional studio quality.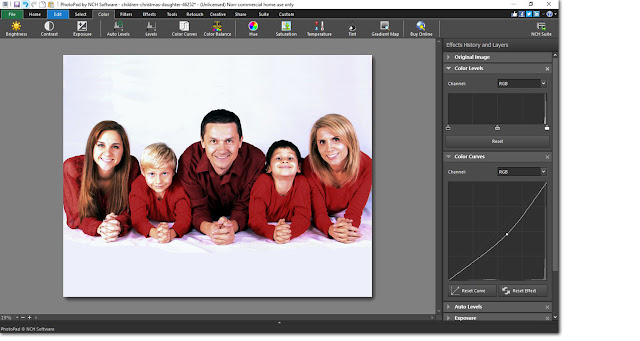
Save Your Photo
Once you are finished making edits to your photo in PhotoPad, you can save the image onto your computer so that you can use it in your holiday greeting card. Click on the File tab and select Save As...Name your image file and select your image file type. After you have selected the destination where you would like to save your photo, simply click Save.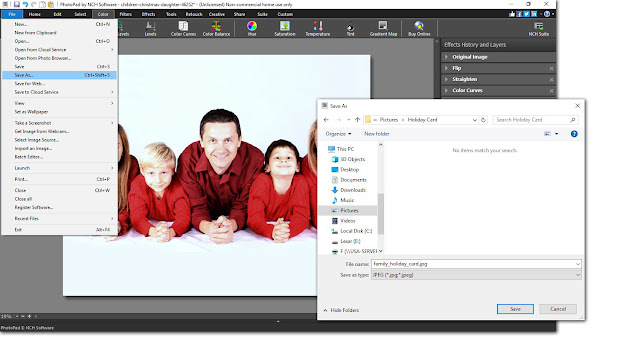
Add Text to Your Photo with DrawPad
No holiday card would be complete without a message of good cheer. DrawPad Graphic Editing Software is the perfect program for adding and editing text on an image. Open DrawPad on your computer and click on the icon that says Open to bring your image into the program. Click on the Text icon that is located underneath the Home tab in the main menu to add text to your image. Click anywhere on your image to start typing. Highlight your text and use the Color Picker to change the color of your text and then use the Text Options menu to change the font size and style.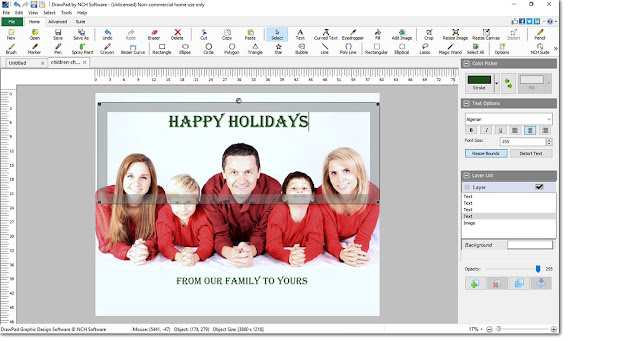
Add Holiday Clipart
Now that we have our text on our image, we can visit the NCH Clipart Library to find some festive clipart to add to our card. You can get to the Clipart Library by clicking on the Advanced tab and then selecting the Clipart icon. It can also be found in the drop-down menu, underneath the File tab. Click on the folders in the library to view their contents and select a file to preview the image in the clipart preview window. When you have found an image you like, simply click Download to add it to your card. You can then move the clipart around your image freely and resize and rotate it as you wish.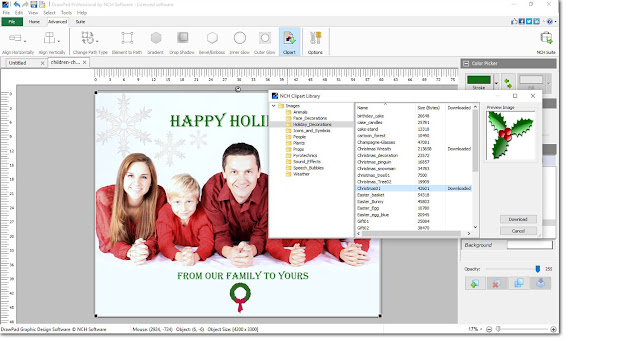
Save and Share
Now have a professional-looking photograph that you have made into your own personal and unique greeting card. The best part is, you didn't even have to get out into the holiday traffic to do it. When you are ready to save your final image, click on the File tab and choose from one of the options listed. You can select the Print option to instantly print off your masterpiece at home. If you want to save on postage this season, you can select the option to Send by Email, and digitally deliver your card straight to the inbox of your loved ones. Lastly, you can select Save As...to save your holiday card to your computer and share it however else you would like.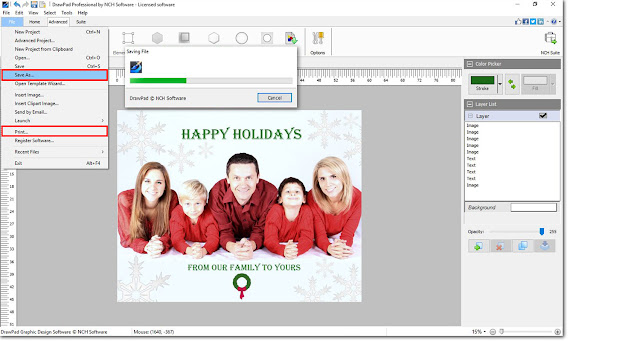
Happy Holidays from all of us here at NCH Software!
New Release: Express Zip File Compression for Windows
Posted by
NCH Software
Download Express Zip 5.23 now at www.nchsoftware.com/zip/index.html. Also available for Mac OS X at the same page
Monday, December 17, 2018
Just Released: RecordPad Sound Recorder for iOS
Posted by
NCH Software
Download RecordPad 7.20 now at www.nch.com.au/recordpad/index.html. Also available for Mac OS X, Android and Windows at the same page
Friday, December 14, 2018
Best Audio Converter Software of 2019
Posted by
Cody Collier
Best Audio Converter Software of 2019

We are very happy to announce that Switch Audio Converter has recently been recognized by TopTenReviews.com as the "Best Overall Audio Converter of 2019." We are constantly aiming to improve our software based on the feedback and demand of our customers. After each new release, the goal remains to deliver a product that is efficient and effective for our users. With a product like Switch, that means making sure that a wide variety of export/import formats are supported and that conversion speeds are lightning fast.
Click here to read the whole review: Switch Audio Converter: Best Overall Audio Converter of 2019
"We believe Switch Plus Edition is the best audio converter for most people because it has all the major import and export formats, and it can convert faster than any software we tested. If you need to convert a large number of files quickly, this is the best option." - TopTenReviews
"Switch is the fastest audio converter software we tested. To test the speed of each converter software, we timed how long it took to convert a 625MB WAV file to a 26MB MP3 file." - TopTenReviews
 Switch is one of the most stable, easy-to-use, and comprehensive multi-format audio file converters available. The program supports conversion between over 40 different audio file formats as well as allows you to perform batch conversions and edit audio file metadata. If you have not had a chance to try out switch, download your free trial today and see what you are missing. As we are constantly making improvements to our programs, we encourage users new and old to send us questions and leave us feedback so that we can keep providing our customers with the best of the best.
For more on Switch, check out these pages:
Wednesday, December 12, 2018
Just Released: Doxillion Document Converter for Windows
Posted by
NCH Software
Download Doxillion 3.12 now at www.nchsoftware.com/documentconvert/index.html. Also available for Mac OS X at the same page
Tuesday, December 11, 2018
Just Released: MixPad Multitrack Recording Software for Windows
Posted by
NCH Software
Download MixPad 5.28 now at www.nch.com.au/mixpad/index.html. Also available for Mac OS X, Android and iOS at the same page
Monday, December 10, 2018
New Release: VideoPad Video Editor for Windows
Posted by
NCH Software
Download VideoPad 6.31 now at www.nchsoftware.com/videopad/index.html. Also available for Mac OS X, Android and iOS at the same page
Saturday, December 8, 2018
New Release: MeshMagic 3D Modeling Software for Windows
Posted by
NCH Software
Download MeshMagic 2.00 now at www.nchsoftware.com/meshmagic3d/index.html
Friday, December 7, 2018
How to Edit Videos on Mac
Posted by
Cody Collier
How to Edit Videos on Mac
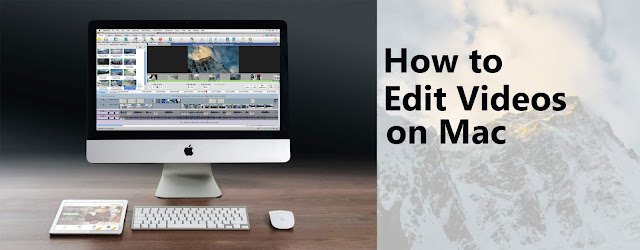
If you find yourself wondering what to do with those videos you took on your family ski trip, then learning how to edit videos on Mac may just change your entire home movie game. Editing your videos on Mac is a great way to get all of that footage organized and put together something that you and the people around you will actually enjoy watching. With a simple video editing software for Mac, such as VideoPad Video Editor, you can easily learn how to edit videos on Mac like a pro.
Import Videos on Mac
To begin editing videos on Mac, start by importing your video files into VideoPad. Open the program on your Mac and then click on the icon that says Add Files. This will open the file finder window where you can locate the video clips on your Mac that you would like to edit. Once you have selected the files you wish to use in your video, click Open to bring them into the program.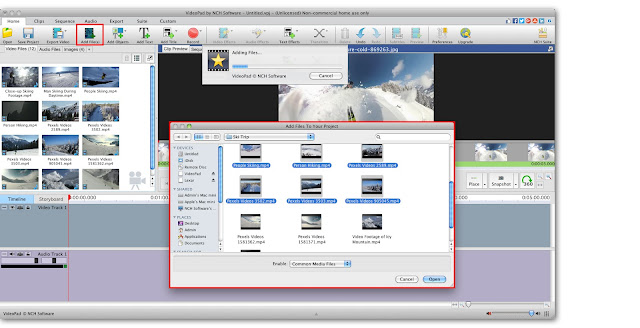
Trim Video Clips
When editing videos on Mac, one of the first things you might want to do is trim your video clips down to the good stuff. From the media bin on the left-hand side of the program, click on a clip that you want to trim to open it in the clip preview window. Drag the red and blue brackets along the timeline in this window to set the beginning and endpoints of your clip. You can also let your video play, and click on the Start and End buttons where you want the beginning and end of the clip to be. To split your video into two separate clips, simply click on any point in the timeline and then click on the scissors icon. This will create two new clips in the media bin.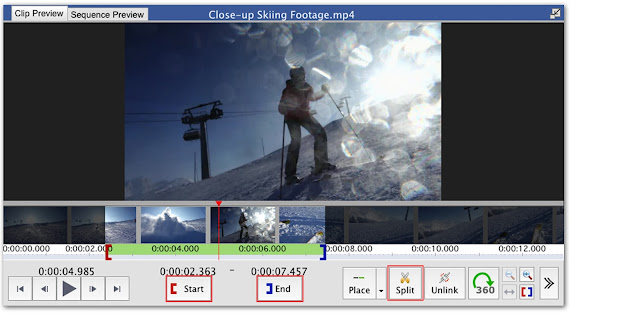
Add Video Effects
VideoPad Video Editor for Mac is full of great effects that you can add to your videos. Touch up and enhance your videos by making color and contrast adjustments. You can also choose from a variety of special effects to really bring your videos to life. To add a video effect, select a clip and then click on the Add Effects tab in the top menu. This will launch the Effects Window, where you can choose your first video effect. After selecting an effect, the Effects Layers Panel will open up and you can adjust your effects and arrange their order. Effects can be layered on top of each other to create your own new and unique video effect.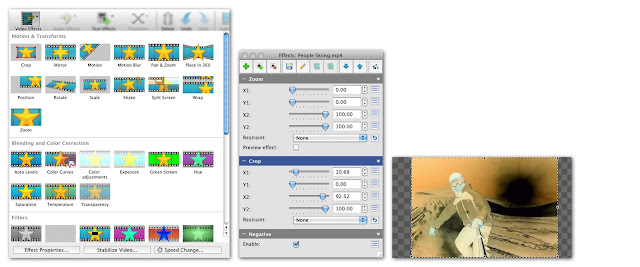
Video Editing Timeline
Once your video clips are trimmed and you have added your desired effects, you can then start putting them together to make your movie. Drag and drop your clips from the media bin directly into the VideoPad timeline in any order you would like. You can rearrange the order of your video clips in the timeline later or as you go. When a clip is in the timeline, it will have a green checkmark on it in the media bin.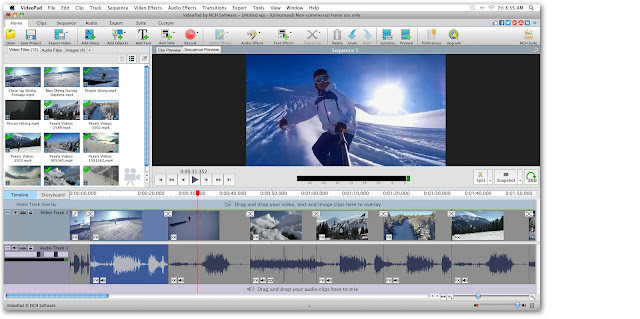
Add Video Transitions
VideoPad Video Editor is loaded with great video transitions to use when you are learning how to edit videos on Mac. If you have several video clips that you would like to edit together, it is a good idea to use transitions to make the change between them smooth and seamless. Click on the X icon between any two video clips in your timeline to open the Transitions Window and select a transition. You can adjust the duration of your transition in the bottom right-hand corner of the transitions menu, or by double-clicking on the transition bar that appears once it has been added.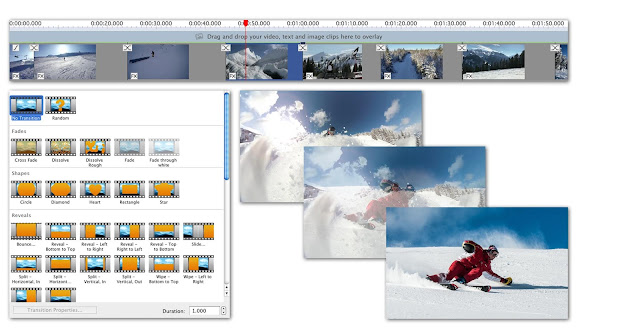
Add Audio to Video
Adding music or narration to videos on Mac makes for a professional-looking final product and helps your video to be more captivating and interesting to your audience. You can add audio files by clicking on the Add File(s) button in the main menu. Select the audio file or files you wish to add to your video and import them into the program. Once imported, your audio clips will appear in the media bin under the Audio Files tab. Click on an audio file to view it in the preview window and trim and adjust it as you like. Drag the audio clip from the media bin into the timeline and place it wherever you want. Click on the FX or Speaker icons that are located on the audio clip to add audio effects and adjust the volume of your audio clip.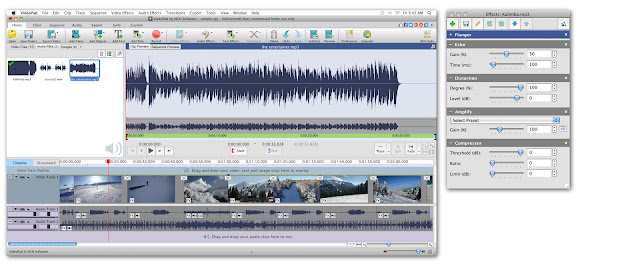
Add Text to Video
Adding text to a video on Mac is a great way to provide your viewer with additional info that isn't otherwise available to them. Click on the Add Text button in the top menu to add text to your video. Type your text into the text box that appears and make any font and style adjustments you wish. When you exit out of the text window, you will see your new text as a clip on your timeline. You can move your text clip, add transitions and effects to it, and increase or decrease the duration of the text clip in your video. If you need to edit your text, double-click on the text clip in your timeline or click in the text box underneath the preview window.
Export Video on Mac
We have now successfully learned how to edit videos on Mac with VideoPad Video Editor. We demonstrated how to trim video clips and apply video effects. We learned how to combine video clips together in the timeline and add transitions between them. We also learned how to add audio and text to our videos and how to navigate the VideoPad interface while doing so. You are now ready to export your final video product to your Mac. To export your video, click on the button that says Export Video in the top menu. You can choose from a variety of exporting options such as saving as a video file, burning to a disk, or uploading your video straight to YouTube.
Just Released: FlexiStation Employee Client for Windows
Posted by
NCH Software
Download FlexiStation 3.00 now at www.nchsoftware.com/flexi/index.html. Also available for Mac OS X at the same page
Wednesday, December 5, 2018
Just Released: MixPad MultiTrack Recorder for iOS
Posted by
NCH Software
Download MixPad 5.27 now at www.nch.com.au/mixpad/index.html. Also available for Mac OS X, Android and Windows at the same page
Tuesday, December 4, 2018
New Release: Fling File Transfer for Windows
Posted by
NCH Software
Download Fling 3.00 now at www.nchsoftware.com/fling/index.html
Monday, December 3, 2018
Just Released: Pocket WavePad for iOS
Posted by
NCH Software
Download WavePad 8.41 now at www.nch.com.au/wavepad/index.html. Also available for Android, Windows and Mac OS X at the same page


