Showing posts with label Switch. Show all posts

Friday, May 24, 2019

How to Change WMA to MP3 with Switch Audio Converter

How to Change WMA to MP3 with Switch Audio Converter


Windows Media Audio files, or WMA files, are a common audio file format, primarily meant to be opened and played on Windows Media Player and other Microsoft audio players. You can play WMA files with some other third-party software, but many audio players and devices (iPhone) will not support them. That is why it is useful to know how to change WMA to MP3. MP3 files are a much more commonly supported file type and are arguably a superior format anyways. You can easily change WMA files to MP3 format with an audio file conversion program such as Switch WMA File Converter Software.


Download Switch

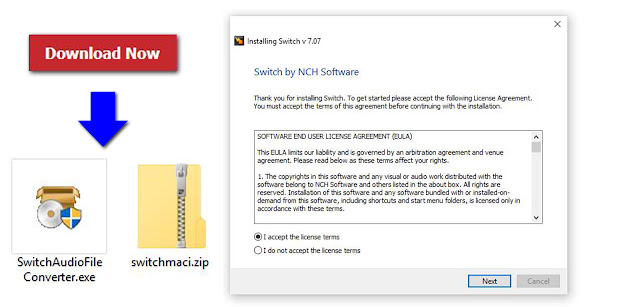
Download Switch Audio File Converter software. Follow the installation instructions and launch the program on your computer.
Download Switch Audio File Conversion Software

Import WMA Files

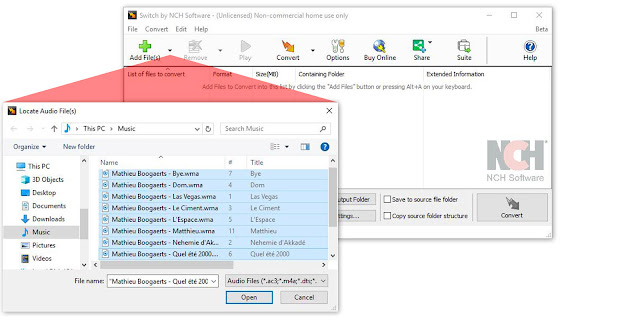
Click on the green Add File(s) button located in the main toolbar to open the file finder window. Find and select the WMA files on your computer and click Open to bring them into Switch to convert them to MP3 format. You can also drag and drop WMA files directly into the program to change.
Import WMA files to Change them to MP3

Options Menu

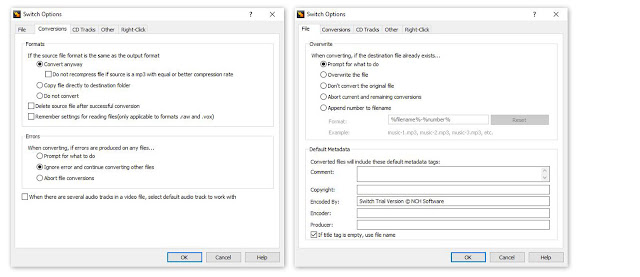
Click on the Options icon in the main toolbar to open the Options window. This is where you can add and make adjustments that will be performed on your WMA files during the conversion. You can add metadata to your converted MP3 audio files as well as change settings to handle duplicate files and formats. Once you are finished adjusting these options, click OK.
Audio File Converter Options

Select Output Destination

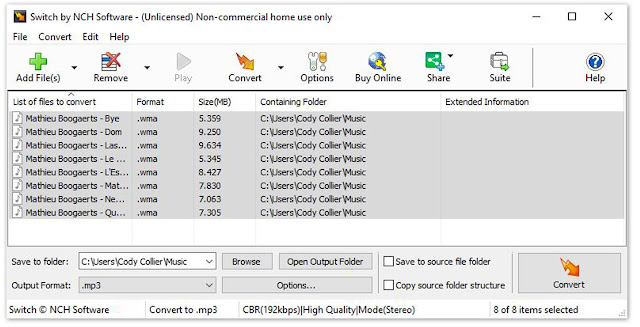
Set the output destination where you would like your converted files to go after you have converted them from WMA to MP3 format. Click on the Save to folder drop-down menu to select a folder from this list, or click on the Browse button to open the file finder window and select a folder on your computer.
Set Output Destination for MP3 Files

Set Output Format to MP3

With your output folder set, you can now set the output format to MP3. Click on the drop-down menu on the left side of the program next to the words "Output Format" to view the list of available audio file formats. To change your WMA files to MP3 files, simply select the option from this list that says, "MP3." All conversions performed will now be in the MP3 audio file format.
Set Output Format Type to MP3

Encoder Options

Click on the Encoder Output Settings... button to launch the window for WMA Output Settings. Here you can make adjustments and change audio encoder settings such as metadata, sample rate, bitrate, and amplify/normalizing audio. These settings will be applied during the conversion process while your WMA files are being changed to MP3 files.
WMA Encoder Options


Change WMA to MP3

Once everything is set up, you are ready to change your WMA files to MP3. Simply click on one of the Convert buttons, located in the bottom right-hand corner of the program and in the main toolbar. This will start the conversion process. You can select only one file to convert them one at a time or you can select all of them to perform easy batch MP3 conversions.


Finished

After the WMA to MP3 conversion is complete, you will see a green banner at the bottom of the program that says "Conversion Complete." You can click the button on the banner to open the output folder and view your newly converted MP3 files. You have now successfully learned how to changed WMA to MP3 using Switch Audio File Converter Software.


To read more about Switch and other audio topics, check out these similar posts:

Friday, February 15, 2019

How to Change M4A to MP3 Audio Files with Switch

How to Change M4A to MP3

How to Convert M4A to MP3

M4A files (MPEG-4 Audio files) are a common audio file type used by Apple, similar to the MP4. All of the songs on the Itunes Store are in the M4A format because of their compression size and high quality. Not all audio players and browsers will work with M4A files, though. That is why it is important to know how to change M4A to MP3 to be able to store your files in a more versatile and widely recognized format. With a simple audio file conversion software such as Switch, you can easily change M4A to MP3 without any problems.


Download Switch

You can download Switch Audio File Converter Software by clicking on one of the red download buttons on this page. You can also learn more about the program before downloading by visiting the product page here: www.nch.com.au/switch/
An image demonstrating how to download and install Switch Audio File Conversion Software
Download Switch Audio File Conversion Software
Download the program and follow the installation instructions as directed. Once you have installed the software on your computer, you can open the program and prepare to convert M4A to MP3.

Import M4A Files

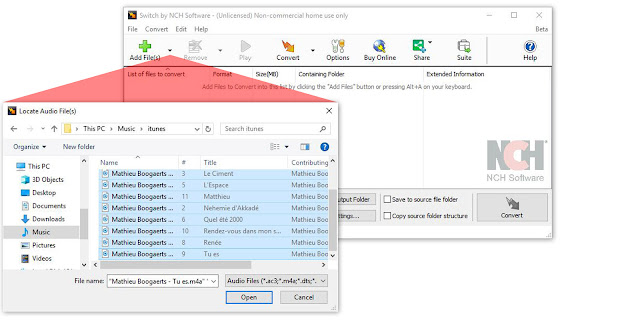
Import your M4A files into the program by clicking on the icon with the green plus symbol in the top left-hand corner of the program that says "Add Files." This will open the file finder window where you can browse your computer and locate the M4A files that you would like to convert to MP3s.
An image demonstrating how to import M4A files into Switch to convert to MP
Import M4A files to Convert to MP3

Options Menu

Click on the icon that says "Options" in the main menu to open the Options Window and view some of the changes and adjustments you can make to your M4A files while performing this conversion. Here you can add metadata to your converted MP3 files as well as fix settings to handle duplicate files and formats. When you are finished adjusting these options, click "OK."
A screenshot of the options menu in Switch Audio File Conversion Software
Audio Conversion Options

Choose Output Folder

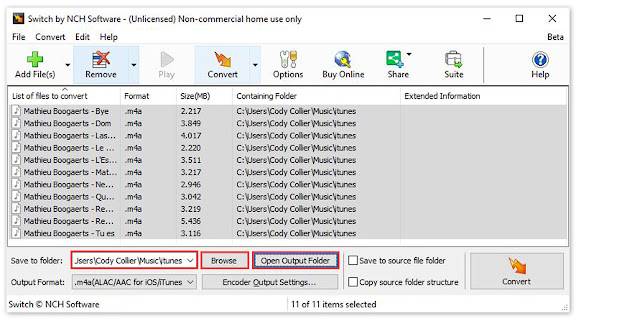
Select your output destination where you would like your converted files to end up after you have changed them from M4A to MP3 format. You can click on the "Save to folder" dropdown menu to select a folder from this list or click on the "Browse" button to open the file finder window and select any output folder destination on your computer.
A screenshot displaying the buttons to set an output destination folder in Switch Audio File Converter Software
Set Output Destination for MP3 Files

Set Output File Type to MP3

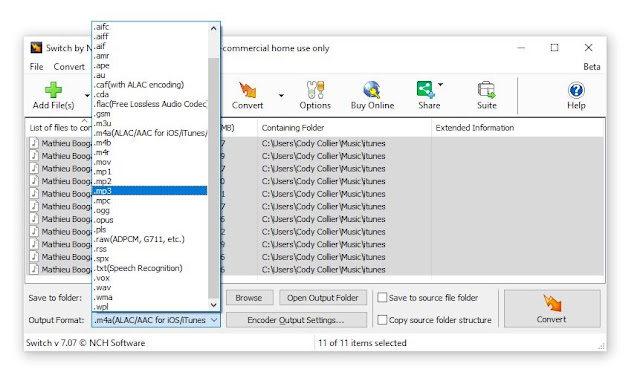
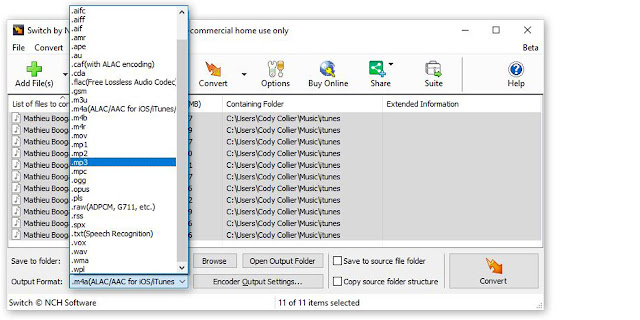
Once your output folder is set, you can select the output format. Click on the dropdown menu on the left side of the program next to the words "Output Format" to view the list of available audio file formats you can convert to. To change your M4A files to MP3 files, simply select the option from this list that says, ".mp3."
A screenshot demonstrating how to set the output format type to convert M4A to MP3
Set Output Format Type

Encoder Options

Click on the "Encoder Output Settings..." button to launch the window for M4A Output Settings. Here you can make adjustments and change audio encoder settings such as metadata, sample rate, bitrate, and amplify/normalizing audio. These settings will be applied during the conversion process while your M4A files are being changed to MP3s.
Encoder options windows for M4A encoding in Switch
M4A Encoder Options


Change M4A to MP3

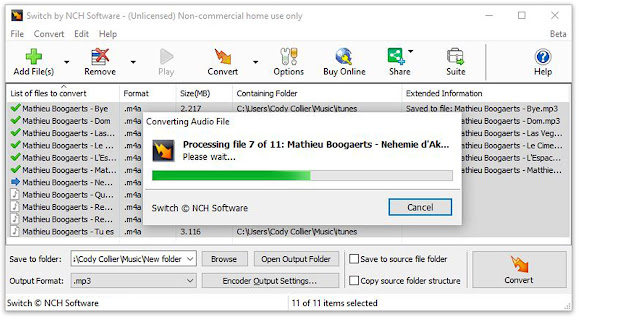
Now that we have everything set up, you are ready to change your M4A files to MP3. Simply click on the "Convert" button, located in the bottom right-hand corner of the program, to begin the conversion process. You can select only one file to convert or select all of them to perform easy batch conversions.
Switch Audio File Converter Software converting M4A files to MP3 in a batch conversion
Converting M4A to MP3

Finished

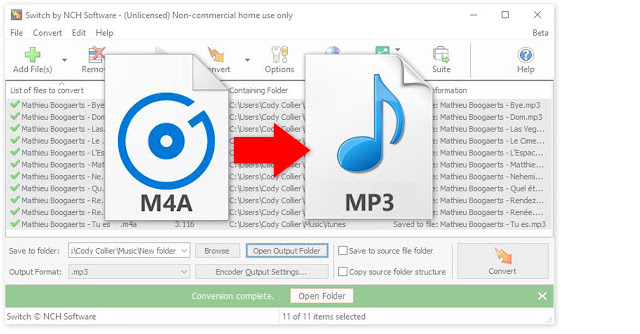
After the conversion is complete, you will see a green banner at the bottom of the program that says "Conversion Complete." You can click the button on the banner to open the output folder and view your newly converted MP3 files. You have now successfully learned how to change M4A to MP3 using Switch Audio File Converter Software
How to convert M4A to MP3 with Switch Audio File Converter Software
Completed M4A to MP3 Audio File Format


To read more about Switch and audio file conversion, check out these similar posts:

Friday, December 14, 2018

Best Audio Converter Software of 2019

Best Audio Converter Software of 2019


We are very happy to announce that Switch Audio Converter has recently been recognized by TopTenReviews.com as the "Best Overall Audio Converter of 2019." We are constantly aiming to improve our software based on the feedback and demand of our customers. After each new release, the goal remains to deliver a product that is efficient and effective for our users. With a product like Switch, that means making sure that a wide variety of export/import formats are supported and that conversion speeds are lightning fast.

Click here to read the whole review: Switch Audio Converter: Best Overall Audio Converter of 2019

"We believe Switch Plus Edition is the best audio converter for most people because it has all the major import and export formats, and it can convert faster than any software we tested. If you need to convert a large number of files quickly, this is the best option." - TopTenReviews

"Switch is the fastest audio converter software we tested. To test the speed of each converter software, we timed how long it took to convert a 625MB WAV file to a 26MB MP3 file." - TopTenReviews


Switch is one of the most stable, easy-to-use, and comprehensive multi-format audio file converters available. The program supports conversion between over 40 different audio file formats as well as allows you to perform batch conversions and edit audio file metadata. If you have not had a chance to try out switch, download your free trial today and see what you are missing. As we are constantly making improvements to our programs, we encourage users new and old to send us questions and leave us feedback so that we can keep providing our customers with the best of the best.


For more on Switch, check out these pages:

Friday, November 16, 2018

How to Change CDA to MP3 with Switch CDA Converter

How to Change CDA to MP3 with Switch CDA Converter


A CDA file is an extension for an audio file on a CD. That means that CDA files do not actually contain sound data, but they reference a file that does. You may load CDA files onto your computer only to find that you cannot play them on your audio player. Learning how to change CDA to MP3 is the best way to get your CDA files into a universally recognized format that can be played anywhere. With a simple audio conversion tool, such as Switch Audio File Converter Software, you can quickly change CDA to MP3 and use the files from your CD in many different applications.


Add CDA Files

Open Switch Audio File Converter Software on your computer and click on the Add File(s) button. Click on the drop-down arrow to view a list of import location options. Clicking directly on the green plus sign will launch the file finder window. From here you can locate and select the CDA files that you wish to convert to MP3. Once your files are selected, click the button that says Open to bring them into Switch.


Listen to CDA Files

You can listen to your CDA files in Switch before converting them to MP3. Simply double click on any file in the program to listen or select a file and click on the Play button at the top of the program. This is a useful way to make sure that you have the correct audio file selected if your files do not have names.


Output Format

To change CDA to MP3 using Switch, use the Output Format drop-down menu to select MP3 from the list of output formats. This will make it so that any CDA files that you convert will be converted to MP3. The MP3 audio file format is the most common and widely accepted audio file type and converting your CDA files to MP3 will make it so that you can listen to them practically anywhere.


Encode Metadata

With Switch Audio File Converter Software, you can easily add meta tags and metadata to your MP3 files. Click on the Encoder Output Settings...button to launch the MP3 Output Options window. From here, you can choose from several audio file encoding options that the program has to offer. Click on the Metadata tab and enter any desired metadata content you would like in your MP3 files.


Encode Volume Settings

You can also adjust the audio settings while you convert using the Encoder Output settings button. Click on the tab that says Volume to make audio adjustments to your files as they are being converted such as Normalize, Amplify, and Noise Reduction.

Change CDA to MP3

With your CDA files imported into the program and your encoder settings set, you are now ready to change your CDA files to MP3. Click on the box that says Save to Folder and choose an output destination from the drop-down menu. This is where your converted CDA files will appear as MP3 files once the conversion has been performed. Select the CDA files you wish to change to MP3 and then click on the large Convert button, located in the bottom right-hand corner of the program.


Write Audio Tags

If your CDA files are coming directly from a CD, they may contain track info that can be included in the converted MP3 files. This can be very useful for keeping your music organized and adding your MP3 files to your music library. If you are prompted with this window, you can click Write Tags to have the audio track tag information from your CDA files included in your converted MP3s.


View Converted MP3 Files

When the conversion is complete you will see that all of your CDA files will have a green checkmark next to them in the program, meaning that they were all converted successfully. You can click on one of the two folder buttons that appear after a conversion to view your MP3 files and you can now play them anywhere you would like.


For more on audio conversion, check out these posts:

Friday, June 1, 2018

Best Tool to Edit MP3 Tags and Metadata with Switch Audio Converter

Edit MP3 Metadata with Switch Audio Converter


Best Tool to Edit Metadata and Tags when Converting to MP3

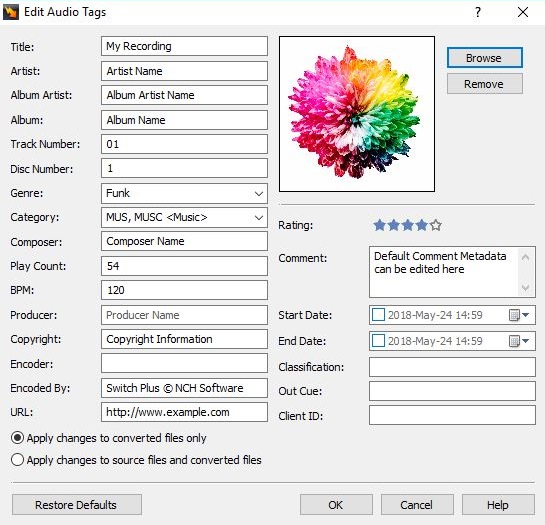
When converting a track to MP3, you can edit the track metadata and tags to include title, artist, track artwork, producer, rating, genre, comments, and more. If you record your own music, you may want to set up metadata and tags for your finished recordings before sharing. Editing your tags and metadata will ensure that your album artwork, artist name, and other tags show up correctly when your track is loaded into a new audio library. You can easily edit the metadata of MP3 and tags for audio files when converting with Switch Audio Converter.


Edit MP3 Tags

To edit the tags of an audio file, begin by loading the file into Switch Audio Converter. To import an audio file, click on the "Add Files" button in the top left-hand corner of the program window.


After you have imported an audio file, you can right-click on the file in Switch and select "Edit Audio Tags" to edit the audio tags.


This will open the Tag Editor for the selected audio file. Here, you can edit the audio track title, artist, album, genre, BPM, producer, rating, artwork, and more. For new recordings, many fields will be blank. If the audio file that you are converting currently has audio tags, the existing tags will be displayed in the Tag Editor.


To edit a tag, click on the field that you would like to edit and type in the new tag information that you would like to save for your mp3 file. You can edit the song Rating by clicking on the star value that you would like to assign to the audio file.


Add Artwork to an MP3 File

To add the artwork to an MP3 file, click on the "Browse" button the right of the artwork image in the Tag Editor. Then, select a file from your computer to use as the artwork for your audio file. 

Apply Changes

You can apply changes to converted files only, or you can apply changes to source files and converted files. To apply tag edits to converted files only, select the option that says "Apply changes to converted files only". This option will leave the file tags for the source file in their original state while applying the tag edits to only converted files.


 To apply tag changes to the original source file as well as converted files, select the option that says "Apply changes to source files and converted files".


Convert to MP3 with New Tags

To convert your file to MP3 with the edited tags, click on the "Convert" button in the bottom right-hand corner of the Switch program window.


Friday, July 8, 2016

How to Change WAV to MP3 files with Switch WAV Converter

How to Change WAV to MP3 Files with Switch WAV Converter


Audio files exist in a wide variety of formats, each with its own benefits and potential drawbacks. When editing or playing audio tracks, you may need to convert from one format to another to suit your distribution needs.

What are WAV Audio Files?

WAVE files are uncompressed, lossless CD-quality music files. Though they are popularly known by their file extension, .wav, WAVE stands for Waveform Audio File Format. WAV files can contain compressed audio, however, they are more often used to take advantage of uncompressed audio. 

 When Should You Use WAV Audio Files?

Due to their uncompressed nature, .wav files are the best choice for radio, TV, DVDs, and other projects that require uncompromised high-quality audio tracks. As a result, it is uncommon to share WAV files on the internet because uncompressed audio files are often very large files and result in slow file transfer. WAV files are favorable for keeping archived versions of original recordings as they will retain original audio quality.

What are MP3 Audio Files?

MP3 is a compressed, lossy format that is widely used for audio tracks on the internet in web pages, web videos, audio sharing, and more. MP3 audio files are extremely popular because they take up very little disk space due to being compressed to roughly one-tenth of their original size. 

When Should You Use MP3 Audio Files? 

MP3 audio files are able to load quickly while retaining high audio quality, which makes them favorable for use on web pages, in embedded videos, in audio sharing, and in multimedia presentations.  However, this popularity is a double-edged sword as compressed MP3 audio tracks retain less information and as a result, can be more difficult to edit.

How To Change WAV to MP3 Files

After editing an original audio recording in WAV format, you may want to compress your file for easy sharing on the internet. Switch Audio Converter is a simple audio converter that can accomplish WAV to MP3 conversion quickly and easily. Switch also has the option to batch convert audio files, which is efficient and effective for audiophiles who need to change hundreds of audio tracks in a short period of time. 

Step 1: Load WAV Files

In order to change WAV to MP3 with Switch, begin by loading the WAV files that you would like to convert. To do this, open Switch Audio Converter and click on the "Add File(s)" button.


Step 2: Select Audio Output Format 

Once you have added the WAV audio files that you would like to convert, select the audio output format that you would like from the "Output Format" selector at the bottom left of the Switch window. 


You can also select a specific folder where the converted file will be saved, or check the box to output to the same folder as the source file. 

Step 3: Change Audio Files

Now that your file has been added to Switch and you have selected MP3 as your desired output format, simply click the "Convert" button to change your files!


Once your file has been converted, a prompt will appear allowing you to be taken directly to the output folder you selected, or to open the file directly. 


Congratulations! Your new MP3 file is now ready to be shared with the world.


Download Switch Audio Converter to Get Started!


More Audio Posts from NCH Software: 


Tuesday, March 10, 2015

Now Available: Switch Audio Converter for Android

NCH Software is proud to announce that Switch Audio File Converter, one of our most popular audio programs, is now available on Android devices through the Google Play and Amazon App Stores.

If you need to convert a single file, or a whole batch of files, Switch Sound Converter gets the job done quickly and easily. It supports over 40 file types, including all popular audio formats and many specialty formats for amateurs and professionals alike. Whether you have a single song that you need to convert for iTunes, or have hundreds of files that need to be converted into a specialty format, Switch is the app you've been waiting for.

Switch Audio Converter Free - screenshot

Switch Audio Converter Released for AndroidOur desktop version of Switch Audio File Converter has won numerous awards, including the TopTenReviews.com Gold Award in the audio converter category for the second year in a row. Like the app, it is considered the most stable, comprehensive, and functional multiple format sound file converters available.

For Android, we made sure that Switch preserve's the metadata and tags on any song it converts so it can be easily identified after conversion. It can import entire playlists from any folder library on your phone/tablet, and produces fast results.

Switch Audio File Converter for Android will help you convert, organize, transform, and enhance the way you enjoy your favorite sound files. As always, we are happy to take any and all feedback from our wonderful customers to make this app even better in future versions, so if you want a new feature just let us know!

Get it for free from Google Play.

Friday, April 19, 2013

Preview Switch Audio Converting Software

CNET recently started making download preview videos to give you a quick taste of a program before you download. Take a look at the speedy Switch Sound Converter below. It really only takes seconds to convert audio and music files to mp3, aiff, wav, wma, or any one of the other audio formats—over 40 formats in all.


So now that you've had a peek, download Switch Audio Converter for your Mac or PC today for quick and easy audio converting whenever you need it.

Saturday, December 15, 2012

Y is for YouTube

NCH Software ABCs Series

YouTube has a wealth of videos, from information to humor you can find videos about just about everything, a whole world of endless amusement is just a click away. But watching videos isn't the only side. There are millions of aspiring YouTube stars out there who would do well to note some of the useful and easy YouTube software programs below that can help you download, record, edit and upload videos directly to YouTube. Who knows, yours could be the next big viral video. And, for video tutorials on many NCH products, stop by the NCH Software YouTube channel.

<<< Previous: X if for eXpressNext: Z is for Zip >>>

Thursday, November 15, 2012

Audiophiles Rejoice


Do you have a significant investment in audio equipment and want to get the most range from your music collection? Do you want the crisp highs and deep bass you’re used to from CD’s? Then stop listening to audio compressed in the outdated MP3 format! Anytime audio is compressed, even with 320kbps quality MP3s, some range is sacrificed to reduce the file size and sound artifacts can occur.

For true studio sound, lossless formats such as an uncompressed WAV (Waveform Audio File Format), or a compressed FLAC (Free Lossless Audio Codec), are the better option, even though they require more storage space. The smaller file size of the lossless FLAC is great for music collections, supports tagging for artist and album information, and is ideal for streaming audio because it is fast seeking. One note of caution if you’re straying away from your computer, while FLAC is a popular lossless audio format, not all devices, like car stereos, will support playback without modification.

Additionally, editing music in lossless formats, like with our WavePad Audio Editor Software, means you can exercise more control, on more sound data than with other formats. Starting with the highest quality possible source will result in the best final product. Use our other audio tools, like Switch Audio File Converter Software, to batch convert audio files between formats, for example if you don’t have room for your FLAC collection on your gym iPod.

Give your equipment and ears the quality they deserve!

Friday, June 22, 2012

New Music Industry Book Takes You Behind the Scenes

HIT CLICK behind the scenes of the Music Industry by Rory NicollGo behind the scenes of the music industry with Scottish producer Rory Nicoll, author of the new book, HIT CLICK, a must have book for anyone in the music industry. HIT CLICK is packed full of exclusive interviews with industry leaders and artists, contact information and reviews, offering collective wisdom on all aspects of the music industry, from the alchemy of a hit record to the business side of music.

NCH Software is honored to have been included in the book's reviews of music software. Nicoll concludes that "NCH does exactly what it tells you it will: It provides easy to understand software solutions to many of the activities required of an audio engineer." In another excerpt from the review, Nicoll states:

"I've spent about a day and a half experimenting with various NCH audio programs and one thing that continually surprises me is just how powerful the programs are. With each application measured in MB, the entire suite can be loaded at once without causing any detriment to even the oldest hard drive. The applications run quickly. Speed is always good. The functions are simple to find and they are overall user-friendly."

To read more about all aspects of the music industry, you can find HIT CLICK: Thriving In Tomorrow's Music Industry released today and on sale now on Amazon.

Wednesday, June 13, 2012

Amazing Tools for Transcription

Guest post by EQ Trans UK

Amazing Transcription Software ToolsAs a transcription services provider which caters to clients all across the UK, we believe in the importance of using technology that enables our transcriptionists to perform at their optimum, while simultaneously benefiting our clients as well. Using the appropriate software while working on a transcript can help a transcriptionist do a better thorough job of transcribing and, of course, help in meeting deadlines faster, too.

We have been using various NCH software for a while and they are now form basics of what we do. If you are new in the transcription industry, here is what minimum you need to have to get going:

Express Scribe – This audio player which can be used on both PCs and Macs comes loaded with many features, such as support for foot pedals, variable speed playback, as well as speech-to-text integration. This software does a great job of supporting all the popular file formats. It also gives a transcriptionist better control over the audio playback through the use of a foot pedal and even keyboard shortcuts. Express Scribe does not take up too much screen space, unlike other software, and runs quietly in the background while a transcriptionist is at work.

Switch Sound File Converter - Although there are plenty of file converters available, this software wins hands down for its simplicity. Our clients often send us digital audio files in other formats and we use this software to convert them into an mp3 format using 128 bit mono encoding. This makes it easier for uploading files on our secured server so that our transcriptionists can get to work. Switch also gives users an additional option of configuring up to 3 right-click options which make the conversion process faster, too.

Prism Video Converter - This video file converter converts files from any format to the most commonly used formats, either in singles or in batches, and can even convert files directly from DVDs and other multimedia devices. We use this software mainly for converting large video files into mp3 file format so that they can be uploaded on our server easily. Prism also has another option of resizing a video file format and customising it in terms of the frame rate, brightness, and contrast, as well as text and caption addition.

WavePad Editing Software - One factor which can be detrimental to the process of transcribing itself is the presence of background noise in an audio file. The WavePad Audio Editing Software works on both PCs and Macs, allowing the user to cut and paste specific sections of the recording, besides adding features like noise reduction. This software supports a large number of file formats and has a remarkably easy-to-use interface as well.


EQ Trans UK is a transcription agency based in the UK. We have a well-trained and certified team of transcriptionists to address any client requirement.

Wednesday, February 15, 2012

NCH at the Heart of Transcript Divas Transcription Services

Guest post by Transcript Divas Transcription Services

NCH Software is at the heart of our business process at Transcript Divas Transcription Services. We use three of their programs to edit, convert and transcribe audio and video dictation files.
express scribe transcription software
NCH Software is key in solving two problems we often have to deal with, even before our typists get to work. Obscure recording formats can be problematic–although Express Scribe handles most common formats, clients do send us files that are difficult to handle, especially large video files. So to save time at the typist's end, we batch-convert these problem files to the smaller and more compatible MP3 audio file format using NCH's Switch File Converter.

The second key difficulty we often encounter is how to deal with poor-quality recordings. A surprisingly large number of interviews take place in noisy cafes, with hissing coffee machines and clunking cups almost drowning out the speech. We also receive poorly-recorded group sessions, where the participants farthest from the microphone are practically inaudible, while the closest voices are deafening. In these situations Transcript Divas employ WavePad sound editor to process recordings before they go out to typists. Functions we find particularly useful are 'normalize,' 'amplify volume,' and 'remove noise or hiss.'

Almost all of our 30 Divas use NCH Software's Express Scribe, which is free–though there's also a paid version, Express Scribe Pro, which has more functionality. Express Scribe's user-friendliness makes it the preferred choice when compared with other transcription software packages, and this is something it shares with all of NCH's programs. As one Diva put it, "I especially like the fact that you don't need to be a technical whiz-kid to use it!" Key features that Divas mention are its ability to handle most common file types, the essential functions of speed adjustment, rewind and fast-forward, and the 'volume boost' for quiet files–which saves typists having to go into WavePad for a small poorly-recorded Express Scribe Pro also plays video files–an ability our 'Video Divas' put to good use. To maximize typing speed, many of our typists also use a foot-pedal.

Another key feature our typists have highlighted is Express Scribe's ability to insert time-coding. This is seen as a real gem by the typists, and can save countless hours of inserting them by hand! For the uninitiated, go to Options → Display–this allows you to set the required combination of hours, minutes and seconds. Once you have chosen, simply go to 'Notes,' 'Insert' and 'Time' each time you need to put in a time code, or press Ctrl+Shift+T to save even more time.

Transcript Divas Transcription Services is a transcription agency with offices in London, New York, Toronto and Sydney.