Thursday, February 28, 2019
New Release: Voxal Voice Changer for Windows
Posted by
NCH Software
Download Voxal 4.00 now at www.nchsoftware.com/voicechanger/index.html. Also available for Mac OS X at the same page
Just Released: Prism Video File Converter for Windows
Posted by
NCH Software
Download Prism 5.03 now at www.nchsoftware.com/prism/index.html. Also available for Mac OS X at the same page
Friday, February 22, 2019
Best Video Editing Software of 2019
Posted by
Cody Collier
Best Value Video Editing Software of 2019

We are pleased to announce that our own VideoPad Video Editing Software has recently been named the Best Value Video Editing Software of 2019 by TopTenReviews.com. These picks are made through vigorous and thorough testing of multiple popular programs by a team of expert editors in order to help shoppers make well-informed purchasing decisions. We are glad that VideoPad stood out from the pack in performance but also in affordability.
"If you want a functional video editing program at a fraction of the price, consider VideoPad. This software has many of the tools we look for in the best video editing software." -TopTenReviews
 | VideoPad is a fully featured video editor for creating professional quality videos in minutes. The program comes with over 50 visual and transition effects to add a professional touch to your movies. Drag and drop video clips for easy video editing and export movies in multiple resolutions including full HD, 2K and 4K (720p, 1080p, 1440p, 2160p and more. Save your login credentials to upload videos directly to YouTube, Facebook or Flickr from VideoPad. VideoPad is available for both PC and Mac and has mobile versions for Android and IOS as well. |
For more on VideoPad, check out these other posts:
Just Released: ClickCharts Diagram Flowchart Software for Mac OS X
Posted by
NCH Software
Download ClickCharts 4.02 now at www.nchsoftware.com/chart/index.html. Also available for Windows and Android at the same page
Friday, February 15, 2019
How to Change M4A to MP3 Audio Files with Switch
Posted by
Cody Collier
How to Change M4A to MP3

M4A files (MPEG-4 Audio files) are a common audio file type used by Apple, similar to the MP4. All of the songs on the Itunes Store are in the M4A format because of their compression size and high quality. Not all audio players and browsers will work with M4A files, though. That is why it is important to know how to change M4A to MP3 to be able to store your files in a more versatile and widely recognized format. With a simple audio file conversion software such as Switch, you can easily change M4A to MP3 without any problems.
Download Switch
You can download Switch Audio File Converter Software by clicking on one of the red download buttons on this page. You can also learn more about the program before downloading by visiting the product page here: www.nch.com.au/switch/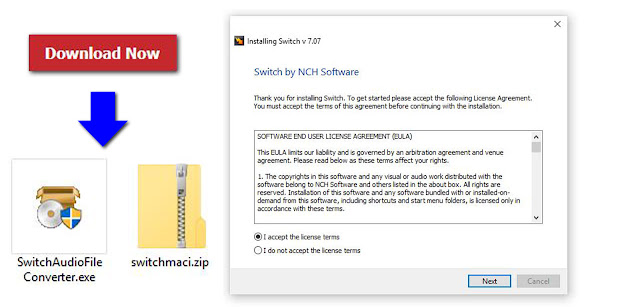 |
| Download Switch Audio File Conversion Software |
Import M4A Files
Import your M4A files into the program by clicking on the icon with the green plus symbol in the top left-hand corner of the program that says "Add Files." This will open the file finder window where you can browse your computer and locate the M4A files that you would like to convert to MP3s.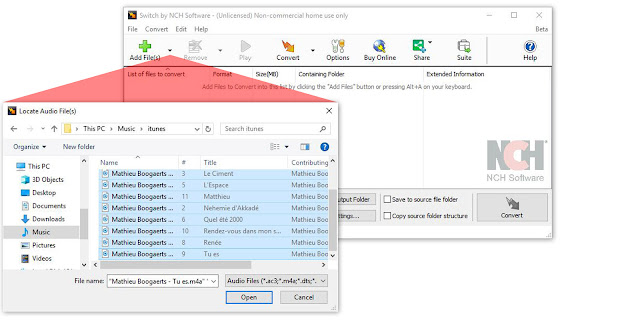 |
| Import M4A files to Convert to MP3 |
Options Menu
Click on the icon that says "Options" in the main menu to open the Options Window and view some of the changes and adjustments you can make to your M4A files while performing this conversion. Here you can add metadata to your converted MP3 files as well as fix settings to handle duplicate files and formats. When you are finished adjusting these options, click "OK."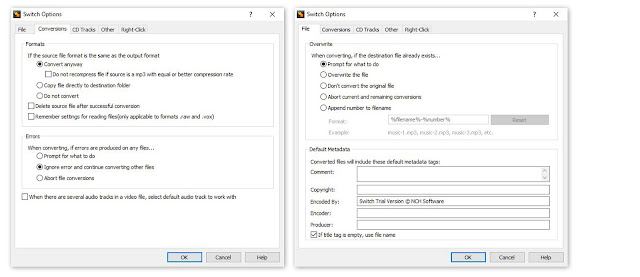 |
| Audio Conversion Options |
Choose Output Folder
Select your output destination where you would like your converted files to end up after you have changed them from M4A to MP3 format. You can click on the "Save to folder" dropdown menu to select a folder from this list or click on the "Browse" button to open the file finder window and select any output folder destination on your computer.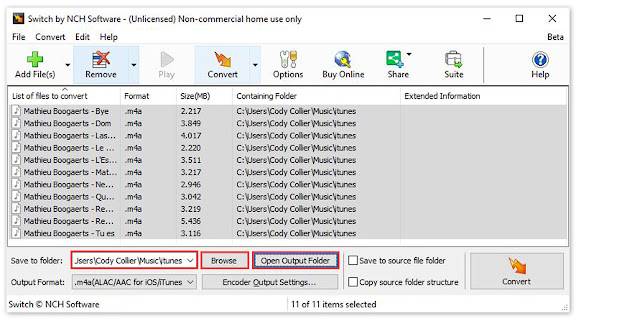 |
| Set Output Destination for MP3 Files |
Set Output File Type to MP3
Once your output folder is set, you can select the output format. Click on the dropdown menu on the left side of the program next to the words "Output Format" to view the list of available audio file formats you can convert to. To change your M4A files to MP3 files, simply select the option from this list that says, ".mp3."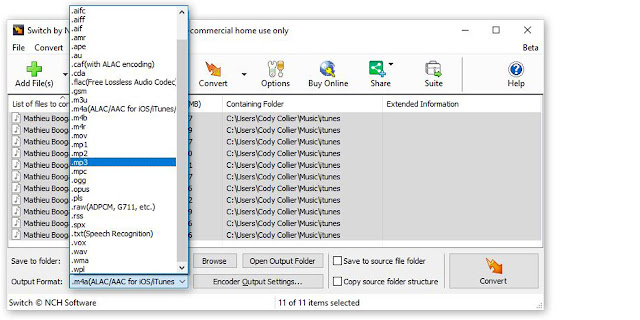 |
| Set Output Format Type |
Encoder Options
Click on the "Encoder Output Settings..." button to launch the window for M4A Output Settings. Here you can make adjustments and change audio encoder settings such as metadata, sample rate, bitrate, and amplify/normalizing audio. These settings will be applied during the conversion process while your M4A files are being changed to MP3s. |
| M4A Encoder Options |
Change M4A to MP3
Now that we have everything set up, you are ready to change your M4A files to MP3. Simply click on the "Convert" button, located in the bottom right-hand corner of the program, to begin the conversion process. You can select only one file to convert or select all of them to perform easy batch conversions.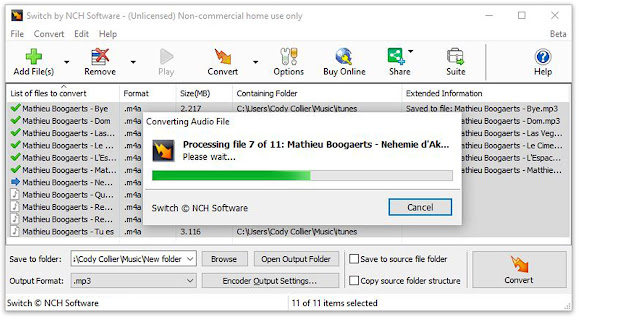 |
| Converting M4A to MP3 |
Finished
After the conversion is complete, you will see a green banner at the bottom of the program that says "Conversion Complete." You can click the button on the banner to open the output folder and view your newly converted MP3 files. You have now successfully learned how to change M4A to MP3 using Switch Audio File Converter Software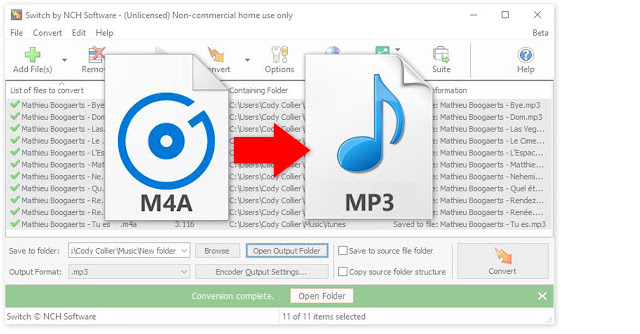 |
| Completed M4A to MP3 Audio File Format |
To read more about Switch and audio file conversion, check out these similar posts:
Labels:
apple,
audio conversion,
convert m4a,
convert mp3,
file conversion,
file converter,
itunes,
m4a,
MP3,
nch software,
Switch
New Release: Pixillion Image Converter for Mac OS X
Posted by
NCH Software
Download Pixillion 6.01 now at www.nchsoftware.com/imageconverter/index.html. Also available for Windows at the same page
Friday, February 8, 2019
Writing Your Own Drum and Percussion Notation
Posted by
Cody Collier
Writing Your Own Drum and Percussion Notation
Percussion notation is a type of musical notation indicating notes to be played by percussion instruments. Many people forget that drummers can also write and read music just like any other type of musician. A feature that users have been asking for, drum and percussion notation for Crescendo Music Notation Software, is finally here.
Drum Kit Score
Generally, there are two categories for percussion instruments: pitched and non-pitched. For non-pitched percussion instruments like drum kits, you can create a score with a blank percussion stave using the New Blank button on the Score toolbar tab, New Blank Drum Kit Score from the File menu, or the keyboard shortcut Ctrl+D. You can also insert a percussion stave in the Parts and Staves dialog. This will open up a new blank score that is specifically used for creating drum and percussion sheet music.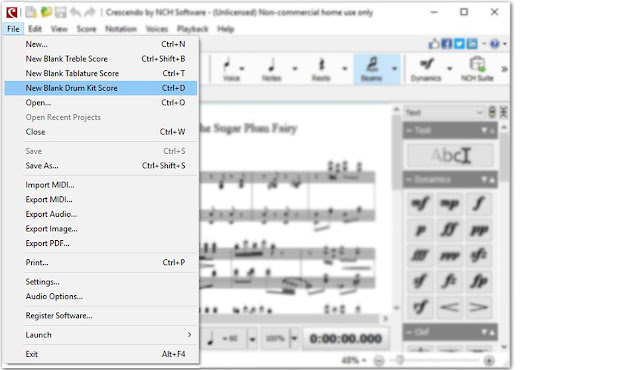
Drum and Percussion Notation
There are many different ways percussionists will write and transcribe drum notation in sheet music. Luckily there are some universal standards that are agreed upon and also followed in Crescendo Music Notation Software. Below is a sample that shows how Crescendo will interpret and recognize just a few of the different percussion music "notes."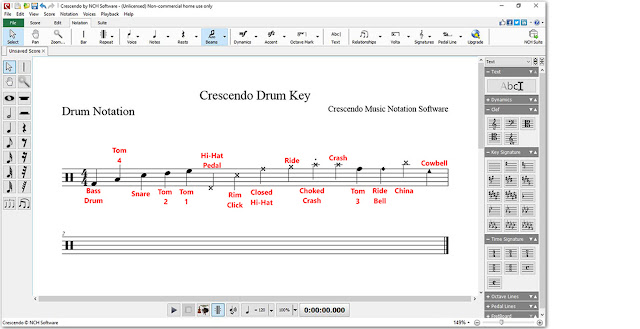
Adding Percussion Notes
You can select a note tool to add notes on the percussion stave by choosing the type of note from the toolbar on the left-hand side of the program and then clicking on a bar to place that note within your score. Once you click to place the note, a half-circle menu will appear to show you the different distinctions you can make to the note, such as making it a cymbal, drum, rimshot, or other percussion-related specification.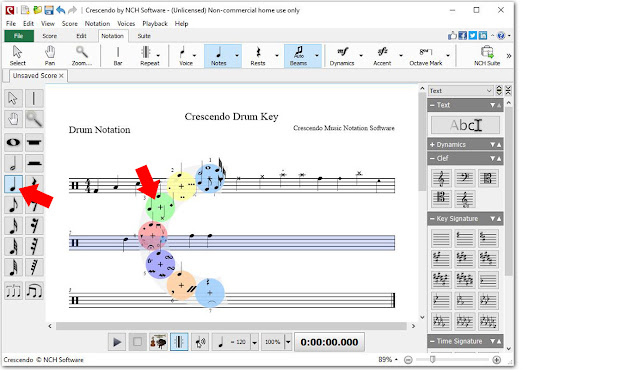
Adding Slurs and Tuplets
Adding slurs and tuplets to your drum and percussion composition is simple and easy. Simply select the slur or tuplet option from the toolbar on the left-hand side of the program to load the cursor with this option. Then just click on the notes where you would like to start and end your slur or tuplet within your score. You will see the new line drawn between your selecting notes to indicate a slur or a tuplet.
Changing Time Signatures
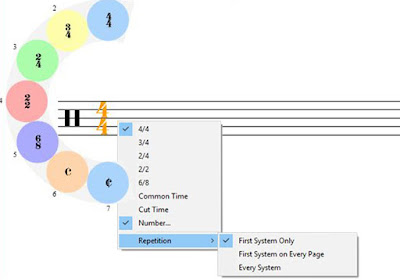 To change the time signature of your drum and percussion score, click on the time measure once to display the wheel of different time signatures. Simply select the option you desire to have that time signature applied to your project. You can also right-click on the time signature in the staff and select a new time signature from the drop-down menu.
Playback
Crescendo Music Notation Software allows you to listen to your drum and percussion notation as it is played back to you on the very instruments it was written for. Simply click on the play button at the bottom of the program to listing to your composition on your computer.
Save and Share
 When you are finished creating your drum and percussion sheet music, simply click on the Export icon, located at the top of the program. You can choose to export your music as an audio file. Then, listen to it and share it over and over again. You can also choose to export your sheet music as an image file or a PDF file if you are going to be taking your creation to the stage. Save your file and print it, so you are ready to rock at any time.
Do you need help using Crescendo?
View the Help Manual: http://help.nchsoftware.com/help/en/crescendo/win/help.pdf
Visit the Crescendo Help Forum: http://nch.invisionzone.com/forum/123-crescendo-music-notation/
Contact Crescendo Technical Support: https://www.nch.com.au/support/supportcontact.html?software=Crescendo
Monday, February 4, 2019
Just Released: SoundTap Streaming Audio Recorder for Windows
Posted by
NCH Software
Download SoundTap 6.00 now at www.nch.com.au/soundtap/index.html. Also available for Mac OS X at the same page
New Release: Spin 3D Mesh Converter for Windows
Posted by
NCH Software
Download Spin 3D 3.00 now at www.nchsoftware.com/3dconverter/index.html
Friday, February 1, 2019
New Release: PhotoStage Slideshow Producer for Windows
Posted by
NCH Software
Download PhotoStage 6.00 now at www.nchsoftware.com/slideshow/index.html. Also available for Android, Mac OS X and iOS at the same page

