Showing posts with label equalizer. Show all posts

Thursday, April 27, 2023

Best Way to Enhance Audio with Windows 10 Audio Equalizer and DeskFX


On Windows 10, audio equalizers offer a quick and easy way to enhance the overall music-listening experience. If you can access an equalizer, you can not only enhance sound quality but also enjoy a higher level of customizability when it comes to your tunes.


You might be wondering, is a sound equalizer really necessary? Are there any other ways to improve audio quality on your computer by using other programs or types of software?


If you truly want to improve the sound quality on your computer, using a Windows 10 audio equalizer is definitely one of the first things you should try. 

Friday, April 27, 2018

How to Edit Audio Files with WavePad

How to Edit Audio Files with WavePad

musician recording with WavePad

You don’t have to be a professional music producer to record and edit your own music. With easy-to-use music editing software like WavePad, you can take your audio recordings to the next level. Recording and editing your songs yourself is a great way to share and preserve your musical masterpieces and anyone can do it. Whether you are recording your voice for a podcast or you are editing tracks of your band playing live music, it has never been easier to create professional-quality recordings from home.

Record Audio

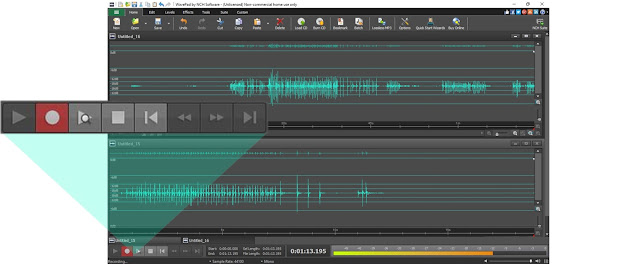
If you don’t already have an audio recording to work with, don’t worry. WavePad allows you to record audio directly into the program using an accessory microphone or the internal microphone on your computer or device. To begin recording a new track, simply click the red record button, a new blank track will be created and your recording will begin automatically. You can stop your recording by clicking the square stop button, pushing the Esc key, or by clicking anywhere on the track.

screenshot of recording in WavePad audio editing software
Recording Audio in WavePad

Import Audio

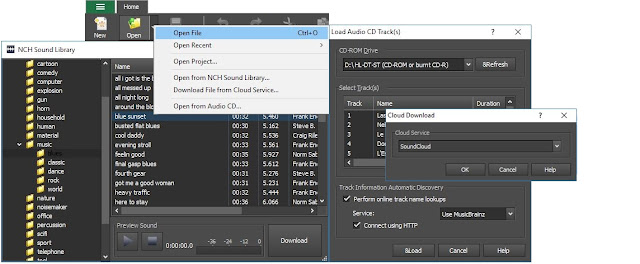
If you already have a pre-recorded track you would like to work with, you can easily import the track into WavePad to edit. Simply press Ctrl + O on Windows or Command + O on Mac to open it. You can also go to the main drop-down menu and select File and then Open. Import a file from your computer or external device, or you can choose to open a file directly off of a CD or data disc. You can even import files straight from the Cloud. Make sure to explore the NCH Sound Library for additional audio samples and sounds to add to your music or audio project.

screenshot of WavePad audio recording software file import
Import Audio Files

Trim Tracks

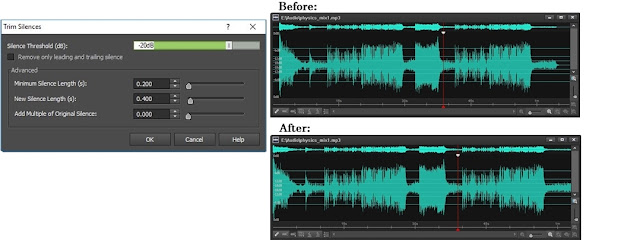
Trimming down your audio recordings or music tracks is one of the first tasks you will want to complete when you begin editing audio files. WavePad allows you to easily remove the silences from the beginning and end of your recordings. Simply select your entire track, go to the Edit tab, click Trim, and then choose the Auto-trim silence from the Start and End of the File option from the drop-down menu.
screenshot of trimming silences in WavePad audio editing software
Trim Out Silences in Your Tracks 

Split Tracks

You can split your recordings and files at any point you would like to in WavePad. Simply place your cursor wherever you would like to split your track, select the Split option from under the Edit tab and then choose "Split at cursor" from the drop-down menu. This will split your audio at the position of the cursor, generating two separate tracks.

screenshot demonstrating how to split audio tracks in WavePad
Split Tracks

Reduce Noise

Removing background noise from your audio tracks is essential if you want to make your recording sound professional. Background sounds such as chair squeaks, footsteps, and even your own breathing, are all noises that are easily picked up by your microphone. Luckily, they are just as easily removed from your tracks. Choose the track you want to remove noise from and then select the Cleanup option in the Effects menu. From there you can choose from a variety of noise cleanup options, such as auto click/pop removal or noise reduction.

Screenshot demonstrating how to remove background noise from an audio file or recording
Reduce Background Noise

Mix Audio

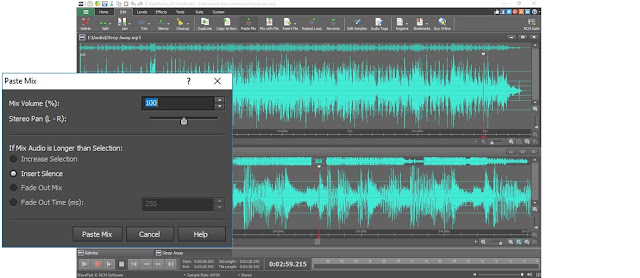
The Paste-Mix feature in WavePad allows you to overlay tracks to create mash-ups, voice-overs or layer recorded instruments for that full band sound. To combine the audio from two tracks into one, start by selecting one of the tracks and copying it to the clipboard. Next, select your second track and click on the Paste Mix icon in the menu under the Edit tab. When you play it back you will hear that the two pieces of audio have now been combined.

screenshot demonstrating how to mix audio tracks in WavePad
Mixing Audio Tracks 

Volume Control

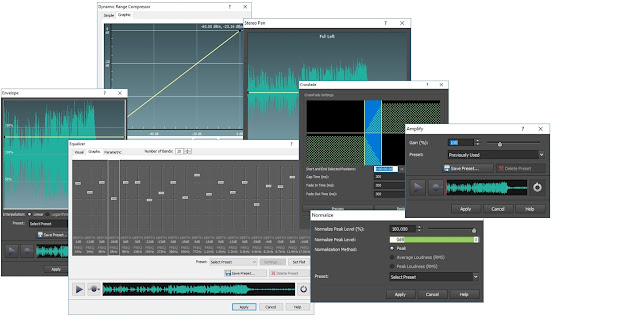
Now that your song or voice recording is cut down to the good stuff, you can decide what you want to do with your volume levels. Not all microphones are created equally and so your song may end up being a lot louder or a lot quieter than you expected. Select the Levels tab to view some of the different volume control options available in WavePad. Select Normalize Audio from the effects tab to amplify audio gain across the entire track. This is a great last step to finalize your project before exporting.

screenshot demonstrating different audio adjustments and controls for music editing
WavePad Volume Control Features

Save and Export

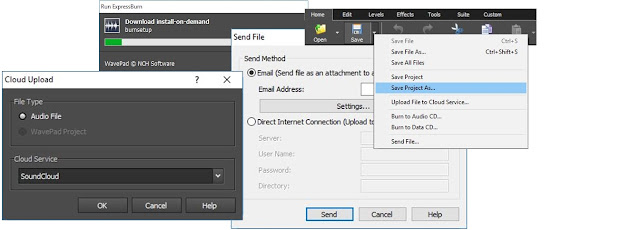
When you are finished editing your audio project, you will need to save it. WavePad has several easy options for saving and exporting your audio files. Under the Home tab, you can click on the Save icon and choose to burn your song to an audio or data CD, send the file in an email, upload it to the cloud, or save it as a number of audio file formats. If you plan on making additional edits to your project later, you can save all of your work as a WavePad project file to preserve quality.

screenshot demonstrating the different ways to save and export a music project
Saving Audio Files


Tuesday, June 4, 2013

Do More with Audio - Blog Carnival June 4, 2013

Here are this edition's entries to Do More with Audio:

Denise Thompson presents How to Choose the Best First Student Guitar posted at Find A Babysitter, saying, "Learning to play a musical instrument allows your child to strengthen a wide range of their auditory skills, benefiting her throughout her adult life if she continues to play."

Björgvin Benediktsson presents Methods For Recording Acoustic Guitar posted at audioissues, saying, "Recording an acoustic guitar requires different methods recording an electric guitar."

David Thompsonn presents Exploring the Merits of Children Learning to Play an Instrument posted at Backup Care, saying, "Once a child reaches middle school, the school will often offer orchestra or band as an elective class. If your child isn’t particularly driven or musically inclined, why would you want to encourage him to play an instrument?"

Peter Kirn presents Music for Dance, Music and Movement posted at Create Digital Music, saying, "Movement and machines are the reason I do what I do, exploring new sounds in a way that is human and gestural."

sigh presents Sounding a Social Game posted at Behind the Scenes of Lucky Lady Games Studio, saying, "So now that all the essentials of the Lucky Lady Casino is arted up & in production, we have focused our energies towards another sensory must-have in game design, sound!"

Jenifer Sarah presents Jet Audio free download latest version of MP3 player 2013 posted at Software Collection, saying, "Jet Audio free download is one of the smartest Mp3 player available on the internet. You can play your all audio and video files with this latest version of Jet Audio free download. The best thing about this Jet Audio free download is that you can also convert your favorite video files into many formats. The audio controllers provided in this version of Jet Audio free download are amazing."

You might also be interested in: That concludes this edition of Do More with Audio. If you have an audio story to share or advice, tips or tricks to share, we hope you will submit your audio posts and articles to the next edition.

Monday, April 8, 2013

WavePad Audio Editing Tips & Tricks

WavePad Audio Editing Software Tips and Tricks
Below you will find a compilation of some of the audio effects and sound editing basics for the WavePad audio editor that you will want to know and test out for yourself as you delve into the world of audio editing. Another great way for those new to audio editing to get started is by watching the WavePad sound editor intro video tutorials so you can see the audio editor in action.

Split and Cut Audio Files
You can split a file at any point you choose by simply clicking the Split button on the Edit tab. This will create two audio files split at the point you had the cursor. Be careful when you use this function, the action cannot be undone. Additional audio splitting options include splitting at bookmarks, splitting at silences and similar Trim options that delete sections instead of creating new audio files.

Amplify Audio Volume
To make the audio sound louder, instead of simply turning the volume control up you want to amplify the file. You will find Amplify on the Effects tab, which will open a window where you can either adjust the amplification using the slider or by selecting a preset level from the drop-down menu. Selecting 200% will double the volume, 50% will cut the volume in half.

Equalize Audio
Amplifying affects the full spectrum of the audio in a file, but if you want to increase or decrease certain frequencies, for example, boosting all of the lower bass frequencies, then you want to use the Equalizer. The Equalizer is also on the Effects tab and opens a graph of the frequencies going from low to high frequencies as you move left to right. This gives you very finite control of the frequency ranges you want to control. Moving a point up will make the frequency stronger and moving a point down will make it weaker.

Normalize Audio
Normalizing an audio file is similar to amplifying, except that normalizing increases the sound of the loudest peak to the maximum level without causing clipping in digital audio. This is frequently used as the last step before saving a final version of an edited song or recording. To normalize an audio file, you will find Normalize on the Effects tab.

Fade In and Out of Audio
Fading in and out of an audio file will help acclimate the ear to the background noise of a file. To fade in, select a region at the beginning of your file, then select "Fade in" under Fade on the Effects tab. Similarly, you can select "Fade out" with a region at the end of your file selected. A good tip is to fade in quicker than you fade out because the ear expects to hear the initial audio quickly, but abrupt transitions to silence at the end can be jilting.

Remove Background Noise
Since not every audio recording is made in a sound studio environment, you often get unwanted background noise in recordings. To remove background noise you want to take advantage of the Cleanup options on the Effects tab. Specifically, under Noise Reduction try using Audio Spectral Subtraction and then Multi-band noise gating. If the presets don't give the results you want, try using lower levels on these reductions until you find a combination that leaves only audio you want to keep.

Remove Vocals
You will find an option to Reduce Vocals under the Voice button on the Effects tab. This will open a dialog box that allows you to change the pan position and width, the vocal level, and preserve the bass. Generally, the default settings will work the best, but different songs may require different settings to effectively reduce or eliminate the vocal frequencies, so if you don't get the results you want, try adjust these settings until you are satisfied with the result.

Layer Audio & Voiceovers
WavePad won't allow you to record directly over another file; highlighting a file and clicking record will replace the selection. Depending on how much mixing you want to do, you may want to consider moving to MixPad audio mixing software, but for some basic audio mixing within WavePad, you want to use the Paste Mix feature. Copy the audio you want to add to your file to the clipboard, then select all in the file you want to add it to, then select Paste Mix on the Edit tab. This will open a window with options on what to do if your files are not the same length. When you click OK the two pieces of audio will be combined.

Sound Effect Library
Find audio clips and sound effects to add to your audio projects in the NCH Sound Effect Library. Open the Sound Library from the Tools tab. This opens a new window where you can preview and download sound effects and royalty-free music clips.

Audio Effect Plugins
In the Windows version of WavePad, you can add DirectX and VST plugin effects to further expand your audio editing capabilities. Find the options to add and use VST and DirectX plugins on the Effects Tab. VST Plugins will open their own interface where you can adjust the settings, while you will need to go into the settings when selecting a DirectX plugin for the effect to be applied when you click OK. Get started with this list of free VST plugins you can download and use with WavePad.

FFT Sound Analysis
All of the audio editing features outlined above are all easy to put into action, but don't let that fool you into thinking that WavePad doesn't have a lot of power under the hood. One of the more advanced areas you can explore is the powerful audio analysis tools for examining the spectral content of the audio. Learn about the FFT and TFFT audio analysis graphs and what they represent to start to get your feet wet. These tools can be used in many fields, including linguistics and mathematics, in addition to sound engineering.


If you have any other tips, favorite features, or advice of your own, please comment and share them below.

Tuesday, April 2, 2013

Do More with Audio - Blog Carnival April 2, 2013

Here are this edition's entries to Do More with Audio:

Shaun Farley presents Creative Uses of Reverb posted at Designing Sound, saying, "Reverb is used to create realism and adding appropriate reverb will instantly help dialogue fit better into a scene. However, reverb can also be used in many other creative ways, here is a small collection of examples."

Denise Young presents 10 Benefits of Playing a Musical Instrument posted at Au Pair Care, saying, "There are many benefits to playing a musical instrument that go beyond improving hand-eye coordination and instilling a sense of responsibility in your child."

Ken Theriot presents EQ Basics posted at Home Brew Audio, saying, "Equalization&emdash;or EQ&emdash;is a big part of mixing and mastering music, but for those new to audio engineering it may be difficult to grasp. Here are some of the basics for using EQ effectively."

stayonbeat presents Free VSTs for Music Producers and Artists posted at stayonbeat.com.

Lee Pritchard presents Why you should remove breaths from voice over audio posted at Media Music Now, saying, "The problem is that once audio is produced with compression and EQ the breaths will actually become more prominent, making de-breathing essential."

Michelle Brown presents 10 iPhone Apps for Music Maniacs posted at Nanny, saying, "Apple and the app developers for the iPhone App Store are bringing instruments and equipment right to your mobile device, allowing you to use them anywhere and at any time."

Sydney Bell presents 10 of the Best Mash Ups posted at Longhorn Leads, saying, "Mash-ups are the combination of two songs sites like YouTube have boosted the art to mind-boggling popularity."

Peter Kirn presents Makey Makey + Fruits and Vegetables = Music posted at Create Digital Music, saying, "Simple circuits have long been able to make use of sensors in real-world items, but the Make Makey interfacing has made those circuits silly-simple. The project grew out of research at MIT Media Lab's Lifelong Kindergarten. Here see Massive Attack's Teardrop, as covered by artist j.viewz on fruits and veggies using the Make Makey system."


You might also be interested in:

That concludes this edition of Do More with Audio. If you have an audio story to share or advice, tips or tricks to share, we hope you will submit your audio posts and articles to the next edition.

Wednesday, February 6, 2013

Boosting the Bass in Audio Files

Boosting Bass in Songs and Music Files with the WavePad Equalizer Want to boost up the bass in your music? The Equalizer in WavePad music editing software is your answer. Open your song in WavePad and select Equalize on the Effects tab. Equalizing allows you to adjust the level of frequencies in your audio amplifying ranges of sound frequencies. So you can change the volume of just the higher or lower (bass) frequencies in a song, as opposed to simply amplifying a song which will affect all of the frequencies.

Unlike a graphic equalizer you might see in a studio, with a multitude of knobs and dials for certain frequencies, the WavePad equalizer displays a graph of the frequencies going from the low frequencies at the left to the high frequencies on the right giving you very finite control of the frequency ranges you want to control. Move a point up on the graph to make the frequency stronger and lower a point to make it weaker.

To familiarize yourself with the equalizer take advantage of the presets to get started, but don't be afraid to play around with them and to adjust their settings to see how they affect your songs. To boost the bass start with the Low Pass filter presets. If you hit play you will hear the higher frequencies drop down, giving a boosted effect to the bass. Chances are the result won't be exactly what you wanted on the first shot, but this will provide a good starting place to make further adjustments. Changes aren't applied until you actually click Apply, so you can continue to tweak the graph as needed without fear.

Other preset filters include a High Pass Filter which is the opposite of the Low Pass Filter lowering the bass instead of the higher frequencies, a Band Pass Filter to maintain the frequencies in a specified range and lower the regions above and below that section, and several more that you can experiment with on your own, or go to the help for more details on the settings of each of these presets.

Try WavePad sound editor today to boost your bass and pump up the volume of your music.

Tuesday, August 2, 2011

Do More with Audio - Blog Carnival August 2, 2011


Here are this edition's entries to Do More with Audio:


Stephanie presents Outsourcing Audio Editing posted at Vox Daily discussing the decsion to outsource audio editing or keeping it internal.

Jason Briggs presents Delving Into Different Audio File Formats posted at Free Ultimate Hobbies.

Dave Taylor presents Convert WMA audio files to MP3 on my Windows PC? posted at Windows Daily News.

David Spark presents "How to be a podcaster" podcasting resources posted at Spark Minute.

Dan Friedman presents 10 Tips For Getting the Most From Your Voice Over Session posted at The ProComm Voiceover weblog.

Abraham Hyatt presents Audio Editing and Recording for Journalists posted at Digital Journalism Protland.

JC presents EVP - Electronic Voice Phenomena posted at Patently Paranormal.

Suzanne Bird-Harris presents My Favorite Audio Editing Tool posted at Suzanne Bird-Harris.


You might also be interested in:That concludes this edition of Do More with Audio. Be sure to Submit your audio articles for the next edition.

Monday, May 30, 2011

Give Your Music a Boost: The WavePad Equalizer

WavePad Music Boosting Sound Equalizer I have noticed a lot of questions on our YouTube channel about enhancing the bass in a song using WavePad audio editor. How is it done? Since the graphical interface of WavePad's equalizer was recently updated, now is the perfect time to review how to use it.

The first thing you want to do is load your music into WavePad. Do this by clicking the Open File icon on the toolbar, browse to your music file, and click Open.

Next, click the Effects menu and select Equalizer. This will open the Equalizer dialog, which might not be what you expect if you were looking for knobs and dials. This equalizer still weakens and strengthens frequencies like knobs on a mixing board, but represents the frequencies in graph form. The graph works logically enough; the low frequencies are represented on the left of the graph, the high frequencies on the right. If there is a point on the graph line that is higher, that frequency will be stronger. If the graph point is lower, the frequency will be weaker.

The easiest way familiarize yourself with this equalizer is to make use of the presets. Don't be afraid to play around with them and to adjust their settings to see how they affect your music--you don't have to commit to any changes until you click Apply.

Let's boost the bass as an example. Click the Play button and then select the Low Pass filter from the list of presets. You'll hear the higher frequencies drop down, giving a boosted effect to the bass. The result probably isn't exactly the sound you imagined, so you can make adjustments based on this starting place to even out the sound how you want. You can do this using the Low Pass Options dialog that opened when you selected this preset, but you'll have more control if you close the dialog and move around the graph points yourself. You can also add graph points by clicking on the graph's line.

For more information about how to use the different equalizer presets, view the Effects topic in the help manual. For more information about frequencies, view the General Audio Concepts topic, also in the help manual. The help manual is accessed by pressing F1 from the program.

To try WavePad and boost your bass, download the program from our website. You'll also want to see the other audio software we have for maximizing your audio production.