Showing posts with label WavePad. Show all posts

Friday, October 14, 2022

New Features Now Available in WavePad's FFT Analyzer

NCH Software continues to take sound editing to a whole new level with powerful, intuitive and affordable Wavepad audio editing software. WavePad includes one of the most advanced FFT (Fast Fourier Transform) sound analyzers available anywhere. This FFT feature now provides the ability to run FFT on 'live' audio from multiple input types including microphone and instrument lines. Additional new FFT features include:

  • Choice between Hamming and Hanning audio analysis
  • Export FFT to a graph
  • Zoom in and Zoom out for a better view of the sound analysis

The FFT window now displays the graph for the whole window. Other controls and functions, such as zoom, can be found in the (right click) context menu:

fft graph sample

Easily access the 'Live FFT Display' via the main 'Tools' option in either the Tools dropdown or Tools sub-menu:

fft selection in tools dropdown


fft option in tools sub menu

Leverage the audio editing software that is the number one choice for both sound engineers and home audio enthusiasts.


Friday, April 19, 2019

How to Split Audio with WavePad

How to Split Audio Files


Learning how to split audio tracks is an important skill to have for anybody editing audio and sound files. You may want to split your tracks to rearrange them in an audio or video project or perhaps you want to split them just to trim off the excess in your recording. In either case, WavePad Audio Editing software will allow you to split audio tracks with ease.

Download WavePad here to get started: https://www.nch.com.au/wavepad


Splitting Audio Files in WavePad


How to Split Audio

  1. Add an audio file into the WavePad 
  2. Click the Split button on the Edit toolbar and select an option.
  3. Split at the cursor or Split into component channels will cause the splitting to occur immediately.
  4. Choose another option to open the Split File into Multiple Parts dialog.
  5. Complete the dialog and click Split to split the audio file.
  6. Save or export your project


Friday, November 30, 2018

Introducing Multi-Channel Audio Editing with WavePad

Multi-Channel Audio Editing with WavePad Audio Editor


You have been asking for separate channel audio editing and we have been listening. We are excited to announce that WavePad Audio Editor is now capable of performing sperate edits to individual audio channels in your multi-channel audio files. Not only is the new feature a fun and exciting way to step up your audio editing game, but it is also easy and simple to learn. Being able to edit and make adjustments to the separate channels in a multi-channel audio file is an important task in audio and sound editing. Not all edits are applicable for all channels in a file so being able to edit them individually can help you achieve a higher level of professional sound quality.


Open your Audio File in WavePad

Open your audio file in WavePad Audio Editor by clicking on the Open icon in the main menu and selecting the option that says Open File. This will launch the file finder window where you can choose the file with multiple channels that you wish to edit and bring it into the program. Select your file and then click Open to bring the file into WavePad.

Show Different Channels

Beneath your waveform on the left-hand side, locate the Show Different Channels Separately button. Click on this button to show the separate channels in your multi-channel audio file. Stereo is generally the most common, which will display two channels. At this point, all edits made will still be applied to both channels, but now the separate channels in the track are visible.

Separate Channel Editing

In the same toolbar, you will also find the option to enable separate channel editing. Your first few uses, a bubble tip will point out the Separate Channel Editing button. Click the Separate channel editing button to enable separate channel editing mode. Select the channel you wish to edit by clicking on its waveform and editing it as usual. The active channel will be colored and the inactive waveforms will turn gray. To edit all channels simultaneously, click the Separate Channel Editing button again to disable it.

Editing Audio Channels Separately

Now that you have enabled separate channel editing, you can make typical edits to each channel individually. Select a channel to activate it and then choose from a variety of the audio editing options available in WavePad. You can normalize the audio and adjust the gain of just one channel and then perform different edits on another channel. If you wish to edit only a portion of one channel, simply click on the waveform of the channel you wish and drag the cursor to select only a  portion of it.

Export Multi-Channel Audio Files

Once you are finished editing the separate channels of your audio, you can then export your new audio file however you would like. From the main menu, select File and choose Save File As... to save your multi-channel audio file in a variety of popular formats. You can also burn your file to a disk or upload it directly to the cloud.


For more on audio editing, check out these posts:

Friday, October 5, 2018

How to Edit an Audio File and Change it to MP3

How to Edit an Audio File and Change it to MP3


The MP3 audio file format is the most commonly used format for sound today. MP3s are the preferred file type for sending and receiving audio files as well as storing them on discs and devices. Learning how to change an audio file to MP3 will provide you with virtually unlimited sharing and storing possibilities for your music and audio files. With a simple audio editing software such as WavePad Audio Editing Software you can easily learn how to edit audio files and save audio as MP3.


Import Audio

To begin editing audio files to export as MP3, you will first have to import those files into WavePad. You can add files to a WavePad project directly from a disc, from your computer or external drive, from the NCH Sound Library or you can record audio directly into the program.
 

Edit Audio

Before changing audio to MP3, you may first want to edit your music or sound file. Click on the Edit tab in the main toolbar to view the options for editing your audio files in WavePad. From here you can perform basic audio editing such as splitting and trimming clips, removing silences, mixing audio files, and performing general audio file cleanup.


Adjust Audio Levels

Adjusting audio levels is something both seasoned music producers and beginners alike can quickly accomplish in WavePad. Adjusting audio levels will allow you to clean up and improve the sound quality of audio files. Click on the Levels tab in the main tool bar to view the different options for adjusting audio levels. Use the Noise Reduction feature to eliminate any unwanted background noise in your audio. You can also use the Amplify function to increase the sound volume or the Normalize function to further optimize the overall sound quality.


Apply Effects

WavePad comes loaded with a variety of exciting and useful audio editing effects that you can use on your files. Choose from a list of classic effects such as Reverb, Chorus, and Echo or experiment with the many other effects available such as the Voice Changer. WavePad even allows you to combine and layer effects over each other to in order to create your own unique and original sound effect.


Use Tools

Make use of the many tools available in WavePad while you learn how to edit audio files and save them as MP3. Use the Surround Sound Editor to edit and apply a surround sound effect to your audio for playback with a surround sound system. The Batch Converter Tool allows you to add multiple files for editing and converting all at once within your project. You can access the NCH Sound Library from the Tools tab and access a library of free sound effects and audio samples to use in your audio editing project.


Save as MP3

Now that you have successfully learned how to edit an audio file with WavePad, you are ready to learn how to change audio files to MP3. Click on the Home tab in the main toolbar and then click on the drop down arrow next to the Save button. Here you can select the option that says Save File As... to launch the file finder window. Select your preferred output destination and name the file what you would like. Then click on the drop down menu that says Save as File Type and choose the option MPEG Layer-3. This is just a longer way of saying "MP3." Once you click Save, your newly edited audio file will appear as an MP3 in your chosen output folder.


For more on audio editing, checkout these posts: 

Friday, April 27, 2018

How to Edit Audio Files with WavePad

How to Edit Audio Files with WavePad

musician recording with WavePad

You don’t have to be a professional music producer to record and edit your own music. With easy-to-use music editing software like WavePad, you can take your audio recordings to the next level. Recording and editing your songs yourself is a great way to share and preserve your musical masterpieces and anyone can do it. Whether you are recording your voice for a podcast or you are editing tracks of your band playing live music, it has never been easier to create professional-quality recordings from home.

Record Audio

If you don’t already have an audio recording to work with, don’t worry. WavePad allows you to record audio directly into the program using an accessory microphone or the internal microphone on your computer or device. To begin recording a new track, simply click the red record button, a new blank track will be created and your recording will begin automatically. You can stop your recording by clicking the square stop button, pushing the Esc key, or by clicking anywhere on the track.
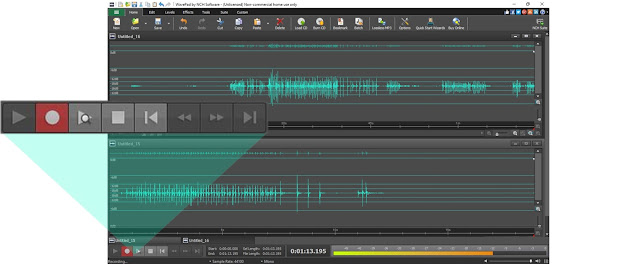
screenshot of recording in WavePad audio editing software
Recording Audio in WavePad

Import Audio

If you already have a pre-recorded track you would like to work with, you can easily import the track into WavePad to edit. Simply press Ctrl + O on Windows or Command + O on Mac to open it. You can also go to the main drop-down menu and select File and then Open. Import a file from your computer or external device, or you can choose to open a file directly off of a CD or data disc. You can even import files straight from the Cloud. Make sure to explore the NCH Sound Library for additional audio samples and sounds to add to your music or audio project.
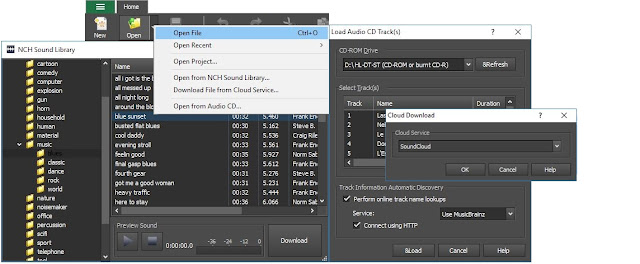
screenshot of WavePad audio recording software file import
Import Audio Files

Trim Tracks

Trimming down your audio recordings or music tracks is one of the first tasks you will want to complete when you begin editing audio files. WavePad allows you to easily remove the silences from the beginning and end of your recordings. Simply select your entire track, go to the Edit tab, click Trim, and then choose the Auto-trim silence from the Start and End of the File option from the drop-down menu.
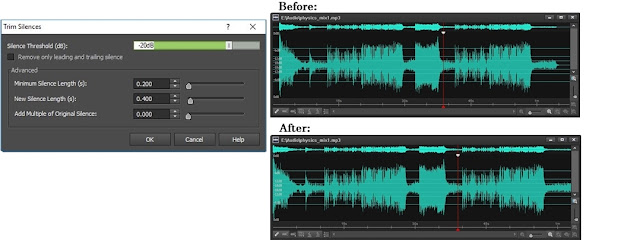
screenshot of trimming silences in WavePad audio editing software
Trim Out Silences in Your Tracks 

Split Tracks

You can split your recordings and files at any point you would like to in WavePad. Simply place your cursor wherever you would like to split your track, select the Split option from under the Edit tab and then choose "Split at cursor" from the drop-down menu. This will split your audio at the position of the cursor, generating two separate tracks.
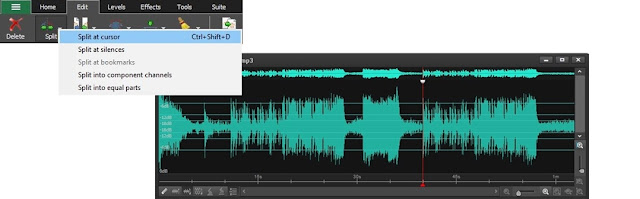
screenshot demonstrating how to split audio tracks in WavePad
Split Tracks

Reduce Noise

Removing background noise from your audio tracks is essential if you want to make your recording sound professional. Background sounds such as chair squeaks, footsteps, and even your own breathing, are all noises that are easily picked up by your microphone. Luckily, they are just as easily removed from your tracks. Choose the track you want to remove noise from and then select the Cleanup option in the Effects menu. From there you can choose from a variety of noise cleanup options, such as auto click/pop removal or noise reduction.
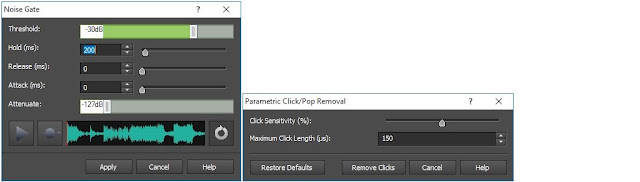
Screenshot demonstrating how to remove background noise from an audio file or recording
Reduce Background Noise

Mix Audio

The Paste-Mix feature in WavePad allows you to overlay tracks to create mash-ups, voice-overs or layer recorded instruments for that full band sound. To combine the audio from two tracks into one, start by selecting one of the tracks and copying it to the clipboard. Next, select your second track and click on the Paste Mix icon in the menu under the Edit tab. When you play it back you will hear that the two pieces of audio have now been combined.
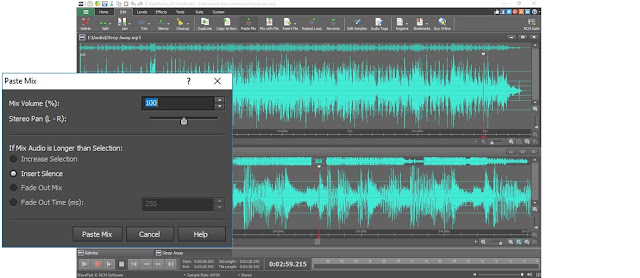
screenshot demonstrating how to mix audio tracks in WavePad
Mixing Audio Tracks 

Volume Control

Now that your song or voice recording is cut down to the good stuff, you can decide what you want to do with your volume levels. Not all microphones are created equally and so your song may end up being a lot louder or a lot quieter than you expected. Select the Levels tab to view some of the different volume control options available in WavePad. Select Normalize Audio from the effects tab to amplify audio gain across the entire track. This is a great last step to finalize your project before exporting.
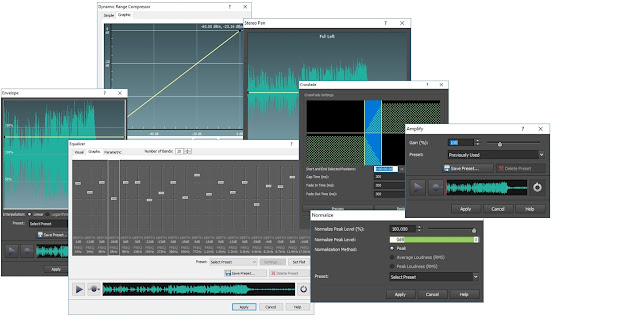
screenshot demonstrating different audio adjustments and controls for music editing
WavePad Volume Control Features

Save and Export

When you are finished editing your audio project, you will need to save it. WavePad has several easy options for saving and exporting your audio files. Under the Home tab, you can click on the Save icon and choose to burn your song to an audio or data CD, send the file in an email, upload it to the cloud, or save it as a number of audio file formats. If you plan on making additional edits to your project later, you can save all of your work as a WavePad project file to preserve quality.
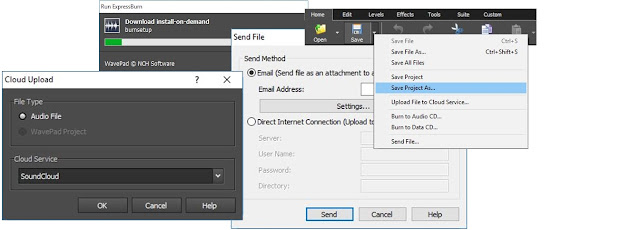
screenshot demonstrating the different ways to save and export a music project
Saving Audio Files


Monday, January 30, 2017

Navigate Speech in WavePad

Navigate Speech in WavePad


Using the Navigate Speech Tool in WavePad

The Navigate Speech tool in WavePad Audio Editor will allow you to locate sections of audio quickly and easily. Using speech recognition, WavePad can generate a script of words spoken in an audio file and can navigate directly to the moment when a specific word was spoken in an audio file. This can be very useful in many different situations. For example, you can use the Navigate Speech tool to locate and navigate to a specific section in a large audio recording, such as a company meeting, college lecture recording, or audio file for transcription.

Using the Navigate Speech Tool

To begin, load your audio file into WavePad. You can do this by selecting "Open File" from the File menu, or by using the key command "Ctrl+O"


Once your audio file has been opened in WavePad, click on the Tools menu in the top bar menu, and Select "Navigate Speech" from the list of tools.


When you click on the Navigate Speech tool, WavePad will begin using speech recognition to generate an output of the words spoken in your audio file. Once your audio file script has been generated, you can use the file to navigate easily throughout the recording.

Search for a Keyword

To search for a specific word in your audio file, simply type the keyword into the box at the bottom of the Navigate Speech window, and click on the "Search" button to locate all instances of a specific word in the text file.


Locate a Specific Word in the Audio File

You can use the generated text to navigate to any point in your audio file. To navigate instantly to the point in your audio file when a specific word is spoken, simply double click on the word that you would like to navigate to.

Highlight a Region in the Audio File

You can also use the Navigate Speech tool to highlight a region of your audio file. To do this, highlight words or paragraphs in the generated text and the region will become selected in your audio file waveform. This can be useful when trimming audio files, or for breaking out specific sections in a larger audio file.


You may also like:


Thursday, March 3, 2016

WavePad로 노래에서 보컬을 제거하는 방법

 WavePad 오디오 편집 프로그램의 가장 인기 있는 기능 하나는 노래 또는 오디오의 일부분에서 보컬을 제거 또는, 감소시키는 기능입니다. 사용자는 보컬을 제거한 가라오케, 악기 샘플링, 음악 트랙 리믹스 등으로 오디오 사용 단순히 노래의 경음악 버전으로 저장할 있습니다.

보컬을 제거하려면, WavePad 노래를 로드하고 효과 탭으로 이동하여 음성 버튼을 클릭합니다. 드롭 다운 메뉴에서 음성 감소 선택합니다. 이렇게 하면 위치와 , 보컬 수준을 변경할 있는 대화 상자가 열리고, 그리고 베이스를 유지합니다. 일반적으로 기본 설정은 최적의 설정으로 작동하지만, 각각의 다른 노래들은 효과 감소 음성 주파수를 제거하기 위해 다른 설정을 필요로 있습니다. 기본 설정으로 충분하지 않으면, 사용자는 결과에 만족할 때까지 이러한 설정을 조정할 있습니다.

오디오 일부분에서 보컬을 줄이려면, 먼저 지역을 선택해야 합니다. 기본적으로 아무것도 선택하지 않은 경우, WavePad 전체 파일에 효과를 적용합니다. 전체 노래에서 보컬 감소를 편집할 경우, 선택을 건너뛸 있습니다.

오늘 WavePad 음악 편집 프로그램을 다운로드하셔서 노래에서 보컬을 제거하여 좋은 배경 음악, 노래방 노래 만들기 자신의 노래 연주의 녹음을 혼합하여 버전을 시도해 보십시오.

Friday, February 26, 2016

WavePad Audio Editor Given an 8/10 by MicroMart Magazine UK

WavePad Review by MicroMart UK


MicroMart, one of the largest software/computing print magazines in the UK just reviewed NCH's audio editor, WavePad, for it's audio enthusiast's special this month and gave it a 8/10, "Definitely Recommended."

Some highlights:

"WavePad has an interface that makes all these tools easy to use. It's modern, and it places nearly all the functions you need on a ribbon toolbar."

"There are numerous VST plug-ins available for audio editors, and they add a wide range of extra features and functions. It gives WavePad almost unlimited capabilities."

"It's possible to remove the voice from a music track with a couple of mouse clicks, leaving just the music. You could make your own karaoke tracks or mix a different voice with the music."

"Feature-rich and great to use"

Read the full review here:

WavePad 6.38 Review by MicroMart UK

Click on the link to download or purchase:
WavePad by NCH Software

Friday, July 11, 2014

A Great Testimonial from a customer about NCH Products


I am a performing musician and a guitar instructor.  I discovered NCH Software products quite by accident a number of years ago.  I liked the way the products worked and have now used about 6 different titles.  In both my teaching and performance lives I’ve found many uses for NCH software.  One of my favorite programs is WavePad Sound Editor which I use so much it’s like I can’t function without it.  I have it licensed on 3 computers now.

One of the activities I did in my guitar lessons was to record my student’s performance of some song or piece of music they had learned.  Once they had the piece to “performance quality” we‘d record it for their “history” file.  I also would put out compilation CD’s of several students’ performances and would distribute them to all the students in my studio so they could hear what others were doing and how well they played and so on.

Our recording set up consisted of a drum machine for constant tempos, my student’s guitar (and sometimes voice [Taylor Swift lovers]) and my guitar for support/accompaniment or embellishments.  We would record “live” to a Tascam digital field recorder, so we got what we got.

I would take these recordings to WavePad where I could trim any dead air, manipulate overall levels, and add effects and EQ if needed.  Those were the usual operations.

One episode stands out in my mind for a number of reasons and turned out to be a great demonstration of what you can do with WavePad.  My student, a 13 year old girl and dedicated Taylor Swift fan (as well as a good little guitar player and vocalist) had learned to play and sing one of Taylor’s songs.  When we recorded it, she nailed it but I had too soft a vocal mix so we opted to do it again.  After a second take, which she nailed again, I realized I had overcorrected and now the vocal was too loud.  We were also out of time that day. So I wound up with 2 non usable tracks.  That’s when inspiration struck and I turned to WavePad.

Because we had used a drum backing beat at the same tempo and because my student had nailed her performance both times, I realized I had 2 identical length tracks, one with too little vocal, one with too much.  I went to WavePad and was able to stack the two tracks on top of one another and magically came out with a perfect track!  Because it was really 2 performances, it had that “double  tracked” effect, and it sounded amazing.  Also amazing was that my student had not missed a single syllable in her retake and her guitar playing was flawless so her 2 takes were like carbon copies and they fit together perfectly.  Try doing that sometime!

- Tom B. of Las Vegas, NV