Friday, August 31, 2018

Edit Videos on Windows Computers Easily

How to Edit Videos on Windows


There are many different things that you can do with all of those videos you have been taking. Maybe they have been piling up on your phone over the years, or maybe you are the type who films a vacation from the time you leave until the moment you get back. Whatever the reason, learning how to edit videos on Windows PC is a good way to get organized and make something great out of all of that footage. With a simple video editing software such as VideoPad Video Editor, you can quickly learn how to edit videos on Windows with ease.


Import Videos

To begin editing videos on Windows, you will first need to import your video files into VideoPad. Open the program on your PC and click on the icon that says Add files. This will open the file browser window where you can select the video clips that you would like to edit.

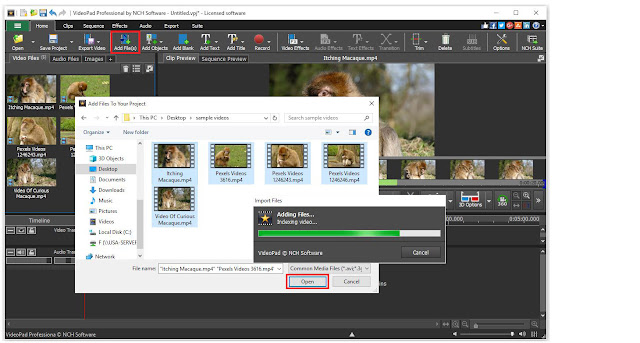
Adding video files to VideoPad 

Trim Videos

One of the first tasks when editing videos on Windows is to trim your clips down to the good stuff. From the media bin on the left-hand side of the program, click on the clip you want to trim. This will open the clip in the preview window. Drag the red and blue brackets along the timeline in this window to set the beginning and endpoints of your clip. To split your clip into two separate videos, simply drag the red cursor to the point you want to split and click on the scissors icon. This will create two new clips in the media bin.

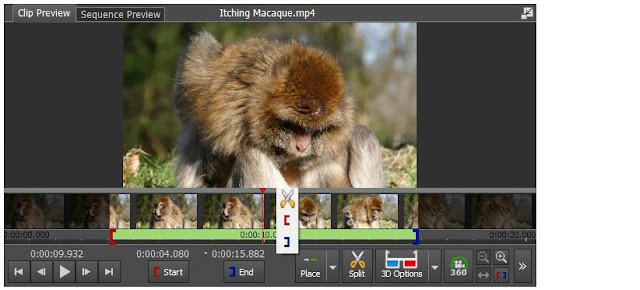
How to trim a video clip

Apply Effects

VideoPad Video Editor comes loaded with great effects that you can add to your videos. You can easily touch up your videos by making color adjustments or take it a step further and add special effects to bring your videos to life. Effects can also be layered on top of one another to create a new and unique video effect of your own. Select the clip that you wish to add effects to, then click on the tab in the top menu that says Add Effects. This will launch the Effects Window where you can choose your first effect. After selecting an effect, the Effects Layers Panel will open up and you can adjust your effects and arrange their order.

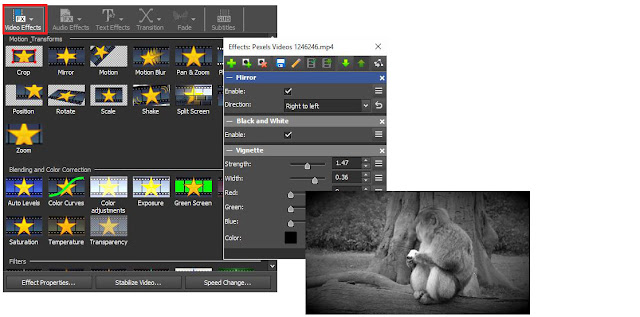
Add effects to videos 

Timeline

Now that you have your clips trimmed and touched up, it is time to put them together. Drag and drop your clips from the media bin directly into the VideoPad timeline in any order you would like. You can drag them one at a time or all at once. You can always change their position in the timeline later if you decide that you want them in a different order. When a clip is in the timeline, it will have a green checkmark on it in the media bin.

Using the VideoPad timeline

Add Transitions

If you have several video clips that you would like to edit together, it is a good idea to use transitions to make the change between them smooth and seamless. VideoPad Video Editor is full of great video transitions to use when you are learning how to edit videos on Windows. Click on the X icon between any two video clips in your timeline to open the Transitions Window and select a transition. You can adjust the duration of your transition in the bottom right-hand corner of the transitions menu.
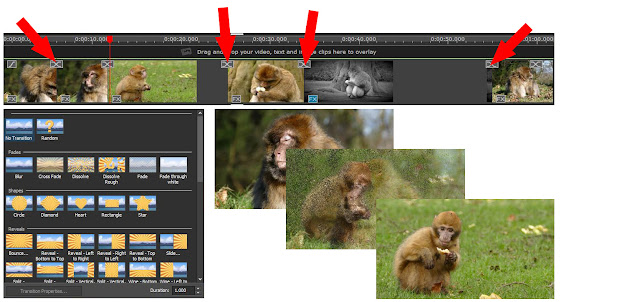
How to add transitions to videos
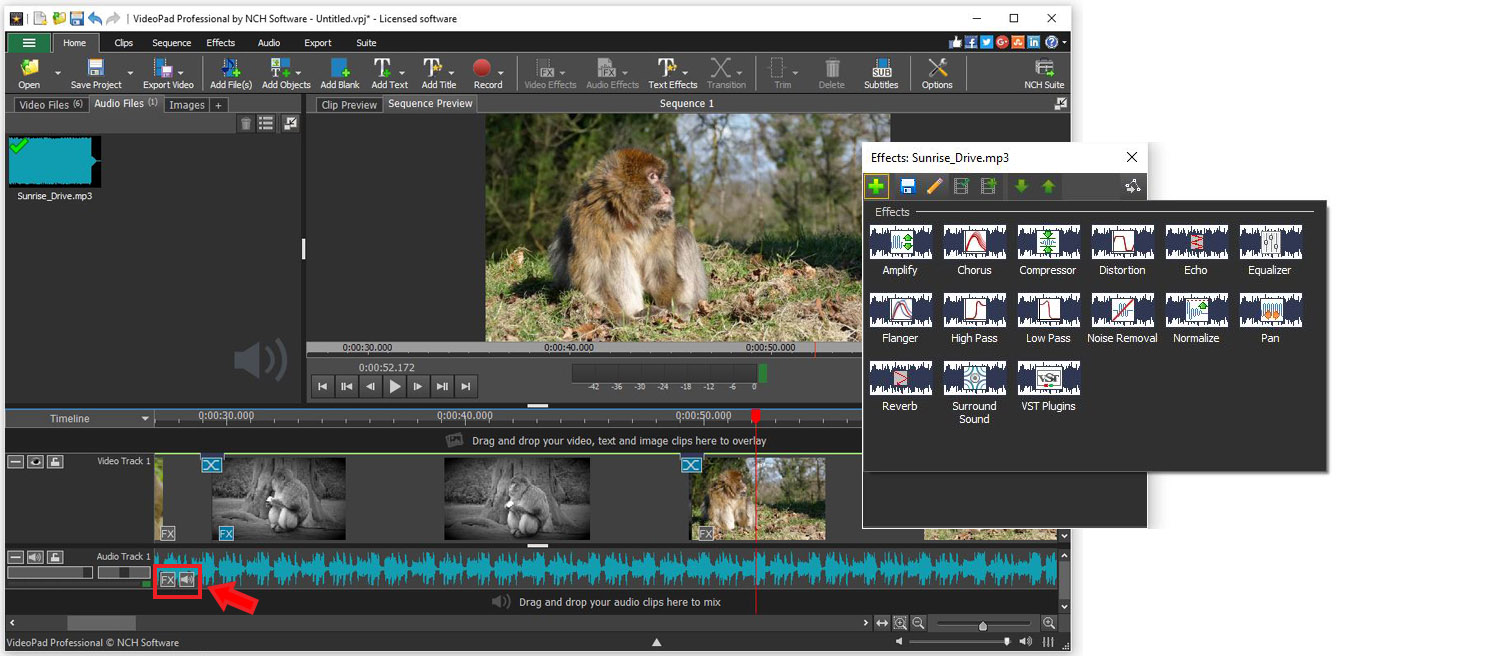
Add Audio

Now that your clips are running together smoothly in your timeline, you are probably wondering how to add audio to videos. Adding music or narration to videos makes for a professional-looking final product and helps your video to be more captivating and interesting to your audience. You can add audio files by clicking on the same Add File(s) button that was used to add your video files. Once imported, drag the audio clip from the media bin into the timeline and place it wherever you would like. Click on the FX or Speaker icons located on the audio clip to add audio effects and adjust the volume of your audio clip.

How to add audio to videos

Add Text

Adding text to a video is a great way to tell the viewer information that isn't otherwise available to them. Click on the Add Text button in the top menu to add text to your video. Type your text in the text box that appears and make any font and style adjustments you wish. When you exit out of the text window, you will see your new text as a clip on your timeline. You can move your text clip, add transitions and effects to it, and increase or decrease the duration of the text clip in your video.

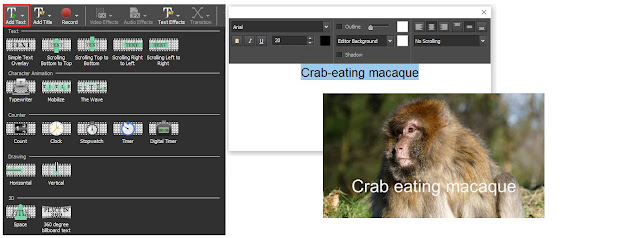
How to add text to videos

Export

We have now successfully learned how to trim video clips and apply effects. We demonstrated how to combine video clips together in your timeline and how to add transitions to videos. We also learned how to add audio and text to videos and how to navigate the VideoPad interface while doing so. You now know how to edit videos on Windows PC and you are ready to export your final video product. Click the button that says Export Video in the top menu. You can choose from a variety of exporting options such as saving as a video file, burning to a disc, or uploading your video straight to YouTube.

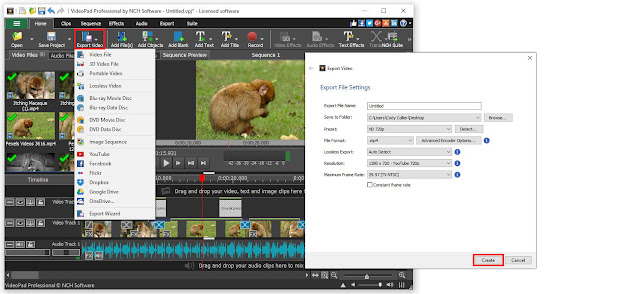
Exporting videos from VideoPad 


For more of VideoPad and video editing, check out these posts:

Wednesday, August 29, 2018

Just Released: Switch Sound File Converter for Android

Download Switch 6.31 now at www.nch.com.au/switch/index.html. Also available for Windows and Mac OS X at the same page

Tuesday, August 28, 2018

New Release: DreamPlan Home Design Software for Windows

Download DreamPlan 3.14 now at www.nchsoftware.com/design/index.html. Also available for Mac OS X and Android at the same page

Friday, August 24, 2018

How to Resize a Picture

How to Resize a Picture


There are often times when we end up with photos that are larger than we need them to be. Many websites will only allow images of a certain size to be used or uploaded. Meanwhile, here you are with your giant photo wondering how to resize a picture. If you encounter an error on the web or another situation where you would need to know how to resize a picture, don't sweat it. With a simple photo editing software such as PhotoPad Photo Editor you can easily learn how to resize a picture or graphic on your own.


Import Your Photo into PhotoPad

The first step to resizing your picture is to bring your image into PhotoPad. After you have opened your copy of PhotoPad on your computer, there are several options for importing images. Click on the option that says Open when you first launch the program and you can immediately start using the Photo Browser. Otherwise, under the Home tab, you may click on the Photo Browser icon or the Open Files icon to select the image you wish to resize. Under the File tab, you can also choose to open an image into the program from a cloud service, such as Google Drive or DropBox.

PhotoPad Photo Browser 


Resize the Canvas and Layers

The Resize icon exists both under the Home tab and under the Edit tab. With your image in the program, click on the Resize icon to resize your photo. You will notice that a resize effect layer has now opened in the Effects History and Layers panel on the right-hand side of the program.

Resizing canvas and layers in PhotoPad

Select Your Scale

There are four options for how to resize a picture in PhotoPad. You can set your scaling units to resize based on Pixels, Percentage, Inches, or Millimeters. For images on the web, Pixels, and Percentages are the more common units used for resizing photos. If you choose to resize by inches, you can access the Resolution option and set the pixels per inch of your photo. You will notice the checked box at the bottom of the layer that says "Keep Aspect Ratio." This means that while you are adjusting the image's size, your width to height ratio will remain the same. This is commonly known as "Constrained Proportions." It is usually best to keep this option checked.


How to Resize an Image

For this example, I have chosen to resize a picture using the percentage option for my units. This is an easy way to conceptualize how to resize a picture. I want my image to be exactly half the size it is right now, so I have set my units to Percentage and then typed in 50% for the value in the width box. You will see that my image is now half the size it previously was. Some websites give you specific dimension requirements for photos in pixels. For this, you would simply change the units to pixels instead of percentage and type in the dimensions you were given into the width and height boxes.

Resize Photo by Percentage 

Save Your Image

Now that you are finished resizing your image, you are ready to save your work and use your newly resized photo. Under the File tab, select the option that says Save As...This will launch the explorer window and allow you to select your output destination and choose your output file type.


Resize by Compressing

Sometimes when people ask how to resize a picture, what they are actually referring to is the file size in terms of storage. This is also known as file compression and can be done just as easily in PhotoPad. With your photo opened in the program, simply go to the File tab and select the option that says Save for web... This will launch a window that will allow you to use a slider to adjust the compression quality of your image and preview the result in real-time. In this example, I have reduced the file size by 80% with almost no observable loss in quality. Click on the OK button when you are finished and your newly compressed image can be saved to your chosen output destination.

Save for Web...


For more on photo editing, check out these posts:

Thursday, August 23, 2018

Wednesday, August 22, 2018

Just Released: MixPad Multitrack Recording Software for Windows

Download MixPad 5.12 now at www.nch.com.au/mixpad/index.html. Also available for Mac OS X, Android and iOS at the same page

Tuesday, August 21, 2018

Just Released: Switch Sound File Converter for Windows

Download Switch 6.29 now at www.nch.com.au/switch/index.html. Also available for Mac OS X and Android at the same page

Just Released: MixPad MultiTrack Recorder for iOS

Download MixPad 5.12 now at www.nch.com.au/mixpad/index.html. Also available for Mac OS X, Android and Windows at the same page

Monday, August 20, 2018

Just Released: WavePad Sound Editor for Windows

Download WavePad 8.21 now at www.nch.com.au/wavepad/index.html. Also available for iOS, Android and Mac OS X at the same page

Friday, August 17, 2018

How to Create a Curved Path with DreamPlan Home Design Software

How to Create a Curved Path with DreamPlan Home Design Software


Creating a Curved Path with DreamPlan Home Design Software


This tutorial will show you how to create a curved path with DreamPlan Home Design Software.
For more information on DreamPlan, visit our website here: https://www.nchsoftware.com/design

For more DreamPlan Tutorials, visit: https://www.nchsoftware.com/design/tutorial.html


How to Create a Curved Path with DreamPlan Home Design Software

  1. Select the Path button on the Exterior tab and draw the edges of your path. 
  2. Select the path and you will see a red handle at each point you clicked with your mouse when drawing the path plus an additional pink handle between each pair of red handles.
  3. Left-click and drag either a red or pink handle to form a curved line.

For more information and additional tips and tricks, watch the full video tutorial above.


To view additional DreamPlan tutorials, visit https://www.nchsoftware.com/design/tutorial.html

Do you need help using DreamPlan?
View the DreamPlan Help Manual: http://help.nchsoftware.com/help/en/dreamplan/win/help.pdf

Visit the DreamPlan forum to ask other users for help or share your designs: http://nch.invisionzone.com/index.php?/forum/174-dreamplan/

Or contact DreamPlan Support: https://www.nch.com.au/support/supportcontact.html?software=DreamPlan

Friday, August 10, 2018

Transfer Video to PC Easily in a Couple of Steps with VideoPad

How to Transfer Video to PC


Everybody loves taking videos these days. We like to film our lives and the things around us so that we can re-visit the memories time and time again. Watching these videos on your camera is great, but transferring videos to a PC allows you to do a lot more with them. Learning how to transfer video to PC will let you save your videos in a secure location, play them back on a much larger screen, edit them to make movies, and share them with whomever you would like. With a simple video editing software such as VideoPad Video Editing Software, you can edit and transfer video to PC with ease.


Transferring Video to PC from SD Card or Other External Device

Import Video Files into VideoPad 
Select Video Files to Transfer to PC
Open your copy of VideoPad Video Editing Software and select New Project. From there, click on the Add Files tab to open your computer's file browser. You can also go to the main menu in the program and select File > Add File(s) or simply use the keyboard command Ctrl + M to open the file finder window. Once this window is open, you can select your SD Card or another external device from where you would like to import your videos. Select the videos you would like to transfer to your PC and then click Open to bring them into VideoPad.

Edit Your Video Clip(s)

With your clips imported into VideoPad, you can now make any edits or adjustments you would like before transferring your videos to your PC. Apply effects, add text and transitions, and crop and trim your video clips so that your captured moments are action-packed and exciting. Drag your clip into the timeline to make any edits you would like and then move on to the next step.

Edit Your Video Clips 

Transfer Video to PC

When you are finished editing your clip, you are now ready to learn how to transfer video to PC. With your clip or clips in your timeline, go to the main menu and select File > Export video... You can also use the keyboard command Ctrl + B. This will launch the export video window and you can select the destination where you would like to transfer video to your PC. Use the Browse button to find a folder and then click Create to start the export. This will transfer whatever clip or clips you have in your timeline to your PC.
Transfer Video to PC


For more on VideoPad and video editing, check out these posts:


Friday, August 3, 2018

How to Add a Fretboard with Crescendo Music Notation Software

How to Add a Fretboard with Crescendo Music Notation Software


How to Add a Fretboard with Crescendo Music Notation Software

Download Crescendo to get started: https://www.nch.com.au/notation/index.html

To view more Crescendo Music Notation tutorials, visit: https://www.nch.com.au/notation/tutorial.html


How To Add a Fretboard

  1. To show the guitar fingering for a chord, click a chord in the Fretboard Toolbox on the right to select it. 
  2. Click on the score to place it.  
  3. For additional options, right-click on the chord after placing it.

For more information and additional tips and tricks, watch the full video tutorial above.


To view more Crescendo Music Notation tutorials, visit: https://www.nch.com.au/notation/tutorial.html

Do you need help using Crescendo?
View the Help Manual: http://help.nchsoftware.com/help/en/crescendo/win/help.pdf

Visit the Crescendo Help Forum: http://nch.invisionzone.com/forum/123-crescendo-music-notation/

Contact Crescendo Technical Support: https://www.nch.com.au/support/supportcontact.html?software=Crescendo