Friday, May 31, 2019
New Release: Crescendo Music Notation Editor for Windows
Posted by
NCH Software
Download Crescendo 4.08 now at www.nch.com.au/notation/index.html. Also available for Android and Mac OS X at the same page
Friday, May 24, 2019
How to Change WMA to MP3 with Switch Audio Converter
Posted by
Cody Collier
How to Change WMA to MP3 with Switch Audio Converter

Windows Media Audio files, or WMA files, are a common audio file format, primarily meant to be opened and played on Windows Media Player and other Microsoft audio players. You can play WMA files with some other third-party software, but many audio players and devices (iPhone) will not support them. That is why it is useful to know how to change WMA to MP3. MP3 files are a much more commonly supported file type and are arguably a superior format anyways. You can easily change WMA files to MP3 format with an audio file conversion program such as Switch WMA File Converter Software.
Download Switch
Download Switch Audio File Converter software. Follow the installation instructions and launch the program on your computer.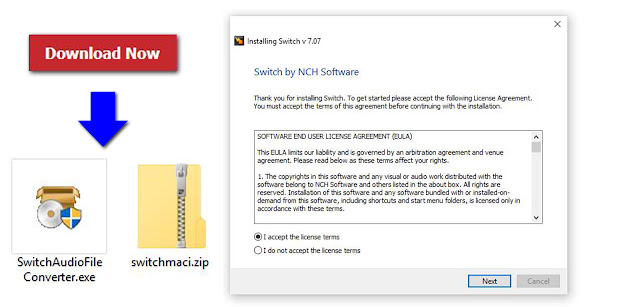 |
| Download Switch Audio File Conversion Software |
Import WMA Files
Click on the green Add File(s) button located in the main toolbar to open the file finder window. Find and select the WMA files on your computer and click Open to bring them into Switch to convert them to MP3 format. You can also drag and drop WMA files directly into the program to change.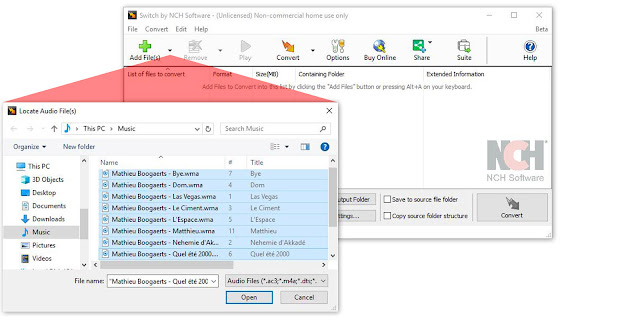 |
| Import WMA files to Change them to MP3 |
Options Menu
Click on the Options icon in the main toolbar to open the Options window. This is where you can add and make adjustments that will be performed on your WMA files during the conversion. You can add metadata to your converted MP3 audio files as well as change settings to handle duplicate files and formats. Once you are finished adjusting these options, click OK.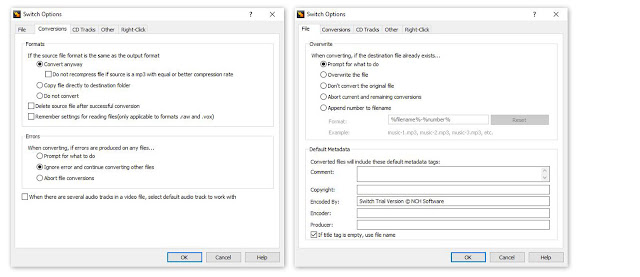 |
| Audio File Converter Options |
Select Output Destination
Set the output destination where you would like your converted files to go after you have converted them from WMA to MP3 format. Click on the Save to folder drop-down menu to select a folder from this list, or click on the Browse button to open the file finder window and select a folder on your computer.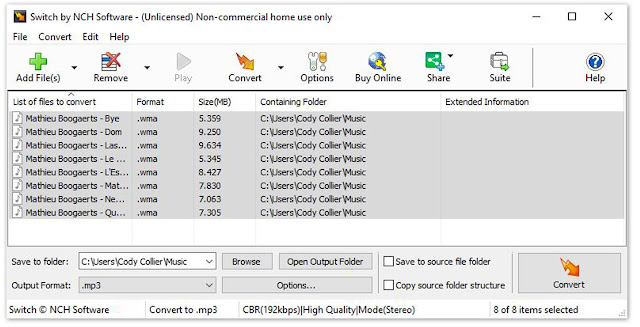 | |
|
Set Output Format to MP3
With your output folder set, you can now set the output format to MP3. Click on the drop-down menu on the left side of the program next to the words "Output Format" to view the list of available audio file formats. To change your WMA files to MP3 files, simply select the option from this list that says, "MP3." All conversions performed will now be in the MP3 audio file format.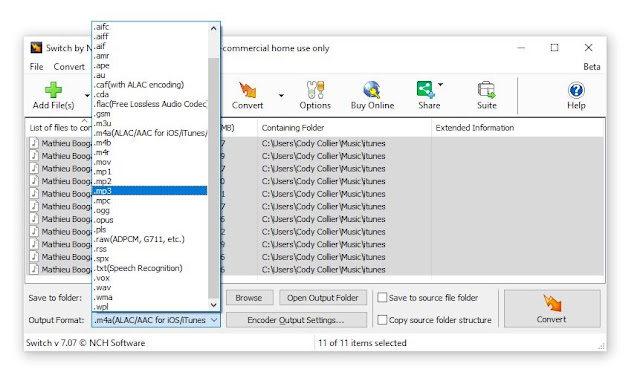 |
| Set Output Format Type to MP3 |
Encoder Options
Click on the Encoder Output Settings... button to launch the window for WMA Output Settings. Here you can make adjustments and change audio encoder settings such as metadata, sample rate, bitrate, and amplify/normalizing audio. These settings will be applied during the conversion process while your WMA files are being changed to MP3 files.
 |
| WMA Encoder Options |
Change WMA to MP3
Once everything is set up, you are ready to change your WMA files to MP3. Simply click on one of the Convert buttons, located in the bottom right-hand corner of the program and in the main toolbar. This will start the conversion process. You can select only one file to convert them one at a time or you can select all of them to perform easy batch MP3 conversions.
Finished
After the WMA to MP3 conversion is complete, you will see a green banner at the bottom of the program that says "Conversion Complete." You can click the button on the banner to open the output folder and view your newly converted MP3 files. You have now successfully learned how to changed WMA to MP3 using Switch Audio File Converter Software.
To read more about Switch and other audio topics, check out these similar posts:
Labels:
audio,
audio conversion,
audio converter,
MP3,
music,
NCH,
nch software,
Switch,
switch audio converter,
WMA
New Release: TempoPerfect Metronome Software for Windows
Posted by
NCH Software
Download TempoPerfect 5.00 now at www.nch.com.au/metronome/index.html. Also available for iOS, Android and Mac OS X at the same page
Wednesday, May 15, 2019
New Release: Debut Video Capture Software for Windows
Posted by
NCH Software
Download Debut 5.45 now at www.nchsoftware.com/capture/index.html. Also available for Mac OS X at the same page
Friday, May 10, 2019
Create Floor Plans with Trace Mode in DreamPlan Home Design Software
Posted by
Cody Collier
Create Floor Plans with Trace Mode in DreamPlan Home Design Software

DreamPlan floor plan maker allows you to import an existing floor plan file, use trace mode to duplicate it into the program, and then edit your house plan design quickly and easily. Visualize floor plans in 3D or as house blueprints. You can plan out all of your home remodeling designs with this simple floor plan design software.
Download DreamPlan to get started, or click here to learn more: www.nchsoftware.com/design
Download DreamPlan to get started, or click here to learn more: www.nchsoftware.com/design
Import Floor Plans in DreamPlan
How to Trace a Floor Plan
- On the Tools tab, click Start Trace Wizard.
- Select the story that you will start with and click Next.
- Browse for your image file and open it into the program (jpg, png, or pdf)
- Click Start Calibration to enter measurements of a known length of a wall
- Go to the building tab and add your walls
- When you are finished tracing your floor plans, you can toggle this view off or on using the Hide/Show Trace Image button
- Repeat the process to add and trace floor plans for additional stories
Wednesday, May 8, 2019
New Release: PhotoStage Slideshow Producer for Windows
Posted by
NCH Software
Download PhotoStage 6.11 now at www.nchsoftware.com/slideshow/index.html. Also available for Android, Mac OS X and iOS at the same page
Tuesday, May 7, 2019
New Release: KeyBlaze Typing Tutor for Windows
Posted by
NCH Software
Download KeyBlaze 3.00 now at www.nchsoftware.com/typingtutor/index.html. Also available for Mac OS X at the same page
Friday, May 3, 2019
How to Change AVI to MP4 with Prism AVI Video Converter
Posted by
Cody Collier
How to Change AVI to MP4 with Switch Audio File Converter
MP4 files and AVI files are two of the most popular video file formats used today. They are both common multimedia container file types and they both have their various advantages. AVI files are most often used for playback on your PC via Windows Media Player, while MP4 files are more commonly used for video playback everywhere else. If you have a video player that does not support AVI files, then you are going to want to know how to change AVI to MP4. Converting AVI to MP4 is a very simple process for anyone and can be done by using Prism AVI to MP4 Converter Software in just a few clicks.
Download & Install Prism
Download and install Prism Video File Converter on your computer. Prism can be used to convert a variety of video file formats, compress video file sizes, add effects, and make other adjustments while performing video file conversions. You can download Prism by clicking on the download button below and following the installation steps.Import Files
The first step to change AVI to MP4 is to import your AVI video files into the program. You can do this by dragging and dropping your video files directly into the program or by clicking on the green Add File(s) icon to launch the Locate Video File(s) window and selecting and importing your AVI video files this way.
Video Conversion Options
Click on the Options tab, located at the top of the program to view the various video file conversion options available in Prism. This is where you can adjust the overwrite settings as well as add metadata to your converted video file properties. This is also where you can add or remove Prism to/from the Windows Explorer right-click menu so that you can perform conversions without even opening the program.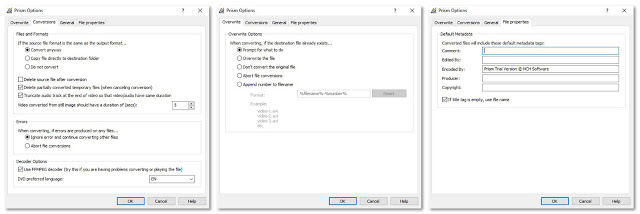
Output Settings
Click on the Output Format dropdown menu to set the output file format to MP4. This will make all of the file conversions performed be to the MP4 video file format. Use the Save to Folder dropdown menu to select the output destination for your newly converted MP4 files. You may also click on the Browse button to launch the file finder window and select a more specific output destination folder on your computer or external device.
Encoder & Video Options
Click the Encoder Options button to adjust the encoding settings of your video files before you convert them. You can adjust the video quality/bitrate as well as adjust the compression settings and sound format. Click on the Video Options button to adjust the frame rate of your converted video files as well as resize them when they are converted.
Video Effects
Click on the Effects button to open the Video Effects window. Here you can add text captions to your converted video files, rotate and flip your videos, adjust color/brightness, & add watermarks. The Edit Video tab in the Video Effects window will allow you to trim down your videos as well.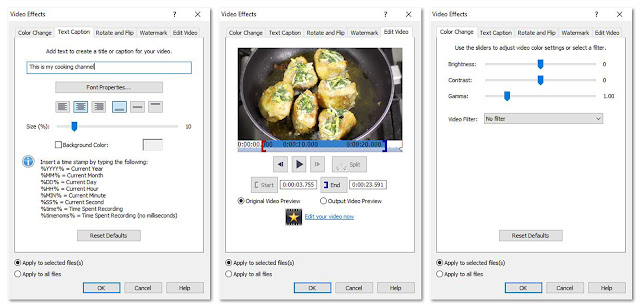
Preview
Click on the Preview button to watch a preview of your video file in the format you will be converting it to. This is useful to keep an eye on the quality of the video if you are compressing it and also just to double check that you are working on the correct files if your file names aren't very descriptive.
Change AVI to MP4
Once you have chosen your output destination and set the output file type to MP4, you are ready to change your AVI files to MP4. Select the files that you would like to convert and click on the Convert icon in the bottom right-hand corner of the program or in the main toolbar. You can convert your files individually or hold down shift to click and select multiple files to convert all at once. The conversion process is extremely fast and your new MP4 files can then be found in your chosen output destination.
For more on articles on video and video editing, check out these posts:
- How to Rotate Videos with Prism Video Converter Software
- The Best Video Editor for YouTube
- How to Convert M4A to MP3
- How to Make a Freeze Frame of a Video Clip
Thursday, May 2, 2019
New Release: DrawPad Graphic Design Software for Windows
Posted by
NCH Software
Download DrawPad 5.13 now at www.nchsoftware.com/drawpad/index.html. Also available for Mac OS X at the same page


