Showing posts with label NCH. Show all posts

Friday, June 28, 2019

How to Add a Logo or Watermark to a Video

How to Add a Logo or Watermark to a Video in VideoPad


Knowing how to add a logo or watermark to a video is a useful skill to have no matter what kind of video creator you are. You can brand your videos with a logo for a professional look on your YouTube channel or you can add subtle watermarks to your videos if you are creating video content for resale. No matter your purpose, adding logos and watermarks to videos is easy with VideoPad Video Editing Software and this tutorial video will show you how.

 Download VideoPad to get started by clicking the button below or visiting our website here: www.nchsoftware.com/videopad/


Adding a Logo or Watermark to a Video

How to Add a Watermark to a Video

  1. Place your video on the Timeline
  2. Drag the logo or watermark image clip onto an overlay track on the Timeline
  3. Click and drag the image along the track to re-position it relative to your video
  4. Click and drag either end of the image clip to change the length
  5. Save and export your video


Friday, May 24, 2019

How to Change WMA to MP3 with Switch Audio Converter

How to Change WMA to MP3 with Switch Audio Converter


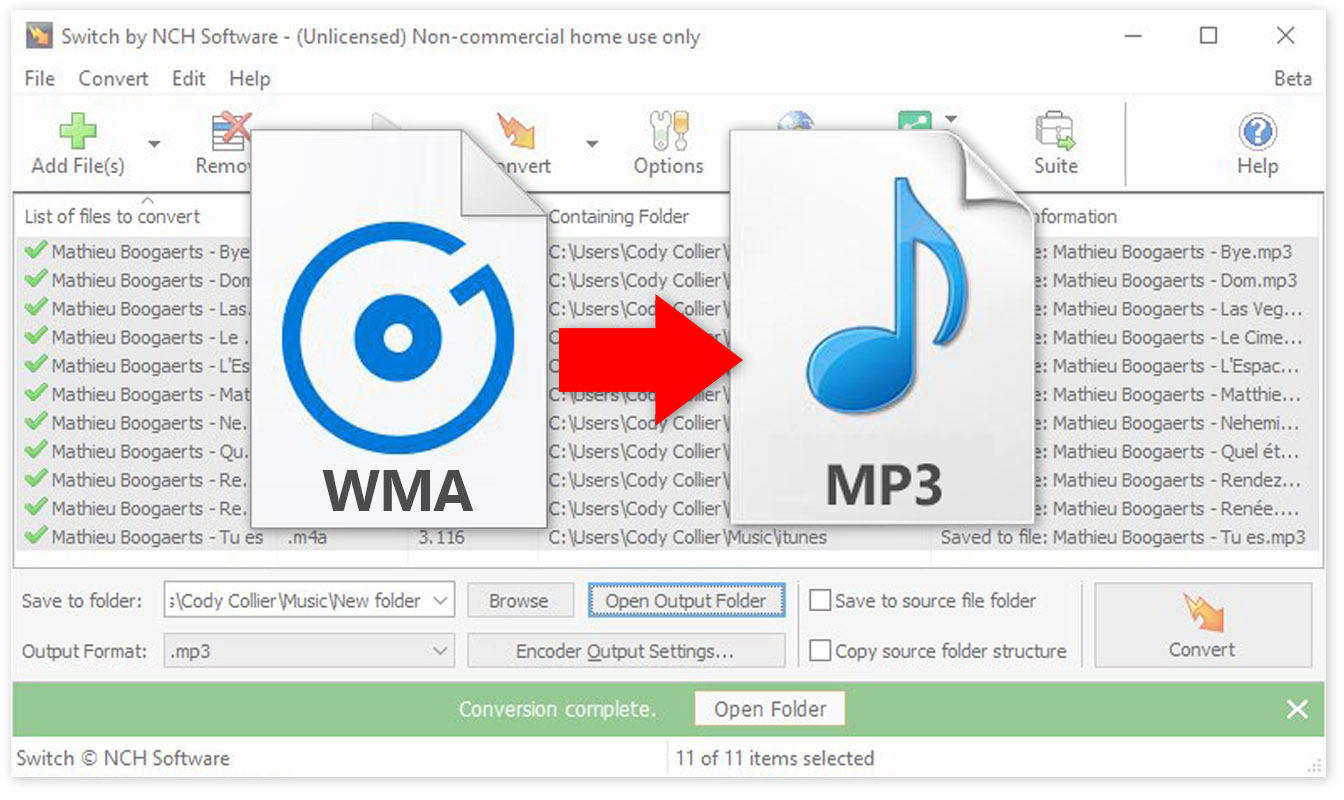
Windows Media Audio files, or WMA files, are a common audio file format, primarily meant to be opened and played on Windows Media Player and other Microsoft audio players. You can play WMA files with some other third-party software, but many audio players and devices (iPhone) will not support them. That is why it is useful to know how to change WMA to MP3. MP3 files are a much more commonly supported file type and are arguably a superior format anyways. You can easily change WMA files to MP3 format with an audio file conversion program such as Switch WMA File Converter Software.


Download Switch

Download Switch Audio File Converter software. Follow the installation instructions and launch the program on your computer.
Download Switch Audio File Conversion Software

Import WMA Files

Click on the green Add File(s) button located in the main toolbar to open the file finder window. Find and select the WMA files on your computer and click Open to bring them into Switch to convert them to MP3 format. You can also drag and drop WMA files directly into the program to change.
Import WMA files to Change them to MP3

Options Menu

Click on the Options icon in the main toolbar to open the Options window. This is where you can add and make adjustments that will be performed on your WMA files during the conversion. You can add metadata to your converted MP3 audio files as well as change settings to handle duplicate files and formats. Once you are finished adjusting these options, click OK.
Audio File Converter Options

Select Output Destination

Set the output destination where you would like your converted files to go after you have converted them from WMA to MP3 format. Click on the Save to folder drop-down menu to select a folder from this list, or click on the Browse button to open the file finder window and select a folder on your computer.
Set Output Destination for MP3 Files

Set Output Format to MP3

With your output folder set, you can now set the output format to MP3. Click on the drop-down menu on the left side of the program next to the words "Output Format" to view the list of available audio file formats. To change your WMA files to MP3 files, simply select the option from this list that says, "MP3." All conversions performed will now be in the MP3 audio file format.
Set Output Format Type to MP3

Encoder Options

Click on the Encoder Output Settings... button to launch the window for WMA Output Settings. Here you can make adjustments and change audio encoder settings such as metadata, sample rate, bitrate, and amplify/normalizing audio. These settings will be applied during the conversion process while your WMA files are being changed to MP3 files.
WMA Encoder Options


Change WMA to MP3

Once everything is set up, you are ready to change your WMA files to MP3. Simply click on one of the Convert buttons, located in the bottom right-hand corner of the program and in the main toolbar. This will start the conversion process. You can select only one file to convert them one at a time or you can select all of them to perform easy batch MP3 conversions.


Finished

After the WMA to MP3 conversion is complete, you will see a green banner at the bottom of the program that says "Conversion Complete." You can click the button on the banner to open the output folder and view your newly converted MP3 files. You have now successfully learned how to changed WMA to MP3 using Switch Audio File Converter Software.


To read more about Switch and other audio topics, check out these similar posts:

Friday, May 10, 2019

Create Floor Plans with Trace Mode in DreamPlan Home Design Software

Create Floor Plans with Trace Mode in DreamPlan Home Design Software


DreamPlan floor plan maker allows you to import an existing floor plan file, use trace mode to duplicate it into the program, and then edit your house plan design quickly and easily. Visualize floor plans in 3D or as house blueprints. You can plan out all of your home remodeling designs with this simple floor plan design software.

Download DreamPlan to get started, or click here to learn more: www.nchsoftware.com/design


Import Floor Plans in DreamPlan


How to Trace a Floor Plan

  1. On the Tools tab, click Start Trace Wizard
  2. Select the story that you will start with and click Next.
  3. Browse for your image file and open it into the program (jpg, png, or pdf)
  4. Click Start Calibration to enter measurements of a known length of a wall
  5. Go to the building tab and add your walls
  6. When you are finished tracing your floor plans, you can toggle this view off or on using the Hide/Show Trace Image button
  7. Repeat the process to add and trace floor plans for additional stories


Friday, May 3, 2019

How to Change AVI to MP4 with Prism AVI Video Converter

How to Change AVI to MP4 with Switch Audio File Converter


MP4 files and AVI files are two of the most popular video file formats used today. They are both common multimedia container file types and they both have their various advantages. AVI files are most often used for playback on your PC via Windows Media Player, while MP4 files are more commonly used for video playback everywhere else. If you have a video player that does not support AVI files, then you are going to want to know how to change AVI to MP4. Converting AVI to MP4 is a very simple process for anyone and can be done by using Prism AVI to MP4 Converter Software in just a few clicks.


Download & Install Prism

Download and install Prism Video File Converter on your computer. Prism can be used to convert a variety of video file formats, compress video file sizes, add effects, and make other adjustments while performing video file conversions. You can download Prism by clicking on the download button below and following the installation steps.

Import Files

The first step to change AVI to MP4 is to import your AVI video files into the program. You can do this by dragging and dropping your video files directly into the program or by clicking on the green Add File(s) icon to launch the Locate Video File(s) window and selecting and importing your AVI video files this way.


Video Conversion Options

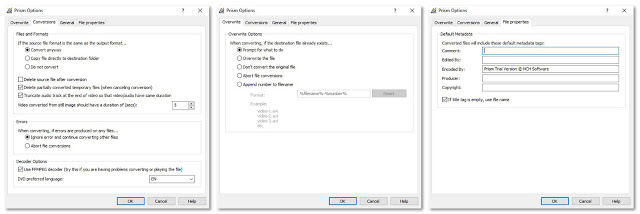
Click on the Options tab, located at the top of the program to view the various video file conversion options available in Prism. This is where you can adjust the overwrite settings as well as add metadata to your converted video file properties. This is also where you can add or remove Prism to/from the Windows Explorer right-click menu so that you can perform conversions without even opening the program.

Output Settings

Click on the Output Format dropdown menu to set the output file format to MP4. This will make all of the file conversions performed be to the MP4 video file format. Use the Save to Folder dropdown menu to select the output destination for your newly converted MP4 files. You may also click on the Browse button to launch the file finder window and select a more specific output destination folder on your computer or external device.


Encoder & Video Options

Click the Encoder Options button to adjust the encoding settings of your video files before you convert them. You can adjust the video quality/bitrate as well as adjust the compression settings and sound format. Click on the Video Options button to adjust the frame rate of your converted video files as well as resize them when they are converted.


Video Effects

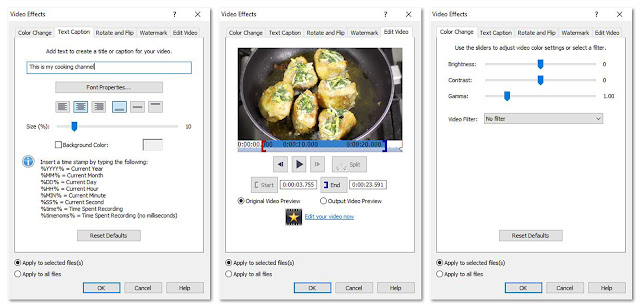
Click on the Effects button to open the Video Effects window. Here you can add text captions to your converted video files, rotate and flip your videos, adjust color/brightness, & add watermarks. The Edit Video tab in the Video Effects window will allow you to trim down your videos as well.


Preview

Click on the Preview button to watch a preview of your video file in the format you will be converting it to. This is useful to keep an eye on the quality of the video if you are compressing it and also just to double check that you are working on the correct files if your file names aren't very descriptive.


Change AVI to MP4

Once you have chosen your output destination and set the output file type to MP4, you are ready to change your AVI files to MP4. Select the files that you would like to convert and click on the Convert icon in the bottom right-hand corner of the program or in the main toolbar. You can convert your files individually or hold down shift to click and select multiple files to convert all at once. The conversion process is extremely fast and your new MP4 files can then be found in your chosen output destination.


For more on articles on video and video editing, check out these posts:


Friday, April 19, 2019

How to Split Audio with WavePad

How to Split Audio Files


Learning how to split audio tracks is an important skill to have for anybody editing audio and sound files. You may want to split your tracks to rearrange them in an audio or video project or perhaps you want to split them just to trim off the excess in your recording. In either case, WavePad Audio Editing software will allow you to split audio tracks with ease.

Download WavePad here to get started: https://www.nch.com.au/wavepad


Splitting Audio Files in WavePad


How to Split Audio

  1. Add an audio file into the WavePad 
  2. Click the Split button on the Edit toolbar and select an option.
  3. Split at the cursor or Split into component channels will cause the splitting to occur immediately.
  4. Choose another option to open the Split File into Multiple Parts dialog.
  5. Complete the dialog and click Split to split the audio file.
  6. Save or export your project


Friday, April 5, 2019

How to Create a Budget with MoneyLine Personal Finance Software

How to Create a Budget with MoneyLine Personal Finance Software

Learning how to create and manage a budget is an important step to becoming more responsible with your money and achieving financial freedom. In order to save money, you have to understand where the money you earn is going. With MoneyLine Personal Finance Software, you can quickly learn how to make a customized budget that you can stick to.

Download MoneyLine to get started: https://www.nchsoftware.com/personalfinance


Create a Budget and Generate a Budget Report


How to create a budget

  1. Set up a new budget from the budget popup window and name your budget
  2. Select accounts to include and deselect accounts to leave out of your budget
  3. Plan your income by entering in the income amounts next to their source
  4. Create categories for your sources of income
  5. Plan your expenses by typing the amounts next to their source
  6. Run a budget report and save, print, send, & share


Friday, March 15, 2019

How to Make Character Animations with Express Animate

How to Make Character Animations with Express Animate


Character animation allows you to bring animated characters to life using simple software and your own creativity. You can animate anything you would like such as clipart, computer drawings, text and more. Character animation used to be a very time-consuming and complicated process that only professional animators could do. However, now it is easier than ever for anyone to create this type of art and make character animations of their own. With simple and easy-to-use 2D animation software such as Express Animate, you can quickly learn how to make animations of your own in no time.


In this first video, you will learn how to create a character "puppet" or character from scratch to animate with Express Animate Animation Software. Use the pen tool to draw shapes and the Fill tool to add color to them.


This second video will demonstrate how to animate the character puppet that you created in the previous tutorial. Add anchor points to your object to create parent-child relationships and create keyframes to mark a changed state of any parameter in time.


And there you have it. Simply follow the steps demonstrated in the above tutorials and you too can create your own animation. Character animation is fun and easy and you will likely find yourself making them more and more now that you have learned how.

Friday, November 2, 2018

How to Mix an Audio File and Change to MP3 format

How to Mix an Audio File and Change to MP3 Format

Mixing audio files is a great way to take the best parts of all of your favorite songs and combine them into one awesome track. With MixPad Audio Mixer, you can mix a variety of audio types together to create mixes and mashups of your very own. After you have made a mix you love, you can change to MP3 format and share it with the world.


Load/Record Tracks

Click on the Load icon underneath the Home tab to add audio clips to your mix. You can add clips from your computer, rip a clip from a disc, or add an empty midi clip to record on a track using a midi controller. Imported clips will be added to the selected track. You can also record your audio tracks directly into MixPad by enabling recording  on the selected track, then clicking on either the record icon underneath the Home tab or on the record button at the bottom of the program.


Arrange your Clips

Use click and drag to rearrange the position of the tracks in your mix. Under the Editing tab, you can choose from a variety of options to cut and trim the clips in your mix. Select a portion of audio in a track to trim, delete, or silence it. Click on any point in an audio clip and choose the Split Clip option to divide it into two separate clips. You can then move the clips around or move them to different tracks in your mix. You can also Merge two separate clips into one clip anywhere you would like within your mix.


Adjust track settings

Adjust the play volume of an entire track using the volume slider in the track controls. You can also adjust the volume at different points in your track by clicking on the red line in the waveform and then dragging the square box that appears up or down to increase or decrease the volume. Click on the envelope icon to choose whether you are adjusting the volume or the pan in your track.


Apply Effects

You can apply live effects to the audio tracks in your mix by selecting a track and then clicking on the FX button to launch the effects window. Layer multiple effects on top of one another and edit and adjust them as you please. Effects will be applied to the audio in the selected track.


Change to MP3 Format

Now that you are finished mixing your audio, you can export your mix and change to MP3 format. Click on the Export Mix button located underneath the Home tab. Use the Browse button to select your output destination, name your file, and set your output file type to MP3. You can also change your file to MP3 directly from the Export Options window by clicking on the dropdown menu and choosing MP3 from the list of output file types. Click Export when you are ready to export your audio mix as an MP3 file.


For more on MixPad and audio editing, check out these tutorial videos:
Thursday, August 25, 2016

Create and Design a Professional Business Card


create your own business card
"Go out of your way to make an outstanding first impression."

The professional world weighs heavy on first impressions, these can make or break any deal or job opportunity. Having a well-designed business card is similar to a sturdy handshake and welcoming smile, it shows others that the individual has a strong sense of organization and presentation. Creating and designing a business card is incredibly easy with the proper business card design software. NCH Cardworks provides several intuitive tools and free business card templates to use.

How to Design a Business Card

Step 1: Download NCH Cardworks and browse the several available templates. Start sketching and envisioning the layout of the card. Make sure to include all the most crucial information: name, image (logo or headshot), business phone, personal phone (optional), email (professional), website, LinkedIn, and more.
business card designs

Step 2: Make sure that the most important information is in, but not overcrowding the layout. Business cards should have a focal point that drives the eyes to the most crucial information. Whether that be the brand imagery or the contact information, this is where the eyes of the beholder need to fixate. 

Step 3: Do NOT forget about the back of the card, be sure to leave a lasting image on the reverse side. Preferably a slogan and brand image will create a lasting impression on the viewer. Leaving a blank back to a card makes it look rushed and cheap. Balance the imagery on the back and front.

Step 4: Once the card has been reviewed, begin the export or printing process. Feel free to print it if you have the necessary tools to make a quality business card. But, it may be easier to export the files and have them professionally printed. This is not a hasty decision, business cards can help make a new business deal, secure a new position or win a free sandwich.


Monday, June 23, 2014

HourGuard for Android Now Available

One of NCH Software's best Business Products is now available on Android devices.  HourGuard Timesheet Software for Android allows users to track time spent on customer projects. The app is simple and easy to use.

HourGuard on Android devices frees up focus on work without having to worry about logging hours or tracking time. The software includes reports on time spent on tasks and sub-tasks.  This is a great product for anyone billing by the hour.

HourGuard Features:
* Push a single button to start/stop time
* Mark tasks complete, active, or closed
* Runs in the background without interfering in other tasks
* Simple and easy to use interface

For anyone looking to improve focus, track time spent, and increase productivity HourGuard TimeSheet Software for Android is a must-have.  If you have already had the chance to try HourGuard, let us know what you like about the app or how we can improve future versions.

Monday, April 21, 2014

NCH Software's Newest Business Tool: Express Project Management Software

NCH Software is continuing to develop valuable tools and software for the Business Productivity space. Express Project Management Software is NCH Software's newest addition to the already great assortment of business tools and utilities.

Below is a quick video introduction for Express Project Management Software.


Express Project is an organization tool designed to simplify project and task management. This software ensures that there is a clear breakdown of what you and your team members need to accomplish along different stages in the project timeline. Express Project features several important features including visual Gantt Charts, scheduling, resources, and custom calendars to fit your needs.


Express Project Additional Features:
* Set task dependancies and constraints
* Identify key tasks using Gantt charts and critical path methodology
* Create project level and resource level schedules/calendars
* Output Gantt Chart information, as well as task and resource information


For more information or to try Express Project Management Software for yourself, visit our website. If you have already had the opportunity to try out Express Project, let us know what you think.  We always enjoy hearing feedback from our fantastic customers.

Thursday, March 20, 2014

New Music Practice Software from NCH Software

PlayPerfect Free Music Practice Software is the newest tool added to NCH Software's Audio Software and Tools.  It can help you practice, learn, and improve playing your favorite instrument using your Windows PC.


PlayPerfect Music Practice Software has visual cues, playback, and performance reports to help young musicians train their ears to detect wrong or out-of-tune notes.  It's a fun way to practice or learn your favorite instrument.


PlayPerfect Free Music Practice Software for Windows features:
- Moving cursor
- Color-changing notes indicating correct or incorrect
- Built-in metronome to help you keep tempo
- Practice sessions recorded as Mp3 files for future playback
- Set the tempo and speed of the piece you are practicing


For anyone looking to improve on their favorite musical instrument, PlayPerfect is a fun and exciting way to accomplish that goal.  If you have already had the chance to use PlayPerfect Free Music Practice Software, let us know how we can improve future versions, or what you really like about the product.