Showing posts with label video text. Show all posts

Monday, July 13, 2020

Easiest Method to Add Text to Video in Minutes


Adding text to video can help make your video more attractive to viewers by adding some context or helping to get your point across. While video editing can sometimes get tricky with many video editors that are too complex for everyone, VideoPad Video Editor makes video editing including adding text to a video as easy as possible in just a few steps. 


Whether you need to add captions, descriptions, labels, quotations, or any other text, you can easily do so with VideoPad’s text overlay tool as this video tutorial will show you how.  


Adding text to a video with VideoPad


  1. Click the Add Text button on the Home tab toolbar.

  2. Select the text type whether it is a simple text overlay, animation, 3D, etc. 

  3. Enter your text in the Title text field and edit the clip attributes, such as font, color, and size.

  4. Click the X to close the Text Editor window.

  5. The text clip will be added to your images bin.

  6. When you are ready to add the text to your sequence, simply drag it to the track above the video clip you want it to overlay or click the Add button at the bottom of the window.


It's so easy to add text to video by following those simple steps. Download VideoPad to try it out now! For more VideoPad tips and tricks, check out more video tutorials here.


Friday, September 14, 2012

VideoPad Introduction in Manga

Not only is it fun for us to learn about see or listen to the audio and video projects that people create with NCH Software products, we also enjoy hearing and seeing what people think about and have to say about our software. When we stumbled upon a comic in a Japanese blog introducing readers to our VideoPad video editing software we contacted the creator and asked for permission to share a translated version with our readers. So take a look at the translated VideoPad comic below.

For those of you who are curious or know Japaenese you can view the original and read more of his thoughts on VideoPad in his blog, Try! Various things! (チャレンジ!いろいろ!). While you're there scroll to the bottom of the post to watch his test video showing some of the things that VideoPad is capable of.

VideoPad is perfect for anyone not satisfied with Movie Maker

If you are read to give VideoPad your own test drive, visit www.nchsoftware.com/videopad to download a copy for yourself.

Friday, April 6, 2012

Super Features: Debut Video Capture

Debut Video Capture Software is one of the most feature-rich video capture programs available, allowing you to capture video from a variety of sources, including your screen, webcam, network camera, or external devices. If you haven’t had time to explore all the amazing ways Debut can make recording video easier for you, we’ve made a list of highlights.
    Debut Video Capture Software Tips, Tricks and Features
  • Add a text caption to your video. Choose the placement, enter the text, change the font, the font color, and add background color to make the text stand out. Be sure to add your caption before recording starts. (more ways to add text to video)
  • Add a watermark to your video to ensure you get credit for the video. Choose a watermark image that isn’t too large, adjust the transparency, and set the alignment. The margin percentage controls how far away the watermark is from the edge. Again, be sure to add your watermark before recording.
  • Create a time-lapse video. Station your camera and click the Edit Output button. On the tab specific for the type of camera you are using, make sure the Enable Time-lapse checkbox is checked. You can specify how often a frame is captured: the closer in time the images are taken to each other, the smoother your video will look. For a more choppy outcome, space images out further.
  • Capture a window or custom area. This is a very useful feature if you want to focus on one area of your screen, rather than the entire thing. Click the selection icon in the lower right corner, next to the caption, color, and watermark buttons. You can then drag the cursor to select a recording area, or highlight and select a specific window on your screen.
  • Schedule recordings. If you need to record while you're away from your computer, set up a scheduled recording. Click the Scheduler button on the toolbar to set a recording time.
  • Click the Edit Output button to resize the final video or to change the frame rate. Remember that a smaller size and a lower frame rate will make the file size smaller.
  • You can specify the file format for the recording from the Record as drop menu. Select the file type, or select which device you are making the recording for.
If you need to edit your recordings after they have been recorded, we recommend you use VideoPad Video Editing Software. With VideoPad, you can edit multiple screen captures or webcam recordings together, add background music and narration, and compile the final product in a format for viewing on your computer, television, portable device, or on the internet.

Friday, July 15, 2011

VideoPad Video Editing Tips & Tricks

VideoPad Video Editing Software Tips and TricksSome of our most popular blog entries have been the posts about speed changing feature to VideoPad and how to stabilize video. Not surprising since changing video speed was such a long-awaited video editing feature for the popular video editing software. To expand on the topic of helpful video editing effects and features here are several Tips and Tricks for how to edit video with VideoPad. If you have any tips of your own please comment and add them to our list. You can also get started with video editing by watching the the VideoPad video tutorials.

Title Screen and Ending Credits
Add a blank slide to the beginning or end of the timeline. Add text to the slideslide by clicking the green plus button on the Overlay Track, and a fade transition to create a dramatic opening or closing effect to your movie. For ending credits, select the vertical scrolling option and adjust the clip duration to control the scrolling speed.

Text Overlays
Adding captions, title screens and credits is a cinch. See our post on Adding text to your videos for some tips to help you get started using the Overlay Track to add text to video clips.

Video Subtitles
Subtitles are another way of adding text to your video projects. See our post on adding subtitles to your video for a quick overview on importing or creating an .ssa subtitle file in VideoPad, or for more detailed instructions go to our video subtitles tutorial.

Image Overlays
To create a watermark effect or add images to your video for presentations, use image overlays. Click the green plus button on the Overlay Track, select the Image or Video radio button, browse for a file and apply it to the sequence. Once it’s on the sequence, you can select it and edit its size, opacity, positioning and more.

Control Effect Duration
To apply an effect to only part of a clip, try slicing the clip in two. Apply an effect to only one slice, and place a cross-fade between the slices for a seamless transition.

Change Video Speed
Speed up or slow down video clips by selecting a clip and selecting the Speed effect from the Effects tab, then use the slider to select the new speed for the video clip, (i.e. 50% for half speed, 200% for double). You can also choose to play the clip backward.

Video Stabilization
One possible problem you may have with videos you have recorded on your camcorder is video clips that are shaky or unsteady. This is a common problem when you film without a tripod to keep the camcorder still no matter how steady you think your hands are. The video stabilization feature is an easy solution to eliminating camera jitter in your videos, giving you a final video that won't make you seasick to watch.

Upload Videos to YouTube
VideoPad has a wide range of output options for saving your final video, and if you are creating your video for YouTube you can even skip a step and upload to YouTube from VideoPad by entering your YouTube account information and other details, which is just one of the many choices available when saving your finished movie. VideoPad also has automated upload options for Facebook and Flickr.

Sound Effects
VideoPad comes with a Sound Effect Library. You can preview and download sounds from the Sound Effects Library by going to Edit -> Sound -> NCH Sound Effect Library. And since VideoPad has unlimited audio tracks, you have plenty of room to add and mix in the sound effect to your movie soundtrack.

Greenscreen Video Editing
For shooting those scenes you can’t do on location, use the chroma-key feature to transport yourself to another locale. To use chroma-key, click the green plus button on the Overlay Track, select the Image or Video radio button, click the Record button, click the Remove Background button, and follow the onscreen instructions. Also see out post on Easy Chroma Key Overlays.

VirtualDub Video Plugins
For even more effects, VideoPad supports VirtualDub plugins. You can add new plugins by selecting Load/Unload Plugins on the Effects Tab, and loading your saved .vdf format VirtaulDub plugin filter.

And for improving the audio or working on a soundtrack for your movie you may want to start by checking out the WavePad audio editing tips and tricks to help get you started with audio editing.

Wednesday, June 22, 2011

How to Add Subtitles to Your Videos (P.S. It's not difficult)

Add Subtitles to Videos Adding text to a video is one of the most common reasons why people use video editors, and VideoPad video editor is an easy way to add any kind of text to your video projects. Previously, I blogged about how to use VideoPad video editor to add overlay text to your videos, which is a great primer for adding short bursts of text like captions, title screens, and credits. For more ambitious text projects, you might be better off using the subtitles feature, which allows you to either upload a subtitle file or create your own subtitles.

Import Subtitles
For movies and shows, many people like to have the words—whether they speak the same language or not—so they can easily follow the dialog. If you have a subtitle file in .ssa format, you can easily import the subtitles to attach to your movie or show.
  1. Click the Subtitles icon in the toolbar of VideoPad.
  2. In the upper left corner of the Subtitles dialog, click the Open folder button. Browse to your .ssa file and open it to load it into the Subtitles dialog.
  3. Click the Play button to preview the subtitles with your movie.

Create Subtitles
If you don't have an .ssa file for your movie, or you want subtitles as back up to the audio of a tutorial or video project, you can create your own subtitles.
  1. Click the Subtitles icon in the toolbar of VideoPad.
  2. Use the preview window to cue the video where the first subtitle will start.
  3. Click the green Plus button in the lower right to add a new subtitle, then type the subtitle in the input field, which is the bottom pane. The subtitle will be added to the list of subtitles.
  4. To set the end of the subtitle, cue up where the subtitle should end and note the time from the sequence clock under the preview window on the right. Select the subtitle from the list and click within the Hide field. Enter the time the subtitle should end and click OK.
Any time you make changes to your subtitle file, be sure to save it by clicking the
Save button in the upper left corner.

Working with text is easy with VideoPad, and so is working with the rest of the program. Try VideoPad out now for free, or view our other video software. You can also view our subtitles tutorial for more help with importing and creating subtitles to your VideoPad projects.

Monday, February 28, 2011

Add Text to Videos

Every now and then, you might find the ocassion to add text to your video. There are only certain times you'll want to add text—afterall, a video should speak for itself—but text can appear as titles, subtitles, captions, overlays, as credits, or a watermark on your video. Adding text is easy to do, you just need a user-friendly video editor like VideoPad Video Editing Software.

Part One: captions, title screens and credits
Text can be added to your videos as captions to describe scenes or to provide commentary to the current action. You can also insert a title screen at the beginning of your movie, and credits at the end.

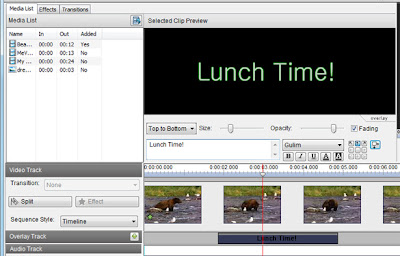
To add a caption or overlay text to any clip, first select the clip in the sequence, then click the green plus button on the Overlay Track. Make sure the Text option is selected, then type the text for the clip in the text field and click Add when you are done. The text will be added at the 'In Point' position, and you'll see a 3-second-long box added to the Overlay Track on the sequence. You can move this box anywhere in the movie along the overlay track, and you can change its duration by dragging out the left and right edges of the box. Select the text overlay to view it in the Clip Preview panel, where you can change the size, opacity, font, color, and more, as shown below.


Creating a title screen is very similar, but first you have to add a blank clip to the movie. Click the 'Insert Blank' icon in the toolbar and choose to add the clip to the beginning of the movie. Next, add a new overlay by clicking the green plus sign on the Overlay Track and type the title into the text field. Select the overlay on the sequence to view it in the Clip Preview panel, where you can position the text in the middle of the screen using the Alignment buttons, and adjust the size using the Size Slider.

To add text credits at the end, add another blank clip to the end of your movie. Create a new Text overlay by clicking the plus sign on the Overlay Track. Then type the credits into the text box, placing each name on its own line, and click OK when you are done. Select the text overlay on the sequence to make it appear in the Clip Preview panel. From the panel, select Bottom to Top from the Scroll drop menu. Preview the credits. If they go by too quickly, increase the duration of the text overlay. If they stop in the middle, you need to increase the duration of the blank clip so the credits have enough time to scroll off the page.

For visual demonstrations of all the text-tips discussed in this blog, you can view the video tutorial VideoPad Video Editor Tutorial - Part 2 and watch the beginning sections on working with text. Part two will talk about working with subtitles in VideoPad.