Friday, November 30, 2018

Introducing Multi-Channel Audio Editing with WavePad

Multi-Channel Audio Editing with WavePad Audio Editor


You have been asking for separate channel audio editing and we have been listening. We are excited to announce that WavePad Audio Editor is now capable of performing sperate edits to individual audio channels in your multi-channel audio files. Not only is the new feature a fun and exciting way to step up your audio editing game, but it is also easy and simple to learn. Being able to edit and make adjustments to the separate channels in a multi-channel audio file is an important task in audio and sound editing. Not all edits are applicable for all channels in a file so being able to edit them individually can help you achieve a higher level of professional sound quality.


Open your Audio File in WavePad

Open your audio file in WavePad Audio Editor by clicking on the Open icon in the main menu and selecting the option that says Open File. This will launch the file finder window where you can choose the file with multiple channels that you wish to edit and bring it into the program. Select your file and then click Open to bring the file into WavePad.

Show Different Channels

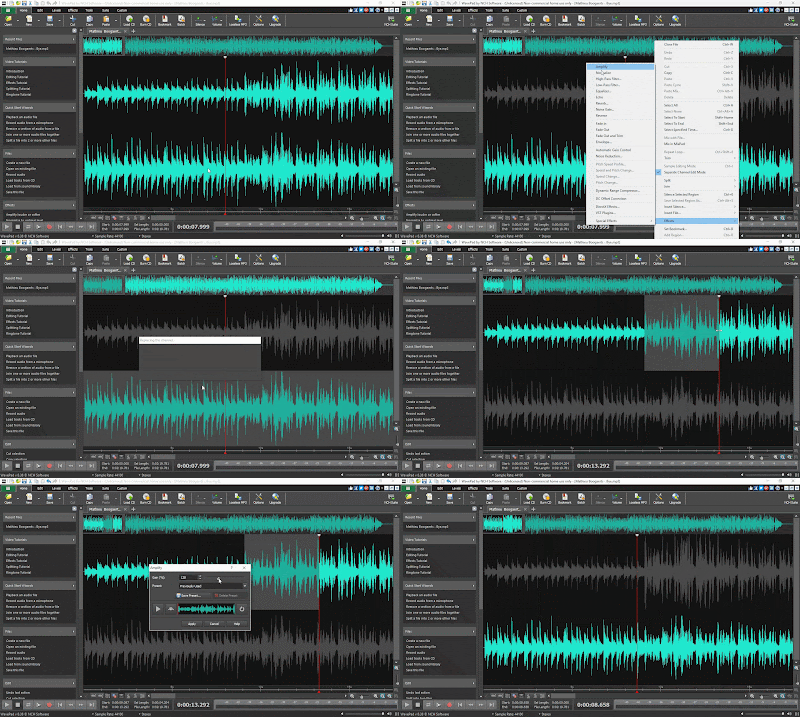
Beneath your waveform on the left-hand side, locate the Show Different Channels Separately button. Click on this button to show the separate channels in your multi-channel audio file. Stereo is generally the most common, which will display two channels. At this point, all edits made will still be applied to both channels, but now the separate channels in the track are visible.

Separate Channel Editing

In the same toolbar, you will also find the option to enable separate channel editing. Your first few uses, a bubble tip will point out the Separate Channel Editing button. Click the Separate channel editing button to enable separate channel editing mode. Select the channel you wish to edit by clicking on its waveform and editing it as usual. The active channel will be colored and the inactive waveforms will turn gray. To edit all channels simultaneously, click the Separate Channel Editing button again to disable it.

Editing Audio Channels Separately

Now that you have enabled separate channel editing, you can make typical edits to each channel individually. Select a channel to activate it and then choose from a variety of the audio editing options available in WavePad. You can normalize the audio and adjust the gain of just one channel and then perform different edits on another channel. If you wish to edit only a portion of one channel, simply click on the waveform of the channel you wish and drag the cursor to select only a  portion of it.

Export Multi-Channel Audio Files

Once you are finished editing the separate channels of your audio, you can then export your new audio file however you would like. From the main menu, select File and choose Save File As... to save your multi-channel audio file in a variety of popular formats. You can also burn your file to a disk or upload it directly to the cloud.


For more on audio editing, check out these posts:

New Release: Switch Sound File Converter for Android

Download Switch 6.47 now at www.nch.com.au/switch/index.html. Also available for Windows and Mac OS X at the same page

Tuesday, November 27, 2018

Just Released: Switch Sound File Converter for Windows

Download Switch 6.46 now at www.nch.com.au/switch/index.html. Also available for Mac OS X and Android at the same page

Monday, November 26, 2018

New Release: MixPad Multitrack Recorder for Android

Download MixPad 5.26 now at www.nch.com.au/mixpad/index.html. Also available for Mac OS X, iOS and Windows at the same page

Wednesday, November 21, 2018

Just Released: RecordPad Sound Recorder for Android

Download RecordPad 7.16 now at www.nch.com.au/recordpad/index.html. Also available for Mac OS X, iOS and Windows at the same page

Tuesday, November 20, 2018

Just Released: WavePad Sound Editor for Windows

Download WavePad 8.38 now at www.nch.com.au/wavepad/index.html. Also available for iOS, Android and Mac OS X at the same page

Friday, November 16, 2018

How to Change CDA to MP3 with Switch CDA Converter

How to Change CDA to MP3 with Switch CDA Converter


A CDA file is an extension for an audio file on a CD. That means that CDA files do not actually contain sound data, but they reference a file that does. You may load CDA files onto your computer only to find that you cannot play them on your audio player. Learning how to change CDA to MP3 is the best way to get your CDA files into a universally recognized format that can be played anywhere. With a simple audio conversion tool, such as Switch Audio File Converter Software, you can quickly change CDA to MP3 and use the files from your CD in many different applications.


Add CDA Files

Open Switch Audio File Converter Software on your computer and click on the Add File(s) button. Click on the drop-down arrow to view a list of import location options. Clicking directly on the green plus sign will launch the file finder window. From here you can locate and select the CDA files that you wish to convert to MP3. Once your files are selected, click the button that says Open to bring them into Switch.


Listen to CDA Files

You can listen to your CDA files in Switch before converting them to MP3. Simply double click on any file in the program to listen or select a file and click on the Play button at the top of the program. This is a useful way to make sure that you have the correct audio file selected if your files do not have names.


Output Format

To change CDA to MP3 using Switch, use the Output Format drop-down menu to select MP3 from the list of output formats. This will make it so that any CDA files that you convert will be converted to MP3. The MP3 audio file format is the most common and widely accepted audio file type and converting your CDA files to MP3 will make it so that you can listen to them practically anywhere.


Encode Metadata

With Switch Audio File Converter Software, you can easily add meta tags and metadata to your MP3 files. Click on the Encoder Output Settings...button to launch the MP3 Output Options window. From here, you can choose from several audio file encoding options that the program has to offer. Click on the Metadata tab and enter any desired metadata content you would like in your MP3 files.


Encode Volume Settings

You can also adjust the audio settings while you convert using the Encoder Output settings button. Click on the tab that says Volume to make audio adjustments to your files as they are being converted such as Normalize, Amplify, and Noise Reduction.

Change CDA to MP3

With your CDA files imported into the program and your encoder settings set, you are now ready to change your CDA files to MP3. Click on the box that says Save to Folder and choose an output destination from the drop-down menu. This is where your converted CDA files will appear as MP3 files once the conversion has been performed. Select the CDA files you wish to change to MP3 and then click on the large Convert button, located in the bottom right-hand corner of the program.


Write Audio Tags

If your CDA files are coming directly from a CD, they may contain track info that can be included in the converted MP3 files. This can be very useful for keeping your music organized and adding your MP3 files to your music library. If you are prompted with this window, you can click Write Tags to have the audio track tag information from your CDA files included in your converted MP3s.


View Converted MP3 Files

When the conversion is complete you will see that all of your CDA files will have a green checkmark next to them in the program, meaning that they were all converted successfully. You can click on one of the two folder buttons that appear after a conversion to view your MP3 files and you can now play them anywhere you would like.


For more on audio conversion, check out these posts:

New Release: Pixillion Image Converter for Mac OS X

Download Pixillion 5.17 now at www.nchsoftware.com/imageconverter/index.html. Also available for Windows at the same page

Friday, November 9, 2018

Introducing: Vertical Video Editing with VideoPad

Introducing: Vertical video editing with VideoPad


Many of our favorite applications are beginning to place mobile-first when it comes to content priorities. Popular mobile apps implement the use of the vertical scroll to shuffle through content. If you scroll upon a video that is shot horizontally, you either have to view it at a very small size or adjust the position of your device to view it full screen. Videos that are filmed and edited to be viewed vertically create a much better user experience on mobile platforms, which are making up an increasingly larger share of video viewers. Learning how to edit vertical videos is a great way to get ahead of the game. VideoPad Video Editing Software provides great options for editing and exporting vertical videos that are simple and effective.


Vertical Videos

When our phones are on their side, or horizontal, the screen has the same aspect ratio as a standard TV or movie screen. Vertical videos are like taking that TV and flipping it on its side. So instead of a  widescreen video, it is a "tall-screen" video. Vertical videos are much more mobile-friendly than horizontal videos and they are a great way to capture tall subjects like people, buildings, and trees. These subjects would normally be cropped in a wide-angle shot. This is why social media platforms like Snapchat have adopted the use of vertical videos in their platforms. The more we turn to mobile to view video content, the more we will be shifting to vertical videos.

Import Vertical Videos

Editing vertical videos in VideoPad is a breeze. Start by importing your vertical videos into the program by clicking on the Add Files button, located underneath the Home tab. This will launch the file finder window where you may find and select the vertical videos that you would like to edit from wherever they are located on your computer. Select the videos you wish to edit, then click Open to bring them into the program.


Aspect Ratio

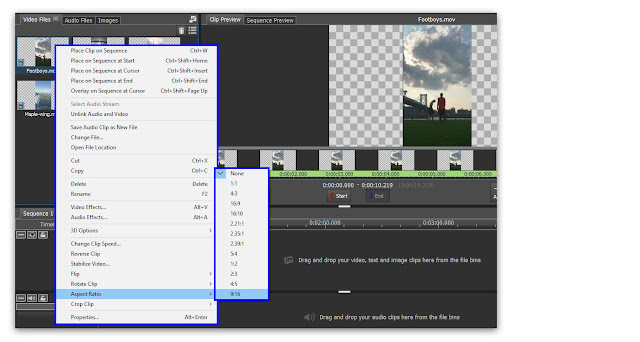
Aspect ratio refers to the ratio of width to height in a video frame. Vertical videos are videos where the height is greater than the width, typically because they were shot on a mobile phone where the screen is like this. To set the aspect ratio for a vertical video in VideoPad, right-click on a video clip in the media bin and hover the Aspect Ratio option to view the various aspect ratios. Select a vertical video aspect ratio from the list such as 4:5 or 9:16.


Edit Vertical Videos

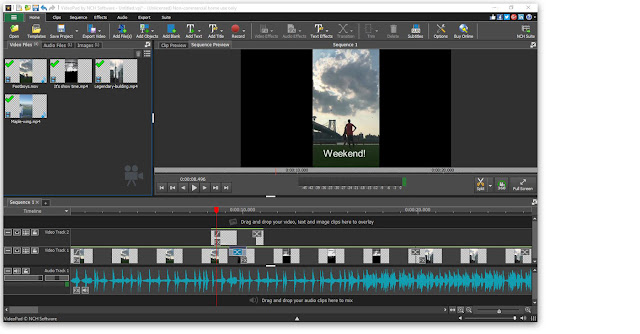
Now that you have set the proper aspect ratio for vertical video editing, you can drag your video clips into the timeline. Here you can perform any edits to your video you would like before exporting it as a movie. Arrange the order of your clips and add transitions between them. Add text and audio to your video and apply any video effects you would like.


Exporting Vertical Videos

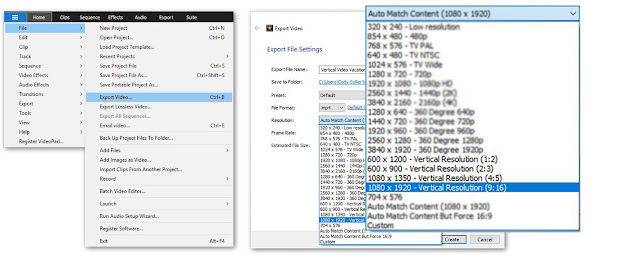
After you are finished editing your video, you are ready to export it and start sharing. To export a vertical video in VideoPad, click on the main File tab and select the option that says Export Video. This will launch the Export Video Window, where you can name your file, set the location and choose the output resolution. Set the Resolution to match your selected aspect ratio and then click Create when you are ready to export. Your vertical video will be exported to your chosen output destination and you are now ready to share it with the mobile video viewing world!


For more on VideoPad, check out these posts:

Monday, November 5, 2018

Just Released: PhotoPad Image Editor for Windows

Download PhotoPad 4.18 now at www.nchsoftware.com/photoeditor/index.html. Also available for Mac OS X and Android at the same page

Friday, November 2, 2018

How to Mix an Audio File and Change to MP3 format

How to Mix an Audio File and Change to MP3 Format

Mixing audio files is a great way to take the best parts of all of your favorite songs and combine them into one awesome track. With MixPad Audio Mixer, you can mix a variety of audio types together to create mixes and mashups of your very own. After you have made a mix you love, you can change to MP3 format and share it with the world.


Load/Record Tracks

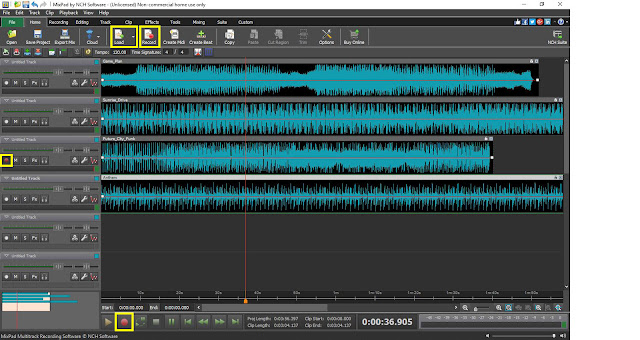
Click on the Load icon underneath the Home tab to add audio clips to your mix. You can add clips from your computer, rip a clip from a disc, or add an empty midi clip to record on a track using a midi controller. Imported clips will be added to the selected track. You can also record your audio tracks directly into MixPad by enabling recording  on the selected track, then clicking on either the record icon underneath the Home tab or on the record button at the bottom of the program.


Arrange your Clips

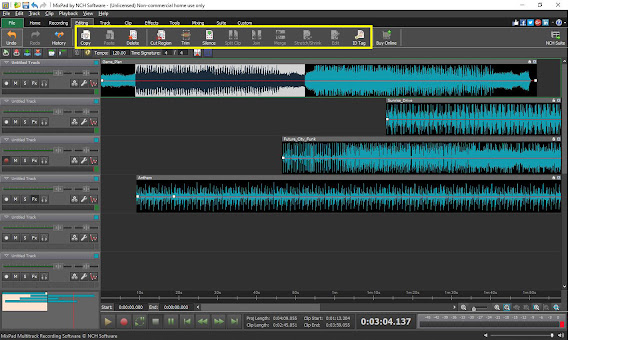
Use click and drag to rearrange the position of the tracks in your mix. Under the Editing tab, you can choose from a variety of options to cut and trim the clips in your mix. Select a portion of audio in a track to trim, delete, or silence it. Click on any point in an audio clip and choose the Split Clip option to divide it into two separate clips. You can then move the clips around or move them to different tracks in your mix. You can also Merge two separate clips into one clip anywhere you would like within your mix.


Adjust track settings

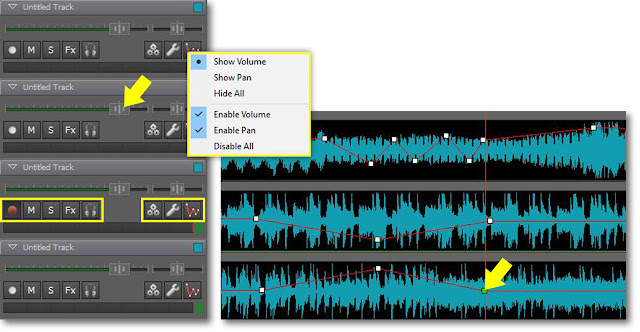
Adjust the play volume of an entire track using the volume slider in the track controls. You can also adjust the volume at different points in your track by clicking on the red line in the waveform and then dragging the square box that appears up or down to increase or decrease the volume. Click on the envelope icon to choose whether you are adjusting the volume or the pan in your track.


Apply Effects

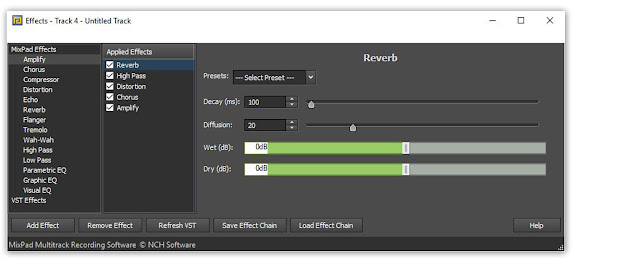
You can apply live effects to the audio tracks in your mix by selecting a track and then clicking on the FX button to launch the effects window. Layer multiple effects on top of one another and edit and adjust them as you please. Effects will be applied to the audio in the selected track.


Change to MP3 Format

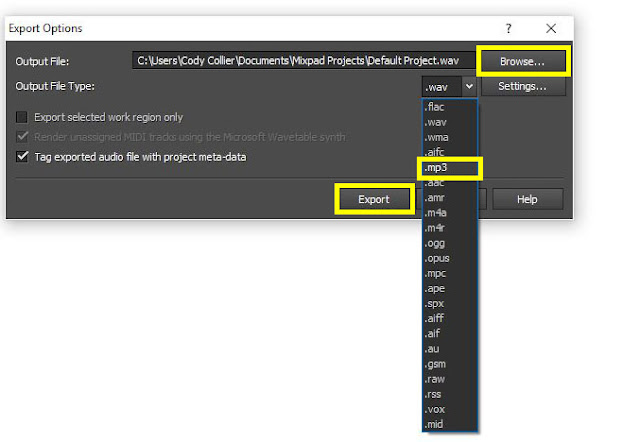
Now that you are finished mixing your audio, you can export your mix and change to MP3 format. Click on the Export Mix button located underneath the Home tab. Use the Browse button to select your output destination, name your file, and set your output file type to MP3. You can also change your file to MP3 directly from the Export Options window by clicking on the dropdown menu and choosing MP3 from the list of output file types. Click Export when you are ready to export your audio mix as an MP3 file.


For more on MixPad and audio editing, check out these tutorial videos: