Wednesday, October 31, 2018
Just Released: SoundTap Streaming Audio Recorder for Windows
Posted by
NCH Software
Download SoundTap 5.06 now at www.nch.com.au/soundtap/index.html. Also available for Mac OS X at the same page
Friday, October 26, 2018
How to Make Curved Text in DrawPad
Posted by
Cody Collier
How to Make Curved Text in DrawPad

How to Make Curved Text in DrawPad Graphic Editor
Download DrawPad to get started: https://www.nchsoftware.com/drawpad/index.html
To view more DrawPad tutorials, visit: https://www.nchsoftware.com/drawpad/tutorial.html
How to Make Curved Text
- Click Curved Text on the Home toolbar
- Draw a path for your text to follow
- Type your text on the path
To view more DrawPad Graphics Editor tutorial videos, visit: https://www.nchsoftware.com/drawpad/tutorial.html
Do you need help using DrawPad?
View the help manual: http://help.nchsoftware.com/help/en/drawpad/win/help.pdfVisit the DrawPad Help Forum: http://nch.invisionzone.com/forum/175-drawpad/
Contact DrawPad Technical Support: https://www.nch.com.au/support/supportcontact.html?software=drawpad
New Release: Doxillion Document Converter for Mac OS X
Posted by
NCH Software
Download Doxillion 3.08 now at www.nchsoftware.com/documentconvert/index.html. Also available for Windows at the same page
Thursday, October 25, 2018
Just Released: Debut Video Capture Software for Windows
Posted by
NCH Software
Download Debut 5.20 now at www.nchsoftware.com/capture/index.html. Also available for Mac OS X at the same page
Just Released: CardWorks Business Card Software for Mac OS X
Posted by
NCH Software
Download CardWorks 4.00 now at www.nchsoftware.com/businesscard/index.html. Also available for Windows at the same page
Friday, October 19, 2018
How to Add Subtitles to a Video or Movie
Posted by
Cody Collier
How to Add Subtitles to a Video or Movie

How to Add Subtitles to a Video or Movie with VideoPad Video Editor
Download VideoPad to get started: www.nchsoftware.com/videopad
To view more VideoPad Video Editor tutorials visit: www.nchsoftware.com/videopad/tutorial.html
How to Add Subtitles
- Add the clips you want to subtitle to the Timeline
- Click the Subtitles button on the Sequence toolbar to open the Subtitles dialog
- Position the cursor where you want the subtitle to appear in your video and type the subtitle into the subtitle entry box
- To add another subtitle, click Add on the toolbar, position the cursor and type in the subtitle
- Keep entering subtitles in this manner until you are happy, then click Apply
To view more VideoPad Video Editor tutorials visit: www.nchsoftware.com/videopad/tutorial.html
Do you need help using VideoPad?
View the Help Manual: http://help.nchsoftware.com/help/en/videopad/win/help.pdfvisit the VideoPad Help Forum: http://nch.invisionzone.com/forum/85-videopad/
Contact VideoPad Technical Support: https://www.nch.com.au/support/supportcontact.html?software=videopad
Just Released: DrawPad Graphic Design Software for Windows
Posted by
NCH Software
Download DrawPad 4.01 now at www.nchsoftware.com/drawpad/index.html. Also available for Mac OS X at the same page
Thursday, October 18, 2018
Just Released: Prism Video File Converter for Windows
Posted by
NCH Software
Download Prism 4.18 now at www.nchsoftware.com/prism/index.html. Also available for Mac OS X at the same page
Wednesday, October 17, 2018
New Release: Pixillion Image Converter for Windows
Posted by
NCH Software
Download Pixillion 5.14 now at www.nchsoftware.com/imageconverter/index.html. Also available for Mac OS X at the same page
Monday, October 15, 2018
Just Released: NCH Tone Generator for Android
Posted by
NCH Software
Download Tone Generator 5.00 now at www.nch.com.au/tonegen/index.html. Also available for Windows, Mac OS X and iOS at the same page
New Release: Voxal Voice Changer for Windows
Posted by
NCH Software
Download Voxal 3.06 now at www.nchsoftware.com/voicechanger/index.html. Also available for Mac OS X at the same page
Saturday, October 13, 2018
Just Released: Crescendo Music Notation Editor for Windows
Posted by
NCH Software
Download Crescendo 3.21 now at www.nch.com.au/notation/index.html. Also available for Android and Mac OS X at the same page
Friday, October 12, 2018
How to Make a Picture Collage
Posted by
Cody Collier
How to Make a Picture Collage
PhotoPad Collage Editor
Launch the PhotoPad application on your computer. On the first window that opens, you will see a variety of different PhotoPad project types. Click on the option that says Collage to launch the PhotoPad Collage Editor.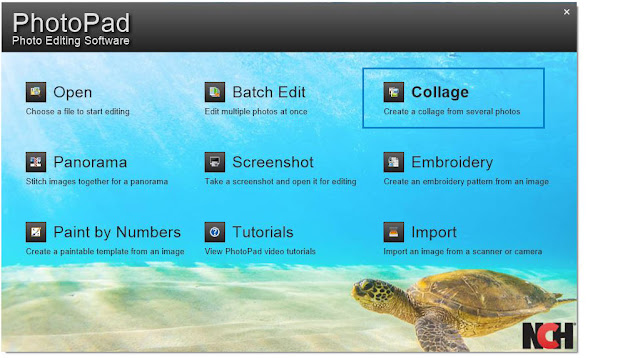
Add Photos
The first step in learning how to make a picture collage is to add your images into the PhotoPad Collage Editor. Click on the Add Images...button on the bottom right-hand side of the Collage Editor window. This will open the file finder window so that you can locate and import your pictures into the program. You can also drag and drop images directly onto your collage to add them.
Adjust Canvas Size
Next, you will want to adjust your canvas size to determine the size of your collage. Under the Canvas Options tab, you can set the final output dimensions of your entire collage. You can choose from a variety of standard image sizes for both print and web. Try using 5 x 7 inches to create a postcard with your collage, or make it 8 x 10 inches for printing in a common photo frame size.
Background
Under the Background Options tab, you can select a background for your collage. Select the solid color option and then click on the Background Color bar to launch the Edit Colors window. You can then select and edit a solid color to be applied to your entire background. You can also choose from one of the many background textures/images in the collage editor to add a more exciting background to your picture collage.
Select a Layout
The PhotoPad collage editor comes loaded with over 30 different layout options. You can rearrange your photos within the layout by clicking on an image and dragging it to the position where you would like it. This will cause this image to swap places with the photo that is in that spot. Select the Free-Form layout option if you would like complete control over the size and positioning of your photos.
 Layout Options
Once you have selected your layout, you can make further changes to the layout style by using the layout options adjustments. Drag the Spacing slider to adjust the spacing or padding between the pictures in your collage. Use the Rounded Corners slider to give the images in your collage the effect of a rounded corner. The Random Tilt slider allows you to make your collage look a little more fun and less organized by randomly tilting your images. Click on the Randomize Layout button to reshuffle the order of your images in the layout.
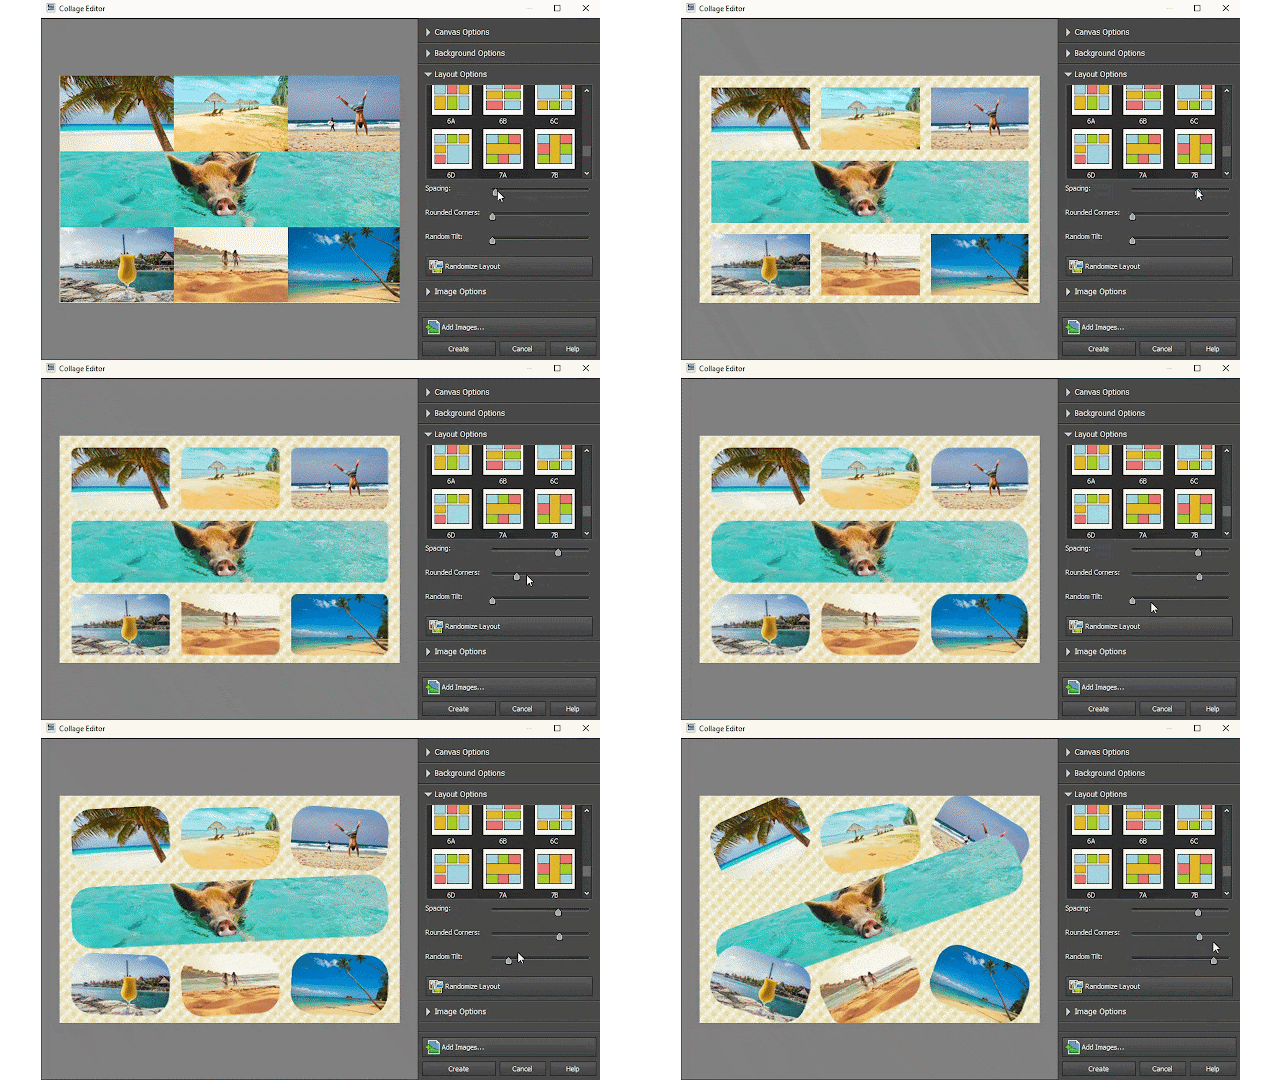
Image Options
Under the Image Options tab, you can remove and replace the pictures in your collage. Select an image and then click on the Remove Image button to remove that image. Then click on the empty space to launch the file finder window and find a new picture to take its place. The Move Forward and Move Back buttons can be used to adjust the layering order of your photos for layout styles that have overlapping images.Create Your Collage
Once you are finished making your collage, click on the Create button at the bottom of the program. This will bring your finished collage into the regular PhotoPad Photo Editing application. Here you can add text or apply any additional effects that you may want. When you are ready to export your finished product, simply click on the File tab and select Save As...from the drop-down menu. Name your file, set your file type and output destination, and then click Save. Your new and eye-catching photo collage is now finished and ready for use.For more on photo editing, check out these similar posts:
Wednesday, October 10, 2018
Just Released: PitchPerfect Musical Instrument Tuner for Android
Posted by
NCH Software
Download PitchPerfect 3.11 now at www.nch.com.au/tuner/index.html. Also available for Mac OS X, iOS and Windows at the same page
Tuesday, October 9, 2018
New Release: FlexiServer for Windows
Posted by
NCH Software
Download FlexiServer 3.00 now at www.nchsoftware.com/flexi/index.html
Friday, October 5, 2018
How to Edit an Audio File and Change it to MP3
Posted by
Cody Collier
How to Edit an Audio File and Change it to MP3
The MP3 audio file format is the most commonly used format for sound today. MP3s are the preferred file type for sending and receiving audio files as well as storing them on discs and devices. Learning how to change an audio file to MP3 will provide you with virtually unlimited sharing and storing possibilities for your music and audio files. With a simple audio editing software such as WavePad Audio Editing Software you can easily learn how to edit audio files and save audio as MP3.
Import Audio
To begin editing audio files to export as MP3, you will first have to import those files into WavePad. You can add files to a WavePad project directly from a disc, from your computer or external drive, from the NCH Sound Library or you can record audio directly into the program.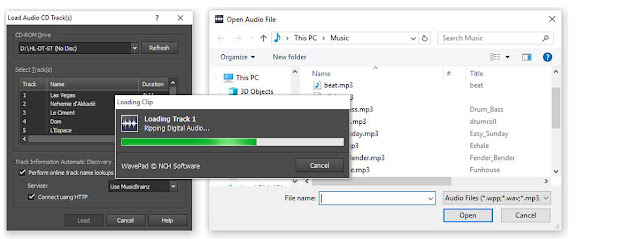
Edit Audio
Before changing audio to MP3, you may first want to edit your music or sound file. Click on the Edit tab in the main toolbar to view the options for editing your audio files in WavePad. From here you can perform basic audio editing such as splitting and trimming clips, removing silences, mixing audio files, and performing general audio file cleanup.Adjust Audio Levels
Adjusting audio levels is something both seasoned music producers and beginners alike can quickly accomplish in WavePad. Adjusting audio levels will allow you to clean up and improve the sound quality of audio files. Click on the Levels tab in the main tool bar to view the different options for adjusting audio levels. Use the Noise Reduction feature to eliminate any unwanted background noise in your audio. You can also use the Amplify function to increase the sound volume or the Normalize function to further optimize the overall sound quality.Apply Effects
WavePad comes loaded with a variety of exciting and useful audio editing effects that you can use on your files. Choose from a list of classic effects such as Reverb, Chorus, and Echo or experiment with the many other effects available such as the Voice Changer. WavePad even allows you to combine and layer effects over each other to in order to create your own unique and original sound effect.Use Tools
Make use of the many tools available in WavePad while you learn how to edit audio files and save them as MP3. Use the Surround Sound Editor to edit and apply a surround sound effect to your audio for playback with a surround sound system. The Batch Converter Tool allows you to add multiple files for editing and converting all at once within your project. You can access the NCH Sound Library from the Tools tab and access a library of free sound effects and audio samples to use in your audio editing project.Save as MP3
Now that you have successfully learned how to edit an audio file with WavePad, you are ready to learn how to change audio files to MP3. Click on the Home tab in the main toolbar and then click on the drop down arrow next to the Save button. Here you can select the option that says Save File As... to launch the file finder window. Select your preferred output destination and name the file what you would like. Then click on the drop down menu that says Save as File Type and choose the option MPEG Layer-3. This is just a longer way of saying "MP3." Once you click Save, your newly edited audio file will appear as an MP3 in your chosen output folder.For more on audio editing, checkout these posts:
- How to Make Beats Using the MixPad Beat Maker
- How to Edit Audio Files with WavePad
- Navigate Speech in WavePad
- How To Record Instrumental and Vocal Tracks with MixPad MultiTrack Mixer
- How To Record Instrumental and Vocal Tracks with MixPad MultiTrack Mixer
- How to Record Streaming Audio
- How to Edit MP3 Tags and Metadata with Switch Audio Converter
Tuesday, October 2, 2018
Just Released: Spin 3D Mesh Converter for Windows
Posted by
NCH Software
Download Spin 3D 2.00 now at www.nchsoftware.com/3dconverter/index.html


