Friday, July 27, 2018

Change Audio to MP3 Format with Switch

How to Change to MP3 format


The MP3 format is one of the most common audio file formats in the world today. MP3 files are widely used for saving and sharing digital audio files because of their compression size and ability to maintain the high quality of their original format. This makes the MP3 file type great for storing and emailing because download speeds are quick and the files don't occupy much space. You may have found yourself in possession of audio files on your computer or on a disc that is in a different format that you would like to change to MP3. With a simple file conversion software such as Switch Audio File Converter Software, you can quickly learn how to change to Mp3 format in a matter of seconds.


Import Files into Switch

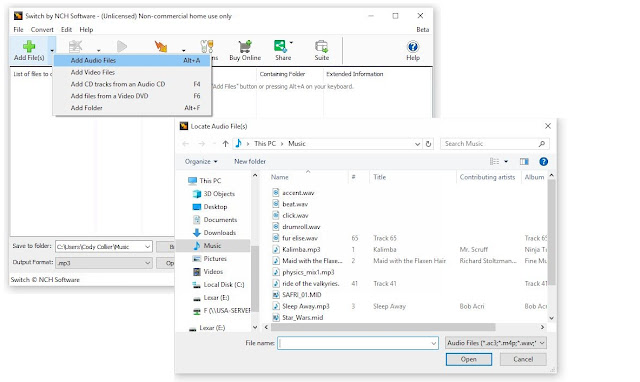
The first step to learning how to change to MP3 format is to open your copy of Switch and add/import the files that you would like to convert. Switch allows you to import individual audio files, video files, entire folders, or even import them from a DVD or audio CD. Click on the green Add Files button at the top of the program to begin adding your files. Once you have selected the files you wish to convert, click Open. You can also drag and drop files from your File Browser window directly into Switch.
How to change to Mp3 Format
Import files to convert to mp3 

Set Output Destination

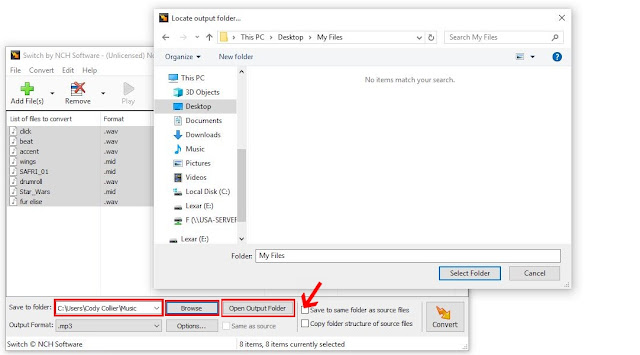
Next, decide where you would like your new files to go once you have converted them. This is where your files will be located after they are changed to MP3 format. Use the drop-down menu or the Browse button at the bottom of the program to set your output folder. You can click on the Open Output Folder button to view the selected output folder and its contents. You can also check the box next to it to save your files to the same folder as the source files. This option will output your converted MP3 files right next to their original versions.
How to set output destination for changing to mp3 format
Set output destination 

Set Output Format

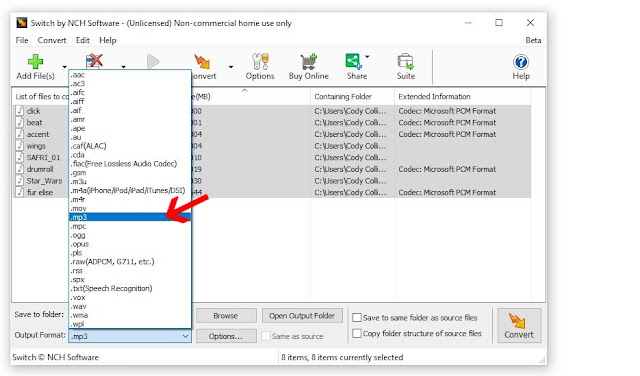
Switch is capable of converting to just about any audio file format you can think of. However, you are here because you want to know how to change to MP3 format, specifically. Click on the Output Format menu at the bottom of the program to open the drop-down menu. Select .mp3 as your output format. This will be applied to any and all files that you select.
How to change output format of audio files to mp3
Set output format 

Output Options

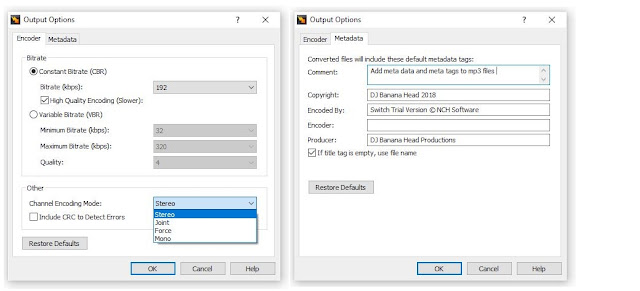
Click on the Options tab next to the Output Format menu to open the Options window. Here you can adjust some of the more advanced options such as the Bitrate and Channel Mode. You can also adjust the metadata that will be attached to your newly converted MP3 files. For more information on adjusting audio file meta tags, check out this blog post:
How to Edit MP3 Tags and Metadata with Switch Audio Converter
How to edit mp3 meta descriptions and mp3 meta data
Edit MP3 metadata 

Convert to MP3

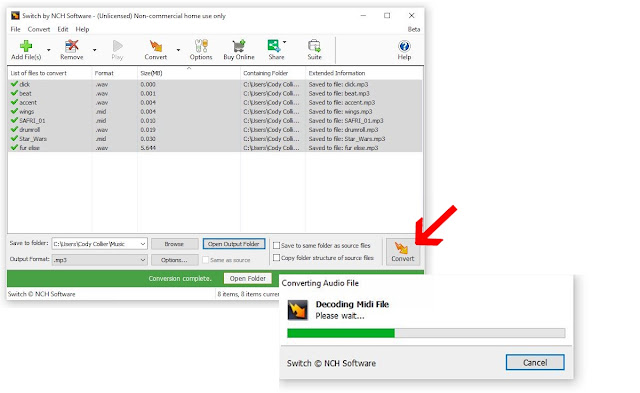
Now that we have chosen our files and set the output format and destination, we are ready to convert our files to MP3. If you imported an entire folder or files from a disc and you only want to change some of them to MP3, simply go through and select those files. Otherwise, with all of your files selected, click on the Convert button at the bottom right of the program. The conversion will be performed and your new MP3 files can now be found in your chosen output folder.
How to convert files to mp3 with Switch
Conversion complete


For more on Switch, check out some of our other posts:

Wednesday, July 25, 2018

Tuesday, July 24, 2018

Just Released: RecordPad Sound Recorder for Android

Download RecordPad 7.07 now at www.nch.com.au/recordpad/index.html. Also available for Mac OS X, iOS and Windows at the same page

Friday, July 20, 2018

Resize a Picture Easily with Pixillion Image Resizer

Resize a Picture Easily with Pixillion Image Resizer


There are times when you may have needed to upload or email a picture you have, only to find out that the file size is too large. Many websites and email clients have restrictions on how large an image can be. Large images take up a lot of space and may not be necessary for all purposes. Learning how to resize a picture is valuable knowledge to have when you encounter a situation like this. With Pixillion Image Conversion Software, you can quickly learn how to resize images with ease.


Import Image

To resize a picture, launch your copy of Pixillion on your computer and open the image file you would like to resize. Click on the green plus sign that says Add Files and select your file or files from their location on your computer. You can resize a single image or batch resize multiple pictures at once.
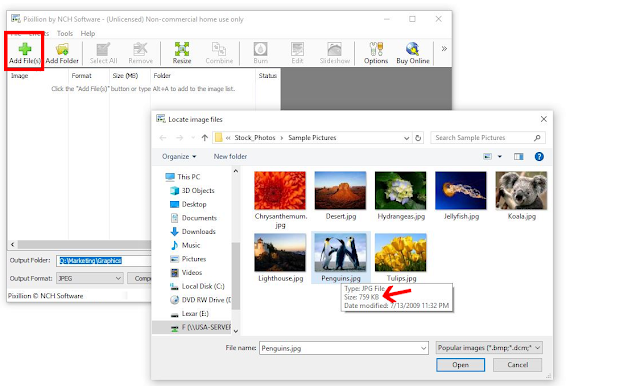
759 KB image file size imported into Pixillion

Output Folder and Format

Next, select your output format and output destination folder at the bottom of the program. If you wish to change the file format of the picture you are resizing, this is where you can select a new file type. Once you have chosen the output folder where you would like your resized picture to be sent, you are ready to resize.

Resizing Options

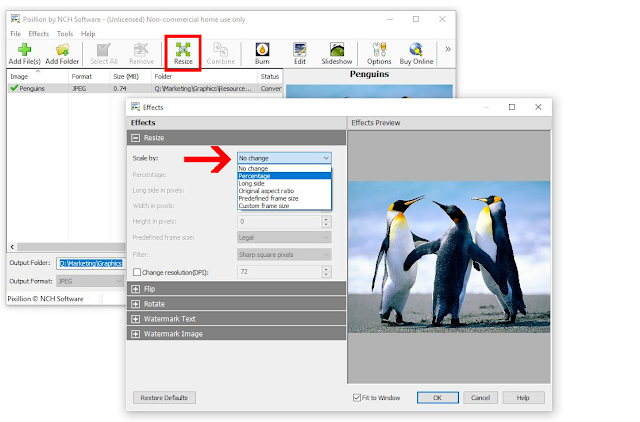
With your image imported into Pixillion and your export format and destination folder selected, you can now click on the green Resize icon in the main toolbar. This will launch the Effects window where the resize tab will open by default. There are 5 different resizing options available to you in Pixillion.
  1. Scale by Percentage
  2. Scale by Long Side
  3. Scale by Original Aspect Ratio
  4. Scale by Predefined Frame Size
  5. Scale by Custom Frame Size 
Scale by options 

Scale by Percentage

Using the Scale by Percentage option is one of the quickest and easiest methods to resize a picture. If you have been given a specific file size you need to achieve with your resize, you can easily adjust the percentage scale to bring your file down to that size. 
Resizing an image by Percentage Scale

Pixels and Resolution

When resizing a picture, the resolution of the image will change. The lower the resolution of an image, the fewer pixels the image will be made up of. Pixillon allows you to decide how it should handle those pixels when resizing an image. You can choose to have sharp square pixels or choose for them to come out smooth and blurry. The sharp and square option will make your picture more in focus, but the pixels may be more noticeable. The smooth blurry option will smooth out the harsh edges of pixelation more.
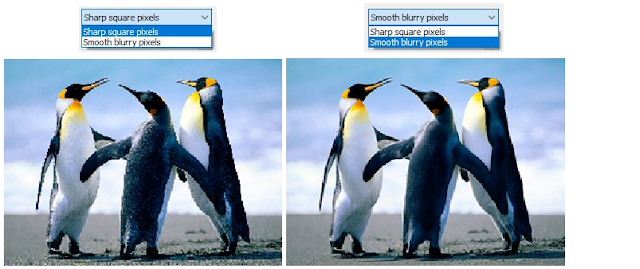
Square Pixels (left) vs. Smooth Pixels (right)

Effects

There are several other effects that can be applied to an image while resizing it. You can flip and rotate your image as well as add text and image watermarks. Use the Effect Preview window to view the effects before applying them.
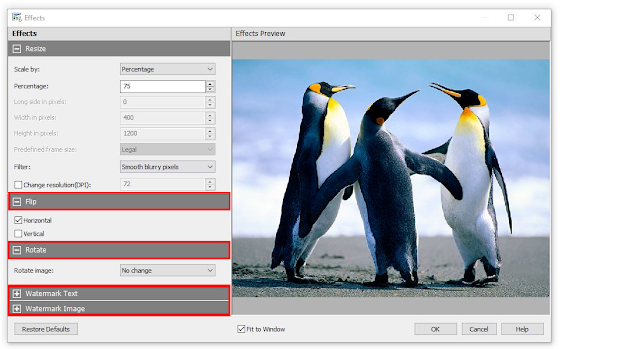
Other Pixillion effects 

Finished Product

When you are finished applying the resize scale and any effects to your picture, click the OK button at the bottom of the effects window to save the settings. With the picture, you want to resize selected, click the Convert button in the bottom right corner of the program. You will see a pop-up window informing you that your conversion is complete. You can either open it then to view your resized image, or view it in the output folder you chose. Notice that our picture that started out at 759 KB has now been resized down to 160 KB with almost no loss in quality.
Resized image file size is 160 KB


Just Released: MixPad Multitrack Recorder for Android

Download MixPad 5.11 now at www.nch.com.au/mixpad/index.html. Also available for Mac OS X, iOS and Windows at the same page

Thursday, July 19, 2018

New Release: Express Invoice Invoicing Software for iOS

Download Express Invoice 6.07 now at www.nchsoftware.com/invoice/index.html. Also available for Mac OS X, Android and Windows at the same page

Just Released: Prism Video File Converter for Windows

Download Prism 4.13 now at www.nchsoftware.com/prism/index.html. Also available for Mac OS X at the same page

Monday, July 16, 2018

Friday, July 13, 2018

Best Way To Extract RAR Files

Best Way to Extract RAR Files


What is a RAR file and how do you open it?

A RAR file is a data container similar to a ZIP file that stores data in a compressed archive format. The RAR file is often considered to be a more advanced file format than the ZIP file, as it uses tighter compression and stronger encryption. A RAR file that has been downloaded from the internet will need to be unpacked in order to view its contents. Using a simple archiving and compression tool such as Express Zip, you can easily extract RAR files and open them on your computer in a matter of seconds.


Step 1

Save the .rar file to your desktop or to the folder of your choice. If the file was downloaded from the internet, it may be saved in the Downloads folder on your computer.

Step 2

Launch your copy of Express Zip File Compression Software from the start menu or desktop shortcut. When Express Zip has opened you will be asked if you want to Open an Existing Archive or create a new one. We are opening an existing archive because we are trying to open a .rar file on your computer. Select the .rar file from the folder where it is saved and open it into Express Zip. You will see the titles and file info of the contents of the archive once you have opened it into the program. You can right-click and select open to view the files before extracting them.


Step 3

To extract a RAR file with Express Zip, first select your desired output folder from the Extract Location bar. This is where your unpacked file will end up after extraction. You may only want to extract certain files from the archive. If this is the case, select only the files that you want and then click on Extract Selected.  You can also do this by right-clicking on the file or files you want and then selecting Extract > Extract Selected from the drop-down menu. To extract everything from your RAR file, simply click the button that says Extract All.


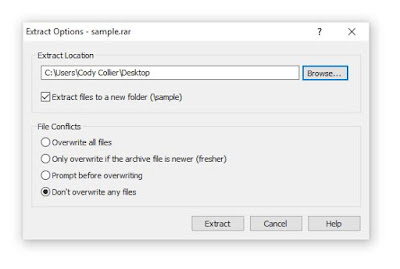
The right-click method will prompt you with a window to specify your extract location. Here you can sort out how you would like to handle any file conflicts that may occur during extraction. The default option is Don't overwrite any files, which is usually best. Once you click Extract, you can find your extracted files in the destination folder.

Pro-Tip

If you already have Express Zip installed on your computer, the fastest way to extract a RAR file is to simply locate the RAR file on your computer, right-click on it, select Express Zip and then select the option Extract Here. This will run the extraction protocol on the compressed data archive file and reveal its contents right next to it in the same folder. Easy as that.


Tuesday, July 10, 2018

Friday, July 6, 2018

Add Text to a Photo Easily with PhotoPad

Add Text to a Photo Easily with PhotoPad

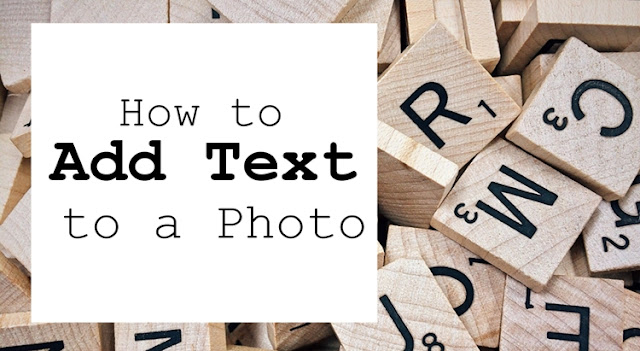
Adding text to a photo is a great way to send a message that a picture on its own might not get across. Learning how to add text to a photo can help you make your own advertisements, postcards, memes, and more. Using a simple photo editing program such as PhotoPad Photo Editing Software, you can easily add text to images of your own with ease.


Adding a Text Layer

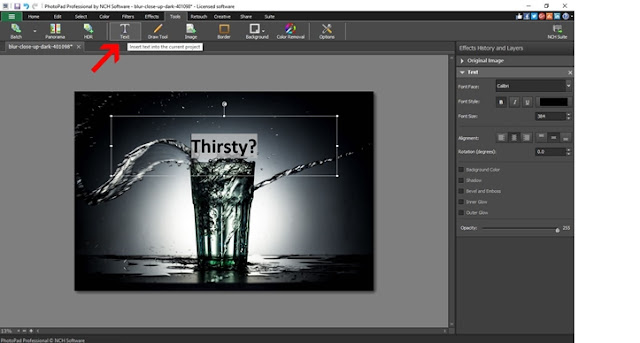
To add text to a photo, open the image that you would like to use in PhotoPad. Under the Tools tab, you will find the Text button. When you click on the text button, your new text layer will open in the layers panel on the right-hand side of the program and your text box will appear on your photo. Use your keyboard to type your text directly into the text box. You can add as many text layers as you would like in order to move individual words or sentences around independently.
Adding a text layer

Adjusting Your Text

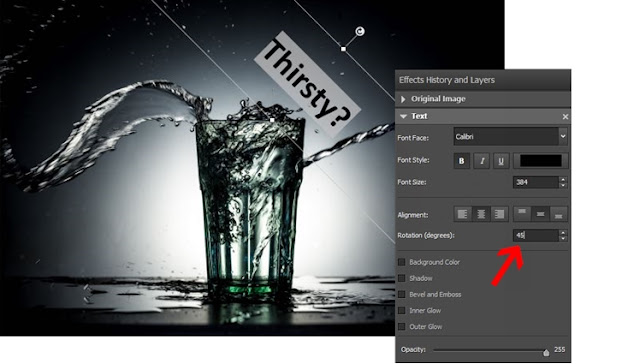
You can move the text around your image by hovering the mouse over the edge of your text box until you see the 4 sided arrow. Then simply click and drag your text box into the position you would like. Use your mouse to resize the text box by clicking and dragging the white squares on the corners and in the center of your text box. You can also rotate your text using the curved arrow at the top of the text box. For a more precise rotation, you can type in the numerical value on your text layer in the layers and effects panel on the right.
Moving and rotating text

Changing fonts

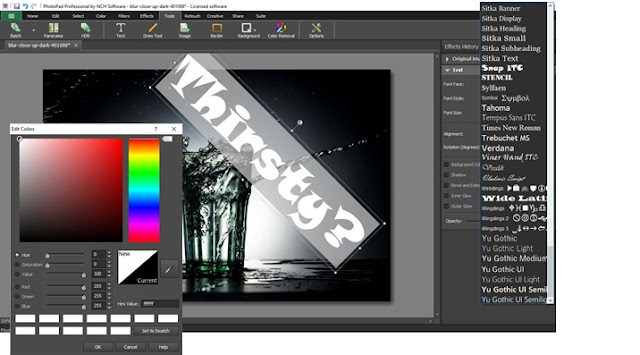
To change your font, select a new font option from the drop-down menu on your text layer in the layers panel. You can choose from a variety of font styles and types and then adjust the font size. You can select to have your font in bold, italics, or underlined and then adjust the alignment of your font left and right and up and down within the text box. Changes made to your text are only made to text that is selected or that has just been typed after making the change.
Changing fonts

Styling Your Text

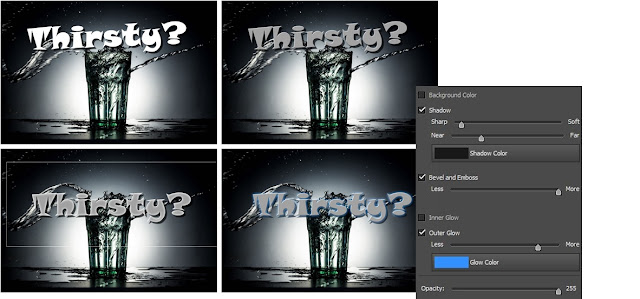
There are several different options for styling your text on your image in PhotoPad. You can add a drop shadow effect to your text by selecting the Shadow option on your text layer. You can adjust the sharpness and the distance of your shadow effect as well as change the color of the shadow. Use the Bevel and Emboss option to give your text more of a 3D look with rounded edges. You can choose to add an Inner Glow, and Outer Glow, or both to the text on your image. Choose the glow color from the color palette and adjust the intensity of the glow to your preference.
Adding text styles and effects

Making Your Text Transparent

You can adjust the opacity or transparency of your text from the layer effects panel too. Changing the opacity of your text is a great option when you want your text to be a little more subtle against your image or when you would like to be able to see through it to the background.
Adjusting text opacity 

Adding A Background Color to Text

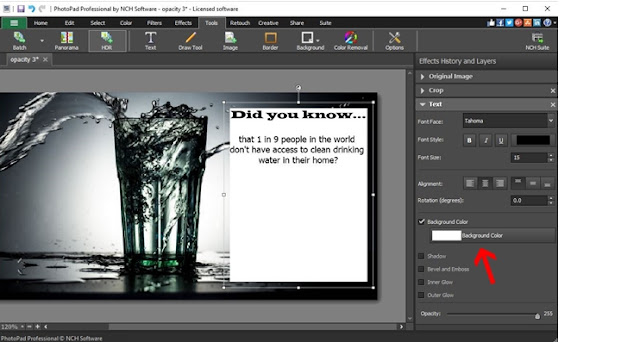
You can also select to have your text appear against a colored background. Checking the Background Color box will fill your text box with a solid colored background that your text will appear on top of. You can change the color of the background and adjust the alignment of your text against it.

Adding text background-color 


For more on photo and image editing, check out some of our other posts:

Thursday, July 5, 2018

Tuesday, July 3, 2018

New Release: Crescendo Music Notation Editor for Windows

Download Crescendo 3.11 now at www.nch.com.au/notation/index.html. Also available for Android and Mac OS X at the same page